Deploy Cloud Function Manually
Use the manual deployment process to create and configure the Google Cloud resources required for the Cyware Intel Exchange integration. This includes enabling APIs, configuring secrets, deploying the Cloud Function, and scheduling the integration.
Before deploying the integration, ensure that the required Google APIs are enabled in your GCP project. These APIs support the Cloud Function and other Google Cloud resources used by the integration.
To enable the APIs, go to APIs & Services > Library in your Google Cloud project. The following table lists the services used by the integration and the corresponding APIs that must be enabled.
Service | APIs to Enable |
|---|---|
Google SecOps | chronicle.googleapis.com |
Cloud Functions |
|
Cloud Scheduler |
|
Cloud Storage (Bucket) | storage-component.googleapis.com |
Secret Manager | secretmanager.googleapis.com |
Cloud Resource Manager | cloudresourcemanager.googleapis.com |
Environment variables marked as secret must be configured as secrets in Google Secret Manager. After creating the secrets, use the secret resource name as the value for the corresponding environment variables during Cloud Function deployment.
Create separate secrets for the Cyware Intel Exchange credentials and the Chronicle service account when using custom authentication.
Steps
To create a secret in Google Secret Manager, follow these steps:
Sign in to the Google Cloud Console.
Go to Secret Manager, click Create Secret, and use the following information:
Enter a name for the secret in the Name field.
Enter the credential value in the Secret Value field.
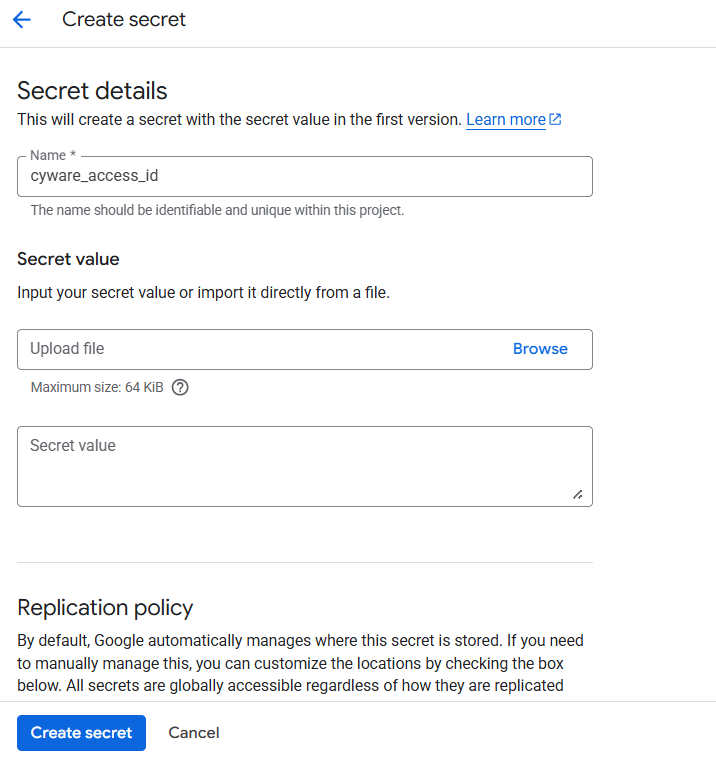
Keep the remaining settings as default and click Create Secret.
You must create separate secrets for the following credentials:
Cyware Access ID
Cyware Secret Key
Chronicle Service Account (when using a custom service account)
For more detailed information about creating secrets, see Google Cloud Documentation.
After creating the secrets, copy the secret resource name and use it as the value for the corresponding environment variables during Cloud Function deployment.
Steps
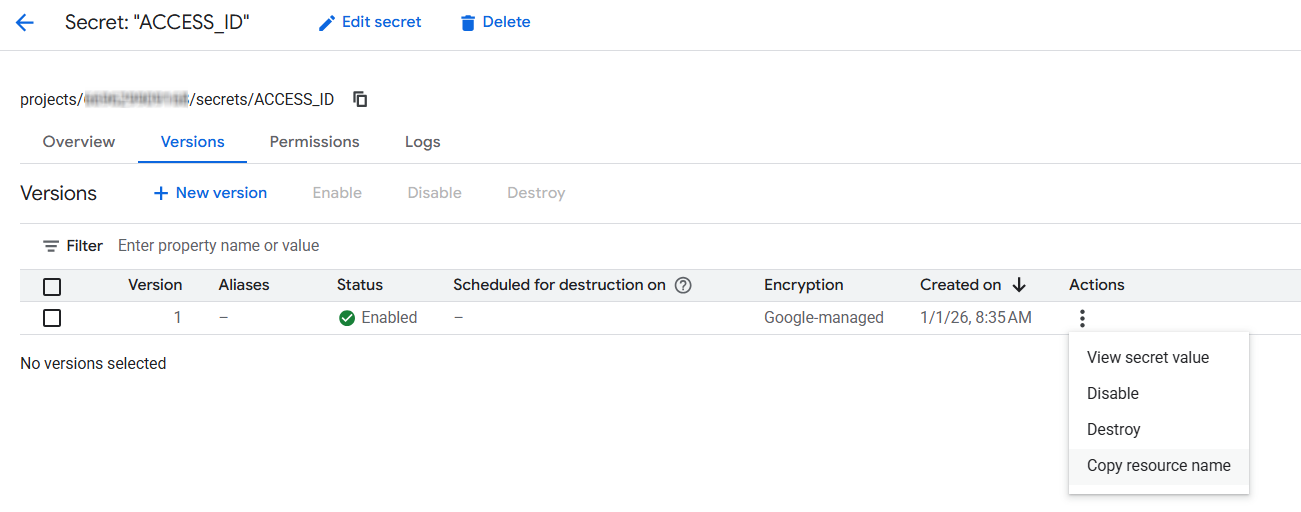
To copy the resource name of a secret, follow these steps:
Open Secret Manager in your GCP project.
Click the secret name.
From the vertical ellipsis of a specific version, click Copy resource name.
After copying the resource name, use it as the value for the corresponding environment variables during Cloud Function deployment. For example:
CYWARE_ACCESS_ID: projects/{project_id}/secrets/{secret_id}/versions/{version_id}Note
Ensure that the resource name follows this format:
projects/{project_id}/secrets/{secret_id}/versions/{version_id}Create a Google Cloud Storage bucket to store the Cloud Function ZIP file used for deploying the integration. The bucket name must be provided as the value for the GCP_BUCKET_NAME environment variable during Cloud Function deployment.
Steps
To create a GCP bucket, follow these steps:
Sign in to the Google Cloud Console.
Go to Buckets in your GCP project and click Create.
Enter a name for the bucket.
Select the region and modify the optional parameters if required.
Click Create.
After creating the bucket, copy the bucket name and use it as the value for the GCP_BUCKET_NAME environment variable.
The Cloud Function authenticates with the Google SecOps Chronicle API to send data from Cyware Intel Exchange. The integration supports the following two authentication methods using a service account:
Note
If both authentication options are configured, the value of CHRONICLE_SERVICE_ACCOUNT takes priority over the default Cloud Function service account.
Default Cloud Function Service Account
If the CHRONICLE_SERVICE_ACCOUNT environment variable is not set, the Cloud Function automatically uses the service account assigned during Cloud Function deployment. Ensure that this service account has the Chronicle API Editor role assigned.
Note
Deploy the Cloud Function in the same GCP project where the Google SecOps instance is configured so the default service account can access the Chronicle API. If the Cloud Function is deployed in another project, consider using a custom service account.
Custom Service Account
You can configure the integration to use a custom service account for authenticating with the Chronicle API. To configure authentication using a custom service account, follow these steps:
Create a service account and assign the Chronicle API Editor role.
Store the service account credentials securely in Secret Manager.
Set the CHRONICLE_SERVICE_ACCOUNT environment variable in the Cloud Function configuration.
The Cloud Function uses this service account to authenticate Chronicle API requests.
Assign the required roles to the service account used by the integration. These roles allow the Cloud Function and Cloud Scheduler to access the required Google Cloud resources.
Steps
To assign roles to the service account, follow these steps:
Open the Google Cloud Console and navigate to IAM.
In the View by Main tab, click Grant Access.
In the New Principals field, enter the service account name. For example, service_account_name.gserviceaccount.com.
In Assign Role, add the following roles:
Cloud Scheduler Job Runner
Secret Manager Secret Accessor
Storage Admin
Chronicle API Editor
Cloud Run Invoker
Role Viewer
Click Save.
During the integration setup, you must provide environment-specific values that are used by the Cloud Function to run the integration. These values are specified as environment variables during Cloud Function deployment.
The following table lists the environment variables required for configuring the integration.
Environment variable | Description | Default Value | Required | Secret Manager |
|---|---|---|---|---|
CHRONICLE_CUSTOMER_ID | Google SecOps customer ID. Navigate to settings in the Google SecOps console for the customer ID. | - | Yes | No |
CHRONICLE_SERVICE_ACCOUNT | Copied resource name value of the service account secret from the secret manager. Required if you are opting for a custom service account authentication option. | - | No | Yes |
CHRONICLE_REGION | A region where the Google SecOps instance is located. | us | No | No |
CHRONICLE_PROJECT_NUMBER | Specifies the GCP project identifier associated with your Google SecOps environment. | - | Yes | No |
GCP_BUCKET_NAME | Name of the created GCP bucket. | - | Yes | No |
CYWARE_ACCESS_ID | Copied resource name value of the Access ID of Cyware Intel Exchange from the secret manager. Generate Access ID from the Cyware Intel Exchange platform's Administration section. | - | Yes | Yes |
CYWARE_SECRET_KEY | Copied resource name value of Secret Key of Cyware Intel Exchange from secret manager. Generate Secret key from the Cyware Intel Exchange platform's Administration section. | - | Yes | Yes |
CYWARE_BASE_URL | Base URL of your Cyware Intel Exchange instance. For example, https://your-ctix-instance.com/ctixapi/ Generate Base URL from the Cyware Intel Exchange platform's Administration section. | - | Yes | No |
CYWARE_TENANT_NAME | Tenant name for multi-tenant Cyware Intel Exchange deployments. | - | No | No |
CYWARE_ENRICHMENT_ENABLED | Flag to enable enrichment of indicators. Accepted values [true, false] | false | No | No |
CYWARE_INDICATOR_LOOKBACK_DAYS | The historical time for indicator data fetching in days. | 7 | No | No |
CYWARE_SAVED_RESULT_SET_NAME | Filter indicators by specific label name in Cyware Intel Exchange. | - | Yes | No |
Note
When using the manual deployment flow, avoid comma-separated values for CYWARE_SAVED_RESULT_SET_NAME. Use the provided deployment script if you need to supply comma-separated saved result set names.
Deploy the Cloud Function to run the integration and send data from Cyware Intel Exchange to Google SecOps. The function is deployed using a deployment command that specifies the runtime, source file, environment variables, and service account configuration.
Command-Based Deployment
Upload the Cloud Function ZIP file to the GCP bucket created earlier and run the deployment command from Cloud Shell.
Steps
To deploy the Cloud Function, follow these steps:
Go to the bucket created earlier in the Google Cloud Console. For more information, see Create a GCP Bucket.
Upload the Cloud Function ZIP file to the bucket. For more information about creating the ZIP file, see Create Cloud Function ZIP.
Click Activate Cloud Shell at the top-right corner of the Google Cloud Console.
Modify the deployment command below based on your configuration values and run the command in the terminal. To understand what each parameter denotes, see the Command Parameters table.
gcloud functions deploy CLOUD_FUNCTION_NAME --set-env-vars “ENV_NAME1=ENV_VALUE1,ENV_NAME2=ENV_VALUE2,ENV_NAME3=ENV_VALUE3” --gen2 --runtime=python312 --region=REGION --source=SOURCE_OF_FUNCTION --entry-point=main --service-account=SERVICE_ACCOUNT_EMAIL --trigger-http --no-allow-unauthenticated --memory=8GiB --timeout=3600s
Command Parameters
Parameter | Description |
|---|---|
CLOUD_FUNCTION_NAME | Unique name of the Cloud Function. |
REGION | Region where the Cloud Function is deployed (for example, us-central1, us-west1). |
SOURCE_OF_FUNCTION | gsutil URI of the Cloud Function ZIP file in Cloud Storage (for example, gs://cyware_bucket/cyware.zip), where cyware_bucket is the name of the created bucket and cyware.zip is the Cloud Function ZIP file. |
SERVICE_ACCOUNT_EMAIL | Email address of the service account used for deployment. Ensure the service account has the required permissions. For more information, see Update Service Account Permission. |
ENV_NAME=ENV_VALUE | Environment variables required for configuring the integration. For more information, see Configure Environment Variables in Cloud Function. |
Example Command
gcloud functions deploy cyware-ctix-secops-function --set-env-vars "CHRONICLE_CUSTOMER_ID=ed19f037-2354-43df-bfbf-350362b45844,CHRONICLE_SERVICE_ACCOUNT=projects/1234567890/secrets/chronicle_service_account/versions/1,CHRONICLE_PROJECT_NUMBER=2134567,CHRONICLE_REGION=us,GCP_BUCKET_NAME=cyware_ctix_bucket,CYWARE_ACCESS_ID=projects/1234567890/secrets/cyware-access-id/versions/1,CYWARE_SECRET_KEY=projects/1234567890/secrets/cyware-secret-key/versions/1,CYWARE_BASE_URL=https://ctix.example.com,CYWARE_ENRICHMENT_ENABLED=true,CYWARE_INDICATOR_LOOKBACK_DAYS=30,CYWARE_SAVED_RESULT_SET_NAME=my-saved-result-set" --gen2 --runtime=python312 --region=us-central1 --source=gs://cyware_ctix_bucket/cyware_ctix.zip --entry-point=main --service-account=1234567890-compute@developer.gserviceaccount.com --trigger-http --no-allow-unauthenticated --memory=8GiB --timeout=3600s
Note
Ensure that the --timeout value specified in the Cloud Function deployment command aligns with the execution frequency configured in the Cloud Scheduler --schedule parameter. This prevents overlapping executions that may lead to duplicate data ingestion.
For example, if the Cloud Function is deployed with --timeout=3600s, configure the Cloud Scheduler with --schedule="*/60 * * * *". This ensures that a new execution starts only after the previous run has completed.
Configure a Cloud Scheduler job to trigger the deployed Cloud Function at regular intervals. The scheduler sends an authenticated HTTP request to the Cloud Function endpoint based on the configured schedule.
Command-Based Deployment
You can create the scheduler job using the gcloud command in Cloud Shell.
Steps
To create a Cloud Scheduler job, follow these steps:
Open the Google Cloud Console.
Click Activate Cloud Shell in the top-right corner of the console.
Modify the command below with values specific to your environment. Run the following command in the terminal to create the scheduler job:
gcloud scheduler jobs create http SCHEDULER_NAME --schedule="CRON_TIME" --uri="CLOUD_FUNCTION_URL" --attempt-deadline=30m --oidc-service-account-email=SERVICE_ACCOUNT_EMAIL --location=LOCATION --time-zone=TIME_ZONE
Command Parameters
Parameter | Description |
|---|---|
SCHEDULER_NAME | Unique name for the Cloud Scheduler job. |
CRON_TIME | Cron expression that defines how frequently the job runs (for example, */60 * * * *). |
CLOUD_FUNCTION_URL | URL of the deployed Cloud Function. You can find this in the Cloud Function details page in the GCP console. |
SERVICE_ACCOUNT_EMAIL | Email address of the service account used to authenticate the request to the Cloud Function. Ensure that the service account has the required permissions. |
LOCATION | Region where the Cloud Scheduler job will be created (for example, us-central1). |
TIME_ZONE | Time zone used to interpret the schedule (for example, UTC). |
Example Command
gcloud scheduler jobs create http cyware-ctix-secops-scheduler --schedule="0 * * * *" --uri="https://us-central1-test.cloudfunctions.net/cyware-ctix-secops-function" --attempt-deadline=30m --oidc-service-account-email=1234567890-compute@developer.gserviceaccount.com --location=us-central1 --time-zone=UTC