Configure Automated Collective Defense
Notice
This feature is available in Collaborate v3.8.9.1 onwards and is only available for Cyware-based cloud deployments. Contact your Cyware sales or support representative to gain access to this feature.
As an analyst, you can configure permissions and settings for Automated Collective Defense (ACD). Members can subsequently use ACD to share, receive, and act on threat indicators. For more information, see Automated Collective Defense.
How does it work?
ACD utilizes Collaborate and Intel Exchange platforms to facilitate the sharing and receiving of threat indicators. Members initiate the sharing process by sending indicators to the network (sharing community) from Collaborate. These indicators are available in Intel Exchange for validation by the network in the configured STIX source. Subsequently, the network can share indicators back with Collaborate's members for action using the configured STIX ACD collection.
To ensure ACD works seamlessly for members, you must configure ACD-related configurations in Intel Exchange and then enable ACD for members in Collaborate.
Before you Start
Ensure that ACD as a feature is enabled for your tenant. Contact Collaborate support for assistance.
Ensure that the Intel Exchange version is updated to v3.7.5.0 or above.
Ensure there are an adequate number of read-only user licenses in Intel Exchange.
Ensure that you have configured the Intel Exchange integration in Collaborate. For more information, see Configure Intel Exchange (CTIX) Integration.
Intel Exchange Settings
To receive indicators submitted by members in Collaborate, you must first add a STIX source in Intel Exchange. All the indicators shared with this source are subsequently available in Collection > Threat Data.
To add the STIX source, follow these steps:
Sign in to Intel Exchange.
Go to Administration > Integration Management. In Feed Sources, select STIX.
Click Add STIX Source. Use the following information while adding a STIX source for ACD:
Source Name: Enter the name of the STIX source. For example, ACD Submissions.
Description: Enter a description. For example, This source is for all ACD-related indicator submissions.
Discovery Service URL: Enter the discovery service URL. This URL is used to authenticate and communicate with Collaborate. You can retrieve this URL by contacting Collaborate support.
Confidence: Enter the confidence score for the source. The default confidence score is 100.
Select STIX Version: Select the STIX version for the source as STIX 2.1.
Select Category: Select the category for the source. The recommended category is Community Feeds.
Authentication Type: Select the authentication type as Basic.
Username and Password: You can get the authentication username and password by contacting Collaborate support.
After adding the details, click Add STIX Source.
Configure Polling Frequency
After adding the STIX source, follow these steps to configure the polling frequency for the source:
Go to Integration Management > STIX > System Feeds
Click the STIX source that you previously added.
Click the vertical ellipsis of the source and click Edit Poll Configuration.
Polling Type: The recommended polling type is Automatic.
Confidence Score: The recommended confidence score is 100.
Frequency: The recommended polling frequency is 60 minutes.
After making the required changes, click Update. The polling frequency is now configured for your ACD-related STIX source. Indicators submitted by members will be polled in Intel Exchange based on this frequency.
Note
To specifically view indicators from your configured ACD STIX source, you can create a global saved search in Threat Data.
In the context of ACD, a STIX collection in Intel Exchange is used to publish indicators in Threat Data to the Member Portal after your review.
To add a STIX collection, follow these steps:
Sign in to Intel Exchange.
Go to Administration > STIX Collections.
Click Add STIX Collection. Use the following information while adding the collection:
Collection Name: To ensure the flow of indicators from Intel Exchange to Collaborate, you must name the STIX collection as ACD Published Collection. This field is case-sensitive.
Description: Enter a description for the collection.
Type: Select the collection type. The recommended type is Polling.
Click Save Collection. After adding the STIX collection, you must associate it with rules to ensure that the indicators are shared seamlessly with Collaborate's ACD.
After creating STIX sources and a STIX collection, you can configure actioning rules to ensure that indicators are shared with Collaborate. You can create two types of rules:
Automated: These rules help you automate the process of sharing indicators with Collaborate, ensuring minimal time spent sharing indicators.
Manual: These rules enable you to take manual action on indicators that may require additional analysis before being shared with Collaborate's members.
To create a rule, follow these steps:
Sign in to Intel Exchange.
Go to the Main Menu, and select Rules in Actions.
Click New Rule.
Enter the rule name, and click Add.
Source: Select the ACD-related STIX source that you added in step 1. For more information, see Step 1: Add STIX Source.
Condition: Select the required condition for the rule. Ensure you select the intent type as Indicator.
Action: Ensure you select the action as Publish to Collection.
The server collection must be the STIX collection you added in step 2 (ACD Published Collection). For more information, see Step 2: Add STIX Collection.
Note
To make it a manual rule, select Run Rule Manually Only.
After selecting the required details, click Save.
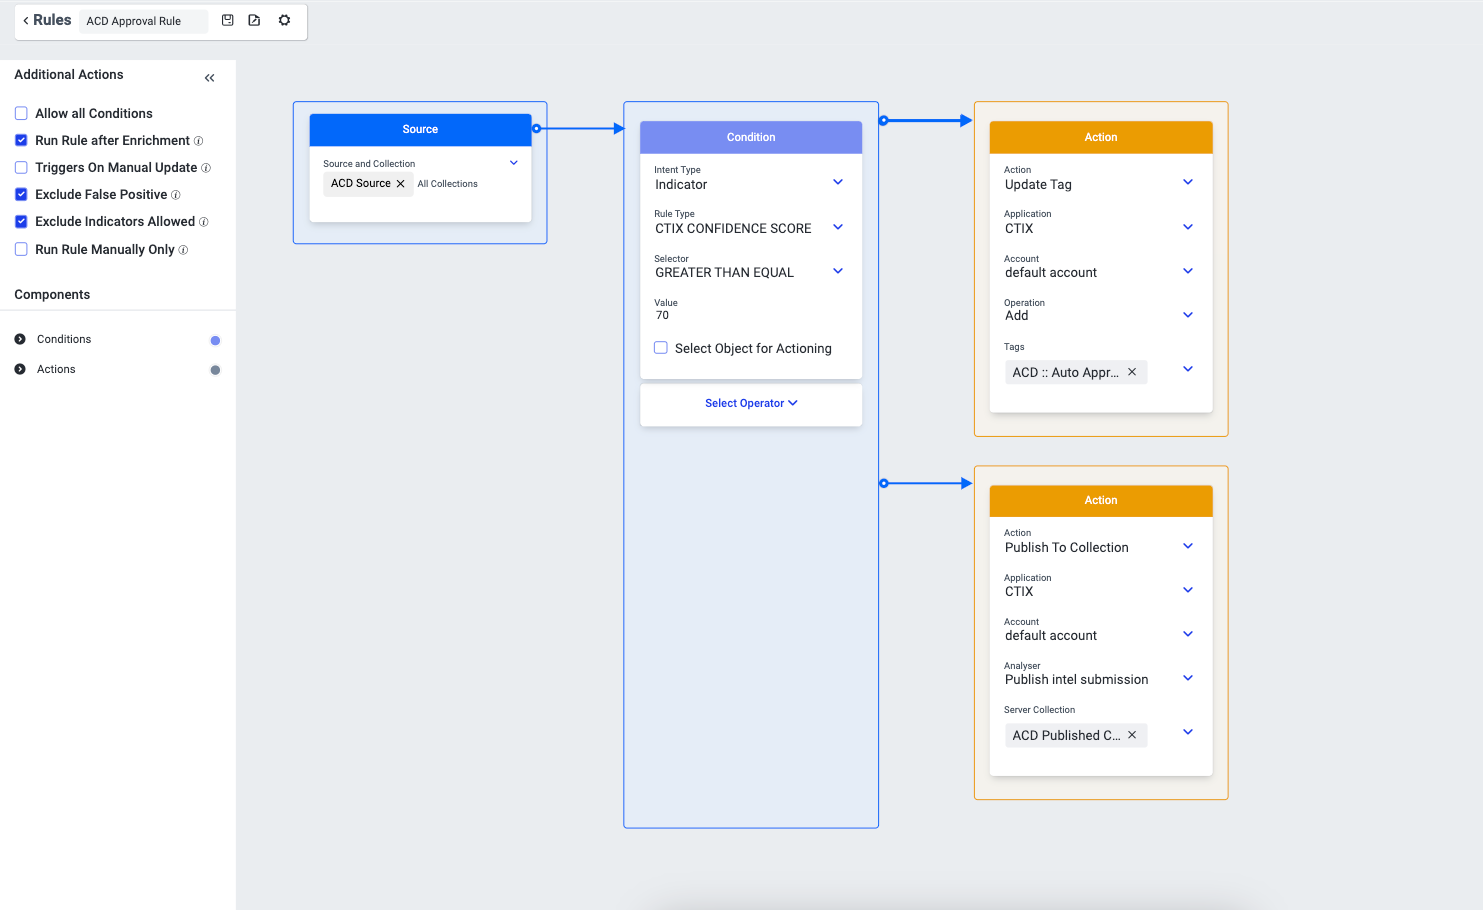
Example 1: Automated Rule
The following example displays the automatic rule where the indicators from the STIX source named ACD Source, whose confidence score is greater than or equal to 70, will be published to the ACD Published Collection. These indicators are then available in Intel Repository > Network Collection > Received Indicators in Collaborate.
 |
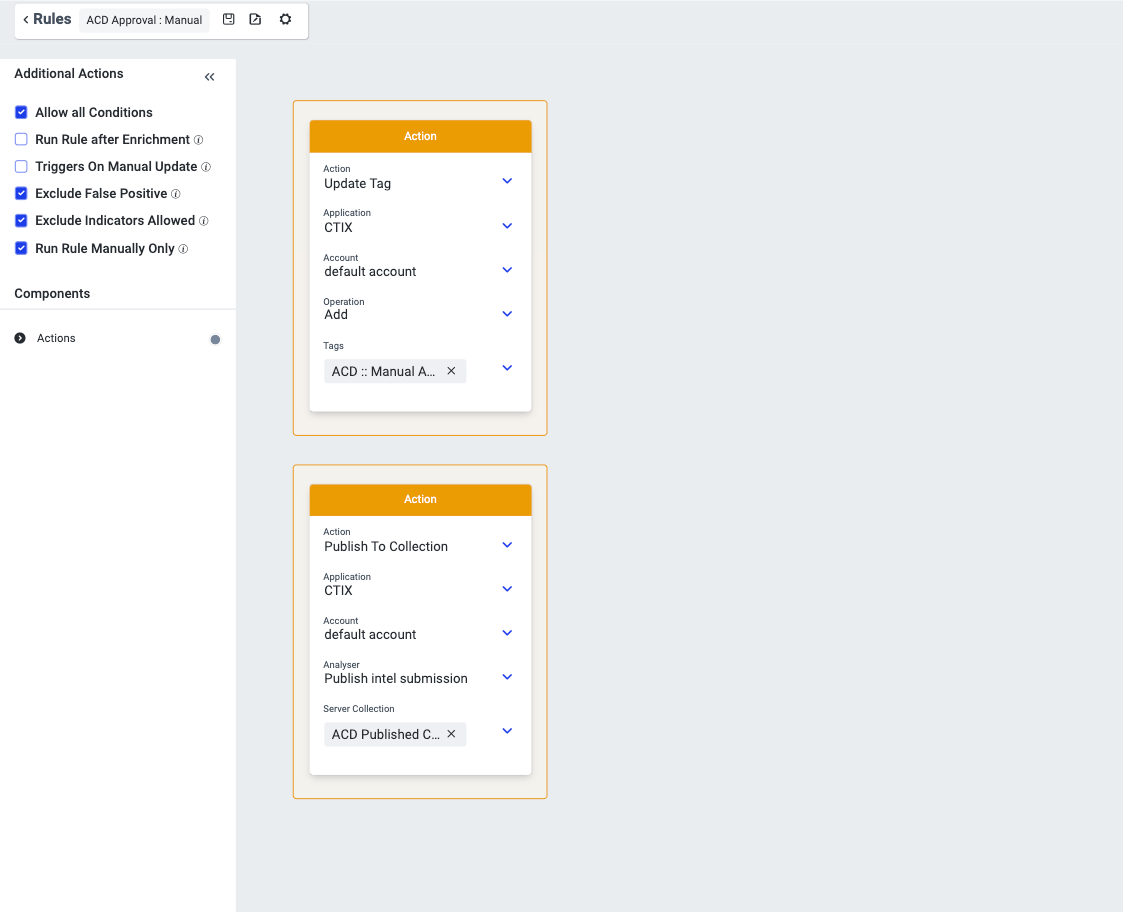
Example 2: Manual Rule
The following example is a rule used for running a rule manually for indicators in Collection > Threat Data.
 |
Collaborate Settings
You must have the View, Create, and Update permissions to Configurations and Organizations.
Steps
To enable ACD for members, follow these steps:
Sign in to the Analyst Portal.
Go to Administration > Configuration > Cyware Add-ons. Turn on the Automated Collective Defense (ACD) toggle to enable the feature. For more information, see Configure Cyware Add-ons.
To enable ACD for members, go to Administration > Settings > Member Settings > Organization and use the following information:
To enable ACD for an existing organization, turn on the ACD toggle from the organization listing.
To enable ACD while creating a new organization, select the ACD checkbox in the organization details page.
For more information, see Organization Details.