Member Submissions
Members submit threat intel reports and requests for information to have a bi-directional sharing of threat information. Analysts review all member submissions which are further shared as alerts to members.
Request for Information (RFI)
The Request for Information (RFI) is the process of gathering relevant and contextual information on threats while partnering to drive enhanced collaboration and knowledge building. Members who need information on any incident, malware, vulnerability, or threat actor for any security decision-making or actioning can raise RFI requests. Members can use this as a formal process to gather information.
For example, when a user requests an RFI to get more information about a malware attack that needs quick action, the analyst approves the request and enables collaboration within security teams. All the members can include their insights and thoughts in responses to add context. The user has all the information and can take the right action to mitigate the threat.
RFIs are useful to analysts and members in the following ways:
Analysts can create alerts directly from the RFIs submitted by members.
Members can interact in real time using comments to deliver actionable, relevant, and contextual information. All the responses received from the RFI are available to members and help in the final assessment of the inquiry.
Submit RFI
You can submit a Request for Information (RFI) to receive relevant and contextual information on cybersecurity threats, vulnerabilities, malware, prioritized intelligence requirements, and more. You can submit RFIs to analysts, and based on review, the RFI can be approved and shared with other members as an alert. If an RFI is not approved by analysts, you can view the decline comment in the Member Portal.
Before you Start
At least one recipient group that you are part of, must have permission to create and view RFIs.
Steps
To submit an RFI, follow these steps:
From the Main Menu, select Request For Information. Alternatively, you can click New in the upper-right corner of the screen and click Request for Information to directly create an RFI.
Click Create.
Basic Details: In this section, you can enter the following details:
Title: Enter a title within 150 characters.
Description: Enter the details that are required in the description field.
TLP: Select a TLP for the RFI.
Analyst Group: If the Analyst Groups feature is enabled, you can submit the RFI to one or more analyst groups. This ensures that the request reaches the right analyst groups based on their area of responsibility.
Share with: If direct sharing of RFIs is enabled for you, you can directly share the RFI as an alert to other members. The recipient groups are displayed based on the TLP you select.
Note
Each recipient group is linked to a TLP, configured by analysts in the Analyst Portal. When you select a specific TLP, you can view a list of recipient groups whose TLPs are equal to or higher than the selected TLP. For example, if you choose TLP: AMBER, you can view recipient groups with TLPs of RED, AMBER+STRICT, and AMBER. Similarly, selecting TLP: CLEAR will display recipient groups with TLPs of RED, AMBER+STRICT, AMBER, GREEN, and CLEAR.
For the direct sharing of RFI as an alert, one of these options for recipients is available to you:
Recipient groups only: Select the recipient groups with whom you want to share the RFI as an alert. You can choose from the list of all the recipient groups you belong to.
Recipient groups or your organization: Select if you want to share the RFI with the recipient groups or with the organization you belong to.
Recipient groups or all organizations: Select if you want to share the RFI with the recipient groups you belong to, or with all organizations in the Member Portal.
Additional Information (Optional): You can add the following details in this section:
Intelligent Requirements (Optional): Search and select one or more published IRs that you follow from the dropdown to enhance the RFI. For more information about IRs, see Intelligence Requirements.
Threat Defender Content (Optional): Search and select one or more published Threat Defender Library content shared by your organization and the analyst from the dropdown.
Note
The fields available in this section depend on the configuration in the Analyst Portal. You may see additional fields to provide more relevant information based on the configuration.
Attachments (Optional): In Attachments, you can add up to 10 attachments to an RFI. The maximum file size for attachments is based on the maximum size configured in the Analyst Portal. The maximum file size supported in Collaborate is 100 MB.
The supported file formats include .pdf, .txt, .doc, .docx, .csv, .xls, .xlsx, .ppt, .pptx, .jpg, .peg, .png, .mov, .mp4, .3gp, .3gpp, .json, .xml, .zip, .7z, .rar, .gz, .log, .evtx, .evt, .msg, .eml, .dem, .yar, m4a, .mp3, .ics, .vss, .vsdx, . vstx, .dotx, .vsd, and .md.
The file name must only include letters, numbers, parentheses, brackets, braces, hyphens, and underscores.
Preview: View the summary of the information under Preview.
Click Submit. The RFI is now submitted to analysts for review. If your RFI is directly shared as an alert, recipients of the alert can view and respond to the RFI alert.
Note
If you are the RFI submitter, you will receive an email notification when a recipient responds to your RFI alert. However, email notifications are not sent when comments are added to the RFI.
You can view all RFIs submitted by you in the Main Menu > Request for Information
Add RFI Comments and Responses in the Member Portal
After you submit an RFI, you can add comments to the RFI to share ideas and improvement tips in the Comments section. These comments are visible to the analysts. After an RFI is published as an alert, recipients of the alert can choose to respond to the RFI alert in the Responses section.
Steps
To add RFI comments and view RFI responses, follow these steps:
Go to Request For Information from the main menu.
Click All to view all your RFI requests.
Click Open to view open RFI requests.
Click Closed to view closed RFI requests.
Select an RFI and you can view details associated with it, such as the status of the RFI, comments on the action, the commenter's name, the RFI ID, alert ID associated with the RFI, the user who created the RFI, the created date, and the Analyst Groups to which the RFI was submitted.
Choose to add any comments for an RFI in the Comments section. You can also add content from your local device as an attachment to the comment. Similarly, if you are the recipient of an RFI alert, you can choose to respond to the RFI in the Responses section and add attachments to it.
Note
You cannot comment after the RFI is closed. The analysts and members can only view a closed RFI.
You can view responses from other members to the RFI alert in the Responses section. You can also download the attachments in the responses.
Note
If you are the RFI submitter, you will receive an email notification when a recipient responds to your RFI alert. However, email notifications are not sent when comments are added to the RFI.
You can add your response and view the RFI alert responses of other members in the RFI Responses section. To view who added a response, hover over the member’s profile and view their details, such as username, email ID, and organization. Like RFI comments, you can add attachments. Additionally, you can also delete your responses to the RFI alert if the response is no longer relevant. Hover over the response, and click Delete.
Click Export to export RFI alert responses submitted on an RFI into a CSV file for offline analysis.
To close an Open RFI, click Status, enter a comment, and click Submit. You cannot reopen a closed RFI.
Share Threat Intel
Threat intelligence sharing helps organizations understand the risks of the most common and severe external threats. Members can create and share threat intel information with analysts. Analysts review the shared threat intelligence and can choose to publish this information as alerts to other members.
Intel Approver Workflow
Threat intel submitted by members is reviewed and approved before it is published as an alert. The following image shows the intel approver workflow:
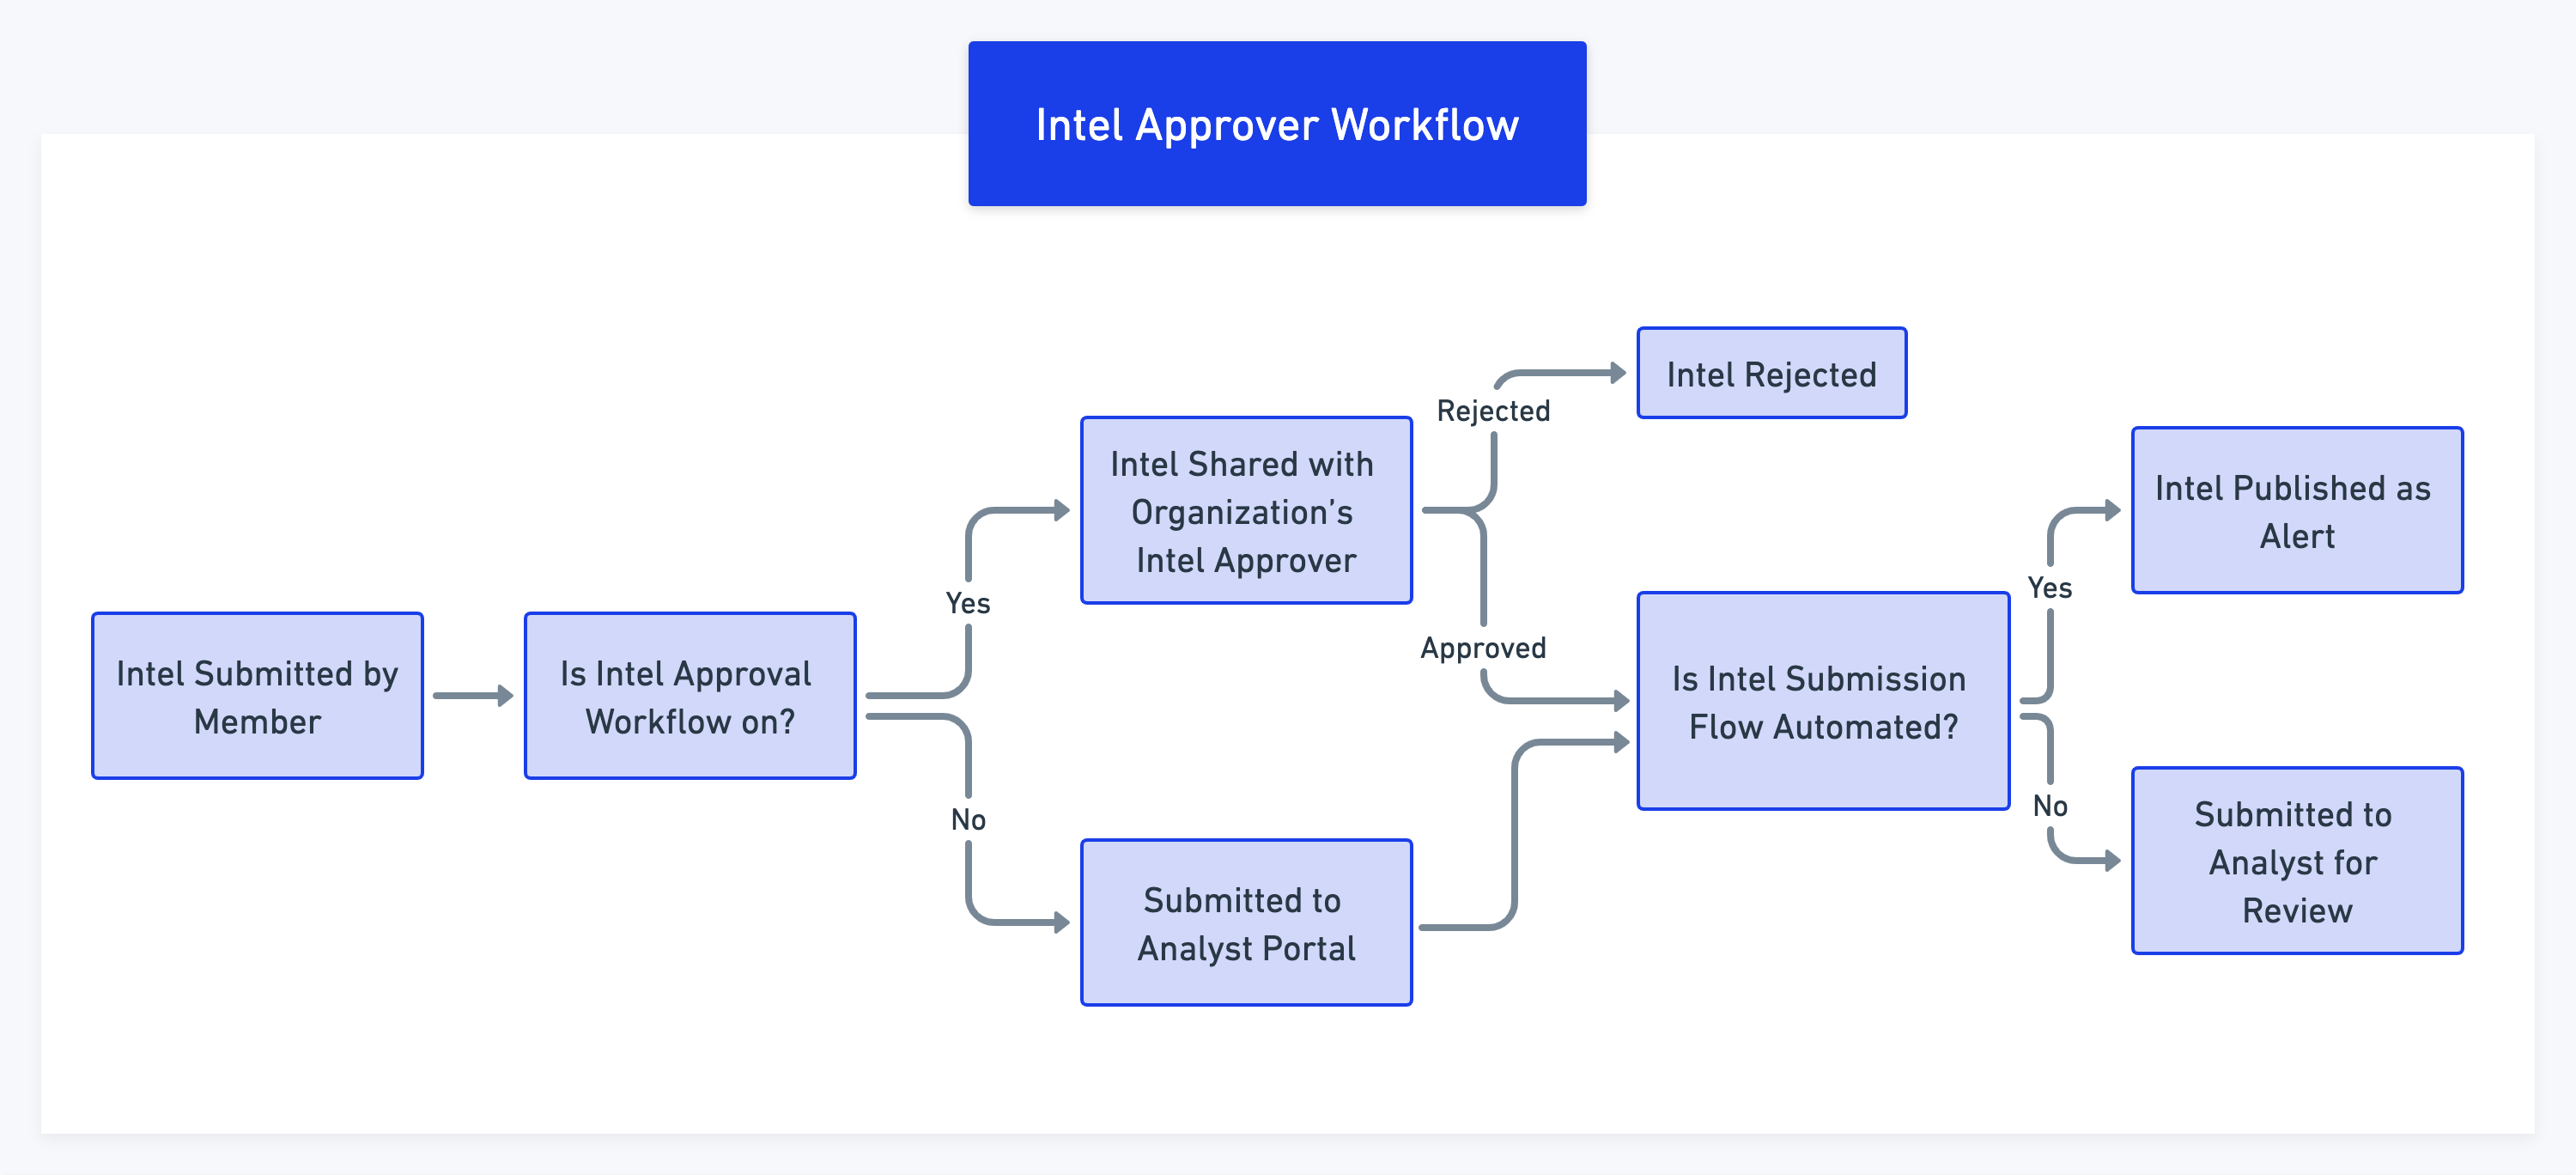
Use the following information to know more about the intel approval workflow:
When members submit threat intel for review, it is listed in Threat Intel in the Analyst Portal.
Intel Approvers can pick threat intel from the list and review. Intel can be reviewed by one approver at a time. If one approver is reviewing the intel, other approvers in the organization will not be able to review the same threat intel.
If the intel approver rejects the submitted threat intel, it will not be published to recipients.
If the intel approver reverts it back to the member for corrections, the members can resubmit it for review after making corrections.
If the intel approver finds all information in the threat intel to be correct and relevant, the intel can be published to other members as an alert.
Create Threat Intel
You can create and submit threat intel reports in the Member Portal to analysts. Analysts can review the intel and subsequently publish them as alerts.
If the automated flow is enabled for your tenant, you can directly share intel as alerts without analyst review. For more information, contact your administrator.
Note
If you want to scan an external web page to detect and extract threat data objects to create intel in , you can configure the Cyware Threat Intel Crawler browser extension.
Steps
To share threat intel, follow these steps:
In the Member Portal, click New > Threat Intel. Alternatively, you can click the side menu bar and click Share Threat Intel > Create.
Basic Details: Select the category of the intel that you are creating. The corresponding fields are based on the category you select. Use the following information while adding information to the threat intel form:
Title: Enter a title within 150 characters.
Description: Enter the description. If you are adding Indicators of Compromise (IOCs) to the description, you can choose to fang or defang them using the Fang Defang option before submitting.
TLP: Select a TLP for the intel.
Share with: If direct sharing of intel is enabled for you, you can directly share the intel as an alert to other members. The recipient groups are displayed based on the TLP you select.
Note
Each recipient group is linked to a TLP, configured by analysts in the Analyst Portal. When you select a specific TLP, you can view a list of recipient groups whose TLPs are equal to or higher than the selected TLP. For example, if you choose TLP: AMBER, you can view recipient groups with TLPs of RED, AMBER+STRICT, and AMBER. Similarly, selecting TLP: CLEAR will display recipient groups with TLPs of RED, AMBER+STRICT, AMBER, GREEN, and CLEAR.
For the direct sharing of intel as an alert, one of these options for recipients is available to you:
Recipient groups only: Select the recipient groups with whom you want to share the intel as an alert. You can choose from the list of all the recipient groups you belong to.
Recipient groups or your organization: Select if you want to share the intel with the recipient groups, or with the organization you belong to.
Recipient groups or all organizations: Select if you want to share the intel with the recipient groups you belong to, or with all organizations in the Member Portal.
Would you like to provide attribution for this form?: Select if you would like to share your attribution for the form. By choosing to provide attribution, your identity will be linked to the submitted intel, allowing analysts and other members to identify the source of the intel.
Note
To view this flag in the Member Portal, it must be enabled from the Analyst Portal. For more information, contact your administrator.
Additional Information (Optional): Enter additional information to support the intel. You can add the following details:
Intelligent Requirements (Optional): Search and select one or more published IRs that you follow from the dropdown to enhance the intel. For more information about IRs, see Intelligence Requirements.
Threat Defender Content (Optional): Search and select one or more published Threat Defender Library content shared by your organization and the analyst from the dropdown.
Note
The fields available in this section depend on the configuration in the Analyst Portal. You may see additional fields to provide more relevant information based on the configuration.
Attachments (Optional): Add attachments to support the intel. Attachments are pieces of information that are more relevant to intel and can help in the incident investigation.
For example, incidents based on computers and networks may contain documentable evidence such as IOCs, screenshots, forensic details, logs, etc. This evidence can help in the investigation and eradication of an incident. The maximum file size for attachments is 20 MB. You can add up to 10 attachments simultaneously.
Preview: Click Preview to view and check the details provided in the threat intel form.
Click Submit.
Manage Submitted Intel
After submitting threat intel, you can view if your submission is approved, rejected, or reverted. Go to Share Threat Intel from the main menu.
Approved: View all the intel submitted by you that are approved by analysts.
Rejected: View all the submissions that were rejected by analysts. You can also view the rejection comment from the analysts to gain more insight into why the intel was rejected.
Reverted: Analysts can revert intel submissions to you when they want additional information about the threat intelligence. You can view the revert comment from the analyst. You have the option to edit reverted intel by clicking Edit Intel.
Drafted: View all intel submissions that were drafted by you. When you click Save as Draft while submitting threat intel, it is available in this section.
Note
While you are editing an intel that is in drafts or has been reverted, any changes in the permissions for recipient groups may result in one or more groups being added or removed from your intel submission form.
Manage Threat Intel
Members who are assigned with the Intel Approver role in an organization are responsible for reviewing and publishing actionable intelligence submitted by other members of the organization. Intel approvers can manage submitted intel under the Share Threat Intel module. Intel submitted by members for approval can be followed up and managed using status such as submitted, approved, rejected, and reverted until the intel is published.
Intel approvers will see four different sections on the left side of the Share Threat Intel module. The sections are named Submitted, Approved, Rejected, and Revered.
Submitted: Threat Intel submitted by members for review will be displayed in this section.
Approved: Threat Intel that is approved by the Intel Approver after review will be listed in this section.
Reverted: Threat Intel that is sent back to the members for making corrections will be listed in this section.
Rejected: Threat Intel that is rejected by the Intel Approver will be listed in this section.
Note
Member Administrators cannot see the Intel Approver feature.
Collaborate Notes
Notice
This feature is available only for Cyware cloud-based deployments.
You can use Collaborate notes to create, export, and submit documents in real-time with other members of the organization.
Key capabilities include:
Create document: Create a document, add recipients and collaborators, and store the content within the Member Portal.
Export document: Export the document in a .pdf file format for offline analysis while collaborating on a document.
Create and submit threat intel: Create and submit intel in collaboration with other members to ensure the accuracy of the information avoid duplicate intel submissions, and then submit the intel. Note that only the owner of a collaborative note can perform this function.
You can create notes using a rich text editor and add members to collaborate. You can do the following:
Assign permissions to control who can change the content, for example, the viewer or editor.
Use comments to suggest edits.
Create multiple drafts of a note.
Create Collaboration Notes
Create and share information using Collaborate Notes.
In the sidebar, click Collaborate in the lower-left corner.
Click Create to add details to the new collaboration note.
Enter a title for your note. This is a mandatory field.
Add recipient groups you want to share the collaboration note with. The available recipient groups are based on the configuration in the Analyst Portal. Assign Viewer or Editor permissions to the members of the recipient group. By default members of the recipient group are assigned Viewer permissions.
Note
If members are added to a recipient group that is already part of a collaboration note, the newly added members have access to view or edit the note based on the assigned permission. If members are removed from the recipient group after they are added to the note, they no longer have access to the collaboration note.
Select members who you want to add as collaborators for the note in Add Collaborators. Specify if the member has viewer or editor privileges.
Click Create to create a new collaboration note. You can now edit the collaboration note. For more information, see Edit a Note.
Edit a Note
Multiple collaborators can edit notes in real-time using a rich text editor. Multi-colored cursors and highlighted text indicate content provided by a particular user. All changes are automatically saved during collaboration.
Before you Start
Create a note or you must be a collaborator to an existing note with editor privileges. For more information on creating a note, see Create Collaboration Notes.
Steps
When editing the note content, you can do the following:
Bold: Changes the text to bold.
Italic: Changes the text to italics.
Underline: Changes the text to underline.
Strikethrough: Changes the text to strikethrough.
Numbered list: Insert an ordered, or numbered list into the content.
Bulleted list: Insert an unordered, or bulleted list into the content.
Increase indent: Tabs the content to the right.
Decrease indent: Tabs the content to the left.
Undo: Undoes an action.
Redo: Redoes an action.
Comment: Provides functionality within the note for comments and feedback. Comments are tracked as individual icons on the right side of the note page, as well as within the highlighted text.
The following options are available:
Entry field: Provides a text field for entering comment content. This option is contextual and only appears when creating or editing a comment.
Include suggested change: Provides a text field for suggesting a change to the content. This option is contextual and only appears when creating or editing a comment or reply.
Edit: Edits the comment.
Delete: Deletes the comment.
Accept Change: Accepts the suggested change, provided in the comment, to the content.
Reply: Provides a text field for replying to a comment. Multiple replies can exist within a comment thread. This option is contextual and only appears once a comment is created.
COMMENT: Executes the comment.
CANCEL: Cancels the comment and closes the comment dialog box.
Revision Walkthrough: Review the complete history of all changes to the note.
The following options are available:
PREVIOUS: Navigate to the previous revision.
NEXT: Navigate to the next revision.
Version number: Displays the number of the current revision. The number changes dynamically, based on which revision you are viewing.
Video timeline: Provides a dynamic timeline for viewing revisions. You can either press the Play button to view a slideshow of the versions, from earliest to latest, or manually slide across the timeline to the specific revision you want to view. A date and time stamp are included at the top-right of the video timeline, indicating when each revision was made.
End Collaboration: At any point, you can end collaboration and note editing by clicking End Collaboration in the upper-right corner. You can no longer edit the note, add collaborators, and submit threat intel.
Export Collaboration Notes
Members an export the notes for offline analysis.
Before you Start
To export a note you must first create a note or be a collaborator to an existing note. For more information on creating a note, see Create Collaboration Notes.
Steps
In the sidebar, click Collaborate in the lower-left corner.
Click the note you want to export.
Click Download as .pdf file in the upper-right corner. The note is downloaded to your system and available in PDF format.
Submit a Collaboration Note for Intel Sharing
You can use your collaboration note as threat intel and submit it to analysts for approval. Analysts can review the intel, and publish it as an alert. For more information, see Share Threat Intel.
Before you Start
Create a note. You must be the owner of the note to share it as threat intel. For more information on creating a note, see Create Collaboration Notes.
Steps
In the sidebar, click Collaborate in the lower-left corner.
Create a note, or open the note that you have previously created.
After editing the note, click Intel Sharing.
Select the category for the threat intel. The content of the note is automatically migrated to the intel-sharing form.
Fill in the details of the report. For more information, see Share Threat Intel.