Administration
Learn about the administrative features to configure and manage important settings of the Analyst Portal, such as user authentication, onboarding users, settings, integrations, and more.
Configure Authentication Methods
You can verify valid users to access the application by configuring the following authentication methods for the Analyst and Member Portals:
Username/Password: Uses the email ID and password of the users configured in the User Management to authenticate. The Username/Password authentication method is enabled by default.
Google Sign-in: Uses the Google account of the users to verify access and authenticate. The email ID of a Google account must be the same as configured in the User Management.
LDAP: Uses the username and password of the users configured in the LDAP server to authenticate.
SAML 2.0: Uses the email IDs of the users to verify access and authenticate.
Manage Analyst Portal Authentication
As a administrator, you can configure the preferred authentication methods for the users signing in to the Analyst Portal.
Note
You can activate one or more authentication methods for the Analyst Portal after configuring them. This enhancement is available from v3.8.3 onwards.
Configure Username and Password as the Authentication Method
By default, the application provides the Username/Password authentication method for the users to sign in using their email ID and password. This authentication method requires users to provide a valid email ID and password combination as configured in User Management to sign in to the application.
To configure the Username/Password authentication method, do the following:
Go to Administration > Integrations > Authentication Method > Analyst Portal > Username/Password.
Click Edit and enter the following details:
Forgot Password: Enable this option to allow users to click Forgot Password and reset their password from the sign-in page. If you disable this option, Forgot Password? will not be available on the sign-in page, and only administrators can reset the user passwords.
Multi-Factor Authentication: Enable this option to authenticate the users using the username and password and a one-time-password (OTP). Multi-factor authentication adds an extra layer of protection from accessing the applications. Select one of the following multi-factor authentication types:
Email: Requires an OTP that is sent to the email ID of the user.
SMS: Requires an SMS service to be configured. See Configure SMS Services
OTP Expiration Time: Enter the OTP expiration time in minutes. After the OTP expires, users must generate a new OTP. For example, five minutes. This option is available only when you enable Multi-Factor Authentication.
Password Link Expiry Duration: Configure a duration in hours after which the password reset link sent in the email expires automatically. Analysts or members must request the administrators to resend the password or the application invite link. The default value for the password expiry is 72 hours. You can configure the expiry time with a minimum of 1 hour and a maximum of 168 hours.
Password Policy: Click View Password Policy and enter the following details to configure your password policy preferences:
Minimum Password Length: Enter the minimum number of characters that a password must include. The minimum password length should be at least eight characters.
Maximum Password Length: Enter the maximum number of characters that a password must include.
Password Conditions: Select at least three of the following character types that must be included in the password:
Lowercase
Uppercase
Numbers
Special Characters
Number of Days to Reset Password after: Enter the days from the last password change after which users must reset their password. requests users to change the password after the specified interval expires. This value must be at least two days.
Number of Days before to remind to Reset Password: Enter the days before the password expiration day to notify users about the password expiry. Users receive an email notification to reset their passwords. This value must be at least one day.
Password Reuse Interval: Enter the count after which users can reuse a previously used password.
Click Add Password Policy to save the configurations.
Click Save.
Configure Google Sign-In as the Authentication Method
You can use Google sign-in to authenticate into the application. Google sign-in mode enables you to use your Google account credentials to sign in to the application.
Before you Start
To sign in using the Google sign-in authentication method, ensure that the email ID of the Google account and the email ID of the user account entered in User Management are exactly the same. For more information about adding users, see Onboard Privileged Users.
Steps
To configure the Google Sign-In authentication method, follow these steps:
Go to Administration > Integrations > Authentication Methods > Username/Password and click Edit.
Enable Google Sign-In and enter the Client ID and Client Secret of your Google cloud platform.
Click Save.
After you configure and activate the Google Sign-in authentication method, users will see an option to log in using Google Sign-in on the login page.
Configure LDAP as the Authentication Method
You can use the Lightweight Directory Access Protocol (LDAP) directory services to authenticate users to access Cyware applications. This authentication method requires users to provide a valid username and password combination as configured in the LDAP directory to sign in to the application.
Note
Users with active accounts in User Management can sign in using their LDAP credentials. For more information, see Onboard Privileged Users.
Before you Start
Ensure that the application servers have active network connectivity with the LDAP server.
Steps
To configure the LDAP authentication method, do the following:
Go to Administration > Integrations > Authentication Methods.
Select LDAP and click Edit. Enter the following details:
Domain Name: Enter the domain name of the LDAP server database. For example, lab.cyware.com.
Server IP/Domain: Enter the IP address or URL of the LDAP server database. For example, 1.1.1.1.
Port: Enter the port number of the LDAP server to connect to the database. For example, 389.
Domain Controller: Enter the details for the LDAP domain name. These details are provided by the LDAP admin of your organization. For example, com.
SSL encrypted: Enable this option to encrypt the application connection with the LDAP server.
Multi-Factor Authentication: Enable this option to authenticate the users using the username and password and a one-time-password (OTP). Multi-factor authentication adds an extra layer of protection from accessing the applications. Select one or more options from the following available multi-factor authentication types:
Email: Requires an OTP that is sent to the email ID of the user to authenticate.
SMS: Requires an SMS service to be configured. See Configure SMS Services
Click Save.
After completing the configuration, turn on the Activate Authentication toggle to activate LDAP authentication method. You can also use Test Connectivity to test the LDAP connectivity.
Configure SAML 2.0 as the Authentication Method
You can enable single sign-on (SSO) using an identity provider (IdP) that supports Security Assertion Markup Language (SAML 2.0). You can use identity providers such as Okta, Google, or Azure AD to set up SAML authentication for the users. SAML 2.0 uses the email ID of the users to authenticate.
After configuring SAML 2.0 as the authentication method in Collaborate, you can set up the SAML SSO using an IdP of your choice. To configure Okta IdP as the SAML 2.0 authentication method, see Set Up SAML SSO Integration using Okta.
Before you Start
Use the following source provider data to configure the identity provider application:
Assertion Consumer URL: An HTTP resource on a website that processes SAML protocol messages and returns a cookie representing the information extracted from the message. As part of the SAML process, Cyware auto-generates an Assertion Consumer Service (ACS) URL for your organization. You must copy the ACS URL using the Copy URL option and provide it to your IdP to generate metadata for your organization.
Entity ID: The unique name provided to the service provider. The Entity ID uniquely distinguishes your application website from others to identify the user or application corresponding to the assertion.
Certificate: The certificate and private key to pass authorization credentials to the IdP. This information will be used for creating an authentication request.
AuthnRequest: Enable the SP-SSO initiated flow to send AuthnRequest from the Service Provider to the Identity Provider.
Group Attribute: You can onboard new and existing analysts and authorize them on every login using SAML IdP user groups. You can map SAML IdP user groups with 's user roles. For this mapping, you will require the group attribute name in the SAML assertion response that contains the names or IDs of user roles in the IdP. For example, the group attribute can be permission_groups in the IdP.
The default group attribute value expected by Collaborate in the SAML assertion response is memberOf.
Once configured, download one of the following IdP metadata details:
Metadata XML file of the IdP
Certificate and SSO URL of the IdP
Steps
To configure the SAML 2.0 authentication method in , follow these steps:
Go to Administration > Integrations > Authentication Methods.
If you want to configure SAML for the Analyst Portal, select Analyst Portal. Similarly, you can configure SAML for the Member Portal.
Select SAML 2.0 and click Edit. Use the following information to configure SAML 2.0 authentication:
To upload the IdP details, select one of the following in Identity Provider attributes:
Metadata XML: Upload the metadata XML file of the IdP.
SSO URL: Enter the SSO URL of the IdP.
SAML Group Mapping for Users: If you are configuring SAML for the Analyst Portal, you can configure a mapping between SAML IdP groups and the 's user role. The user role must match the IdP's group name to grant analysts the appropriate access while signing in to the Analyst Portal.
Use the following information while mapping SAML groups:
Group Attribute: Enter the group attribute in the SAML assertion that contains the names or IDs of user groups on the IdP. For example, permission_groups. The user group values must be a comma-separated list.
If the group attribute value is not set, SAML-authenticated users will be assigned to the default role. If the default user role value is None, a user entry is created in the application, but the user will not be able to access the application.
Note
The default group attribute value for SAML assertion is memberOf and the application expects the memberOf group attribute value in the SAML assertion response if not configured.
Default User Role: Select the default user role you want to use while onboarding and authorizing SAML-authenticated users.
The default user role is None.
The application provisions SAML-authenticated users based on the SAML group mapping in 's user roles. However, if the SAML user group and 's user role are not mapped, then the users will be created with the specified default role permissions. To create a mapping between SAML IdP user groups and 's user roles, see Role-Based Access Control.
Certificate: Upload the certificate of the IdP.
Encrypt: Enable this to encrypt the SAML 2.0 authentication process.
To upload the SP details in Service Provider attributes, use the following information:
Copy the Assertion Consumer URL and Entity ID using the Copy URL option and provide it to your SP to generate metadata for your organization. To know more about this, see
Certificate: Upload the certificate of the SP.
AuthnRequest: Enable this to initiate SP-SSO flow.
Click Save.
After completing the configuration, turn on the Activate Authentication toggle to activate this authentication method.
After you activate and configure an IdP for the SAML 2.0 authentication method, users can select SAML on the sign-in page to sign in to the application without entering the credentials.
Configure SCIM 2.0 for Member Portal
Notice
This feature is available in Collaborate (CSAP) from v3.7.7.0 onwards
SCIM (System for Cross-Domain Identity Management) is a standard protocol that is used to automate user provisioning across systems. In , you can use SCIM to automate the process of creating, updating, and deactivating users, making it easier to maintain up-to-date user information in the Member Portal.
Steps
To generate SCIM 2.0 credentials, follow these steps:
Go to Administration > Integrations > Authentication Method > Member Portal.
Select SAML 2.0, and click Edit.
In SCIM 2.0, turn on the toggle to activate the configuration, and click Save to view the credentials.
You can add these credentials in your identity provider (IdP) such as Okta, to enable SCIM for user provisioning. For more information, see Configure SCIM 2.0 in Okta.
Reset 2FA Recovery Codes
Recovery or backup codes are unique codes that are provided to you during two-factor authentication (2FA) registration and are used to regain account access. As an administrator, you can reset recovery codes for members.
Before you Start
Ensure that 2FA (TOTP) is enabled for the Member Portal.
Steps
To reset recovery codes for members, follow these steps:
Sign in to the Analyst Portal.
Go to Administration > User Management > Member.
Search for the member for who you want to reset recovery codes, using the search option. You can use the email address to search for member details.
Click the vertical ellipsis in the member details, and click Reset Authenticator App. This resets the TOTP authentication key for the user. On registration, the member can now download a new set of recovery codes.
Manage Member Portal Authentication
Admins can directly configure the preferred authentication method for the users of the Member Portal.
Note
You can activate one or more authentication methods for the Member Portal after configuring them. This enhancement is available from v3.8.8 onwards.
Configure Username and Password as the Authentication Method
By default, the application provides the Username/Password authentication method for the users to sign in using their email ID and password. This authentication method requires users to provide a valid email ID and password combination as configured in User Management to sign in to the application.
To configure the Username/Password authentication method, do the following:
Go to Administration > Integrations > Authentication Method > Member Portal > Username/Password and click Edit.
Enter the following details:
Multi-Factor Authentication: Enable this option to authenticate the users using the username and password and a One-Time-Password (OTP). Multi-factor authentication adds an extra layer of protection from accessing the applications. Select one or more options from the following available multi-factor authentication types:
Email: Requires an OTP sent to the user's email ID.
SMS: Requires an SMS service to be configured. See Configure SMS Services
TOTP: Requires an OTP from a TOTP authenticator app such as Okta, Google Authenticator, Authy, or Microsoft Authenticator.
Password Link Expiry Duration: Configure a duration in hours after which the password reset link sent in the email expires automatically. Members must request the administrators to resend the password or the application invite link. The default value for the password expiry is 72 hours. You can configure the expiry time with a minimum of 1 hour and a maximum of 168 hours.
OTP Expiration Time: Enter the OTP expiration time in minutes. Once expired, users must generate a new OTP. For example, 5 Minutes.
Password Policy: Click View Password Policy on the right and enter the following details to configure your password policy preferences:
Minimum Password Length: Enter the minimum number of characters that a password must include. The minimum password length should be at least 8 characters.
Maximum Password Length: Enter the maximum number of characters that a password can include.
Password Conditions: Select at least three of the following character types that must be included in the password:
Lowercase
Uppercase
Numbers
Special Characters
Number of Days to Reset Password After: Enter the days from the last password change after which users must reset their password. CTIX requests users to change the password after the specified interval expires. This value must be at least two days.
Number of Days Before to Remind Reset Password: Enter the days before the password expiration day to notify users about the password expiry. Users receive an email notification to reset their passwords. This value must be at least 1 day.
Password Reuse Interval: Enter the count after which users can reuse a previously used password.
Click Add Password Policy to save the configurations.
Click Save.
Configure Google Sign-In as the Authentication Method
You can use Google sign-in to authenticate into the application. Google sign-in mode enables you to use your Google account credentials to sign in to the application.
Before you Start
To sign in using the Google sign-in authentication method, ensure that the email ID of the Google account and the email ID of the user account entered in User Management are exactly the same. For more information about adding users, see Onboard Privileged Users.
Steps
To configure the Google Sign-In authentication method, follow these steps:
Go to Administration > Integrations > Authentication Methods > Username/Password and click Edit.
Enable Google Sign-In and enter the Client ID and Client Secret of your Google cloud platform.
Click Save.
After you configure and activate the Google Sign-in authentication method, users will see an option to log in using Google Sign-in on the login page.
Configure LDAP as the Authentication Method
You can use the Lightweight Directory Access Protocol (LDAP) directory services to authenticate users to access Cyware applications. This authentication method requires users to provide a valid username and password combination as configured in the LDAP directory to sign in to the application.
Note
Users with active accounts in User Management can sign in using their LDAP credentials. For more information, see Onboard Privileged Users.
Before you Start
Ensure that the application servers have active network connectivity with the LDAP server.
Steps
To configure the LDAP authentication method, do the following:
Go to Administration > Integrations > Authentication Methods.
Select LDAP and click Edit. Enter the following details:
Domain Name: Enter the domain name of the LDAP server database. For example, lab.cyware.com.
Server IP/Domain: Enter the IP address or URL of the LDAP server database. For example, 1.1.1.1.
Port: Enter the port number of the LDAP server to connect to the database. For example, 389.
Domain Controller: Enter the details for the LDAP domain name. These details are provided by the LDAP admin of your organization. For example, com.
SSL encrypted: Enable this option to encrypt the application connection with the LDAP server.
Multi-Factor Authentication: Enable this option to authenticate the users using the username and password and a one-time-password (OTP). Multi-factor authentication adds an extra layer of protection from accessing the applications. Select one or more options from the following available multi-factor authentication types:
Email: Requires an OTP that is sent to the email ID of the user to authenticate.
SMS: Requires an SMS service to be configured. See Configure SMS Services
Click Save.
After completing the configuration, turn on the Activate Authentication toggle to activate LDAP authentication method. You can also use Test Connectivity to test the LDAP connectivity.
Configure SAML 2.0 as the Authentication Method
You can enable single sign-on (SSO) using an identity provider (IdP) that supports Security Assertion Markup Language (SAML 2.0). You can use identity providers such as Okta, Google, or Azure AD to set up SAML authentication for the users. SAML 2.0 uses the email ID of the users to authenticate.
After configuring SAML 2.0 as the authentication method in Collaborate, you can set up the SAML SSO using an IdP of your choice. To configure Okta IdP as the SAML 2.0 authentication method, see Set Up SAML SSO Integration using Okta.
Before you Start
Use the following source provider data to configure the identity provider application:
Assertion Consumer URL: An HTTP resource on a website that processes SAML protocol messages and returns a cookie representing the information extracted from the message. As part of the SAML process, Cyware auto-generates an Assertion Consumer Service (ACS) URL for your organization. You must copy the ACS URL using the Copy URL option and provide it to your IdP to generate metadata for your organization.
Entity ID: The unique name provided to the service provider. The Entity ID uniquely distinguishes your application website from others to identify the user or application corresponding to the assertion.
Certificate: The certificate and private key to pass authorization credentials to the IdP. This information will be used for creating an authentication request.
AuthnRequest: Enable the SP-SSO initiated flow to send AuthnRequest from the Service Provider to the Identity Provider.
Group Attribute: You can onboard new and existing analysts and authorize them on every login using SAML IdP user groups. You can map SAML IdP user groups with 's user roles. For this mapping, you will require the group attribute name in the SAML assertion response that contains the names or IDs of user roles in the IdP. For example, the group attribute can be permission_groups in the IdP.
The default group attribute value expected by Collaborate in the SAML assertion response is memberOf.
Once configured, download one of the following IdP metadata details:
Metadata XML file of the IdP
Certificate and SSO URL of the IdP
Steps
To configure the SAML 2.0 authentication method in , follow these steps:
Go to Administration > Integrations > Authentication Methods.
If you want to configure SAML for the Analyst Portal, select Analyst Portal. Similarly, you can configure SAML for the Member Portal.
Select SAML 2.0 and click Edit. Use the following information to configure SAML 2.0 authentication:
To upload the IdP details, select one of the following in Identity Provider attributes:
Metadata XML: Upload the metadata XML file of the IdP.
SSO URL: Enter the SSO URL of the IdP.
SAML Group Mapping for Users: If you are configuring SAML for the Analyst Portal, you can configure a mapping between SAML IdP groups and the 's user role. The user role must match the IdP's group name to grant analysts the appropriate access while signing in to the Analyst Portal.
Use the following information while mapping SAML groups:
Group Attribute: Enter the group attribute in the SAML assertion that contains the names or IDs of user groups on the IdP. For example, permission_groups. The user group values must be a comma-separated list.
If the group attribute value is not set, SAML-authenticated users will be assigned to the default role. If the default user role value is None, a user entry is created in the application, but the user will not be able to access the application.
Note
The default group attribute value for SAML assertion is memberOf and the application expects the memberOf group attribute value in the SAML assertion response if not configured.
Default User Role: Select the default user role you want to use while onboarding and authorizing SAML-authenticated users.
The default user role is None.
The application provisions SAML-authenticated users based on the SAML group mapping in 's user roles. However, if the SAML user group and 's user role are not mapped, then the users will be created with the specified default role permissions. To create a mapping between SAML IdP user groups and 's user roles, see Role-Based Access Control.
Certificate: Upload the certificate of the IdP.
Encrypt: Enable this to encrypt the SAML 2.0 authentication process.
To upload the SP details in Service Provider attributes, use the following information:
Copy the Assertion Consumer URL and Entity ID using the Copy URL option and provide it to your SP to generate metadata for your organization. To know more about this, see
Certificate: Upload the certificate of the SP.
AuthnRequest: Enable this to initiate SP-SSO flow.
Click Save.
After completing the configuration, turn on the Activate Authentication toggle to activate this authentication method.
After you activate and configure an IdP for the SAML 2.0 authentication method, users can select SAML on the sign-in page to sign in to the application without entering the credentials.
Configure SCIM 2.0 for Member Portal
Notice
This feature is available in Collaborate (CSAP) from v3.7.7.0 onwards
SCIM (System for Cross-Domain Identity Management) is a standard protocol that is used to automate user provisioning across systems. In , you can use SCIM to automate the process of creating, updating, and deactivating users, making it easier to maintain up-to-date user information in the Member Portal.
Steps
To generate SCIM 2.0 credentials, follow these steps:
Go to Administration > Integrations > Authentication Method > Member Portal.
Select SAML 2.0, and click Edit.
In SCIM 2.0, turn on the toggle to activate the configuration, and click Save to view the credentials.
You can add these credentials in your identity provider (IdP) such as Okta, to enable SCIM for user provisioning. For more information, see Configure SCIM 2.0 in Okta.
Configure SMS Services
CSAP Admins can now enable Analyst Portal users to receive their login One Time Passwords (OTP) via SMS on their mobile devices or on their configured email addresses. Admins can integrate SMS gateway services with CSAP for sharing OTP through SMS. SMS integrations can be used with authentication methods such as LDAP, SAML 2.0, etc., for two-factor authentication.
SMS Integrations can be used with authentication methods such as LDAP, SAML 2.0, etc., for two-factor authentication.
The SMS configuration module can be used to integrate third-party SMS sender tools that provide a programmable SMS API for the purpose of receiving authentication OTPs. Admins can easily configure API communication parameters required for any SMS sender tool using the default and customizable fields available in this section. You need to have the view and create/update permissions to access the SMS configuration module. Permissions can only be assigned to a role.
Note
If SMS integration is not configured, CSAP will send two-factor authentication OTPs via email to users.
Procedure
To configure SMS services, do the following.
Go to Management > Integrations > SMS Configuration and click Edit.
Select the HTTP Method for the API endpoint provided by the SMS service provider. For example, POST.
Enter the URL endpoint of the SMS service provider. For example, https://sampledomain.com/sms_service
Enter the authentication type. There are two authentication types - Basic Auth or API keys. You can create key-value pairs for the authentication type provided by the service provider. For more information on the authentication configuration, refer to the API documentation provided by the service provider.
Enter the API payload format provided by the SMS service provided. This payload can be either in form data or JSON.
Enter the format of the message through which users receive the OTP. You can configure the text for the same. For example, Use {otp} as one-time password to log in to the application.
Specify prefix values for phone numbers. For example, +. The phone number value available from the user profile will be appended to the prefix provided. Leave this field empty if the prefix does not apply.
Enter the receiver key name. The receiver's details can be extracted through an test SMS API call.
Enter the message name key. The message details are extracted through an API call.
Click Save.
Click Enable SMS Configurations to finish configuration.
Note
Click on the Test Connectivity button to check the success of the SMS configuration. You should receive a confirmation OTP on the entered phone number.
Configure SMTP Server
Configure the email server and enable the application to send emails to the users with invite links, password reset links, notifications, reports, One-Time Passwords (OTPs), and more. You can configure an email server from your on-premise infrastructure to send emails from the application.
To configure the email server, follow these steps:
Go to Administration > Integrations > Authentication Method > SMTP Configuration.
Click Edit and enter the following details:
Host: Enter the IP address or domain name of the email server. For example, cyware.com.
If you don't have the username and password for the Host Server ID, select Don't have a username and password.
(Optional) User: Enter a username for the Host Server ID. For example, default_user.
(Optional) Password: Enter a password to authenticate the host user.
Port: Enter the port number of the email server that you want to use to send emails. For example, 389.
TLS: Select True to encrypt SMTP for internet communications and secure your data with Transport Layer Security.
From Email: Enter the email address using which sends the emails. For example, csap@cyware.com.
Note
Ensure that this email ID is added to the Allow List to receive emails from .
From Email Name: Enter a sender name for the email ID entered in From Email. Example: CSAP Communications.
Reply To (Email): Enter the email account to which the email replies will be sent. All queries related to Portals will be sent to this email address.
Click Save.
To send a test email, click Test Connection, and enter the email address to send the email to. Click Send Test Email.
After completing the configuration and testing connectivity, to activate SMTP, turn on the Enable SMTP Configuration toggle.
The application saves the email server configuration after successfully sending the test email. All active users can now receive email communications from the application.
Configure Google reCAPTCHA
Notice
This feature is not available for non-Cyware cloud-based deployments.
Enable Google Recaptcha to register CSAP with Google reCAPTCHA service. Google reCAPTCHA helps in detecting abusive traffic and thereby mitigating the possibility of bots signing in to the application without any user interaction.
Before you Start
Ensure you have the View and Update permissions to configure reCAPTCHA.
Steps
To configure reCAPTCHA for CSAP, do the following:
Sign in to the Analyst Portal.
Navigate to Administration > Integrations > Authentication Methods. Click reCAPTCHA Configuration.
Click Edit to add or update the site key and secret key. To generate the site key and secret key, see Creating reCAPTCHA keys.
Turn on the Enable reCAPTCHA on Dashboard toggle to enable Google reCAPTCHA for the Analyst Portal.
Turn on the Enable reCAPTCHA on Member Portal to enable Google reCAPTCHA for the Member Portal.
Role-Based Access Control
The role-based access control (RBAC) helps administrators or root administrators define and manage user access to features and application data based on the user's role in . The following operations can be performed:
You can set varying levels of permissions to enable access to authorized users based on their roles and responsibilities. This protects sensitive data and ensures that the users of your security team can only access the required information.
You can also configure and allow users to perform only selected or all activities for a feature. For example, you can configure a section of users only to view dashboards while permission to create or edit the dashboard rests with another section of users.
In addition to configuring user roles, access control also helps you adhere to any data protection protocols or policies within your organization by restricting users' access to sensitive data. You can achieve this by completely hiding one or more features from a set of users.
Privileged (Analyst) User Roles
The following roles are preconfigured in the Analyst Portal:
Root Admin: Root admins can manage other roles and permissions as well as configure speedbump functionality for admins and analysts. It is unique in having these two specific permissions in addition to other permissions. This prevents unauthorized changes to critical administrative functionalities or the assigning of these permissions to other roles. Attributes of the root admin role cannot be modified.
Note
Only root admins can create other root admins in the Analyst Portal.
Admin: Admins can configure permissions across all modules and features of the Analyst Portal. Admins can assign or revoke standard privileged user roles, and have access to all categories. The permissions given to an admin role supersede the permissions given to other standard or newly created roles.
Publisher: Publishers can review, edit, and publish the content submitted by users with creator roles (for example, alerts, surveys, and more). This role has all the permissions of a creator role, including the ability to create alerts in the Analyst Portal.
Creator: Creates can create content (for example, alerts, surveys, and more) in the Analyst Portal and then submit it to a publisher for review and publishing. Additionally, this role has view permissions for other modules, such as recipient groups, locations, analysis fields, and so on.
Analyst: Analysts can view incidents and threat intel reported by the users and can create alerts. All permissions available to the publisher and creator roles are assigned to analysts. This role can create and publish alerts, and surveys, or generate API keys for users to integrate with other platforms.
Member User Roles
The following roles are available for member users of the Member Portal:
Member: Members can sign in to the Member Portal and access features that are enabled for them.
Intel Approver: Intel approvers are members who have permission to review and publish threat intel shared by other members of their organization.
Member Admin: Member administrators can manage other members and intel approvers in their organization. Member admins have permission to view and interact with a separate Admin Settings section of the Settings module in the Member Portal.
Sector Approver: Sector approvers are members assigned to a particular sector or organization type and have permission to review intel provided by all members from various organizations within a sector.
Sector Admin: Sector administrators are members of a particular sector or organization type that can add more members and define member roles for various organizations within that sector.
Create Custom Roles
Root admins can create custom privileged user roles in the Analyst Portal as required.
Before you Start
Ensure that you have the View and Create or Update permissions for the Roles and Permissions module.
If SAML 2.0 authentication method is activated for you, ensure that you have the SAML group name.
Steps
To create a custom role, follow these steps:
Go to Administration > User Management > Roles and Permissions.
Click Create Role and use the following information to enter the details:
Enter a name for the role. For example, L1 Security Analyst
SAML Group Name: If SAML 2.0 authentication method is enabled, this field becomes applicable. To onboard new analyst users and authorize SAML-authenticated users during every sign-in attempt, you can map SAML IdP groups with 's user roles. If an exact match for the role is found, then the users are granted permissions within the application, as defined by the external identity provider (SAML user group) and 's access permissions. If no user roles are configured, the default user role from the SAML authentication configuration will be automatically assigned. To configure the group attribute and the default user role, see Configure SAML 2.0 as the Authentication Method.
Enter the SAML user group name. You can add multiple user groups as a comma-separated list. The SAML User Group field is pre-filled based on your user group's name. However, you can modify SAML group names to match your IdP group names. After entering the group name, click outside the field to enable the Update button.
When you map multiple user groups to a user group in a Cyware application, the SAML assertion will check the group permissions in sequence from the start of the list and provide access based on the role group that first meets the mapping criteria.
Select the permissions that you want to assign to the role. For example, you can assign View, Create, and Update permissions for the Category module.
Set the role as Active. Inactive roles cannot be assigned to users.
Click Create Role.
Edit Custom Roles
You can modify custom roles created in CSAP. Preconfigured roles for CSAP Analyst Portal, such as Root Admin, Admin, Publisher, Creator, and Analyst cannot be modified.
Before you Start
You must have the View and Create/Update permission to modify a custom role in CSAP.
Steps
To modify a custom role, do the following:
Navigate to Management > User Management.
Select Roles and Permissions and click on the custom role you want to modify. The right hand side pane displays the details of the custom role such as name and permissions associated.
Make changes to the name and permissions as required and click Update to save changes.
Set the role as Active. You cannot set a custom role as inactive if it has active users. Before you set a role to inactive, move all users associated with that role to other roles.
Clone Role
To use an existing role as a template for a new role, you can clone the role and the permissions associated with it. This eliminates the need to manually specify permissions each time you want to create similar roles with different requirements.
Before you Start
You must have the View and Create/Update permissions for the Roles and Permissions module.
Steps
To clone a role, do the following:
Navigate to Management > User Management.
Select Roles and Permissions and click on the role you want to clone. The right hand side pane displays the details of the custom role such as name and permissions associated.
Click Clone Role to create a copy of the role.
Provide a new name for the cloned role and make changes to the permissions as required.
Set the role as Active. You cannot assign inactive roles to users.
Click Create Role.
User Role Permissions
In , you can use pre-configured roles for Analyst Portal users or create custom roles to fit your organization’s specific requirements. While creating or updating a role, you have the flexibility to assign permissions based on available features, ensuring each role has the appropriate access. You can assign a role with the following permissions:
About Us
You can use the About Us setting to add information about your organization. Members will see this information in the Member Portal. The following permissions control access to these settings:
View About Us: Allows users to view the About Us section in Administration > Settings > Other Settings > About Us.
Update About Us: Allows users to edit the content in the About Us section in About Us.
AbuseIPDB
You can integrate with AbuseIPDB to enrich any indicator details while creating alerts. The following permissions are available in this module:
View AbuseIPDB: Allows users to view the Abuse IPDB integration in Administration > Integrations > Third Party Integrations > Abuse IPDB.
Update AbuseIPDB: Allows users to edit the credentials while configuring Abuse IPDB integration.
For more information about configuring AbuseIPDB integration, see Configure Abuse IPDB Integration.
Access Control
Use Access Control to allow or block access to the Analyst Portal based on countries or IP addresses. The following permissions manage this functionality:
View Access Control: Allows users to view the Access Control settings in Administration > Settings > Other Settings > Access Control.
Create Access Control: Allows users to add countries and IP/IP Ranges to the allowed or blocked list in the Access Control section.
Update Access Control: Allows users to update the countries and IP/IP Ranges present in the allowed or blocked list in the Access Control section.
For more information about Access Control, see Access Control.
Alerts
You can share real-time advisories on the latest incidents, breaches, malware, and vulnerabilities with members through Alerts. The following permissions are available for managing this feature:
Can Publish Alert: Allows users to publish alerts from Alerts > Create Alerts.
Can Draft Alert: Allows users to save an alert as a draft.
Can Expire Published Alert: Allows users to expire a published alert.
Can Revert Alert: Allows users with Publisher role to revert an alert.
Can Submit Alert: Allows users to submit an alert to a publisher for further review and publishing.
Can View All Alert: Allows users to view all the alerts published in their organization.
Can View Alert: Allows users to view the alerts they publish.
Can Schedule Alert: Allows users to schedule the time of publishing an alert.
Can Expire Unpublished Alert: Allows users to expire an alert in the draft state.
For more information about Alerts, see Alerts.
Alert Template
You can create editable alert templates to instantly create alerts, and save time from entering the same data multiple times for similar alerts. The following permissions are available in this module:
Update Alert Template: Allows users to update an existing alert template in Administration > Settings > Alert Settings > Alert Template.
View Alert Template: Allows users to view the available alert templates.
Create Alert Template: Allows users to create a new alert template in Alert Template.
For more information about alert templates, see Create Alert Templates.
Analysis Settings
The analysis settings enable you to manage system fields which are out-of-the-box fields used while creating alerts and submitting intel and RFIs. The following permissions are available in this module:
Update Analysis Settings: Allows users to rearrange the order of fields displayed in the Additional section of the alert creation form, intel submission form, and the RFI reporting form in Administration > Field Management Settings > Field Order.
Create Analysis Settings: Allows users to create options for single-select and multi-select fields in Field Management Settings.
View Analysis Settings: Allows users to view the available system fields.
For more information about system fields, see System Fields.
Analyst Dashboard Login Configuration
You can directly configure the preferred authentication method for the users of the Analyst Portal. The following permissions are available in this module:
View Analyst Dashboard Login Configuration: Allows users to view the authentication methods available for the Analyst Portal in Administration > Integrations > Authentication Methods > Analyst Portal.
Update Analyst Dashboard Login Configuration: Allows users to edit the configurations of the available authentication methods.
For more information about the Analyst Portal authentication methods, see Manage Analyst Portal Authentication.
Analyst Groups
The Analyst Groups feature allows you to manage groups of analysts and control their access to specific categories. The following permissions are available in this module:
View Analyst Groups: Allows users to view the list of analyst groups and their details in Administration > User Management > Analyst Groups.
Create Analyst Groups: Allows users to create new analyst groups and assign categories and users.
Update Analyst Groups: Allows users to modify the details of existing analyst groups.
For more information about configuring Analyst Groups, see Configure Analyst Groups.
API Details
You can create and view API credentials to engage with the services programmatically. The following permissions are available in this module:
View API Details: Allows users to view the API integration details in Administration > Integrations > CSAP Integrations.
Update API Details: Allows users to clone roles and update the accessibility of user roles to features in Administration > Integrations > CSAP Integrations > Open API Permission.
Create API Details: Allows users to generate API credentials and create roles to manage user's access to features.
For more information about configuring 's open API, see Configure CSAP Open API.
ATT&CK Heatmap
The ATT&CK Heatmap is a globally accessible knowledge base of adversary tactics and techniques based on real-world observations. The following permission is available in this module:
View ATT&CK Navigator: Allows users to view the ATT&CK Navigator heatmap in Main Menu > ATT&CK Navigator.
For more information about ATT&CK navigator, see ATT&CK Navigator.
Audit Log
You can view all the recent actions performed by Analyst Portal users in Audit Logs. The following permission is available in this module:
View Audit Log: Allows users to view the recent actions of Analyst Portal users in Administration > User Permissions > Audit Logs.
For more information about audit logs, see Audit User Logs.
Automated RSS Alerts
You can automatically publish RSS feeds as alerts from the Analyst portal using Automated RSS Alerts, eliminating the need to create them manually. The following permissions are available in this module:
Update Automated RSS Alerts: Allows users to edit the integration credentials in Administration > Integrations > Third Party Integrations > Automated RSS Alerts.
View Automated RSS Alerts: Allows users to view the view the credentials in Automated RSS Alerts.
For more information about configuring automated RSS alerts, see Configure Automated RSS Alerts.
Browser Extension
Members can use the Cyware Threat Intel Crawler browser extension to submit intel. The following permissions are available in this module:
Update Browser Extension: Allows users to update the browser extension settings in Administration > Configurations > Features.
View Browser Extension: Allows users to view the browser extension settings in Features.
For more information about configuring the browser extension, see Configure Collaborate Features.
Campaign
Campaigns are instances or patterns of harmful intent by threat actors. helps you to create and manage campaigns to share alerts with additional context. The following permissions are available in this module:
View Campaign: Allows users to view the list of campaigns available in Administration > Settings > Alert Settings > Campaign.
Update Campaign: Allows users to edit the available campaigns.
Create Campaign: Allows users to create a new campaign in Campaign > Create.
For more information about campaigns, see Create Campaigns.
Category
Categories help you identify the type of information shared in an alert by analysts and threat intel submitted by members. The following permissions are available in this module:
Update Category: Allows users to update the details of a category in Administration > Settings > Core Settings > Category.
View Category: Allows users to view all the available categories in Category.
Create Category: Allows users to create new categories in Category.
For more information about categories, see Categories.
Channels
Channels are classifications of alerts based on tags, information sources, and recipient groups. The following permissions are available in this module:
Update Channels: Allows users to update the details of a channel in Administration > Settings > Core Settings > Channels.
View Channels: Allows users to view the details of channels in Channels.
Create Channels: Allows users to create new channels in Channels.
For more information about channels, see Channels.
Conference Call
The conference call feature allows members to connect using a simple and common conference calling number. The following permissions are available in this module:
Create Conference Call Entry: Allows users to add conference call details in Administration > Settings > Alert Settings > Conference Call.
Update Conference Call Entry: Allows users to edit the existing conference call details in Conference Call.
View Conference Call Entry: Allows users to view all the available conference call entries in the Conference Call setting.
For more information about conference calls, see Add Conference Call.
Configurations
In this section, you can configure the various features of the Analyst and Member Portal by setting preferences. The following permissions are available in this module:
Update Configurations: Allows users to edit the preferences in Administration > Configurations.
View Configurations: Allows users to view the available preferences in Configurations.
For more information, see Configure Collaborate Preferences.
Crisis Notification
Crisis Notification is a structured information dissemination feature that allows users with permission to send crisis alerts to members. The following permissions are available in this module:
View Crisis Notification: Allows users to view the responses to crisis alerts in Main Menu > Crisis Management.
Create Crisis Notification: Allows users to create and publish crisis alerts from Crisis Management.
For more information about crisis notification, see Crisis Management.
Crisis Template
You can efficiently manage crisis alerts by creating and customizing templates in the settings. The following permissions control access and modifications for crisis management templates:
View Crisis Template: Allows users to view the available crisis management templates in Administration > Settings > Other Settings > Crisis Management.
Create Crisis Template: Allows users to create new templates for crisis notification in Crisis Management.
Update Crisis Template: Allows users to edit available crisis templates in Crisis Management.
For more information on managing crisis templates, see Crisis Management Settings.
CTIX Integration
You can integrate with to send threat intel to . The following permissions are available in this module:
Create CTIX Integration: Allows users to configure the integration in Administration > Integrations > Cyware Integrations > Intel Exchange (CTIX).
Update CTIX Integration: Allows users to edit the credentials in Intel Exchange (CTIX).
View CTIX Integration: Allows users to view the credentials in Intel Exchange (CTIX).
For more information about configuring integration, see Configure Intel Exchange (CTIX) Integration.
Custom Dashboard
You can create and maintain custom dashboards to visually present vital performance metrics based on real-time information. The following permissions are available in this module:
View Custom Dashboard: Allows users to view custom dashboards in Dashboard.
Create Custom Dashboard: Allows users to create a custom dashboard using the available metrics.
Update Custom Dashboard: Allows users to edit an existing dashboard.
For more information about dashboards, see Dashboards.
Custom Email Template
The email management feature contains built-in and customizable email templates for sending email notifications. The following permissions are available in this module:
View Custom Email Template: Allows users to view the available email templates in Administration > Settings > Other Settings > Email Management.
Update Custom Email Template: Allows users to make edits to the existing custom email templates in Email Management.
For more information about customizing email templates, see Email Management.
Custom Fields
Admins can create various types of custom fields such as text boxes, multi-select, single-select, date, and Boolean fields and map them to alert categories to add additional information that may not be included in the standard form. The following permissions are available in this module:
Create Custom Fields: Allows users to create custom fields in Administration > Settings > Field Management > Custom Fields.
Update Custom Fields: Allows users to edit the details of custom fields in Field Management settings.
View Custom Fields: Allows users to view the available custom fields in Custom Fields.
For more information about custom fields, see Custom Fields.
CybelAngel
You can integrate with CybelAngel to enable members to access real-time data as part of incident reports, credential watchlisting, and domain watchlisting. The following permissions are available in this module:
View CybelAngel: Allows users to view the credentials in Administration > Integrations > Recon Darknet Detection > CybelAngel.
Update CybelAngel: Allows users to edit the CybelAngel credentials in CybelAngel.
For more information about configuring CybelAngel integration, see Configure CybelAngel.
Doc Library
The Doc Library is a secure place to store text, image, and video files, and analysts and members can store important files and download them. The following permissions are available in this module:
Update Doc Library: Allows users to edit the files in Main Menu > Doc Library.
Create Doc Library: Allows users to create folders and upload files in the Doc Library.
Delete Doc Library: Allows users to delete files and folders from the Doc Library.
View Doc Library: Allows users to view the files and folders available in the Doc Library.
For more information about Doc Library, see Doc Library.
Email Box
You can integrate and map email accounts in the Analyst Portal. The emails sent to the configured email account are received in Email Submissions. The following permissions are available in this module:
View Email Submissions: Allows users to view all the available email submissions in Main Menu > Email Submissions.
Create Alert from Email: Allows users to create an alert from email submission.
Update Email Submissions: Allows users to update email submissions in Email Submissions.
For more information on managing email submissions, see Manage Email Submissions.
Email Submission Settings
You can integrate and map email accounts in the Analyst Portal to receive email submissions. The following permissions are available in this module:
Update Email Accounts: Allows users to update an existing email account configuration in Administration > Settings > Other Settings > Email Accounts.
Create Email Accounts: Allows users to configure a new email account in Email Accounts.
View Email Accounts: Allows users to view the available email account configurations in Email Accounts.
For more information about email accounts, see Email Accounts.
Entity Sharing
The Sharing Community feature automates alert sharing between two organizations via secure APIs, enabling collaboration and threat knowledge sharing. The following permissions are available in this module:
Create Entity Sharing: Allows users to add new sharing communities using API credentials in Administration > Community Sharing.
Update Entity Sharing: Allows users to activate or deactivate sharing communities and revoke API credentials.
View Entity Sharing: Allows users to view the details of sharing communities.
For more information about sharing community, see Manage Sharing Communities.
Events
You can schedule events through alerts and share invites directly with members or manage event requests from members. The following permissions are available in this module:
View Event Attendance: Allows users to view the responses of members for event attendance on event alerts in Alert Details > Event Attendance of event alerts.
Update Event: Allows users to reject or approve event requests in Main Menu > Event Submissions.
Create Event: Allows users to create alerts from event submissions.
View Event: Allows users to view event requests of members.
For more information on event submissions, see Manage Event Submissions.
Failed Login Details
You can view and audit all the failed login attempts of Member Portal and Analyst Portal users. The following permission is available in this module:
View Failed Login Details: Allows users to view all the failed login attempts in Administration > User Management > Failed Login Details.
For more information about failed login details, see View Failed Login Details.
File Types
You can manage the list of file formats that can be uploaded by members or analysts. The following permissions are available in this module:
View File Extensions: Allows users to view the available file types in Administration > Settings > Other Settings > File Types.
Update File Extensions: Allows users to enable or disable supported file types for the Analyst Portal or the Member Portal.
For more information on file types, see File Types.
Flexera
You can integrate with Flexera to poll for information from Flexera and post them as alerts to members. The following permissions are available in this module:
Update Flexera: Allows users to edit Flexera integration in Administration > Integrations > Third Party Integrations > Flexera.
View Flexera: Allows users to view the credentials of Flexera integration.
Create Flexera: Allows users to configure the Flexera integration.
For more information about configuring Flexera integration, see Configure Flexera Integration.
Google Recaptcha Configuration
You can register with Google reCAPTCHA service to detect abusive traffic, thereby mitigating the possibility of bots signing in to the application without any user interaction. The following permissions are available in this module:
Update Google Recaptcha Configuration: Allows users to edit the integration credentials in Administration > Integrations > Authentication Method.
View Google Recaptcha Configuration: Allows users to view the configuration details.
For more information on configuring Google reCAPTCHA, see Configure Google reCAPTCHA.
Indicators Allowed
You can classify indicators as safe by adding them to Indicators Allowed. These indicators will be parsed as allowed indicators while creating alerts. The following permissions are available in this module:
Update Indicators Allowed: Allows users to update the status of existing indicators in Main Menu > Indicators Allowed.
Create Indicators Allowed: Allows users to add indicators to the allowed list in Indicators Allowed.
View Indicators Allowed: Allows users to view the list of indicators added to the allowed list in Indicators Allowed.
For more information about allowed indicators, see Allowed Indicators.
Intel 471
You can integrate with Intel 471 to poll for information from Intel 471 and post them as alerts. The following permissions are available in this module:
Update Intel 471: Allows users to edit the credentials of the existing configuration in Administration > Integrations > Third Party Integrations > Intel 471.
Create Intel 471: Allows users to configure Intel 471 integration in Intel 471.
View Intel 471: Allows users to view the integration details in Third Party Integrations.
For more information on configuring Intel 471 integration, see Configure Intel 471 Integration.
Intelligence Requirements
You can review and publish an IR submitted by members as well as create IRs in the Analyst Portal. The following permission is available in this module:
View/Create Intelligence Requirements: Allows users to view or create IRs in Intelligence Requirements in the Analyst Portal.
For more information about Intelligence Requirements, see Intelligence Requirements.
Intel Submissions
A member can submit threat intel reports from the Member Portal. You can further share these reports as alerts to all the other members of the organization. The following permissions are available in this module:
Update Intel Submissions: Allows users to create an alert from the intels submitted by members in Intel Submissions.
View Intel Submissions: Allows users to view all the intels submitted by members.
View Submitter Name in Anonymous Intel Submissions: Allows users to view the details of the intel submitter regardless of the submitter's attribution choice.
For more information about intel submissions, see Manage Intel Submissions.
Knowledge Base
You can use Knowledge Base to create and store documents such as policies, guidelines, handbooks, or standard operating procedures that are relevant to your organization. The following permissions are available in this module:
Update Knowledge Base: Allows users to edit the documents in Main Menu > Knowledge Base.
Create Knowledge Base: Allows users to create documents in the Knowledge Base.
View Knowledge Base: Allows users to view the documents in the Knowledge Base.
For more information about Knowledge Base, see Knowledge Base.
Knowledge Base Category
You can create Knowledge Base categories to group associated KB articles. The following permissions are available in this module:
View Knowledge Base Category: Allows users to view the categories created to associate with Knowledge Base articles in Administration > Settings > Other Settings > Knowledge Base.
For more information on creating Knowledge Base categories, see Knowledge Base Settings.
Location Selection
You can create and manage the required number of locations in the Analyst Portal to send alerts specific to a location or region to members. The following permissions are available in this section:
Create Location: Allows users to add new member locations in Administration > Settings > Member Settings > Location.
Update Location: Allows users to edit the details such as country, state, city, and site address of existing locations in Member Location.
View Location: Allows users to view all the available locations.
For more information about locations, see Member Location.
MCL
Member Contribution Level (MCL) is a factored scoring mechanism that allows you to generate confidence statements for the intel shared by members automatically. The following permissions are available in this section:
View MCL: Allows users to view the settings for MCL in Administration > Settings > MCL Settings.
Update MCL: Allows users to edit the values for Information Accuracy and Source Reliability in Member Contribution Level and the Source Reliability Weight of organizations in Organization Configuration.
For more information about MCL, see Configure MCL Settings.
Member
You can add members and manage how they interact with the Member Portal and view sign-ins by members. The following permissions are available in this module:
Update Email Member: Allows users to update the email address of a member in Administration > User Management > Member.
Create Member: Allows users to add members to the Member Portal.
Update Member: Allows users to edit a member's details.
View Member: Allows the users to view the details of existing members.
For more information about onboarding members, see Onboard Members.
Member Portal Login Configuration
You can directly configure the preferred authentication method for the users of the Member Portal. The following permissions are available in this module:
View Member Portal Login Configuration: Allows users to view the authentication methods available for members in Administration > Integrations > Authentication Method > Member Portal.
Update Member Portal Login Configuration: Allows users to edit the configurations of the available authentication methods.
For more information about the Member Portal authentication methods, see Manage Member Portal Authentication.
Menu
You can customize the menu and submenu items on the sidebar navigation in the Member Portal. The following permissions are available in this module:
View Menu: Allows users to view the settings to customize the menu items of Member Portal in Administration > Settings > Other Settings > Menu.
Update Menu: Allows users to update the name of the menu items and the order of the submenu items.
For more information on menu settings, see Menu.
Microsoft Teams
You can integrate with Microsoft Teams to publish alerts as messages in the respective channels. The following permissions are available to use this functionality:
View Microsoft Teams: Allows users to view the integration and the associated details in Administration > Integrations > Third Party Integrations > Microsoft Teams.
Create Microsoft Teams: Allows users to configure a new channel in Microsoft Teams.
Update Microsoft Teams: Allows users to edit the configurations of a channel such as the channel name, webhook URL, status, and more.
Delete Microsoft Teams: Allows users to delete a channel in Microsoft Teams.
For more information on configuring Microsoft Teams, see Configure Microsoft Teams in CSAP.
MISP
You can integrate with MISP to post threat intel information to the MISP application. The following permissions are available in this module:
View MISP: Allows users to view the integration and the configured credential details in Administration > Integrations > Third Party Integrations > MISP.
Create MISP: Allows users to add the credentials to configure the integration.
Update MISP: Allows users to update the credentials of the existing configuration.
For more information on configuring MISP integration, see Configure MISP Integration.
Organization
You can classify members according to organizations. Organizations can also be further grouped into organization types and organization levels. This allows users to share alerts quickly with members from selected organizations and organization types. The following permissions are available in this module:
Update Organization: Allows users to edit the details of existing organizations and organization types in Administration > Settings > Member Settings.
View Organization: Allows users to view the available organizations, organization types, and organization levels.
Create Organization: Allows users to create new organizations, organization types, and organization levels.
For more information about organizations, see Member Organization.
Partner Feed
Partner advisories are threat intelligence providers who share real-time cybersecurity advisories to members of . The following permissions are available in this module:
Update Partner Feed: Allows users to edit the publishing preferences in Administration > Advisory Management > Partner Advisory.
View Partner Feed: Allows users to view the organizations that are partnered with Cyware in Administration > Advisory Management > Partner Advisory.
For more information about Partner Advisory, see Manage Network Advisories.
Privileged User
Users who have access to the Analyst Portal are designated as privileged users. The following permissions are available in this module:
Update Privileged User: Allows users to update the details of privileged users in Administration > User Management > Privileged User.
Create Privileged User: Allows users to add privileged users to the Analyst Portal.
View Privileged User: Allows users to view the details of existing privileged users.
Update Email Privileged User: Allows users to update the email address of existing privileged users.
For more information about onboarding privileged users, see Onboard Privileged Users.
Readers Report
Analysts can generate detailed reports on alerts viewed by members. These reports include crucial alert information such as alert ID, title, publisher details, publication date, and more. The following permissions are available in this module:
Create Readers Report: Allows users to create custom reports based on a selected date range in Reports > Detailed Alert - Read Status Report.
View Readers Report: Allows users to view the list of users who created readers' reports.
For more information, see Detailed Alert - Read Status Report section in Manage Reports.
Recipient Groups
A recipient group is a group of members who receive information in the form of alerts, Doc Library media, Knowledge Base articles, and others, based on their grouping. The following permissions are available to manage this module:
Create Recipient Groups: Allows users to create public and invite-only recipient groups for members in Administration > Settings > Core Settings > Recipient Groups.
Update Recipient Groups: Allows users to edit the details of existing recipient groups.
View Recipient Groups: Allows users to view the recipient groups available in .
For more information about recipient groups, see Recipient Group .
Region
A region refers to a specific geographic area or grouping of countries that share certain characteristics related to cybersecurity. You can use regions to publish alerts specifically to a region. The following permissions are available in this module:
View Region: Allows users to view the available regions in Administration > Settings > Member Settings > Region.
Create Region: Allows users to add new regions.
Update Region: Allows users to update the details and status of existing regions.
For more information about regions, see Create Regions.
Reports
Analysts can use reports to view data related to different modules in the Analyst Portal such as status and breakdown of alerts, device distribution, incident stats, intel submissions, surveys, and personalized keywords in graphical formats. The following permissions are available in this module:
View Graphs: Allows users to visualize data and manage reports in Reports.
For more information about reports, see Reports.
Request For Information
Members can submit Requests for Information (RFIs), facilitating the exchange of insights for optimizing their organization's security posture. As an analyst, you can review these RFIs and publish them as alerts to a larger network. The following permissions are available in this module:
Update Request for Information: Allows users to update the status of an RFI in Main Menu > Request for Info.
View Request for Information: Allows users to view member submissions in Request for Info.
For more information about RFI, see Manage Request for Information.
Request Management
Members can submit requests to join an invite-only recipient group from the Member Portal. Analysts and member admins can approve or reject members' requests to join the invite-only recipient groups. The following permissions are available in this module:
View Requests: Allows users to view a list of requests submitted by members in Main Menu > Request Management.
Accept/Reject Requests: Allows users to accept or reject members' requests to join a group.
For more information about request management, see Request Management.
RSS Feed
RSS feeds are open-source feeds from trusted sources, such as government agencies, security blogs, organizations within the cybersecurity industry, and similar. Members can view data from different RSS feeds to which they subscribe. The following permissions are available in this module:
Update RSS Feed: Allows users to update the status of the advisory sources in Administration > Advisory Management > RSS Advisory.
View RSS Feed: Allows users to view the open-source advisories in RSS Advisory.
Create RSS Feed: Allows users to add new RSS feeds.
For more information about RSS feeds, see Add Custom RSS Advisory Sources.
SMS Configuration
You can integrate with SMS gateway services for sharing OTP through SMS. SMS integrations can be used with authentication methods such as LDAP, SAML 2.0, etc., for two-factor authentication. The following permissions are available in this module:
View SMS Configuration: Allows users to view the configuration in Administration > Integrations > Authentication Method > SMS Configuration.
Update SMS Configuration: Allows users to edit configuration details.
For more information about SMS configuration, see Configure SMS Services.
SMTP Configuration
You can configure the email server and enable the application to send emails to the users with invite links, password reset links, notifications, reports, One-Time Passwords (OTPs), and more. The following permissions are available in this module:
View SMTP Configuration: Allows users to view the configuration in Administration > Integrations > Authentication Method > SMTP Configuration.
Update SMTP Configuration: Allows users to edit configuration details.
For more information about SMTP configuration, see Configure SMTP Server.
Special Handling
Alerts with special handling flags help users share priority alerts with members by allowing them to stand out from other alerts. The following permissions are available in this module:
Create Special Handling: Allows users to create new special handling records in Administration > Settings > Alert Settings > Special Handlings.
View Special Handling: Allows users to view the special handling records.
Update Special Handling: Allows users to edit the details and status of existing special handling records.
For more information about special handling, see Special Handlings.
Survey
You can use surveys to create, send, and collect responses from members about their opinions, behavior, or knowledge of threats and incidents. The following permissions are available in this module:
Can View All Survey: Allows users to view all the surveys submitted by their organization in Main Menu > Survey.
Can Publish Survey: Allows users to publish surveys.
Can Expire Published Survey: Allows users to expire published surveys.
Can Expire Unpublished Survey: Allows users to expire surveys that are saved as drafts.
Can Submit Survey: Allows users to submit surveys to publishers.
Can Schedule Survey: Allows users to schedule the publish time of the survey.
Can View Survey: Allows users to view the list of surveys.
Can Draft Survey: Allows users to save surveys as drafts.
Can Send Survey Draft Notification: Allows users to send push notifications and survey email notifications to the respondents while publishing alerts.
For more information about surveys, see Gather Opinions with Surveys.
Survey Request
Members can request a survey from analysts to include information on threats, vulnerabilities, malware, and more. You can review and publish submitted surveys. The following permissions are available in this module:
Update Survey Request: Allows users to accept or reject survey requests in Main Menu > Survey > Survey Requests.
View Survey Request: Allows users to view the surveys requested by members.
For information about managing survey requests, see Publish a Requested Survey.
Tag Library
Tags are text labels that you can assign to Collaborate components such as alerts, intel reports, Doc Library files, and more. contains a distinct tag library that allows you to save and access various types of tags. The following permission is available in this module:
View Tag Library: Allows users to view various types of tags in Main Menu > Tag Library.
For more information about Tag Library, see Tag Library.
Terms of Use
lets you manage a user agreement displayed on the Member Portal login page. As an analyst, you can customize it to match your organization's policies. The following permissions are available in this module:
View Terms of Use: Allows users to view the terms of use content in Administration > Settings > Other Settings > Terms of Use.
Update Terms of Use: Allows users to edit the content in Terms of Use.
For more information about managing terms of use, see Terms of Use.
Theme Settings
You can use the Theme Settings to customize the logo and theme for the Member Portal web and mobile applications. The following permissions are available in this module:
View Theme Settings: Allows users to view the settings to customize logo and theme in Administration > Settings > Theme Settings.
Update Theme Settings: Allows users to upload images for the logo and edit the themes in Member Portal web and mobile applications.
For more information about theme settings, see Theme Settings.
Threat Assessment
You can use threat assessments to get a pulse of how many members were impacted by a vulnerability, malware, or threat activity. The following permissions are available in this module:
Create Threat Assessment: Allows users to create new threat assessment templates in Administration > Settings > Alert Settings > Threat Assessment.
View Threat Assessment: Allows users to view the threat assessment settings in Administration > Settings > Alert Settings > Threat Assessment.
Update Threat Assessment: Allows users to edit the details and status of existing threat assessment templates.
For more information about threat assessments, see Threat Assessment.
Threat Assessment SLA
SLAs allow analysts to send automatic reminders at specified time intervals to members to respond to threat assessments. The following permissions are available in this module:
View Threat Assessment SLA: Allows users to view the Threat Assessment SLA settings in Administration > Settings > Alert Settings > Threat Assessment > SLA.
Create Threat Assessment SLA: Allows users to create new threat assessment SLAs.
Update Threat Assessment SLA: Allows users to edit the existing details and status of threat assessment SLAs.
For more information about threat assessment SLA, see Threat Assessment SLA.
Threat Defender Library
Threat Defender Library (TDL) is a repository that allows security analysts to store and share content with analysts and members for threat detection, analysis, and response. The following permissions are available in this module:
View Content: Allows users to view the TDL content in Threat Defender Library.
Create Content: Allows users to create TDL content.
Expire Published Content: Allows users to expire TDL content.
For more information about TDL, see Threat Defender Library.
Threat Intel Attributes
Use Intel Sharing Handling to create organization charts representing partners and entities for threat intel sharing. Members can select or unselect partners and entities while reporting a threat intel. The following permissions are available in this module:
Create Threat Intel Fields: Allows users to add partners and their entities in Administration > Settings > Report Settings > Intel Sharing Handling.
Update Threat Intel Fields: Allows users to update the details of existing partners.
View Threat Intel Fields: Allows users to view the available partners and their respective entities in Intel Sharing Handling.
Threat Level
Analysts can configure and use threat levels to display any important information such as current malicious cyber activity, potential or actual damage caused by the threats, and so on from the Analyst Portal. The following permissions are available in this module:
Update Threat Level: Allows users to edit the details of existing threat levels in Administration > Settings > Other Settings > Threat Levels.
View Threat Level: Allows users to view the available threat level configurations in Threat Levels.
Create Threat Level: Allows users to add new threat levels.
For more information about threat levels, see Threat Levels.
Threat Stream
You can integrate with Threat Stream to post threat intel information to the Threat Stream application. The following permissions are available in this module:
Update Threat Stream: Allows users to update the credentials of the existing configuration in Administration > Integrations > Third Party Integrations.
View Threat Stream: Allows users to view the configuration.
For more information about configuring Threat Stream integration, see Configure Threat Stream Integration.
TLP
The Traffic Light Protocol (TLP) is a set of designations that ensure sensitive information is correctly shared with the appropriate recipients. The following permissions are available in this module:
Update TLP: Allows users to edit the summary of different TLP levels in Administration > Settings > Other Settings > TLP.
View TLP: Allows users to view the different TLP levels.
For more information about TLP, see Traffic Light Protocol (TLP).
TLP Control
Analysts can set preferences to automatically show and hide details such as summary, image, optional fields, and attachments in the alert email, or RFI email, based on the selected TLP color. The following permissions are available in this module:
View TLP Control: Allows users to view the TLP preferences in Administration > Settings > Alert Settings > TLP Controls.
Update TLP Control: Allows users to edit the preferences to automatically show and hide details in the alert or RFI email.
For more information about TLP control, see TLP Controls.
Trusted Sharing Community
The Sharing Community feature automates alert sharing between two organizations through secure APIs, enabling collaboration and threat knowledge sharing. The following permissions are available in this module:
Create Sharing Community: Allows users to create rules to automate alert sharing and receiving in Administration > Community Sharing > Rules.
View Sharing Community: Allows users to view the details of configured rules.
Update Sharing Community: Allows users to update the details of existing rules.
For more information about rules, see Rules.
Onboard Privileged Users
Users who have access to the Analyst Portal are designated as privileged users. Admins and root admins can assign unique roles and permissions to every privileged user who has access to the Analyst Portal. This allows administrators to manage a large number of users at the same time, and have granular control of a role or set of permissions for an individual user.
The Privileged User section enables administrators to invite, modify, remove, and manage all users in the Analyst Portal. You can allocate, withdraw, and modify roles and permissions granted to users as required.
Add Privileged Users
You can add new privileged users (analysts), assign roles and permissions, and assign categories. Additionally, you can also create a privileged user as a member.
Just-In-Time User Provisioning
Analysts can onboard the Analyst Portal automatically through Just-In-Time (JIT) user provisioning, which eliminates the manual creation of user accounts. To automate authentication of users, analysts can configure single-sign-on (SSO) configuration using Security Assertion Markup Language (SAML). This process streamlines access by automatically creating and authenticating users into the Analyst Portal. To configure SAML, see Manage Analyst Portal Authentication.
Before you Start
Ensure that you have the View, Create, and Update permissions to the Privileged User module.
Steps
To add privileged users, follow these steps:
Go to Administration > User Management.
Select Privileged User, and click Add. To enter the required details in the User Details tab, use the following information:
Email: Enter the user's email. The email address is used to sign in to the Analyst Portal, receive email alerts and one-time passwords (OTP) for authentication.
Full Name: Enter the full name of the user within 200 characters. For example, John Doe.
(Optional) Phone Number: Enter the user's phone number. Additionally, you can also add the area code and extension format. For example, (123) 456-7890, extension 987.
Role: Select a role for the user. You can choose from the preconfigured system roles. Alternatively, you can assign a custom role to the user. For more information about custom roles, see Role-Based Access Control.
Category(s): Assign categories for the user to use in the Required Details section of the alert creation form. Users can create and save alerts as drafts or publish alerts only with the assigned categories.
Note
By default, admins and root admins have access to all categories. If you select one of these roles for the user, the category field is not displayed.
Analyst Groups: Assign the user to one or more analyst groups to streamline collaboration and manage access to alerts within the group’s assigned categories. By default, admins and root admins have access to all analyst groups.
Note
This field appears only when the Analyst Groups feature is enabled in Configurations. For more information, see Configure Analyst Groups.
(Optional) Active: Ensure that this option is selected to activate the user. Inactive users cannot sign into the application. By default, the user is activated.
(Optional) Allow Publishing to All Users: Select Allow Publishing to All Users to allow the user to publish alerts to the All Users recipient group in the Member Portal.
(Optional) Send Welcome Email: Select Send Welcome Email to send an invitation email to the user you are adding to . The welcome email contains a link to sign into the application.
Turn on the Also create this user as Member? toggle to add the user as a member and provide access to the Member Portal. This creates a separate member role for the user and an invitation email is sent to the user's email account, prompting them to sign in to the Member Portal and complete their account setup. By selecting this option, the Additional Details and Contact Details tabs are available in the Add Privileged User creation form. To add member-specific details, see Add Member Details.
The Send Welcome Email field is visible only when Also create this user as Member? is enabled.
Note
When editing the privileged user details, you cannot edit the selection for Also create this user as Member? For example, if you do not enable this option when adding a privileged user, you will need to add the same user as a member separately.
Click Add.
An email invite is sent to the user, prompting them to sign in to and complete their account setup. The credential configuration must be completed within 72 hours, after which the link expires.
Note
Based on the authentication method configured by the administrator for your organization, the sign-in methods may vary.
Add Member Details
You can also create a privileged user as a member and provide access to the 's Member Portal.
Steps
To add member details, follow these steps:
Go to Administration > User Management.
Select Privileged User, and click Add. Enter the required details in the User Details tab.
After entering the user details, turn on the Also create this user as Member? toggle to add the user as a member and provide access to the Member Portal. This creates a separate member role for the user and an invitation email is sent to the user's email account, prompting them to sign in to the Member Portal and complete their account setup. By selecting this option, the Additional Details and Contact Details tabs become available in the Add Privileged User creation form.
To enter the member details, use the following information:
Organization Type / Sector: Select the organization type or sector to which the member belongs. For example, Finance.
Organization / Entity: Select the organization or entity to which the member belongs. For example, Example Bank.
(Optional) Alert Delivery Options: Use Alert Delivery Options to specify the type of alert notifications you want the user to receive. Available options include Member Portal (Web application), Mobile, and Email Notification. By default, Email Notification is selected and cannot be cleared. If you do not select any other option for alert delivery, the user is created as an email-only user in .
Member Role: Use Member Role to associate one or more roles with the user. Available roles are Member, Intel Approver, Member Admin, Sector Approver, and Sector Admin. By default, Member is selected. Every user added to the Member Portal are assigned the role of member. Along with this role, additional member roles can be assigned to a member. For more information about member roles, see Member User Roles.
(Optional) Email Subscription: Use Email Subscription to control email notifications sent to the user. Important email notifications such as invitation emails, OTP emails, and password change updates cannot be unsubscribed. However, you can choose to subscribe or unsubscribe from email notifications from features such as Actions, Alerts, Intel, Collaboration, RFI, and Survey.
(Optional) Active: Select Active to activate the user. Inactive users cannot sign into . By default, the user is active.
(Optional) Allow Publishing to All Users: Select Allow Publishing to All Users to allow the user to publish alerts to the All Users recipient group in the Member Portal.
(Optional) Send Welcome Email: Select Send Welcome Email to send an invitation email to the user you are adding to . The welcome email contains a link to log in to the application.
To add additional details such as location and recipient groups for the user, see Add Additional Details
To add contact details and crisis notification details for the user, see Add Contact Details
Click Add.
Two separate email invitations are sent to the user for Analyst Portal and Member Portal. The invitation link expires within 72 hours.
Note
Based on the authentication method configured by the administrator for your organization, the sign-in methods may vary.
Add Additional Details
You can include additional details such as location and recipient groups for the user.
Steps
To add additional details, follow these steps:
Go to Administration > User Management.
Select Privileged Users and click Add. Enter the required details in the User Details tab.
After entering the details, turn on the Also create this user as Member? toggle to add the user as a member and provide access to the Member Portal. This creates a separate member role for the user and an invitation email is sent to the user's email account, prompting them to sign in to the Member Portal and complete their account setup. By selecting this option, the Additional Details and Contact Details tabs become available in the Add Privileged User creation form.
Select Additional Details to add the location and recipient groups for the member. To add these details, use the following information:
Specify the location where the member is located. The fields include country, state, city, and site. For example, the United States of America.
Note
The fields, city, and site depend on the state selected. Analysts can configure this in the Member Settings. For more information, see .
Specify the recipient groups to which the member belongs. You can assign public groups, invite only groups, and system groups. You can select one or more recipient groups for the member.
Specify the additional information in Other Information. Analysts can configure these custom fields in the Field Management settings.
Click Add.
Add Contact Details
You can include a physical mailing address and phone number details for crisis notification for the member.
Steps
To add contact details, follow these steps:
Go to Administration > User Management.
Select Privileged Users and click Add. Enter the required details in the User Details tab.
After entering the details, turn on the Also create this user as Member? toggle to add the user as a member and provide access to the Member Portal. This creates a separate member role for the user and an invitation email is sent to the user's email account, prompting them to sign in to the Member Portal and complete their account setup. By selecting this option, the Recipient Groups and Contact Details tabs become available in the Add Privileged User creation form.
Select Contact Details to add the physical location and crisis notification details for the member. To add these details, use the following information:
Enter a physical mailing address for the Member. The fields include street, city, state, zip code, and country.
Enter the country code, phone number, and the extension at which a member can be reached in a crisis. You can enter up to three phone numbers. You can also configure the following additional preferences.
Click Set as Primary to specify which phone number is the primary contact number for the user. You can only specify one number as the primary contact number.
Select Receive SMS next to each contact number to specify if a user receives a text message (SMS) in the event of a crisis. By default, this option is not selected.
Click Add.
Entry Fields Reference for Privileged Users
The following reference topic contains information for entry fields and interactive options when adding or updating a privileged user in CSAP. Fields that are marked with an asterisk (*) are mandatory for adding a privileged user.
User Details
The following entry fields are available, by default, in the User Details tab:
Email*: Enter the email for the user account. This is the only email with which the user is able to sign in to CSAP. Contact your CSAP administrator or Cyware Support if you see an error message stating that your email domain is not supported for CSAP Analyst Portal accounts.
Full Name*: Enter the full name of the user.
Code: Enter the country code for the phone number associated with the user.
Phone Number: Enter the phone number of the user.
Role*: Click the drop-down menu and select the appropriate active role for the user that you are inviting. CSAP Analyst Portal user permissions are based on the role to which the user is assigned. However, permissions can be modified by users with a Root Admin role.
Category(s)*: Click the drop-down menu and select a category or categories to which a user can publish alerts, based on their specified role.
Also create this user as Member? :Toggle on this to add the user you are inviting to the CSAP Member Portal. This creates a separate Member role for the user and an invitation email is sent to the user email account, prompting them to sign in to CSAP Member Portal and complete their account setup. By selecting this option, the Recipient Groups and Contact Details tabs become available in the Add Privileged User window.
Active: Select or clear this check box to indicate the active or inactive status of the user. By default, this check box is selected.
Allow Publishing to All Users: Select this check box to allow the user to publish alerts to all users.
The following fields are contextual, and are only available if you select the Also create this user as Member? check box.
Organization Type/Sector*: Enter the organization type or sector to which the Member belongs.
Organization/Entity*: Enter the organization or entity to which the Member belongs.
Alert Delivery Options: Select the check boxes in this section to specify the types of alert notifications you want the user to receive. Available options include Member Portal, Mobile, and Email Notification. By default, Email Notification is selected.
Member Role: Select the check box or check boxes to associate one or more roles with the Member. Available options include Member, Intel Approver, Member Admin, Sector Approver, and Sector Admin. For more information, see Member User Roles.
Recipient Groups
The following entry fields are available in the Recipient Groups tab only if you select the Also create this user as Member? check box in the User Details tab.
Location: Click the drop-down menu to specify the country where the Member is located.
User Recipient Group(s): Select the entry fields in this section to specify the Recipient Groups to which the Member belongs. Available options include Invite Only Group(s) and System Group(s). You can select one or more Recipient Groups for one or both fields.
Contact Details
The following entry fields are available in the Contact Details tab only if you select the Also create this user as Member? check box in the User Details tab.
Mailing Address: Enter a physical mailing address for the Member. Entry fields include Street, City, State, Zip code, and Country.
Phone Number (For Crisis Notification): Enter the country code and phone number at which a Member can be reached in a crisis. You can enter up to three phone numbers. The following additional options are available:
Set as Primary: Click this radio button to specify which phone number is the primary contact number for the Member. You can only specify one number.
Receive SMS: Select or clear this check box next to each number to specify if a contact number for a Member receives a text message (SMS) in the event of a crisis. By default, this check box is cleared.
Manage Privileged Users
You can manage existing privileged users and perform other supporting actions on the privileged user listing page.
Modify Privileged User Details
You can modify existing privileged user details.
Before you Start
Ensure that you have the View and Create/Update permissions to the Privileged User module.
Ensure that you have the Update Email Privileged User permission to the Privileged User module to modify the email address of a privileged user.
Steps
To modify privileged user details, follow these steps:
Go to Administration > User Management > Privileged Users.
Hover over the user you want to modify and click Edit.
Modify the details of the user as required. Clearing the Active checkbox sends an email to the user, informing them that their account has been deactivated. For more information on modifying the details, see Add Privileged Users.
Note
You can also modify the email address of the user if you have the Update Email Privileged User permission to the Privileged User module.
Click Update.
Change Lock Status of Privileged User
If detects multiple invalid login attempts for a user, the user is locked out of the application. A lockout action means that the user is restricted from accessing the application. Once an account is locked, the user receives an email notifying them of the lockout, as well as providing them a support email address to which they can send an email request to unlock the account.
To unlock a locked-out user, administrators can click on the lock icon for the respective user.
Supported Actions for Privileged Users
You can perform the following actions on the privileged user listing page:
To refresh the Privileged User page, click Refresh.
Hover over a user, click the ellipsis, and use the following information:
To view specific details of the privileged user, click View.
To edit privileged user details, click Edit.
To download a list of all privileged users in .csv file format, click Export CSV. You will receive the link to the exported file in your email from where you can download it. The link can only be used once and expires in 72 hours from the time you receive it.
Search and Filter Privileged Users
To search for information related to specific privileged users, type your query into the Search or filter results… field. By default, it is enabled. If you do not see the field, click Open Filters to access it. You can filter privileged users based on the following parameters:
Status: Option includes Active or Inactive.
Invite Status: Option includes Invited or Accepted.
Locked/Unlocked Users: Option includes Locked or Unlocked.
Role: Option includes all the roles that you have configured for . For more information, see Role-Based Access Control.
Audit User Logs
Administrators can view all the recent actions performed by Analyst Portal users.
Before you Start
Ensure that you have View permissions for the Audit Log module.
Steps
To view all the recent user actions, follow these steps:
Go to Administration > User Management > Audit Logs.
You can view the following details on the audit logs listing page.
Name: The name assigned to the user, with the user role included in parentheses ( ).
Email: The email address of the user.
Action: The action that the user has taken.
Activity: The activity associated with the action. For example, if a user signs in to , the activity field displays the user's email address, IP address, and geolocation.
Date & Time: The date and time of the user log entry.
You can also perform the following actions on the audit logs listing page:
Click Filter to filter the user log information by actions, component filter, date range, and more.
To download a list of all user logs in .csv format, click Export CSV. You will receive the link to the exported file in your email from where you can download it. The link can only be used once and expires in 72 hours from the time you receive it.
Analyst Groups
Notice
This feature is available in v3.8.8.0 onwards.
Analyst Groups let you organize privileged users in the Analyst Portal into distinct groups for streamlined collaboration and task assignment. Admins and root admins can group users based on function, expertise, or operational needs to ensure efficient handling of member submissions and platform activities.
Note
Root Admins and Admins are not part of any Analyst Group but automatically have access to all Analyst Groups and their associated data.
The Analyst Groups section enables you to create, edit, and manage analyst groups with ease. You can assign privileged users to groups, update group details, and control access to specific categories. To utilize this feature, you must enable it from Configurations. For more information, see Configure Analyst Groups.
What are the use cases of Analyst Groups?
Analyst Groups help you organize analysts based on their responsibilities, areas of focus, or access needs. This allows for more structured collaboration and easier management of access and permissions.
You can use Analyst Groups to streamline how different groups work within the platform, whether they are focused on threat detection, response, or intel analysis.
You can use Analyst Groups to review and manage member submissions, ensuring the right groups evaluate RFIs or intel submissions relevant to their focus areas.
User Access in Analyst Groups
Users who belong to an analyst group can perform the following actions based on the categories assigned to that group:
View and edit alerts within those categories.
Edit alerts that are in the Draft, Submitted, or Submitted to Publisher states, as long as they belong to the same group.
Create Analyst Group
Notice
This feature is available in v3.8.8.0 onwards.
Analyst Groups help you organize privileged users in the Analyst Portal for focused collaboration and efficient task management. You can create a group at any time and assign users based on their responsibilities or areas of focus.
Before you Start
Ensure that you have the View, Create, and Update permissions for the Analyst Groups feature.
Ensure that you have enabled the feature from Configurations. For more information, see Configure Analyst Groups.
Steps
To create an analyst group, follow these steps:
Go to Administration > User Management > Analyst Groups.
Click Create and use the following information:
Group Name: Enter a unique name for the analyst group. For example, Malware Investigation Unit
Description: Enter a brief description about the analyst group. For example, Focuses on malware-related alerts across all regions.
Categories: Select one or more categories to associate with the group. Users in this group will access data in the Analyst Portal based on these categories. For example, Malware, Malware Advisories
Note
By default, the Request for Information category is automatically assigned to all analyst groups.
Users: Select one or more user accounts to include in the group from the dropdown.
Turn on the Active toggle to activate the analyst group.
Click Create.
The analyst group is now created and can be used to assign specific tasks, manage access permissions, and allow users in the group to access relevant data in the Analyst Portal.
Manage Analyst Groups
Notice
This feature is available in v3.8.8.0 onwards.
You can manage existing Analyst Groups from the listing page, where you can view group details, make updates to users or categories, and take actions like editing or deactivating a group.
View Analyst Groups
You can view existing analyst groups and perform related actions from the Analyst Groups listing page. Ensure that you have the View permission for the Analyst Group feature.
Use the following information to view analyst groups:
The Analyst Groups list displays the following information:
Name: The unique name of the analyst group.
Active/Inactive Users: The number of active and inactive users within the analyst group.
Updated On: The date when the analyst group was last updated.
Associated Categories: The categories linked to the group, defining the type of data the group has access to.
Status: Indicates whether the group is active or inactive.
To search for information related to specific analyst group, type your query into the search bar. By default, it is enabled. If you do not see the field, click Open Filters to access it. You can filter analyst groups based on the following parameters:
Status: Filter groups based on whether they are Active or Inactive.
Category: Filter groups by one or more associated categories.
Name: Filter by the group's name, using full or partial matches.
To perform supported actions on an analyst group, hover over the group, click the vertical ellipsis, and select one of the following options:
Edit: Modify the details of the group.
Note
You must have the Edit permission to modify the details.
View: View detailed information about the group, including its name, description, assigned categories, and user list.
Modify Analyst Group Details
You can modify existing analyst group details, including the group’s name, description, assigned categories, and users.
Before you Start
Ensure that you have the View and Create/Update permissions to the Analyst Groups feature.
Steps
To modify the details of an analyst group, follow these steps:
Go to Administration > User Management > Analyst Groups.
Hover over the analyst group you want to modify, click the vertical ellipsis, and click Edit.
Modify the details of the analyst group as required. You can activate or deactivate the analyst group.
Note
To deactivate an analyst group, you must first remove all the users from the group.
Click Update to save your changes
Onboard Members
Add members and manage how they interact with the Member Portal and view sign-ins by members. Privileged users with admin or root admin roles can invite, modify, and manage members, including setting their status to inactive. Members are users who receive alerts from security experts (Publishers, Creators), on the Member Portal (web or mobile application). With the features provided by the Member Portal, members can stay updated with crucial information and prepare for the potential impact of cyber events and other developments.
Add Members
You can add members to the Member Portal and assign roles and permissions to members.
Before you Start
Ensure that you have the View, Create, and Update permissions to the Member module to add members and update member details.
Steps
To add members, follow these steps:
Sign in to the Analyst Portal.
Go to Administration > User Management.
Select Member and click Add. Use the following information while entering details in the User Details section:
Email: Enter the user's email. The email address is used to log in to the Member Portal and receive email alerts and a 2FA one-time password (OTP).
Full Name: Enter the full name of the user. For example, John Doe.
Organization Type / Sector: Select the organization type or sector to which the member belongs. For example, Finance.
Organization / Entity: Select the organization or entity to which the member belongs. For example, Example Bank.
Alert Delivery Options: Specify the type of alert notifications you want the user to receive. Available options include Member Portal (Web application), Mobile, and Email Notification. By default, Email Notification is selected and cannot be cleared.
Note
If you select email notification as the only alert delivery option, the user is created as an Email-Only user in .
Member Role: Associate one or more roles with the member. Available roles are Member, Member Admin, Sector Admin, Intel Approver, and Sector Approver. By default, the Member role is selected and cannot be cleared. For more information about member roles, see Member User Roles.
Member Permissions: Select permissions for the member using the following information:
To enable the Intel Lake feature for the member, select Intel Lake. Selecting this option enables the member to view details of threat intel objects derived from . By default, this checkbox is not selected. For more information, see Intel Lake.
Display Intel Lake data for indicators in alerts: Allow members to view Intel Lake data when they click indicators that are included in alerts. This option is enabled by default.
Display Intel Lake Module: Allows members to view the Intel Lake module as part of the sidebar in the Member Portal. This option is enabled by default.
Generate Intel Lake open API credentials: Allows members to generate Intel Lake open API credentials.
Note
Before you enable Intel Lake for members:
Ensure that Intel Lake as a feature is enabled for your tenant. This feature is available only for Cyware cloud-based deployments. Contact Cyware Support for assistance.
Ensure that the version is updated to v3.5.2.0
Ensure there are an adequate number of read-only user licenses in .
Ensure that you have configured integration. For more information, see Configure Intel Exchange (CTIX) Integration.
Email Subscription: Select the checkbox to configure email notifications sent to the member. Important email notifications such as invitation emails, OTP emails, and password change updates cannot be unsubscribed. However, you can choose to subscribe or unsubscribe from email notifications from features such as Actions, Alerts, Intel, Collaboration, RFI, and Survey.
Active: To make the member profile active, select the Active checkbox. Inactive users cannot log in to the application. By default, this checkbox is selected.
Send Welcome Email: To send a welcome email to the member, select the Send Welcome Emailcheckbox. The welcome email contains a link to log in to the Member Portal. If you want to add additional details and contact details of the member, use the following sections.
After making changes, click Add to add the member. An email invitation is sent to the user for Member Portal login. The invitation link expires in 72 hours.
Note
Sign-in procedures may vary, if your organization uses a specific authentication configuration, such as single sign-on (SSO).
Add Additional Details
You can include additional details such as location and recipient groups for the member.
Before you Start
Ensure that you have the View, Create, and Update permissions to the Member module.
Steps
To add additional details, follow these steps:
Go to Administration > User Management.
Select Members, and click Add.
Select Additional Details to add the location and recipient groups for the member. Use the following information while entering details in the Additional Details section:
Specify the location where the member is located. The fields include country, state, city, and site. For example, the United States of America.
Note
The fields, city, and site depend on the state selected. Analysts can configure this in the Member Settings.
Specify the recipient groups to which the member belongs. You can assign public groups, invite-only groups, and system groups. You can select one or more recipient groups for the member.
Click Add.
Add Member Contact Details
You can include a physical mailing address and phone number details for crisis notification for the member.
Before you Start
Ensure that you have the View and Create or Update permissions to the Member module.
Steps
To add contact details, follow these steps:
Go to Administration > User Management.
Select Members and click Add.
Select Contact Details to add the physical location and crisis notification details for the member. Use the following information while entering details in the Contact Details section:
Enter a physical mailing address for the member. Entry fields include street, city, state, zip code, and country.
Enter the country code and phone number at which a member can be reached in a crisis. You can enter up to three phone numbers. You can also configure the following additional preferences:
Click Set as Primary to specify which phone number is the primary contact number for the member. You can only specify one number as the primary contact number.
Select Receive SMS next to each contact number to specify if a member wants to receive a text message (SMS) in the event of a crisis. By default, this checkbox is not selected.
Click Add.
Entry Fields Reference for Members
The following reference topic contains information for entry fields and interactive options when adding or updating a Member in CSAP.
Note
Fields that are marked with an asterisk (*) are mandatory for adding a Member.
User Details
The following entry fields are available, by default, in the User Details tab:
Email*: Enter the email ID for the user account. This is the only email ID with which the user is able to sign in to CSAP.
Full Name*: Enter the full name of the user.
Organization Type/Sector*: Enter the organization type or sector to which the Member belongs.
Organization/Entity*: Enter the organization or entity to which the Member belongs.
Title: Enter the job title for the Member.
Code: Enter the country code for the phone number associated with the user.
Phone Number: Enter the phone number of the user.
Office Number*: Enter the work phone number of the user.
Alert Delivery Options: Select the check boxes in this section to specify the types of alert notifications you want the user to receive. Available options include Member Portal, Mobile, and Email Notification. By default, Email Notification is selected.
Member Role: Select the check box or check boxes to associate one or more roles with the Member. Available options include Member, Intel Approver, Member Admin, Sector Approver, and Sector Admin. For more information, see Member User Roles.
Active: Select or clear this check box to indicate the active or inactive status of the user. By default, this check box is selected.
Recipient Groups
The following entry fields are available in the Recipient Groups tab:
Location: Click the drop-down menu to specify the country where the Member is located.
User Recipient Group(s): Select the entry fields in this section to specify the Recipient Groups to which the Member belongs. Available options include Invite Only Group(s) and System Group(s). You can select one or more Recipient Groups for one or both fields.
Contact Details
The following entry fields are available in the Contact Details tab:
Phone Number (For Crisis Notification): Enter the country code and phone number at which a Member can be reached in a crisis. You can enter up to three phone numbers. The following additional options are available:
Set as Primary: Click this radio button to specify which phone number is the primary contact number for the Member. You can only specify one number.
Receive SMS: Select or clear this check box next to each number to specify if a contact number for a Member receives a text message (SMS) in the event of a crisis. By default, this check box is cleared.
Manage Members
You can manage existing members in and perform other supporting actions on the member listing page.
Modify Member Details
You can modify existing member details.
Before you Start
You must have the View and Update permissions to modify member details.
You must have the Update Member Email permission to the Member module to modify a member's email address.
Steps
To modify member details, follow these steps:
Sign in to the Analyst Portal.
Go to Administration > User Management > Member.
Hover over the member you want to modify, click the vertical ellipsis, and click Edit.
Modify the details of the members as required. Clearing the Active checkbox sends an email to the member, informing them that their account has been deactivated. For more information about the fields, see Add Members.
Note
You can also modify the email address of the member if you have the Update Member Email permission to the Member module.
Click Update.
Change Lock Status of Member
If detects multiple invalid login attempts for a member, the member is locked out of the application. A lockout action means that the member is restricted from accessing the application. Once an account is locked out, the member receives an email notifying them of the lockout, as well as providing them a support email address to which they can send an email request to unlock the account.
To unlock a locked-out member, administrators can click on the lock icon for the respective user.
Supported Actions for Members
You can perform the following actions on the member listing page:
To refresh the member page, click Refresh from the upper-right corner.
Hover over a member, click the vertical ellipsis, and use the following information:
To modify member details, click Edit.
To view the details of the member, click View.
To reset the TOTP authenticator app configuration, click Reset Authenticator App. This resets the authentication token for and the TOTP authenticator app. After resetting, the member must reconfigure the authenticator app for by scanning the new QR code.
To reset the member's password, click Reset Password. The member will receive an email with a password reset link.
To download a list of all members in .csv format, click Export CSV. You will receive the link to the exported file in your email from where you can download it. The link can only be used once and expires in 72 hours from the time you receive it.
Search and Filter Members
To search for information related to specific members, type your query into the Filter field. By default, it is enabled. If you do not see the field, click Open Filters from the top-right corner to access it. You can filter members based on the following parameters:
Status: Option includes Active or Inactive.
City: Option to filter members based on the city they are located in.
Country: Option to filter members based on the country they are located in.
Crisis Configured: Option to filter members based on crisis notification contact details configuration.
Invited Users: Option to filter members who are invited and not invited to the Member Portal.
Locations: Option to filter members based on their location.
Locked/Unlocked Users: Option to filter members based on their account lock status.
Invite Status: Option includes Invited or Accepted.
Member Roles: Option to filter members based on the roles that are assigned. For more information, see Member User Roles.
Organization Types: Option to filter members based on the organization type they belong to.
Organizations: Option to filter members based on the organizations they belong to.
Recipient Group: Option to filter members based on recipient groups they belong to.
Registered/Unregistered Users: Option to filter members based on their registered status. Members who have accepted the invitation to the Member Portal are considered registered users.
Status: Option to filter members on their status. User status can be Active or Inactive. Inactive members cannot access the Member Portal.
Subscription Status: Option to filter members based on their email alert subscription preference.
Send Bulk Invitation for Members
You can invite multiple unregistered members to the Member Portal with a bulk action. Unregistered members are members who are added to the Member Portal, but have not accepted the invitation and have not logged in to the Member Portal at least once.
Before you Start
You must have the View and Create/Update permissions to the Member module.
Steps
To invite unregistered members, follow these steps:
Go to Administration > User Management > Member.
In the upper-right corner, click Bulk Invite.
Select the checkboxes for members you want to invite. To select all members in the list, select the Select all checkbox.
Use the search and filter option to search for members based on city, country, location, member roles, organization types, and other parameters.
Click > to view the list of members selected by you in the previous step. Click < to go back to the main list.
Click Invite to send the invitation to the members.
Bulk Import Members from CSV File
You can bulk import members by uploading a CSV file to the application. The bulk import feature also provides sample files to help users enter the member data in the accepted format. You can download sample files, fill in member details to the CSV file, and upload it back to to bulk import all the members.
Ensure that the CSV is in UTF-8 format and first row has the header information (e.g. Name, Email, User Group, and more). The information provided in the CSV file is case-sensitive.
Before you Start
Ensure that you have the View and Update permissions for the Member section.
Steps
To bulk import members, follow these steps:
Go to Administration > User Management > Member.
In the upper-right corner, click Import CSV.
Drag and drop or upload the CSV file that contains the member details. Download the sample provided to enter the member details in the correct format. You can choose between the minimalist version and the full version of the sample file. Ensure the CSV file includes the following mandatory details for each member: Name, Email, Organization, and Organization Type. To specify if the members have permission for features such as the Intel Library, download the Full Version sample file and select the permission as Yes or No.
Note
Starting with v3.8.3, along with the name and email, it is mandatory to include the member's organization and organization type in the CSV file.
If the organization and organization type specified in the CSV file do not already exist in , they will be created upon successful import of the file.
When the data is processed, the new members are created in , and the member details are available in the Member section. You will receive an email summarizing the import result.
If the import fails, the email will include a link to download a .csv file containing the failed records. You can use this file to review the failed records and make the necessary corrections. The link expires 72 hours after you receive it and can only be used once.
Member User Roles
The following roles are available for member users of the Member Portal:
Member: Members can sign in to the Member Portal and access features that are enabled for them.
Intel Approver: Intel approvers are members who have permission to review and publish threat intel shared by other members of their organization.
Member Admin: Member administrators can manage other members and intel approvers in their organization. Member admins have permission to view and interact with a separate Admin Settings section of the Settings module in the Member Portal.
Sector Approver: Sector approvers are members assigned to a particular sector or organization type and have permission to review intel provided by all members from various organizations within a sector.
Sector Admin: Sector administrators are members of a particular sector or organization type that can add more members and define member roles for various organizations within that sector.
View Failed Login Details
View and audit all the failed login attempts of Member Portal and Analyst Portal users.
Before you Start
You must be a Root Administrator or an Administrator to access Failed Login Details.
Steps
To view failed login details, follow these steps:
Go to Administration > User Management, and click Failed Login Details.
The list view shows the following details:
Email: Shows the email address of the member.
Login Failed Reason: Shows the reason for failed login for the member.
Portal: The platform from which the user attempts to sign in. Options include Analyst Portal, Member Portal, and Mobile App.
Date & Time: The date and time at which the login was attempted.
You can also perform the following actions on the Failed Login Details page:
To refresh Failed Login Details, click Refresh.
To search for information related to specific failed sign-in attempts, click Filter. Available filter parameters include date range and platform.
To export the failed login attempt details as a .csv file, click Export CSV. If you have applied any filters, you will receive the exported file according to your selections.
Note
You will receive the link to the exported file in your email from where you can download it. The link can only be used once and expires in 72 hours from the time you receive it.
Bulk Invite Unregistered Members
You can invite multiple unregistered users to the CSAP Member Portal with a bulk action.
Steps
To invite unregistered members, do the following:
Sign in to the CSAP Analyst Portal.
Go to Administration > User Management > Member.
In the upper-right corner, click Bulk Invite.
Select the checkboxes for members you want to invite. To select all members in the list, select the Select all checkbox.
Note
Use the search and filter option to search for members based on city, country, location, member roles, organization types and other parameters.
Click > to view the list of members selected by you in the previous step. Click < to go back to the main list.
Click Invite to send the invitation to the members.
Manage Collaborate Settings
The settings module lets users customize and tweak the configurations of other Collaborate modules. The settings module includes additional features that augment the experience of the platform and truly empower users with timely, relevant information.
Use the Search bar in the Settings module to search for the desired settings option.
Quick Setup
Use Quick Setup to walk you through all the settings to help you get started with just a few clicks.
Before you Start
You must have the View and Create/Update permission for the Settings feature.
Steps
To start quick setup, do the following.
Navigate to Management > Settings and click Launch Quick Setup.
The feature walks you through all the settings to help you started with the CSAP application.
Manual Setup
You can search or directly go to any setting to manually configure your preferences.
Before you Start
You must have the View and Create/Update permissions for the Settings feature.
Steps
To configure settings, do the following.
Navigate to Management > Settings.
Search for a settings or select a required setting. For example, Core Settings > Recipient Groups.
Field Management Settings
As an analyst, you have complete control and customization capability over the fields used across various functionalities through Field Management. You can define and manage various field types, such as text boxes, single-select, multi-select, and more, for alert creation, intel submission, RFI reporting, and member management. You can customize these field types to align with your organization’s requirements, or use the out-of-the-box available fields offered by . Additionally, for optimal organization, you can arrange the order of listed fields according to your preference.
To view Field Management, go to Administration > Settings > Field Management.
System Fields
System fields are out-of-the-box fields that are used while creating alerts, submitting intel and RFIs. While you cannot create system fields, you can edit these fields according to your preferences.
Text boxes allow users to add information in text format. When you create an alert, or submit an intel or an RFI, the text boxes associated with the selected category appear in the Additional section of the respective forms. Some examples of the available text box fields are Sources, Likely Motivation, Available Patch, and more.
While creating an alert, you can also add hyperlinked references directly within supported text box fields using the Reference icon. These references are inserted inline with your content and are also listed in the Reference section of the form. Additionally, when using the Reference icon, you can view a list of all references added across the form and reuse them as needed.
For example, you can assign the Available Patch text box field to the Vulnerability category to allow analysts to add available patch details when sharing alerts of the category Vulnerability and to allow members to add available patch details when submitting threat intels of Vulnerability category. Additionally, you can assign the Sources text box field to the Request For Information category to allow members to include source details when submitting an RFI.
A single-select field allows users to select a single option from a preset list of options. When you create an alert or submit intel, the single select fields linked to your selected category display automatically in the Additional section of the respective forms. Similarly, the single select fields associated with the RFI category appear in the RFI form. Some examples of single-select fields are Priority, Severity, Announcement Type, Kill Chain Phase, and more.
For example, you can assign the Number of Systems Affected field to the Malware category to allow analysts to add a count of affected systems when sharing alerts of the category Malware, and to allow members to add affected system details when submitting threat intels of Malware category. Additionally, you can assign the Risk field to the Request For Information category to allow members to include the risk level when submitting an RFI.
A multi-select field allows users to select predefined options from a list. Unlike a single-select field, you can select as many options as you like from the list. As you create an alert, submit intel, or an RFI, the single select fields associated with your selected category will automatically appear in the Additional section of the respective forms. Some examples of multi-select fields are Vulnerability Type(s), Vendors, Targeted Sector(s), and more.
For example, you can assign the Info Source field to the Informational category to allow analysts to select sources of information when sharing alerts of the category Informational, and to allow members to add information source details when submitting threat intels of Informational category. Additionally, you can assign the Targeted Sector(s) field to the Request For Information category to allow members to include information about the sectors targeted when submitting an RFI.
This section contains fields that are unique from text boxes, single-select and multi-select fields. An example of this is the Tags field, which allows you to assign text labels to alerts, intel submissions, and RFIs. These fields appear during the alert creation process and the intel submission form in both the Analyst Portal and Member Portal, and when a member submits an RFI, other fields associated with the RFI category are displayed in the Additional section of the RFI submission form.
For example, you can assign the Incident Date field to the Crisis Notification category to allow analysts to add the date of the incident when sharing alerts of the category Crisis Notification, and to allow members to include the incident date when submitting threat intels of Crisis Notification category. Additionally, you can assign the Tactics-Techniques-Sub-techniques field to the Request For Information category to allow members to include tactic-technique pairs when submitting an RFI.
Enable Tags Field for Alert Creation and Intel Submissions
Tags are keywords that are attached to alerts published from the Analyst Portal and intel submitted from the Member Portal. Tags help analysts quickly identify the information and context available in an alert or an intel. For example, the Actionable Indicators tag informs analysts that the alert or intel contains important threat indicator details that need action at the earliest. contains a distinct tag library that allows you to save and access various types of tags. For more information, see Tag Library.
Steps
To enable the tags field for alert creation and intel submission, follow these steps:
Go to Administration > Settings > Field Management > Other Fields.
Tags are available as one of the fields. Hover over the Tags field, click the vertical ellipsis, and click Edit to make changes.
Use the Alert toggle to show or hide the Tags field while creating an alert.
Use the Intel toggle to show or hide the Tags field on intel submission.
Click Update to save changes.
Make Tags Field Mandatory for a Category
To make the Tags field mandatory for alert creation and intel submissions, the Tags field must be assigned to an alert category. When the particular category is used by analysts for alert creation or by members for intel submission, the Tags field is made mandatory.
Steps
To assign the Tags field to an alert category, follow these steps:
Go to Administration > Settings > Core Settings > Category.
Choose a category to which you want to assign the Tags field. You can choose both System categories and Custom categories.
Hover on the category and click Edit to open the Update Category window.
Scroll down to the bottom of the Update Category window to see the field mapping table for the category.
Click Others to see the list of available fields. Locate the Tags field from the list and use the following information:
Turn on the Enable/Disable toggle to include the Tags field in this category.
Turn on the Mandatory toggle to make the Tags field mandatory. This makes the field mandatory for all alerts and intel published using this category.
Select Visible to Members to show the Tags field to alert recipients.
Click Update to save changes.
Manage System Fields
You can view and manage system field details.
Before you Start
Ensure that you have the View and Update permissions to the Settings module to manage system fields.
Steps
To manage system fields, follow these steps:
Sign in to the Analyst Portal.
Go to Administration > Settings > Field Management.
Select any of the system field types and use the following information:
Select Open Filters to search fields based on the text.
Hover over a field of your choice, click the vertical ellipsis, and select Edit. You can update the required details like field name, description, and usage preferences.
Note
The description that you enter in Field Description is displayed as an info icon for the text box field which helps members get more context about the field.
Click Update to save changes.
Custom Fields
Admins can create various types of custom fields such as text boxes, multi-select, single-select, date, and Boolean fields and map them to alert categories. Custom fields appear while creating alerts, in the threat intel submission form, or in the Request for Information form of the Member Portal.
Analysts can use custom fields to add additional information that may not be included in the standard form. For example, configure and use a custom field Vulnerability Discovered Year in RFI to include additional information such as the year of discovery for a vulnerability.
Alert, Intel & RFI Custom Fields
Create and manage custom fields for alert, intel, and RFI submission forms to align with your organization's requirements. You can create various field types such as text boxes, single-select, multi-select, and more, and map them to alert categories for effective usage.
Before you Start
Ensure that you have the View and Create/Update permissions for the Custom Fields module.
Note
If you want to search for a custom field in a specific module, click the Filter icon to open the search field and enter your query into the Search bar.
Create a Custom Field
To create a custom field, follow these steps:
Go to Administration > Settings > Field Management > Custom Fields.
Select Alert, Intel & RFI, click Create, and use the following information:
Field Name: Enter the name of the field. For example, IP Address.
Field Description: Enter a description for the field. Members can view this description when they hover over the info icon while sharing threat intel or submitting an RFI.
Field Type: Select a field type. For example, Text.
Use the text field to allow users to enter text characters.
Use the text box users to allow users to enter text characters in a WYSIWYG editor.
Use the Boolean field to allow users to provide true or false values as entries.
Use the date field to allow users to select a date entry from the calendar.
Use the single-select field to allow users to select a single option from a preset list of options.
Use the multi-select field to allow users to select multiple options from a preset list of options.
Use the threat indicator field to allow users to add threat indicators such as IP, domain, email, URL, SHA1, SHA256, MD5, and IPv4 CIDR.
Turn on the Alert toggle to use this field while creating alerts. You must first map this field to an alert category, and then use the field in the alert content. When you select a category for the alert, the single-select fields assigned to the category display automatically in the Additional section of the alert creation form. For example, you can assign the IP Address field to the Phishing Attack category to allow analysts to add malicious IP details when sharing phishing attack alerts.
Turn on the Intel toggle to enable members to use this field while sharing threat intel. This field appears in the Additional section of the intel submission form.
Turn on the RFI toggle to enable members to use this field while submitting an RFI.
Click Create. When a publisher selects a category while creating an alert, the fields assigned for alerts display automatically in the Additional tab of the Create Alert page. To map fields to an alert category, see Create Custom Alert Categories.
Update a Custom Field
To update the details of a custom field, follow these steps:
Hover over the field you want to modify, click the vertical ellipsis, and click Edit.
Update the required details such as the field name, description, and usage preference.
Set the status of the field to active using Active/Inactive. You can only assign active fields to alert categories.
Search and Filter Custom Fields
You can search and filter custom fields from the list. You can directly search using a keyword or filter by parameters such as field status (active, inactive) and field type.
Member Profile Custom Fields
You can add custom fields and display extra information about members in their profiles as required. This also allows analysts to collect any information about your members, and save it to their profiles. You can create custom field types such as text boxes, multi-select, single-select, date, phone number, and other fields in Field Management.
Before you Start
Ensure that you have the View and Create/Update permissions for the Custom Fields module.
Create a Member Profile Custom Field
To create a custom field for the member profile, follow these steps:
Go to Settings > Field Management > Custom Fields > Member Profile.
Click Create and use the following information:
Field Name: Enter the name of the field. For example, IP Address.
Field Description: Enter a description for the field. Members can view this description when they hover over the info icon while updating their profile.
Field Type: Select a field type. For example, Text.
Turn on the Mandatory toggle to make the field mandatory for members. Mandatory fields are visible under the primary details section, and non-mandatory fields are shown in the additional details section.
To create the field, click Create.
When the admin or the member admin adds a new member to , the custom field created for the member profile is shown in the User Details or Additional Details of the Add Member form. Mandatory fields will be visible under the respective sections or specifically, the user details section, and non-mandatory fields will be a part of the additional details section.
Edit Member Profile Custom Field
To edit a custom field, follow these steps:
Hover over the field you want to modify, click the vertical ellipsis, and click Edit.
Make required changes to the field name, description, and mandatory or non-mandatory preference.
Activate the field using Active/Inactive after making changes and click Update.
Search and Filter Member Profile Custom Fields
You can search and filter custom fields from the list. You can directly search using a keyword or filter by parameters such as field status (active, inactive) and field type.
Organization Profile Custom Fields
Notice
This feature is available in v3.8.8.0 onwards.
You can add custom fields to capture and display additional information about organizations in their profiles. This helps you record important organization-specific details as needed. You can create custom field types such as text boxes, multi-select, single-select, date, and other fields in Field Management.
Before you Start
Ensure that you have the View, Create, and Update permissions for the Custom Fields module.
Create an Organization Profile Custom Field
To create a custom field for the organization profile, follow these steps:
Go to Settings > Field Management > Custom Fields > Organization Profile.
Click Create and use the following information:
Field Label: Enter the name of the field. For example, IP Address.
Field Description: Enter a description for the field. Analysts can view this description when they hover over the info icon while updating an organization profile.
Field Type: Select a field type. For example, Text.
Turn on the Mandatory toggle to make the field mandatory for analysts.
To create the field, click Create.
When an admin creates or updates an organization profile, the custom field created is shown in the Basic Info section of the Create Organization form. Member Admins can view and update these fields while editing organization details.
Edit Organization Profile Custom Field
To edit a custom field, follow these steps:
Hover over the field you want to modify, click the vertical ellipsis, and click Edit.
Make required changes to the field name, description, and mandatory or non-mandatory preference.
Activate the field using Active/Inactive after making changes, and click Update.
Search and Filter Organization Profile Custom Fields
You can search and filter custom fields from the list. You can directly search using a keyword or filter by parameters such as field status (active, inactive) and field type.
Field Order
In this section, you can rearrange the order of fields displayed in the alert creation form, the intel submission form, the RFI reporting form, and more. You can prioritize essential information by dragging and dropping frequently used fields to the top. This customization ensures that essential information receives immediate attention.
The field order you define is maintained consistently across the following areas:
Analyst Portal:
When you create or edit an alert, the fields appear in the order you have configured.
The same order is maintained in the Preview and Publish section, and while viewing alert details.
Alerts created from intel or RFI submissions also follow this field order.
If you use an alert template, it preserves your defined field order.
Member Portal:
Members see the same order while submitting intel or RFIs based on your configuration.
In the alert listing, the Additional Filters panel reflects the same order.
Alert emails and exported reports (PDF, CSV) display fields in your specified order.
Core Settings
The core settings contain preferences for important features such as recipient groups, categories, and channels. All core feature settings are grouped in a single section for easy management.
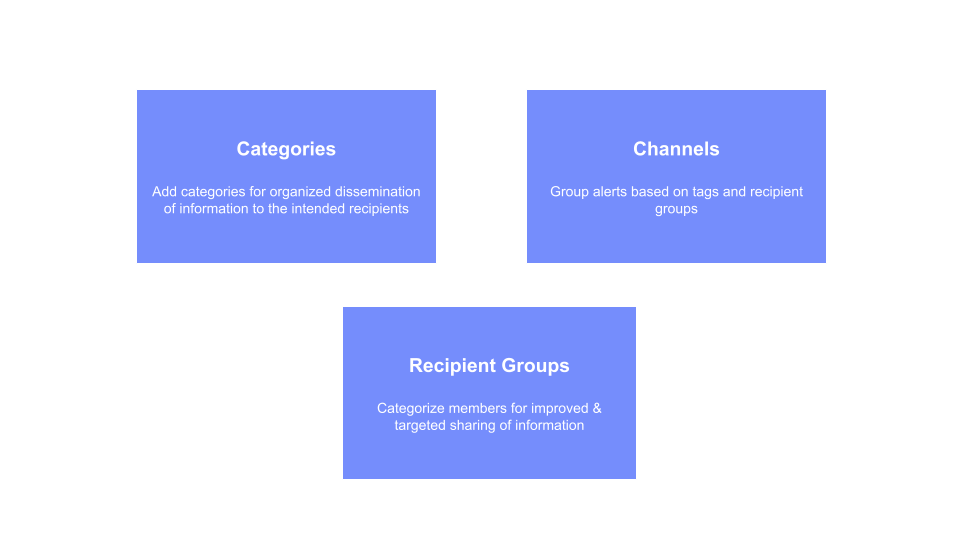
Categories
Categories help you identify the type of information shared in an alert by analysts and threat intel submitted by members.
What is a Category?
A category is used to classify alerts and threat intel based on the information shared. Adding a category to an alert helps in the organized dissemination of information to the intended recipients. Examples of categories are Vulnerability Advisories, Educational, RSS Alerts, Malware Advisories, and more.
Types of Alert Categories
System categories: System categories are pre-configured in the Analyst Portal. You can modify the field details of system categories, but you cannot the category name. Examples of system categories are Crisis Notification, Partner Advisory, Cyber Vulnerability and more.
Custom categories: To add more categories apart from system categories, create custom categories in the Analyst Portal. These categories are created and managed by administrators and are used while creating alerts. Add and edit custom categories based on your preference. Examples of custom categories are Zero Day Vulnerability, Ransomware, Critical Vulnerability and more.
Where can I use Categories?
Use categories while creating alerts in the Required section of the alert creation form. The Additional section in the alert creation form displays fields based on the category you choose.
Create Custom Alert Categories
You can create custom categories based on your organization's requirements to categorize alert information. For example, you can create a Zero-day Vulnerability category to share zero-day vulnerability advisories. Admins can map fields such as text boxes, single-select, multi-select, and custom fields to categories. When creating alerts and submitting threat intel, the Additional section displays fields based on the category selected for the alert. Create custom categories and assign fields to allow alert creators to add additional information to the alert. You can create a maximum of 100 custom categories.
Before you Start
Ensure that you have the View, Create, and Update permissions for categories.
Steps
To create a new custom category, follow these steps:
Sign in to the Analyst Portal and go to Administration > Settings.
Click Core Settings > Category > Custom Categories.
To create a custom category, click Create. Use the following information to enter the details:
Enter a name for the category in 100 characters. For example, Critical Vulnerability.
Select a color label for the category. The color is used to identify the category in the Member Portal.
Enter a description to communicate the purpose of the category in 1000 characters. For example, This category is used to share Zero-day vulnerability advisories.
Select an image for the category. The default category image is the image configured in Settings > Theme Settings > Logo Management. The selected image is automatically added to the alert when the category is used.
Select the Allow members to submit Threat Intel in this Category checkbox to use the category for threat intel submissions from the Member Portal. This allows members to use the category while submitting threat intel.
Select the Don't allow member to disable this category checkbox to restrict members from deactivating the category in the Member Portal.
Assign fields such as text boxes, single-select, multi-select, and custom fields to the category. When creating alerts from the Analyst Portal, the Additional section displays fields based on the category you choose.
Use the Enable/Disable toggle to use a field for the custom category.
Turn on the Mandatory toggle for the field to make it mandatory if this category is used while creating alerts.
Select the Visible to Members checkbox to display the field to recipients in the published alert.
Note
Ensure that the Active toggle is turned on to use the category while creating alerts.
After making the changes, click Create. The custom category is now available for use while creating alerts and submitting threat intel.
View System Alert Categories
System categories are pre-configured categories that are used while creating alerts or while members are submitting threat intelligence. While you cannot create new system categories, you can edit the fields associated with these categories. System categories supported in are Malware Advisories, Vulnerability Advisories, Crisis Notification, Partner Submission, Partner Advisory, Event, Request for Information, Poll, Knowledge Check, Informational, Actionable, Intel Alerts, Incident Alerts, and Educational.
When creating alerts and submitting threat intel, the Additional section displays fields based on the category selected for the alert. View and edit system categories and assign fields to allow alert creators to add additional information to the alert.
Note
You cannot deactivate or change the name of the system categories.
Before you Start
Ensure that you have the View, and Update permissions for categories.
Steps
To view and edit system categories, follow these steps:
Sign in to the Analyst Portal, and click Administration > Settings.
Click Core Settings > Category > System Categories.
Hover over the system category you want to view or modify field details for, click the vertical ellipsis, and click Edit. For more information about the fields in this form, see Create Custom Alert Categories.
After making the changes, click Update. The system category is now updated.
Manage Alert Categories
To manage categories, you must have the View, and Update permissions for categories. By default, the Category page displays all active categories.
You can perform the following actions to manage categories:
To filter categories, use the filter option. Search using a keyword or filter by parameters such as status (active, inactive). To close filters, click the Clear all filters icon.
The Number of Analysts column displays the number of analysts in the Analyst Portal who can use the category.
The Number of Alerts column displays the number of alerts that use the particular category. Click the number of alerts for the category to view the list of all alerts.
Admins can assign categories while adding privileged users in the Analyst Portal. Privileged users can publish alerts with categories that are assigned to them.
Channels
Channels group alerts based on tags, information sources and recipient groups.
What is a Channel?
Channels in the Analyst Portal are classification of alerts based on tags, information sources and recipient groups. If the published alert contains info source or tags associated with a channel, the alert is automatically grouped into this channel. For example, if you create a channel named Finance and add tags like Finance Phishing, Banker Trojan and other finance related tags, all alerts that contain these tags will appear in this channel. Similarly, if you add information sources (Info Sources) to this channel, all alerts with this information source will appear in this channel.
Where can I use Channels?
While analysts use channels to group alerts based on tags to access them easily. Members use channels created by analysts to filter alerts in the Member Portal.
Create a Channel in the Analyst Portal
You can create channels, and map info sources, tags, and recipient groups to the channel.
Before you Start
Ensure that you have the View and Create permissions to create channels.
Steps
To create a new alert channel, follow these steps:
Sign in to the Analyst Portal.
Go to Administration > Settings > Core Settings > Channels.
Click Create and enter the following information:
Channel name: Enter a name for the channel. For example, Finance. This name is displayed in the Alerts section in the Analyst Portal and members can see this name while using filters in the Member Portal.
Recipient Groups: Select the recipient groups for the channel. Only members from the selected recipient groups will receive alerts from the channel. Privileged users can add multiple recipient groups to a channel. Members included in the selected recipient groups can view the channel by using filters in the Member Portal.
(Optional) Info Source(s): Select the information sources for the channel. For example, External Intel Source. In this case, any alerts published with External Intel Source as the information source are added to the channel.
(Optional) Tag Group: Select the pre-configured tag groups. The tags in the tag group you select are automatically added to the Tags field.
Tags: Select the tags for the channel. For example, Ransomware. In this case, any alert tagged with Ransomware is added to the channel. Privileged users can add multiple tags to a channel. To refine your search, you can use the following filter options:
Starts With: Shows tags that begin with your input.
Exact Match: Shows tags that exactly match your input.
Contains: Shows tags that contain your input anywhere within the tag name.
Note
Ensure that the Active toggle is turned on to make the channel visible.
After making the changes, click Create. The channel is now available in .
Manage Channels in the Analyst Portal
To manage channels, you must have the View, and Update permissions for channels. By default, the Channel page displays all active channels.
You can perform the following actions to manage channels:
To filter channels, use the filter option. Search using a keyword or filter by parameters such as status (active, inactive). To close filters, click the Clear all filters icon.
To edit a channel, hover over the channel, click the vertical ellipsis, and click Edit. You can edit all channels except the All channel. This channel consolidates alerts sent to all recipient groups.
Drag and drop channels to specify the order in which they appear in the Analyst Portal. By default, the All channel is the first channel in the order. You can change the order according to your preference.
Recipient Group
Members are categorized into recipient groups for the targeted sharing of information.
What is a Recipient Group?
A recipient group is a group of members who receive information in the form of alerts, Doc Library media, Knowledge Base articles, and others, based on their grouping. For example, an alert based on a particular malware targeting the finance department of an organization may be sent to the Finance & Accounts recipient group of the organization. Similarly, the best security practices alert can be sent to all recipient groups within the organization. A member can be a part of multiple recipient groups.
Types of Recipient Groups
Public Groups: These recipient groups are open to all members for the purpose of receiving targeted alerts based on their role in the organization. While onboarding, members can select public groups (they can change their choice later in the Member Portal profile settings).
Note
Public groups can be activated or deactivated by the administrator.
Invite-Only Groups: These recipient groups are created by analysts to meet the functional requirements of an organization. Privileged users can create a required number of invite-only groups, and a member may be included in multiple invite-only groups. However, invite-only groups can only be controlled by the privileged users, and members will not be given the option to request or add themselves to these groups.
System Groups: A predefined set of recipient groups created for the purpose of sending targeted alerts. For example, all survey requests can be tagged to the Survey Managers system group. Users in these groups can be modified.
Note
The All Users system group is available to all users irrespective of other recipient groups assigned to them.
Org-based Groups: These recipient groups are automatically created for organizations and include all their members. They stay updated as the organization changes and help streamline alert delivery and access control. You can create them individually or in bulk, but if a group with the same name already exists, you will need to rename the organization or group.
Create Recipient Group
Analysts can create public recipient groups and invite-only recipient groups for members.
Before you Start
Ensure that you have the View, Create, and Update permissions to create recipient groups.
Steps
To create a recipient group, follow these steps:
Sign in to the Analyst Portal and click Administration.
Click Settings > Core Settings > Recipient Groups > Invite Only Groups or Public Groups, and click Create.
Group Name: Enter a name for the recipient group. For example, Information Security Officers.
Group Description: Enter a description to provide user details about the group and its functions.
(Optional) Group TLP: Select a Traffic Light Protocol (TLP) for the recipient group. The TLP is a set of designations that ensures sensitive information is correctly shared with the appropriate recipients. There are four categories in the TLP version 1.0 protocol and five categories in the TLP version 2.0 protocol. While creating alerts, you can select recipient groups based on a particular TLP while adding recipients for an alert.
Note
Alerts tagged with higher TLP cannot be published to recipient groups that are lower in the TLP hierarchy.
(Optional) Group Type: If you select Public, the recipient group is visible and accessible to all members.
If you select Invite Only, members can only join the recipient group by invitation or an approved request to join. The following additional options are available for invite-only groups:
Closed Group: A closed group is not visible to members who have not been added to it. Members cannot request to join the recipient group.
Request to Join Group: The recipient group is visible to all members on the Member Portal. Members can request to join the recipient group.
Select the checkboxes for features you want to enable for the recipient group. The features include access to Knowledge Base, intel reports, Messenger, Doc Library, Survey, Member Directory, RFI, Threat Defender Library (content viewing and creation), Organization Directory, and Collaboration (content viewing and editing). To select these features, ensure they are enabled in Configurations. For more information, see Configure CSAP Features.
Note
Permissions to access Member Portal features are assigned to members based on all the recipient groups the member belongs to. For example, if a member belongs to two or more recipient groups, the features configured for all the recipient groups are available to the member.
(Optional) Auto-publish Cyware advisory alerts to this group: Select the checkbox to automatically deliver Cyware advisory alerts from selected alert tags. By default, this checkbox is clear. After selecting this checkbox, you see the following options:
(Optional) Alert Tags: Add multiple tags and categories to receive alerts.
Auto-publish Type: Select if the Cyware advisory alerts are sent with or without notifications.
Auto-publish alerts without notification: Members will not receive any notifications for the alerts.
Auto-publish alerts with notification: Alerts published by Cyware with push notification enabled will be delivered to members with both mobile app and email notifications.
Select checkboxes for mobile app and email notifications according to your preference. These options are deactivated if you choose to auto-deliver all alerts without notification.
(Optional) Allowed Member Submissions: Select whether members of this recipient group can directly share intel and RFI with other members of this recipient group. This allows you to limit members' ability to share intel and RFIs within the group, ensuring appropriate information distribution. By default, both Intel Submission and Request For Information are selected. This permission only applies when automatic publishing of intel or RFI is enabled in Configuration. For more information, see Configure Member Submission Preferences.
To select RFI for member submission, ensure that the feature is enabled. For more information, see Configure CSAP Features.
Note
Ensure that the Active toggle is turned on to make the recipient group available in .
After making the changes, click Create. You can now share information with the recipient group.
Create Groupsets for Recipient Groups
A groupset is a set of many recipient groups. Use groupsets to send alerts to multiple recipient groups simultaneously and reduce the time taken to disseminate information through alerts.
Steps
To create a groupset, follow these steps:
Go to Recipient Groups > Groupset and click Create in the upper-right corner.
Enter a name and description for the groupset.
Add recipient groups to the groupset. You can select recipient groups from the Public groups, Invite Only groups, System groups, or Org-based groups fields, or type recipient group names into the corresponding text fields to search for the
Note
Ensure that the Active toggle is turned on to make the groupset available while creating alerts.
After making the changes, click Create.
Add Members to Recipient Groups
To add members to a recipient group, follow these steps:
Go to Recipient Groups and choose the recipient group type (Invite Only or System).
Hover over the recipient group to which you want to add members, click the vertical ellipses and select Member Management.
In the Members not in this group section, select the checkbox for members you want to add to the recipient group. You can filter member email IDs by city, country, location, member role, organization type, organization, recipient group and state.
After selecting the checkboxes, click > to move the members to the Members in this group section. This means the members are now added to the recipient group.
Remove Members from Recipient Groups
To remove members from a recipient group, follow these steps:
Go to Recipient Groups and choose the recipient group type (Invite Only or System).
Hover over the recipient group to which you want to add members, click the vertical ellipses and select Member Management.
In the Members in this group section, select the checkbox for members you want to remove from the recipient group. You can filter member email IDs by city, country, location, member role, organization type, organization, recipient group, and state.
After selecting the checkboxes, click < to move the members to the Members not in this group section. This means the members are now removed from the recipient group.
Clone a Recipient Group
To clone a recipient group, follow these steps:
Go to Recipient Groups and select the recipient group type.
Note
You can only clone Invite Only Groups, Public Groups, or Groupset.
Hover over the recipient group to which you want to clone, click the vertical ellipses, and select Clone Group. Follow the procedure to Create Recipient Group and fill in the required details.
The newly cloned group will inherit the group TLP, status, feature permissions, and auto-delivery of alert preferences from its parent group. Additionally, members of the parent group will be automatically included in the cloned group.
You can modify the details of the cloned recipient group based on your preference.
Note
Ensure the Active toggle is turned on to make the cloned recipient group available in .
After making the changes, click Create. The recipient group is now cloned. For more information about adding members to the recipient group, see Add Members to Recipient Groups.
Modify Recipient Group Details
You can modify the recipient group details such as name, description, TLP, and more.
Steps
To modify the details of a recipient group, follow these steps:
Go to Recipient Groups and choose the recipient group type (Invite Only, System, Public, or Groupset).
Hover over the recipient group you want to edit, click the vertical ellipsis, and click Edit.
Note
The Organization Directory checkbox is available from v3.8.5. If Organization Directory was previously enabled for members across the tenant, they will continue to access it after upgrading to v3.8.5, and the Organization Directory checkbox will be selected by default for recipient groups. However, it is not automatically enabled for system recipient groups, even if it was enabled previously. You can manually enable it for system recipient groups if required.
After making the changes, click Update.
Modify Org-based Group Details
Notice
This feature is available in v3.8.8.0 onwards.
Org-based groups are created during the organization setup process and automatically include all members of the organization. These groups stay updated as the organization changes, helping you manage communication and access with minimal effort. You can create org-based groups from Settings > Member Settings > Organization. For more information, see Organization Details.
After creation, you can update the details of an org-based group to suit your requirements.
Before you Start
Ensure that you have the View, Create, and Update permissions to the Recipient Groups feature.
Steps
To modify the details of an org-based group, follow these steps:
Go to Administration > Core Settings > Recipient Group > Org-based Groups.
Hover over the recipient group you want to edit, click the vertical ellipsis, and click Edit.
Update the group description, TLP, and enable the required features for the recipient group based on your preference. By default, the TLP is CLEAR.
Note
You cannot edit the group name directly. To change it, update the name of the associated organization.
After making the changes, click Update.
Alert Settings
Admins can now manage the preferences of the features that add more context to alerts published from the Analyst Portal.
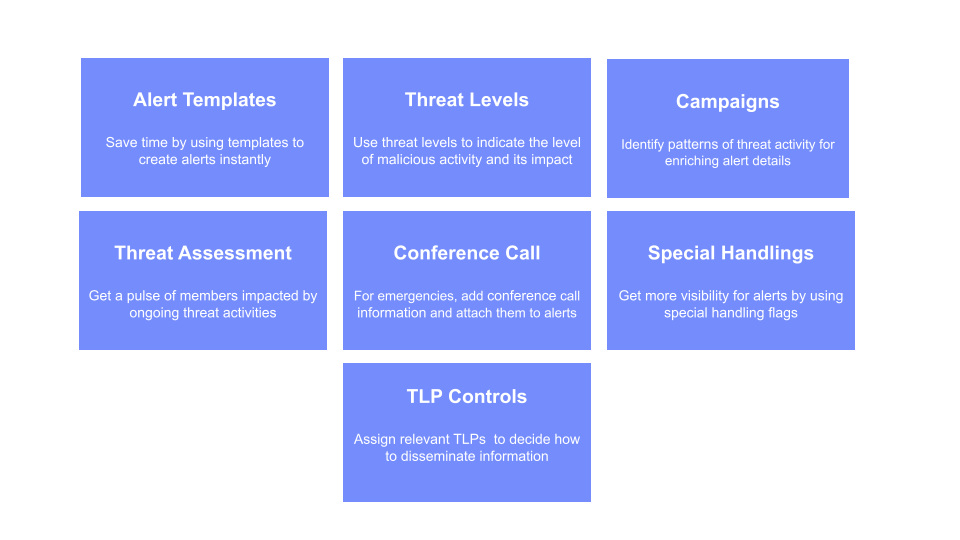
Create Alert Templates
Analysts can create editable alert templates to instantly create alerts, and save time from entering the same data multiple times for similar alerts.
What is an Alert Template?
An alert template is used while creating alerts and consists of information such as alert title, summary, category, TLP, recipient groups and other alert information. For example, create alert templates for alert types such as phishing alerts, malware alerts and other types.
Note
After creating a template, you cannot delete it. You can only move the template to inactive status.
Where Can I Use an Alert Template?
Use alert templates to create alerts that are sent to members. The following video shows how to create alerts from templates:
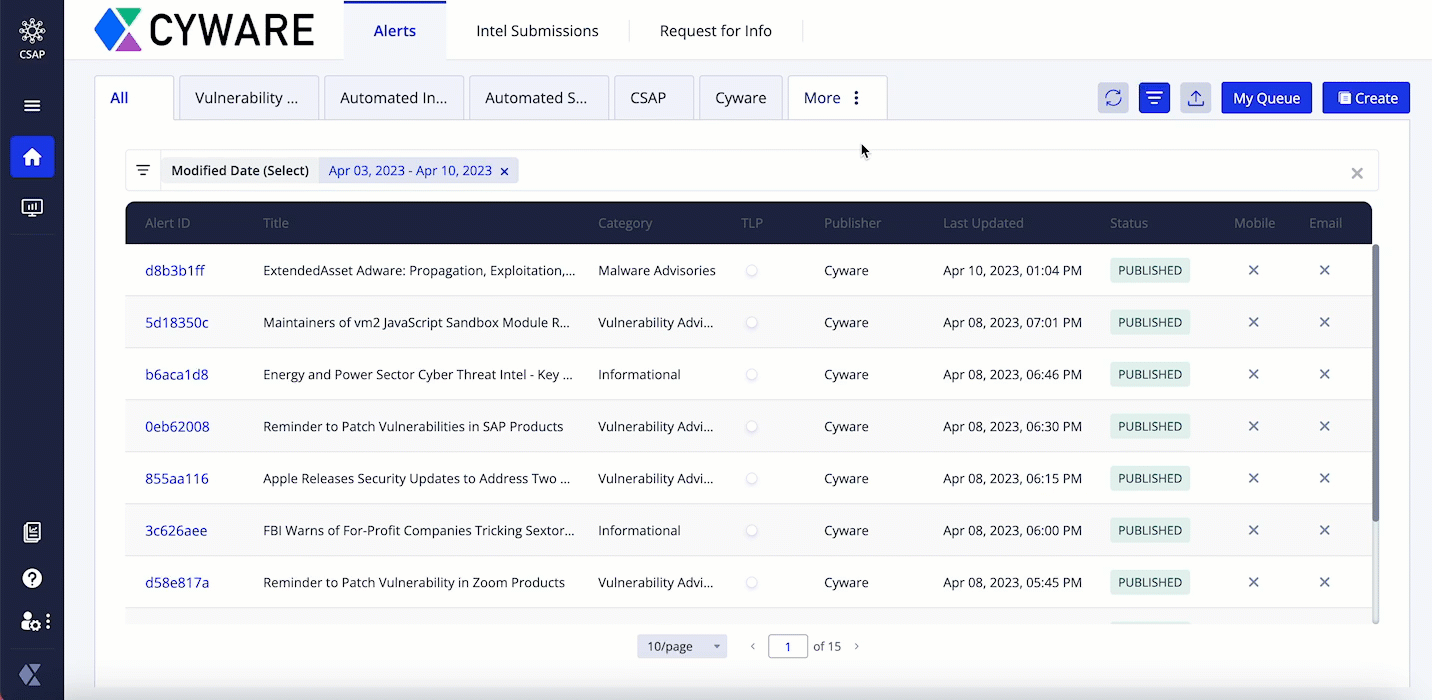 |
Before you Start
You must have the View and Create permissions for alert templates.
Steps
To create a new alert template, do the following.
Sign in to the Analyst Portal and click Sign in to the Analyst Portal and click Administration > Settings in the lower-left corner.Administration > Settings in the lower-left corner.
Click Alert Settings > Alert Template. To create a new template, click Create in the upper-right corner.
In the Required section, add the required details to the template such as alert title, summary, category and TLP. For more information about the fields in this section, see Add Required Information to the Alert.
In the Additional section, add more information to the template such as references, and other details based on the category you chose in the Required section. For more information about the fields in this section, see Add Additional Information to the Alert.
In the Recipients section, add recipient groups and individual recipients who will receive the alert. For more information about the fields in this section, see Add Recipients to the Alert.
In the Finish section, select the Microsoft Teams Publication checkbox and select the active Teams channels to post the alert to. For more information about configuring Teams channels, see Configure Microsoft Teams in CSAP.
Note
Ensure that the Active toggle is turned on to use the alert template for creating alerts.
After adding information to the alert template, click Create. The alert template is now available for use while creating alerts from the Alerts page in the Analyst Portal.
Manage Alert Templates
To manage alert templates, you must have the View and Update permissions for campaigns. By default, the Alert Template page displays all active alert templates.
You can perform the following actions to manage alert templates:
To filter alert templates, use the filter option. Search using a keyword or filter by parameters such as status (active, inactive). To close filters, click the Clear all filters icon.
To edit alert templates, hover over the campaign, click the vertical ellipsis of the campaign, and click Edit.
To activate or inactivate an already existing template, click Edit. Turn the Active toggle on or off based on your preference.
Create Campaigns
CSAP helps you to create and manage campaigns to share alerts with additional context. This also helps users understand threat details and improve their response capabilities.
What are campaigns?
Campaigns are instances or patterns of harmful intent by threat actors. They are identified through sets of incidents, malware, vulnerabilities exploited, and identified tactics, techniques, and procedures (TTPs) of threat actors. Examples of campaigns are phishing email campaigns, social engineering attacks and other campaigns.
Where can I use campaigns?
While creating an alert, select an active campaign in the Required section of the alert creation form.
 |
Before you Start
You must have the View and Create permissions for campaigns.
Steps
To create a campaign, do the following:
Sign in to the Analyst Portal and click Administration > Settings in the lower-left corner.
Click Alert Settings > Campaign. To create a campaign, click Create in the upper-right corner.
Enter a name for the campaign. For example, Phishing Email Campaigns.
Note
Ensure that the Active toggle is turned on to use the campaign while creating alerts.
To create the campaign, click Create.
Manage Campaigns
To manage campaigns, you must have the View and Update permissions for campaigns. By default, the Campaign page displays all active campaigns.
You can perform the following actions to manage campaigns:
To filter campaigns, use the filter option. Search using a keyword or filter by parameters such as status (active, inactive). To close filters, click the Clear all filters icon.
To edit campaign names, hover over the campaign, click the vertical ellipsis of the campaign, and click Edit.
Drag and drop campaigns to re-order campaigns based on your preference. This order is displayed in the Campaign dropdown while creating alerts.
To activate or inactivate an already existing campaign, click Edit. Turn the Active toggle on or off based on your preference.
Threat Assessment
Threat assessment can be used to quickly get a pulse of how many members are impacted by a vulnerability, malware, or threat activity. Analysts can post threat assessment questions with multiple response options along with any alerts published to members. Based on the recipient's response to an alert, analysts can extract a consolidated report to assess the sector-wide impact.
Threat assessment questions and answers created from this section can be added to alerts published from the CSAP Analyst Portal. Only active threat assessments can be tagged to alerts published from the CSAP Analyst Portal.
Create Threat Assessment Template
You can create threat assessment templates and use them to quickly attach threat assessment questions to an alert.
Before you Start
You must have the Create/Update permissions for the Threat Assessment module to create and manage threat assessment templates.
Steps
To create a threat assessment template, do the following.
Navigate to Management > Settings > Alert Settings > Threat Assessment and click Create.
Enter a unique name for the threat assessment template. For example, Patch Assessment.
Enter the questions for the threat assessment template. For example, Have you patched this vulnerability?
You enter answer choice for the threat assessment questions and create multiple-choice questions for your threat assessment.
Make sure to activate the template using Active/Inactive and click Create.
Note
Privileged users can map threat assessments using their names to appropriate alerts in order to display them in the CSAP Member Portal. Member responses can be extracted from the Reports section.
Update Threat Assessment Template
You can update the details of existing threat assessment templates and manage preferences.
Before you Start
You must have the Create/Update permissions for the Threat Assessment module to create and manage threat assessment templates.
Steps
To update the threat assessment template, do the following.
Navigate to Management > Settings > Alert Settings > Threat Assessment.
Hover over the threat assessment template to update and click Edit.
Make changes to the template. See Create Threat Assessment Template
Make sure to activate the template using Active/Inactive and click Update.
Search and Filter Threat Assessment Template
You can search and filter SLA from the list. Click Filter to open the search bar and directly search using a keyword.
Threat Assessment SLA
SLAs allow analysts to send automatic reminders at the specified time interval to members for responding to threat assessments. Privileged users can map SLAs using the SLA name to appropriate Threat Assessments in order to send response reminders. You can configure up to three intervals to send reminders to members for responding to a threat assessment.
Note
Only active SLAs can be tagged to threat assessments published from the CSAP Analyst Portal.
Create Threat Assessment SLA
To create a threat assessment SLA, do the following.
Navigate to Management > Settings > Alert Settings > Threat Assessment > SLA.
Click the Create button to create a new SLA.
Provide a name for the SLA.
Define the SLA Threshold for your SLA. The threshold will send reminders to the recipients at the defined time intervals. Consider a scenario where SLA 1 = 10 minutes, SLA 2 = 20 minutes, and SLA 3 = 30 minutes.
SLA 1: Threat assessment recipients will receive the first reminder after 10 minutes from the time of receiving the alert.
SLA 2: Threat Assessment recipients will receive the second reminder after 20 minutes from the time of receiving the alert.
SLA 3: Threat Assessment recipients will receive the third reminder after 30 minutes from the time of receiving the alert.
Determine the status of the SLA (Active, Inactive) via the toggle switch at the top right of the screen.
After finishing, click Create.
Update Threat Assessment SLA
To update the threat assessment SLA, do the following.
Navigate to Management > Settings > Alert Settings > Threat Assessment > SLA.
Hover over the SLA to modify and click Edit.
Make required changes to the SLA. See Create Threat Assessment SLA
Make sure to activate the threat assessment SLA using Active/Inactive and click Update.
Search and Filter Threat Assessment SLA
You can search and filter SLA from the list. Click Filter to open the search bar and directly search using a keyword.
Add Conference Call
Add conference call information and attach them to alerts.
What are Conference Calls?
The conference call feature allows members to connect using a simple and common conference calling number. Members can communicate with a singular number in any emergency circumstances related to the alert. For example, this feature can be used for crisis notifications to relay information to different members simultaneously over a call.
Where Can I Use Conference Calls?
While publishing an alert, active conference call numbers can be tagged to an alert in the Finish section while creating alerts.
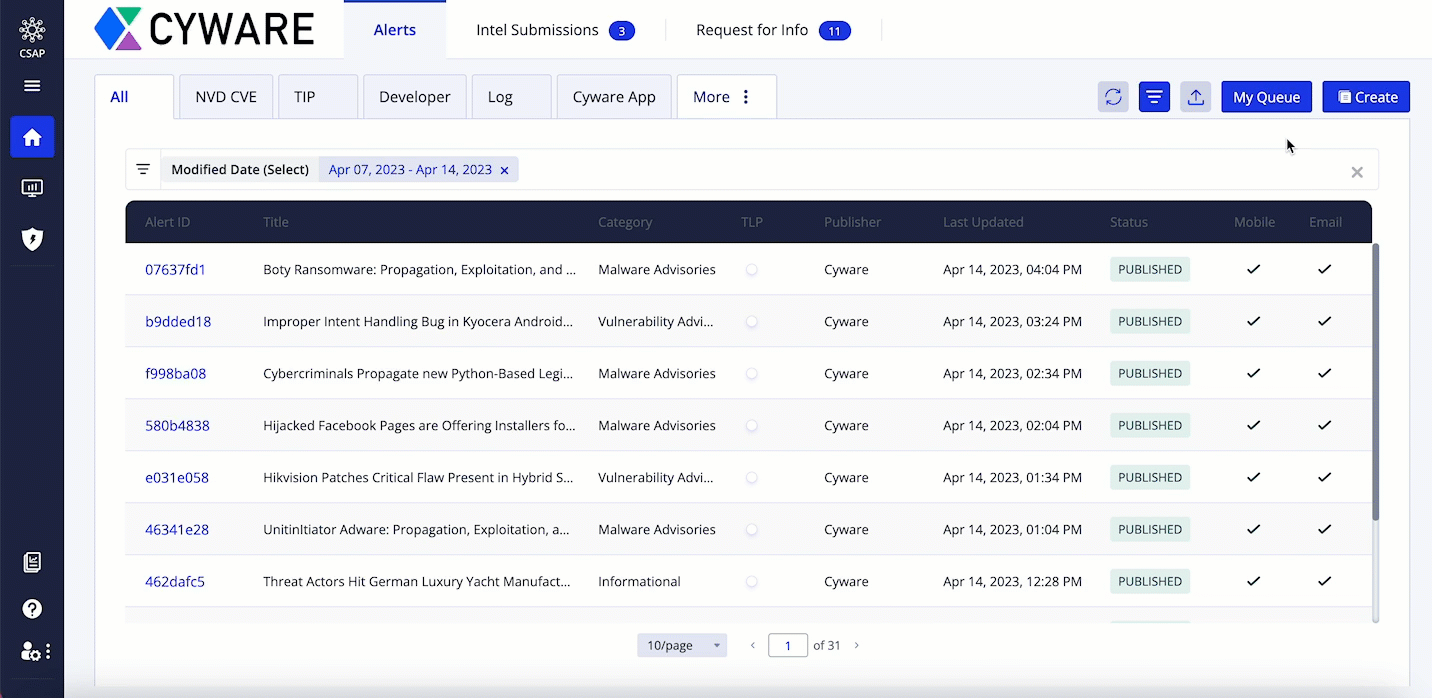 |
Before you Start
You must have the View and Create permissions for the Conference Call setting.
Steps
To add conference call information to the directory, do the following:
Sign in to the Analyst Portal and click Administration > Settings in the lower-left corner.
Click Alert Settings > Conference Call.
Enter a unique name for the conference call info. For example, Crisis Conference Call.
Enter the conference call number for the conference call info. Number format must be {Dial-in Number},{PIN}#. For example, 8008888888,12345#. Ensure that there are no spaces between numbers.
Enter the video conference URL. This enables analysts to connect via online conferencing applications such as Zoom, Google Meet, and Microsoft Teams. The format for URL is http://example.com.
Note
Ensure that the Active toggle is turned on to use this information while creating alerts.
After adding information to the conference call, click Create. The conference call information is now available for use while creating alerts from the Alerts page in the Analyst Portal.
Manage Conference Call Information
To manage conference call information, you must have the View and Update permissions. By default, the Conference Call page displays all active campaigns.
You can perform the following actions to manage conference call information:
To filter conference call information, use the filter option. Search using a keyword or filter by parameters such as status (active, inactive). To close filters, click the Clear all filters icon.
To edit conference call information, hover over the conference call, click the vertical ellipsis, and click Edit.
To activate or inactivate an already existing information, click Edit. Turn the Active toggle on or off based on your preference.
Special Handlings
Alerts with special handling flags help users to share priority alerts with members by allowing them to stand out from other alerts. For example, you can create a special handling flag named Top Secret to share alerts containing secret information with the member. You can create special handling flags and manage them easily from this section.
While publishing an alert, active special handling flags can be tagged to an alert from the Flags section of the Create Alert page.
Note
Members can access the special handling flags from the alert content and filter alerts based on special handling flags from the CSAP Member Portal.
Create Special Handlings
You can create new special handling records and attach them to alerts.
Before you Start
You must have the Create/Update permissions for the Special Handlings module to create and manage special handling records.
Steps
To create special handlings, do the following.
Navigate to Management > Settings > Alert Settings > Special Handlings and click Create.
Enter the name for the special handling flag. For example, Requires Manual Review.
Enter the description for the special handling flag. This helps analysts understand the purpose of use for the special handling flag.
Update Special Handlings
You can update and manage existing special handling records.
Before you Start
You must have the Create/Update permissions for the Special Handlings module to create and manage special handling records.
Steps
To update special handlings, do the following.
Navigate to Management > Settings > Alert Settings > Special Handlings.
Hover over the special handling flag to modify and click Edit.
Make sure to activate using the special handling using Active/Inactive and click Update.
Search and Filter Special Handlings
You can search and filter special handlings from the list. You can directly search using a keyword or filter by parameters such as status (active, inactive).
TLP Controls
The Traffic Light Protocol (TLP) is a set of designations that ensure sensitive information is correctly shared with the appropriate recipients. In , the TLP hierarchy helps analysts decide how to disseminate information such as alerts, doc library files, and intel reports to appropriate recipients.
TLP 1.0: is a simple and intuitive schema for indicating when and how sensitive information can be shared with members.
TLP 2.0: is the latest version of TLP released by the Forum of Incident Response and Security Team (FIRST) that includes a few updates to TLP version 1.0. is compliant with the new TLP version 2.0 and analysts can start using it in all the modules of to disseminate information to the appropriate recipients.
To select a TLP version for your instance, see Configure Collaborate Features
TLP 1.0
TLP 1.0 enlists the following colors to indicate the expected sharing boundaries to be applied while sharing information with the recipients.
Color | Definition |
RED | Not to be disclosed. Restricted to limited recipients. |
AMBER | Limited disclosure. Restricted to a few recipients of the organization and its clients. |
GREEN | Limited disclosure. Restricted to the community. |
WHITE | Disclosure is not limited. Information can be shared freely. |
TLP 2.0
TLP 2.0 enlists the following colors to indicate the expected sharing boundaries to be applied while sharing information with the recipients.
Color | Definition |
RED | Not to be disclosed. Restricted to limited recipients. |
AMBER+STRICT | Limited disclosure. Restricted to a few recipients of the organization only. |
AMBER | Limited disclosure. Restricted to a few recipients of the organization and its clients. |
GREEN | Limited disclosure, restricted to the community. |
CLEAR | Disclosure is not limited. Information can be shared freely. |
Configure TLP Controls
Analysts can set preferences to automatically show and hide details such as summary, image, optional fields, and attachments in the alert email, or RFI email, based on the selected TLP color. Additionally, analysts can also configure some related preferences to perform actions based on the selected TLP color.
For example, if Summary in Email and Image in Email is selected and the Additional Fields in Email is not selected for RED TLP, then the email alert will show only the summary and image for the alert.
Before you start
Ensure that you have the View and Update permissions to configure TLP controls.
Steps
To configure TLP controls, follow these steps:
Go to Administration > Settings > Alert Settings > TLP Controls.
Click Edit. Analysts can set the following preferences:
Summary in Email: Select a TLP color to show the summary under an alert in the email to be sent to the recipient. For example, when you select RED as the TLP color for Summary in Email, the recipient receiving an alert with RED TLP will be able to view the alert summary in the email received.
Additional Fields in Email: Select a TLP color to show the additional fields under an alert in the email to be sent to the recipient.
Image in Email: Select a TLP color to show the image under an alert in the email to be sent to the recipient.
Attachment in Email: Select a TLP color to show an attachment under an alert in the email to be sent to the recipient.
Export in Member Portal: Select a TLP color to show the export option under an alert to the member in the member portal. For example, when you select GREEN as the TLP color for Export in Member Portal, the member trying to export an alert with GREEN TLP views that option under Alerts in Member Portal.
Image in Member Portal: Select a TLP color to show the image under an alert to the member in the member portal.
Allow Export as PDF: Select a TLP color to allow export as PDF in the alert chosen.
Summary in Intel Email: Select a TLP color to show the summary under an intel in the email to be sent to the recipient.
Summary in RFI Email: Select a TLP color to show the summary under an RFI in the email to be sent to the recipient.
Post to CTIX from Alert: Select a TLP color to post the associated alerts to the platform. For example, if you select RED, automatically posts all the RED TLP alerts to the platform.
Post to CTIX from Automated Intel: Select a TLP color to post the associated automated intel to the platform. For example, when you select RED, automatically posts all the RED TLP automated intel to the platform.
Send Email to Publisher: Select a TLP color to send an email to publishers when an alert with this TLP color is created. For example, when you select RED, automatically sends emails to publishers on a RED TLP alert creation.
Select the actions you want to perform for the corresponding TLP color.
Click Update Configuration to save the changes.
Advisory Settings
In Advisory Settings, you can configure advisory categories that are used to classify RSS advisory sources based on the information shared by them. There are two types of advisory categories:
Custom categories: These categories are created by you and are used while adding new RSS advisories. For example, create a custom category called Data Theft News which is assigned to an RSS advisory that provides educational feeds.
System categories: These are existing categories that are supported in CSAP. You cannot create new system categories or disable existing ones. The system advisory categories supported by CSAP are Vulnerabilities, Malware, Security News, CISO News, Threat Advisories, Personal Blogs, Security & Risk Management, and Miscellaneous.
Create Advisory Categories
You can create advisory categories in the Custom categories section only.
Before you Start
Ensure you have the View, Create and Update permissions for RSS Feeds in User Management.
Steps
To create custom advisory categories, do the following:
Sign in to the Analyst Portal.
Go to Administration > Settings in the lower-left corner.
Click Advisory Settings and in the Custom categories section, click Create in the upper-right corner.
Enter the name of the category. For example, Cyber Threats News.
Enter the description for the category.
After making the changes, click Create. Ensure that the Active toggle is turned on to make the category available while adding new RSS advisory sources in Advisory Management > RSS Advisory.
Member Settings
As an administrator, you can manage member-specific settings such as the location, region, organization details, and organization types for easier sharing of information. For example, you can share an alert that is specific to a country, location, or organization using this setting.
Member Location
An organization may have different entities or branches located at various locations around the world. The CSAP Analyst Portal allows you to create and manage the required number of locations to send alerts specific to a location or region to members. Members can update and share their location details from in Profile Settings of the Member Portal.
Add Location
You can add or create new locations and map them to members. Additionally, you can also send alerts to recipients based on their location.
Before you Start
You must have the View and Create/Update permissions for the Locations feature.
Steps
To add a new member location, do the following.
Sign in to the Analyst Portal.
Navigate to Administration > Settings > Member Settings > Location and click Create.
Select a country, state, and city for the location details. If you have permission to add custom locations, type the location name and click Add.
Note
To get permission to add custom locations, contact your CSAP administrator.
Add a site address to mention a physical location.
Turn on the Active toggle to make the location available for use.
Click Create to add the new location. This location is now available while adding or updating member details in User Management.
Note
Locations that contain active users can't be disabled.
Bulk Update Member Location
You can add multiple members to a specific location using the bulk update feature.
Before you Start
You must have the View and Create/Update permissions for the Locations feature.
Steps
To bulk update member locations, do the following.
Navigate to Administration > Settings > Member Settings > Location.
Click Actions and select Bulk Update.
Select the source location and destination location.
Select the members from the source location list and move them to the destination.
After making changes, close the window to update.
Create Regions
Publish alerts to specific regions for targeted communication of information.
What is a region?
A region refers to a specific geographic area or grouping of countries that share certain characteristics related to cybersecurity. This categorization helps you analyze and address cybersecurity threats, vulnerabilities, regulations, and best practices within a particular area. Examples of regions are North America, APAC, EMEA and others.
Where can I use regions?
You can use regions to publish alerts specifically to a region. For example, if there is a ransomware that is specifically designed to exploit vulnerabilities commonly found in the systems and networks used in the APAC region, you create and publish an alert to the countries in the APAC region.
Before you Start
You must have the View, Create, and Update permissions for Region.
Steps
To create a new region, do the following:
Navigate to Administration > Settings > Member Settings > Location > Region and click Create.
Enter the region name. For example, North America.
Select a country, or a group of countries that are part of this region.
Note
Countries that are not previously selected for other regions appear in the dropdown list to avoid overlapping of regions.
Click Create to create the region. Ensure you have turned on the Active toggle to activate the region. You can only use active regions while creating alerts.
Manage Regions
You can update the region name, country and the status of existing regions by hovering over the region, clicking the vertical ellipsis, and clicking Edit.
Use the filters to view regions by their status (active or inactive) and search for regions.
Member Organization
Admins can classify members according to organizations while inviting them to the Member Portal. Organizations can also be further grouped into organization types. This allows users to share alerts quickly with members from selected organizations and organization types. Some examples of organizational types are Retail Services, Healthcare institutions, Financial Services, Law Firms, etc.
Note
Privileged users can assign an organization to members while inviting them to the Member Portal.
Organization Details
You can create organizations and assign them to members to efficiently share alerts based on the organizations. To create new organizations, you must first create organization types and organization levels. See Organization Types and Organization Levels.
You can create organizations and assign them to members.
Before you Start
Ensure that you have the View and Create or Update permissions for the Organization feature.
Steps
To create a new organization, follow these steps:
Go to Administration > Settings > Member Settings > Organization > Organization Details.
Click Create and enter the following details:
Enter the organization name. For example, Finance Company.
Select the organization type. To create an organization type, see Create Organization Type.
Select the organization level. Levels allow you to determine the maximum number of members who are part of this organization. To create an organization level, see Create Organization Level.
Specify the maximum number of member admins allowed for the organization.
Specify a maximum number of intel approvers allowed for the organization. Intel approver workflow configuration must be enabled in Configurations.
Add organization details such as Organization HQ, URL, About, and Logo.
In Allowed Member Email Domains, enter the allowed email domains for members of this organization. Only members with email addresses linked to these specified email domains will be added to this organization. For example, if you enter sampledomain.com, only members whose email addresses consist of sampledomain.com can be added to this organization. Enter multiple email domains with a comma as the separator.
If you do not specify any allowed email domains, members with any email domain can be added to the organization.
Select the Create a recipient group for this organization checkbox to automatically create a recipient group with the same name as the organization. This group includes all members of the organization.
Note
If a recipient group with the same name already exists for a selected organization, you must rename either the organization or the recipient group before creating a new one.
Select the Cyware Orchestrate checkbox to enable CO for the organization. Members will be able to operationalize threat intelligence using orchestration capabilities. This checkbox is visible only if it is enabled in Configuration. For more information, see Configure Cyware Add-ons.
Turn on the Allow members to generate API credentials toggle to enable members to generate API credentials in the Member Portal. After generating the API credentials, members can view alerts, get a list of alerts, share threat intel, and perform other actions using open APIs.
Select the checkbox for CybelAngel to enable this integration as part of Digital Risk Protection for members in this organization.
Enter the Stream ID from CybelAngel to fetch and display data from a specific stream. Additionally, you can specify whether you'd like to make CybelAngel visible to all member users or only to specific member users.
Select the alert delivery options for the organization:
Member Portal: Enable to receive alerts on the Member Portal web application.
Mobile: Enable to receive alerts on the Cyware Enterprise mobile application.
Email Notification: Enable to receive alerts as email notifications.
Click Domain(s) to enter the trusted domains for your organization. Then, click the IP Address(s) and enter the trusted IP addresses for your organization. For more information, see IP Address and Domain Management.
Turn on the Active toggle to activate the organization and click Create.
Import Organization Details
If you want to import organization details from a CSV file instead of manually creating an organization, click Actions > Import CSV in the upper-right corner.
You can choose to download the sample file for your reference by clicking Full Version.
Ensure the CSV file consists of header information that is consistent with the sample file.
Enter all field information for the organization in the file, and proceed to upload it.
You can update the details of an existing organization.
Before you Start
Ensure that you have the View and Create or Update permissions for the Organization feature.
Steps
To update an existing organization, follow these steps:
Go to Administration > Settings > Member Settings > Organization > Organization Details.
Hover on the organization you want to modify and click Edit. Use the following information to edit the organization details:
Edit the details such as organization name, organization type, and more.
Note
You can only remove an organization type if no members of this organization are linked to it.
To update the details in Digital Risk Protection, edit the information in it.
Select the Create a recipient group for this organization checkbox to automatically create a recipient group with the same name as the organization.
Note
You cannot deselect this checkbox while updating organization details. To stop using the group, inactivate the associated org-based group instead. For more information, see Recipient Group .
Turn on the Active toggle to activate the organization.
Note
If you are updating the allowed member email domains, ensure that all existing members have the specified email domains.
Click Update.
You can perform the following activities on the listing page:
Click Refresh to refresh the organization list.
Click Filter to search for organizations or filter them based on Email Notification Alert Delivery, Mobile Alert Delivery, Organization Levels, Organization Types, Webapp Alert Delivery, and Status (Active and Inactive).
To enable Intel Operations (Cyware ) for an organization, turn on the CO toggle for that organization.
Notice
This feature is available in v3.8.8.0 onwards.
You can create org-based groups to automatically include all members of an organization in a recipient group. These groups stay up to date as the organization changes, helping you manage communication and access more efficiently.
Before you Start
Ensure that you have the View and Create or Update permissions for the Organization feature.
Ensure that you have the Create or Update permissions for the Recipient Groups feature.
Steps
To create an org-based group, follow these steps:
Select the checkbox for one or more organizations for which you want to create associated recipient groups.
Note
You can bulk select multiple organizations to create multiple org-based groups. You will receive a status report in your email once the request is processed.
Click Create Recipient Group. An org-based group is created for each selected organization. You must update the recipient group details and enable the required features for each group manually in Settings > Core Settings > Recipient Group > Org-based Groups. For more information, see Recipient Group .
Note
If a recipient group with the same name already exists for a selected organization, you must rename either the organization or the recipient group before creating a new one.
Admins can add multiple IP addresses and domains to an organization's information page and manage them within a single space. In the Update Organization window, the IP Address(s) tab and the Domain(s) tab enable the management of information for the entries being provided. When entering multiple IP addresses and domains for an organization, they are automatically added to the Indicators Allowed module as trusted indicators. IP address and domain information can also be subsequently modified and deleted, once information for an organization has been populated, or downloaded in CSV file format and viewed offline.
Update Organization Domains
You can add trusted domains when creating or updating an organization in .
Before you Start
Ensure that you have the View and Create or Update permissions for the Organization feature.
Steps
To update the organization's domains, follow these steps:
Go to Administration > Settings > Member Settings > Organization.
In Organization Details, go to the organization that you want to edit, click the vertical ellipsis, and click Edit.
To add trusted domains to your organization, click the Domain(s) tab and then click Add.
Enter the domain name, a description, the provider organization, and a valid date range. Optionally, you can clear the Active check box if you would like to render your domain inactive. By default, the domain is set to active.
After making the required changes, click Add Domain.
The domain is now added to your organization as a trusted indicator.
Repeat steps 4 to 6, as needed, for each new domain that you want to add.
Alternatively, if you want to edit an existing domain, in the domain list, click the Edit icon next to the entry and follow steps 5 and 6.
Update Organization IPs
You can add trusted IP addresses when creating or updating an organization in .
Before you Start
Ensure that you have the View and Create or Update permissions for the Organization feature.
Steps
To update organization IPs, follow these steps:
Go to Administration > Settings > Member Settings > Organization.
In Organization Details, go to the organization that you want to edit, click the vertical ellipsis, and click Edit.
To add trusted domains to your organization, click the IP Address(s) tab and then click Add.
Enter the domain name, description, the provider organization, and a valid date range. Optionally, you can clear the Active check box if you would like to render your domain inactive. By default, the check box is selected.
After making the required changes, click Add IP Address.
Repeat steps 4 to 6, as needed, for each new IP address that you want to add.
Alternatively, if you want to edit an existing IP address, in the IP address list, click the Edit icon next to the entry and follow steps 5 and 6.
IP Address and Domain Management
Admins have the ability to add multiple IP addresses and domains to an organization's information page and manage them within a single space. In the Update Organization window, the IP Address(s) tab and the Domain(s) tab enable the management of information for the entries being provided. When entering multiple IP addresses and domains for an organization, they are automatically added to the Indicators Allowed module as trusted indicators. IP address and domain information can also be subsequently modified and deleted, once information for an organization has been populated, or downloaded in CSV file format and viewed offline.
You can add trusted IP addresses or domains when creating or updating an organization in CSAP.
To update domains for an existing organization, do the following.
Click the Management button and select Settings.
Click Member Settings and then click Organization.
In the Organization Details tab, navigate to the organization that you want to edit and click the Edit icon.
To add trusted domains to your organization, click the Domain(s) tab and then click Add.
Enter the domain name, a meaningful description, the provider organization, and a valid date range. Optionally, you can clear the Active check box if you would like to render your domain inactive. The check box is selected, by default.
When you are finished, click Add Domain.
The domain is now added to your organization as a trusted indicator.
Repeat steps 4 to 6, as needed, for each new domain that you want to add.
Alternatively, if you want to edit an existing domain, in the domain list, click the Edit icon next to the entry and follow steps 5 and 6.
To update IP addresses for an organization, do the following.
Click the Management button and select Settings.
Click Member Settings and then click Organization.
In the Organization Details tab, navigate to the organization that you want to edit and click the Edit icon.
To add trusted domains to your organization, click the IP Address(s) tab and then click Add.
Enter the domain name, a meaningful description, the provider organization, and a valid date range. Optionally, you can clear the Active check box if you would like to render your domain inactive. The check box is selected, by default.
When you are finished, click Add IP Address.
Repeat steps 4 to 6, as needed, for each new IP address that you want to add.
Alternatively, if you want to edit an existing IP address, in the IP address list, click the Edit icon next to the entry and follow steps 5 and 6.
Organization Types
Categorize organizations based on parameters such as the domain of operation, country of operation, etc, to make alert sharing easier.
Create Organization Types
You can create organization types to categorize organizations based on similarities and parameters such as the domain of operation, country of operation, etc, to make alert sharing easier.
Before you Start
You must have the View and Create/Update permissions for the Organization feature.
Steps
To create an organization type, do the following.
Navigate to Management > Settings > Member Settings > Organization > Organization Types and click Create.
Enter a name for the organization type. For example, Financial Institutions.
Make sure to activate the organization type using Active/Inactive and click Create.
Update Organization Types
You can update organization type details.
Before you Start
You must have the View and Create/Update permissions for the Organization feature.
Steps
To update an organization type, do the following.
Navigate to Management > Settings > Member Settings > Organization > Organization Types.
Hover on the details you want to update and click Edit.
Make the required changes and activate the organization type using Active/Inactive and click Update.
Manage Organization Types
You can perform the following activities on the listing page.
Click Refresh to refresh the organization type list.
Click Filter to search for organization types or filter them as per their status (Active, Inactive).
Create Organization Type
Categorize organizations based on similarities and parameters such as the domain of operation, country of operation, etc. to make alert sharing easier.
To create an organization type, do the following.
Navigate to Management > Settings > Member Settings > Organization > Organization Types and click Create.
Enter a name for the organization type. For example, Financial Institutions.
Make sure to activate the organization type using Active/Inactive and click Create.
Organization Levels
Organization levels allow administrators to group members within an organization by setting up a limit for adding the number of members to an organization. This allows administrators to relegate the task of managing members in a particular organization to a Member Administrator. Organization levels also allows administrators to determine the maximum number of members that can be part of their organization.
This feature is controlled by two configurations that can be enabled in Management > Configuration > Organization Management.
Organization Level Member Administration: Allows administrators to relegate selected members as Member Administrators and allow them to administer members from their organization under roles such as Member, Intel Approver, etc.
Limit number of users in an Organization: This allows administrators to configure how many members can be part of an organization based on the assigned organization level.
Create an Organization Level
You can create organization levels and assign them to organizations.
Before you Start
You must have the View and Create/Update permissions for the Organization feature.
Steps
To create an organization level, do the following.
Navigate to Management > Settings > Member Settings > Organization > Organization Levels and click Create.
Enter the level name. Levels can be mapped to organizations while creating them from the Organization Details section.
Enter the maximum count of members that can be part of the organization level.
Make sure to activate the organization level using Active/Inactive and click Create.
Bulk Update Organization Level
You can bulk assign an organization level to required organizations.
Before you Start
You must have the View and Create/Update permissions for the Organization feature.
Steps
To bulk update organization level to organizations, do the following.
Navigate to Management > Settings > Member Settings > Organization > Organization Levels.
Click Actions and select Bulk Update.
Select the organization to which you want to assign a threat level and select a threat level.
Click Update.
Update Organization Level
You can update the name and licence count of an existing organization level.
Before you Start
You must have the View and Create/Update permissions for the Organization feature.
Steps
To update organization level details, do the following.
Navigate to Management > Settings > Member Settings > Organization > Organization Levels.
Hover on the details you want to update and click Edit.
Make the required changes and activate the organization level using Active/Inactive and click Update.
Manage Organization Levels
You can perform the following activities on the listing page.
Click Refresh to refresh the organization level list.
Click Filter to search for organization level or filter them as per their status (Active, Inactive).
Create Organization Level
Organization levels allow Administrators to group members within an organization by setting up a limit for adding a maximum number of members to an organization. This allows administrators to relegate the task of managing members in a particular organization to a member administrator. Levels allow administrators to determine the maximum number of members that can be part of their organization. This feature is controlled by two configurations. These configurations can be enabled in the Organization Management section of Configurations.
Organization Level Member Administration: Allows CSAP Analyst Portal administrators to relegate selected members as Member Administrators and allow them to administer members from their organization under roles such as Member, Intel Approver, etc.
Limit number of users in an Organization: This allows CSAP Analyst Portal administrators to configure how many members can be part of an organization based on the assigned organization level.
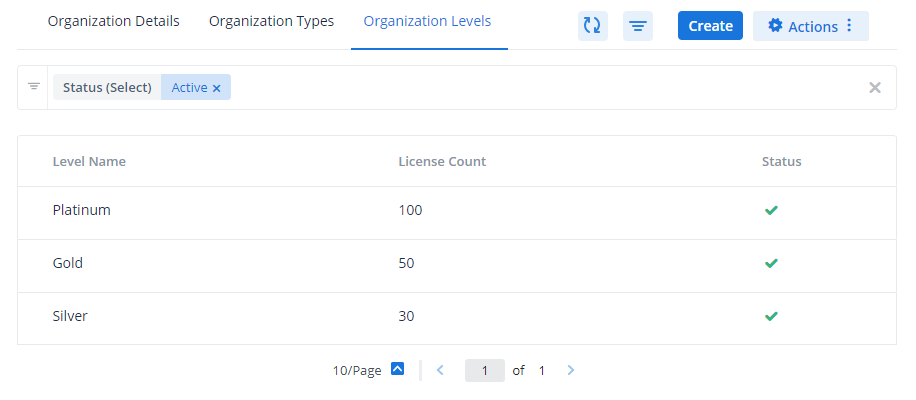
Steps to create Organization Level
To create an organization level, do the following.
Navigate to Management > Settings > Member Settings > Organization > Organization Levels and click Create.
Enter the level name. Levels can be mapped to organizations while creating them from the Organization Details section.
Enter the maximum count of members that can be part of the organization level.
Make sure to activate the organization level using Active/Inactive and click Create.
Theme Settings
Use Theme Settings to customize the logo and theme for the Member Portal web and mobile applications.
Logo Management
Customize the application to reflect your organization's branding by adding your organization's logo. When you add or update the logo, it is displayed in the Analyst Portal, Member Portal, as well as the Cyware Enterprise mobile application.
You can modify the primary logo for the Member Portal and the Cyware Enterprise mobile app for the light and dark modes. Additionally, you can also modify the default image used in alerts.
Before you Start
Ensure that you have the View and Update permissions to the Theme Settings module.
Steps
To modify the logos for the Member Portal web application and mobile application, follow these steps:
Go to Administration > Settings > Theme Settings > Logo Management.
To update the logo, click Edit. Use the following information:
To update the logo for the Member Portal and Analyst Portal web application, click Upload in Web App Primary Logo and select an image from your computer.
To update the logo for the Cyware Enterprise mobile app, click Upload in Mobile App Primary Logo.
You can also update the logos for dark mode in the Member Portal. The supported file types for logos include .png, .jpeg, and .jpg.
To update the default image while creating an alert, click Upload in Alert Default Image and select an image from your computer. This selected image will only appear during alert creation if the feature is enabled. For more information about enabling the alert default image, see Configure Alerts Settings.
The maximum allowed size for logo images and the default alert image is 1.5 MB each. To avoid exceeding the upload limit, either reduce the image size or upload and save one image at a time.
After making the changes, click Save Logo.
Note
You can only upload file types that are supported for your instance. For more information, see File Types.
Themes
You can personalize your CSAP experience by selecting a theme for the CSAP Member Portal web application. You can choose from a list of default themes such as Persian Blue, Capri Sea, Dual Indigo, and Electric Violet, or apply a custom theme based on your organization's branding.
To modify the theme, do the following.
Modify Theme
You can select a theme from the available list or create a custom theme and use in for your CSAP Member Portal web application.
Before you Start
You must have the View and Update permissions for the Theme Settings feature.
Steps
To modify the theme, do the following:
Navigate to Management > Settings > Theme Settings > Themes and click Edit.
To use a default theme, click the Default Themes radio button and select one of the following themes.
Persian Blue
Capri Sea
Dual Indigo
Electric Violet
To use a custom theme, click the Create Custom Theme radio button and then click Edit Custom Theme. A color picker dialog box opens, where you can select a specific color and shading for your theme. Alternatively, you can enter a hexadecimal color value into the text field.
After finishing, click Save Theme.
Other Settings
As an administrator, you can manage and customize aspects of the Analyst Portal features such as access control, crisis management, email accounts, file types, knowledge base, license management, menu, speedbump, and more.
Access Control
CSAP offers enhanced security with the access control feature. Access control enables admins to allow or block countries or IP addresses for allowing or restricting respective users to access the CSAP Analyst Portal.
Note
Ensure that you are connected to a public network to retrieve country and IP address details.
Configure Access Control for CSAP
You can configure access control for your CSAP application.
Before you Start
You must have the View and Create/Update permissions for the Access Control feature.
Steps
To apply access control mode, do the following:
Navigate to Administration > Settings > Other Settings > Access Control.
To activate access control, turn on the Enable Access Control toggle in the upper-right corner.
Apply a Mode to Access Control: Admins can enable the allow access or block access mode. Allow access mode provides access only to users from the listed countries and IP ranges. On the other hand, the block access mode restricts access from the listed countries and IP ranges. It is a best practice to add your country and IP to the allowed list before enabling the feature.
Note
The feature only works when either country and IP addresses are allowed or blocked. Enabling or disabling the feature will have no impact if no data is configured.
Add IP addresses to the Block List or Allow List
You can add allow or block a list of IP addresses.
Before you Start
You must have the View and Create/Update permissions for the Access Control feature.
Steps
Select IP/IP Range and click Add.
Enter all the IP addresses separated by commas on the Add to Allow List/ Add to Block List form.
Provide a suitable reason for your allowing or blocking the IP addresses. This is a mandatory field.
Click Add.
Click Edit to edit the countries, IP address, or reason.
Click Delete to delete a country or IP address.
Add Countries to the Block List or Allow List
You can allow or block a list of countries.
Before you Start
You must have the View and Create/Update permissions for the Access Control feature.
Steps
Select Country tab and click Add.
Select the required countries from the drop-down.
Provide a suitable reason for your allowing or blocking the countries. This is a mandatory field.
Click Add.
Click Edit to edit the countries, IP addresses, or reasons.
Click Delete to delete a country or IP address.
Crisis Management Settings
Crisis Management is a structured information dissemination feature that allows top management executives with permission to send crisis alerts to a group of specific individuals. Crisis alerts are usually initiated in case of an emergency where the top management wants to gauge the impact of an incident. Users who receive crisis alerts can promptly respond to these alerts at the earliest possible time.
Create Crisis Management Template
Analysts can create crisis management templates from settings and quickly reduce the effort to create crisis alerts.
Before you Start
You must have the View and Update permissions for the Crisis Configuration feature.
Steps
To create a new crisis management template, do the following.
Navigate to Management > Settings > Other Settings > Crisis Management.
Click Create.
Enter a title for the crisis management template. For example, Ransomware Crisis Alert.
Enter a suitable description for the template to allow users to understand the usage of the template. For example, This template is used to send Crisis Notification alerts at time of ransomware alert crisis.
Select a TLP for the crisis management template. TLP ensures that the alert information is rightly shared with appropriate recipients.
Note
The selection of the TLP corresponds with the TLP hierarchy of the recipient groups for the alert. For example, if TLP AMBER is assigned to a crisis alert, the alert cannot be shared with recipient groups that have TLP lower in the hierarchy such as GREEN and WHITE.
Select your preference to send notifications for the template.
Mobile Push Notification: Sends a push notification for the alert to mobile devices that have installed the Cyware Enterprise Mobile app.
Email Alert: Sends an email notification to recipients.
SMS Alerts: Sends SMS alerts to recipients.
Voice Alert (Phone Call): Calls the recipients via phone to alert them about the crisis.
After finishing, click Create.
Note
Use the Create from Templates in Main Menu > Crisis Management to utilize the templates for crisis alert creation. The title and description from the template will be automatically filled into the crisis alert. CSAP will publish a crisis alert using the Crisis Notification category.
Update Crisis Management Template
You can update existing crisis management templates and make sure the details are up to date for reuse.
Before you Start
You must have the View and Update permissions for the Crisis Configuration feature.
Steps
To update an existing crisis management template, do the following.
Navigate to Management > Settings > Other Settings > Crisis Management.
Hover over the template you want to update and click Edit.
Make required changes to the template. See Create Crisis Management Template
Click Update.
Email Accounts
You can integrate and map your email account inbox and access emails directly from the Analyst portal. The configured email inbox can be accessed via the Email Submissions menu of the Analyst Portal. Emails received in the configured inbox can be used to create and share the alerts to recipient groups from the Analyst Portal.
Configure Email Account
You can configure your email account to directly access emails received in your inbox.
Before you Start
You must have the View and Create/Update permissions for the Email Submission Settings feature.
Steps
To configure an email account, do the following.
Navigate to Administration > Settings > Other Settings > Email Accounts.
Click Create.
Enter a name for the email account. For example, Phishing Email Inbox.
Add the server information to retrieve emails from the email server.
Select the email protocol for the email account. Available protocols include Internet Messaging Access Protocol (IMAP), Post Office Protocol (POP3), and Exchange Web Services (EWS). If you select EWS, the latest 100 emails sent to your account are displayed in Email Submissions. Additionally, if you delete any emails in your original email account, it is not automatically deleted in CSAP.
Enter the port number for the email communication. For example, 443.
Enable SSL Encrypted to help you secure communication between a browser client and a server. If you consider email security, an SSL makes sure that no data in your mail is exposed to Man-in-the-Middle (MITM) during transit.
Specify the email domain for the email account. For example, mail.google.com. The EWS email default domain is outlook.office365.com.
Enter the user's email and secret key or password for the email account. For IMAP and POP3 account types, enter the password. For EWS, enter the secret key.
Add email addresses to view emails from specific senders in the Email Submissions inbox. For example, if you add username@example.com in Sender Whitelisting, you will only be able to view emails from this address in Email Submissions. You can add multiple email addresses in this field. If no email address is specified, all emails sent to your email account are visible.
Make sure to activate the email account using Active/Inactive and click Create.
Note
After adding email addresses in Sender Whitelisting, emails from these addresses are visible after a buffer time of 5 to 10 minutes.
Update Email Account
You can update an existing email account configuration.
Before you Start
You must have the View and Create/Update permissions for the Email Submission Settings feature.
Steps
To update an existing email account configuration, do the following.
Navigate to Management > Settings > Other Settings > Email Accounts.
Hover over the email account you want to configure and click Edit.
Make required changes to the email account configuration. See Configure Email Account.
Make sure to activate the email account using Active/Inactive and click Update.
Search and Filter Email Account
You can search and filter email accounts from the list. You can directly search using a keyword or filter by parameters such as status (active, inactive).
Email Management
The email management feature contains in-built and customizable email templates for admins to send email notifications. You can modify the templates with the desired look and include the right information required by the members. You can customize the email notifications sent from using the new in-built WYSIWYG template builder which makes it easy to add the necessary images and content to meet specific requirements.
Modify Email Templates
The templates are categorized as actions, alerts, login and user registration, request for information, threat intelligence, surveys, and others.
Before you Start
Ensure that you have the View and Create or Update permissions for the Email Management feature.
Steps
To edit a template, follow these steps:
Go to Administration > Settings > Other Settings > Email Management.
Click on the ellipses for the template you want to modify and select Edit Template.
You can edit the subject and body of the template as required. Simply drag and drop the required placeholders to the email body or use the WYSIWYG editor to modify the template body.
Click Preview to view the changes in the template.
After finishing, click Save to update the template with the changes.
File Types
The file types page shows the list of formats that can be uploaded to the CSAP application by members or analysts. You can enable or disable supported file types for the Analyst Portal or the Member Portal.
Configure File Types
You can configure the supported file types for your CSAP features.
Before you Start
You must have the View and Create/Update permissions for the File Types feature.
Steps
To configure the supported file types for CSAP, do the following.
Navigate to Management > Settings > Other Settings > File Types.
On the File Types page, click Update.
In the Analyst Portal and Member Portal columns, toggle the options for different file extensions on or off, as needed.
Important
Some file types, such as .exe, zip, and several others listed on the File Types page, are prone to increase the risk of malicious file upload. By making any edits to this list, you accept the risk of malicious file upload by allowing extra file extensions.
Once you are finished, click Save Changes.
Alternatively, if you do not want to save your changes, click Cancel.
The following extensions are supported in CSAP:
Extension | Media Type |
|---|---|
application/pdf | |
.txt | text/plain text/x-c++ text/x-asm |
.doc | application/msword application/vnd.openxmlformats-officedocument.wordprocessingml.document |
.docx | application/vnd.openxmlformats-officedocument.wordprocessingml.document application/vnd.openxmlformats-officedocument.wordprocessingml.template application/octet-stream application/msword |
.csv | text/csv text/plain text/html application/vnd.ms-exce application/csv |
.xls | application/vnd.ms-excel application/msword |
.xlsx | application/vnd.openxmlformats-officedocument.spreadsheetml.sheet application/vnd.openxmlformats-officedocument.spreadsheetml.template application/vnd.ms-excel,application/octet-stream application/msword |
.pptx | application/vnd.openxmlformats-officedocument.presentationml.presentation application/vnd.openxmlformats-officedocument.presentationml.template application/vnd.openxmlformats-officedocument.presentationml.slideshow application/octet-stream,application/vnd.ms-powerpoint |
.jpg | image/jpeg |
.jpeg | image/jpeg |
.png | image/png |
.mov | video/mp4 application/mp4 video/x-msvideo text/vnd.wap.wml video/x-sgi-movie audio/mp4 |
.mp4 | video/mp4 application/mp4 video/x-msvideo text/vnd.wap.wml video/x-sgi-movie audio/mp4 application/octet-stream |
.3gp | application/octet-stream video/x-msvideo text/vnd.wap.wml video/x-sgi-movie video/3gpp |
.3gpp | application/octet-stream video/x-msvideo text/vnd.wap.wml video/x-sgi-movie video/3gpp video/3gpp2 |
.json | application/json application/javascript text/plain |
.xml | application/xml text/xml text/plain |
.zip | application/zip application/x-zip-compressed application/octetstreamapplication/x-tar application/gzip,application/x-gzip |
.7z | application/x-7z-compressed |
.rar | application/x-rar application/x-rar-compressed application/octet-stream application/vnd.rar |
.gz | application/gzip application/x-gzip |
.log | text/plain text/x-log |
.evtx | application/octet-stream |
.msg | application/vnd.ms-outlook application/CDFV2-unknown message/rfc822 application/octet-stream |
.eml | message/rfc822 |
.dcm | application/dicom |
.yar | text/plain |
.m4a | audio/mp4 audio/x-m4a video/mp4 |
.mp3 | audio/mpeg |
.ics | text/calendar |
.vss | application/vnd.ms-office application/octet-stream |
.vsdx | application/octet-stream application/vnd.visio application/vnd.ms-visio.drawing application/vnd.ms-visio.viewer |
.vstx | application/octet-stream application/vnd.visio |
.dotx | application/vnd.openxmlformats-officedocument.wordprocessingml.document application/vnd.openxmlformats-officedocument.wordprocessingml.template |
vsd | application/vnd.ms-office application/vnd.visio application/vnd.ms-visio.viewer application/octet-stream |
.md | text/plain text/markdown text/x-markdown |
Knowledge Base Settings
The Analyst Portal consists of a dedicated Knowledge Base (KB) that allows you to access extensive material including various policies, guidelines, handbooks, and standard operating procedures for your organization. Knowledge Base articles are classified under various categories and sub-categories.
Create Knowledge Base Category
You can create Knowledge Base categories to group associated KB articles
Before you Start
You must have the View, Create, and Update permissions for the Knowledge Base settings.
Steps
To create a Knowledge Base category, follow these steps:
Go to Administration > Settings > Other Settings > Knowledge Base.
Click Create.
Name: Enter the name for the new knowledge base category. For example, Policies.
(Optional) Sub-categories: To add a sub-category, click Sub-category. You can add up to 20 sub-categories for a KB category.
Turn on the Active toggle.
Click Create. The category is now available while creating or updating KB articles in the Knowledge Base. For more information, see Create a Knowledge Base Article.
Note
Only active knowledge base categories can be seen by users in the CSAP Member Portal. CSAP users can see active knowledge base categories while uploading documents to the knowledge base on the CSAP Analyst Portal.
Update Knowledge Base Category
You can modify details of existing knowledge base categories.
Before you Start
You must have the View and Create/Update permissions for the Knowledge Base Settings feature.
Steps
To update an existing knowledge base category, follow these steps:
Go to Administration > Settings > Other Settings > Knowledge Base.
Hover over the category you want to edit, click the vertical ellipsis, and select Edit.
Note
Ensure you turn on the Active toggle to make the category available while creating or viewing KB articles.
After making the required changes, click Update.
Search and Filter Knowledge Base Categories
You can search and filter categories from the list. You can directly search using a keyword or filter by parameters such as status (active, inactive).
Menu
CSAP administrators can customize the menu and submenu items on the sidebar navigation in the CSAP Member Portal. Administrators can pin submenus as default in the Member Portal sidebar. The Menu section shows the names of all menus and submenus available in the Member Portal. Administrators can rename menu and submenu names from the Menu section.
Administrators can also allow their members to modify pinned menu items based on their preferences.
Enable Menu Configuration in the CSAP Member Portal
Use the Enable Menu Configuration in the CSAP Member Portal to allow members to customize the menu and submenu item names in the Member Portal. If this toggle switch is turned off, the default menu and submenu names will be shown in the Member Portal.
Customize Menu and Submenu
Admins can customize the menu and submenu item names and arrange the order of the menu items on the Member Portal sidebar.
Administrators can pin up to 4 key features in the Member Portal sidebar to provide quick access to any new member.
Members can easily change the pinned features in the Member Portal later, by unpinning the default features and pin features used most frequently.
Before you Start
You must have the View and Update permissions for the Menu feature.
Steps
To customize the menu and submenu, do the following.
Click on Update from the top-right to start customizing the menu and submenu names.
Click on Edit for a required menu to modify the menu and submenu names. The default menu and submenu name will be shown in the field to allow administrators to revert back to default settings.
After finishing, Update.
Click on Save Changes to apply new settings.
Note
On the first login, members can see the menu items in the order arranged by the admin. Members can also rearrange the menu items based on their individual preferences.
Speedbump
Speedbump adds an extra authentication layer to important activities performed in the Analyst Portal. CSAP administrators can configure preferences to mandate analysts to verify the alert through an authentication and confirmation pop-up before they publish it.
Enable and Configure Speedbump
You can configure speedbump preferences to enable speedbump for important activities such as alert publish.
Before you Start
You must have the View and Create/Update permissions for the Settings feature.
Steps
Navigate to Management > Settings > Other Settings > Speedbump.
Enable speedbump using the Enable Speedbump toggle on the top-right corner. This displays the status as Enabled near the speedbump title.
Click Edit to configure speedbump preferences.
Select Conditions and specify the conditions for using speedbump. See Speedbump Conditions.
Click Save and Proceed.
Select Authentication and specify the authentication method for the speedbump. See Speedbump Authentication Methods.
Click Save and Enable to save speedbump configuration. You can also use Save as Draft to enable the configuration later.
Speedbump Conditions
Speedbump pop-up can be enabled for alerts based on defined conditions. The conditions are detailed below.
Admin Activities Conditions
You can configure your preferences to automatically enable the speedbump authentication pop-up when admins attempt to make changes in the following modules.
Module | Speedbump Condition |
|---|---|
User Management |
|
Settings |
|
Integrations |
|
Configurations |
|
Alert Conditions
You can configure your preferences to automatically enable the speedbump authentication pop-up based on details provided in the alert.
Alert Component | Speedbump Condition |
|---|---|
For Alerts with TLP | Enable speedbump authentication based on TLP. For example, analysts must enter the last 4 digits of their phone number for alerts with Red TLP. |
For Alerts with Categories | Enable speedbump authentication based on categories selected while creating alerts. |
When number of Indicators are more than | Enable speedbump authentication based on the number of threat indicators in an alert. |
Percentage of Recipients out of total Members | Enable speedbump authentication based on the recipient count. For example, enter the OTP sent to the phone if the alert is to be sent to more than x% of users. |
Alert Includes
You can configure your preferences to automatically enable the speedbump authentication pop-up based on the following alert content inclusions.
Inclusion | Speedbump Condition |
|---|---|
Attachments | Enable speedbump authentication if the alert content contains attachments. |
Threat Assessment | Enable Speedbump authentication if the alert content contains threat assessment. |
Conference Call | Enable speedbump authentication if the alert content contains a conference call link. |
Mobile Push Notification | Enable speedbump authentication if the mobile push notification option is enabled for the alert. |
Email Notification | Enable speedbump authentication if the email notification option is enabled for the alert. |
Crisis Notification | Enable speedbump authentication if the alert is a crisis notification. |
Speedbump Authentication Methods
Different authentication methods can be configured for verification when speedbump is enabled. The following methods can be enabled.
Verification Method | User Activity |
|---|---|
OTP to the Registered Email ID | Users will receive a One Time Password (OTP) on their registered emails to authorize speedbump confirmation. |
OTP to the Registered Phone Number | Users will receive One Time Password (OTP) on their registered mobile numbers to authorize speedbump confirmation. |
Last 4 digits of the Registered Phone Number | Users must enter the last four digits of their registered mobile number emails to authorize speedbump confirmation. |
Show a reCAPTCHA | Users must enter the displayed reCAPTCHA to authorize speedbump confirmation. |
Support
Add custom support details to the Collaborate (CSAP) Member Portal sign-in page, to help members with login issues, security concerns, account recovery, and more.
Steps
Sign in to the Analyst Portal.
Navigate to Administration > Settings > Other Settings > Support. Use the following information while entering support details:
Enter the support email address and contact details.
In Other Details, enter additional support information for members when they sign in to the CSAP Member Portal. These may include FAQs, troubleshooting guides, information about your organization, and any other details.
Note
The support details appear in the lower half of the Member Portal login page.
Click Save Changes. This information is now available for members while signing in to the Member Portal.
Traffic Light Protocol (TLP)
The Traffic Light Protocol (TLP) is a set of designations that ensure sensitive information is correctly shared with the appropriate recipients. In CSAP, the TLP hierarchy allows analysts to disseminate information such as alerts, doc library files, and intel reports to appropriate recipients by using TLP colors.
Analysts can provide custom descriptions for every TLP color available in the hierarchy. CSAP supports both TLP 1.0 and TLP 2.0 standards. To select a TLP version for your CSAP instance, see Configure Collaborate Features
Modify TLP Description
You can modify the default descriptions designated for the TLP colors to suit your requirements.
Before you start
You must have the View and Update TLP permission to access the features in Settings > Other Settings > TLP.
To modify a TLP description:
From Administration, click Settings.
Click Other Settings.
The TLP colors are shown based on the TLP version selected for your CSAP instance. To select a TLP version for your CSAP instance, see Configure Collaborate Features
Click Edit to change the description and click Save.
Terms of Use
allows you to access and manage a user agreement, which is displayed on the login page of the Member Portal. As an analyst, you can customize the user agreement for members to align with your organization's policies.
Before you Start
Ensure that you have the View and Update permissions for the Terms of Use feature.
Steps
To manage the terms of use, follow these steps:
Go to Administration > Settings > Other Settings > Terms of Use. Use the following information:
Click Edit to modify the title and description for the terms of use. After making the changes, click Save.
Turn on the Enable in Member Portal toggle to display the terms of use in the Member Portal.
Turn on the Show on Every Login toggle to display the terms of use after every user login. You can only use this if you enable Enable in Member Portal.
Click Reset Terms of Use to prompt members to re-accept the terms of use within the same session. If members reload the page or switch to other features, they will be prompted to accept the user agreement again.
Threat Levels
CSAP users can now use the threat level indicator feature to indicate the current level of malicious cyber activity and reflect the potential/actual damage caused by the threats. Threat levels are determined and communicated to members based on the specific organization's security requirements. Security teams can determine and update threat levels based on various parameters such as likely damage due to the threat, target of the threat, preventive measures that are in place, and other crucial data such as lethality and criticality of the threat.
Before you Start
You must have the View and Create/Update permissions for the Threat Levels feature.
Map Threat Levels
To map threat levels with threat type and threat criteria, do the following.
Navigate to Management > Settings > Alert Settings > Threat Levels.
Select Types and click Create.
Enter a name for the threat type. For example, Critical Vulnerability.
Click Create.
Switch to Criteria and click Create.
Enter a name and description for the criteria. For example, Critical Threat.
Click Create.
Switch to Levels and click Create.
Enter a unique name and description for the threat level.
Select criteria from the list and click Create.
Create Criteria
This section details the procedure to create a criteria value. Criteria can be mapped to threat levels.
Click the Create button from the Criteria tab and provide a name for the Threat Criteria. The name can be seen when creating new threat levels.
After finishing, click Save.
Create Threat Type
This section details the procedure to create a threat type value. Threat types can be mapped with threat levels.
Click the Create button from the Threat Types tab and provide a name for the Threat Type. The name can be seen in the Threat Levels module while mapping Threat Types with Threat Levels.
After finishing, click Save.
Create Threat Level Mapping
Map the threat criteria, level, and types to create a threat level mapping that will be displayed to members on the Member Portal.
The threat levels, types, and criteria can be used to create a bulletin of information that the member can use as a reference.
Before you Start
You must have the View and Create/Update permissions to access Threats Levels. Permissions can only be assigned to a role.
You must have created the Criteria, Levels, and Types from Settings. See Threat Levels.
Steps
From Main Menu, select Threat Levels.
Click New.
Select the Threat Type, Threat Level, and Threat Level Criteria.
The threat type can be, Classified Information breach, Critical Intel Sharing, Phishing Attacks, and so on.
The threat level can be high, low, medium, critical, elevated, and so on.
The threat level criteria can be classified information, and so on.
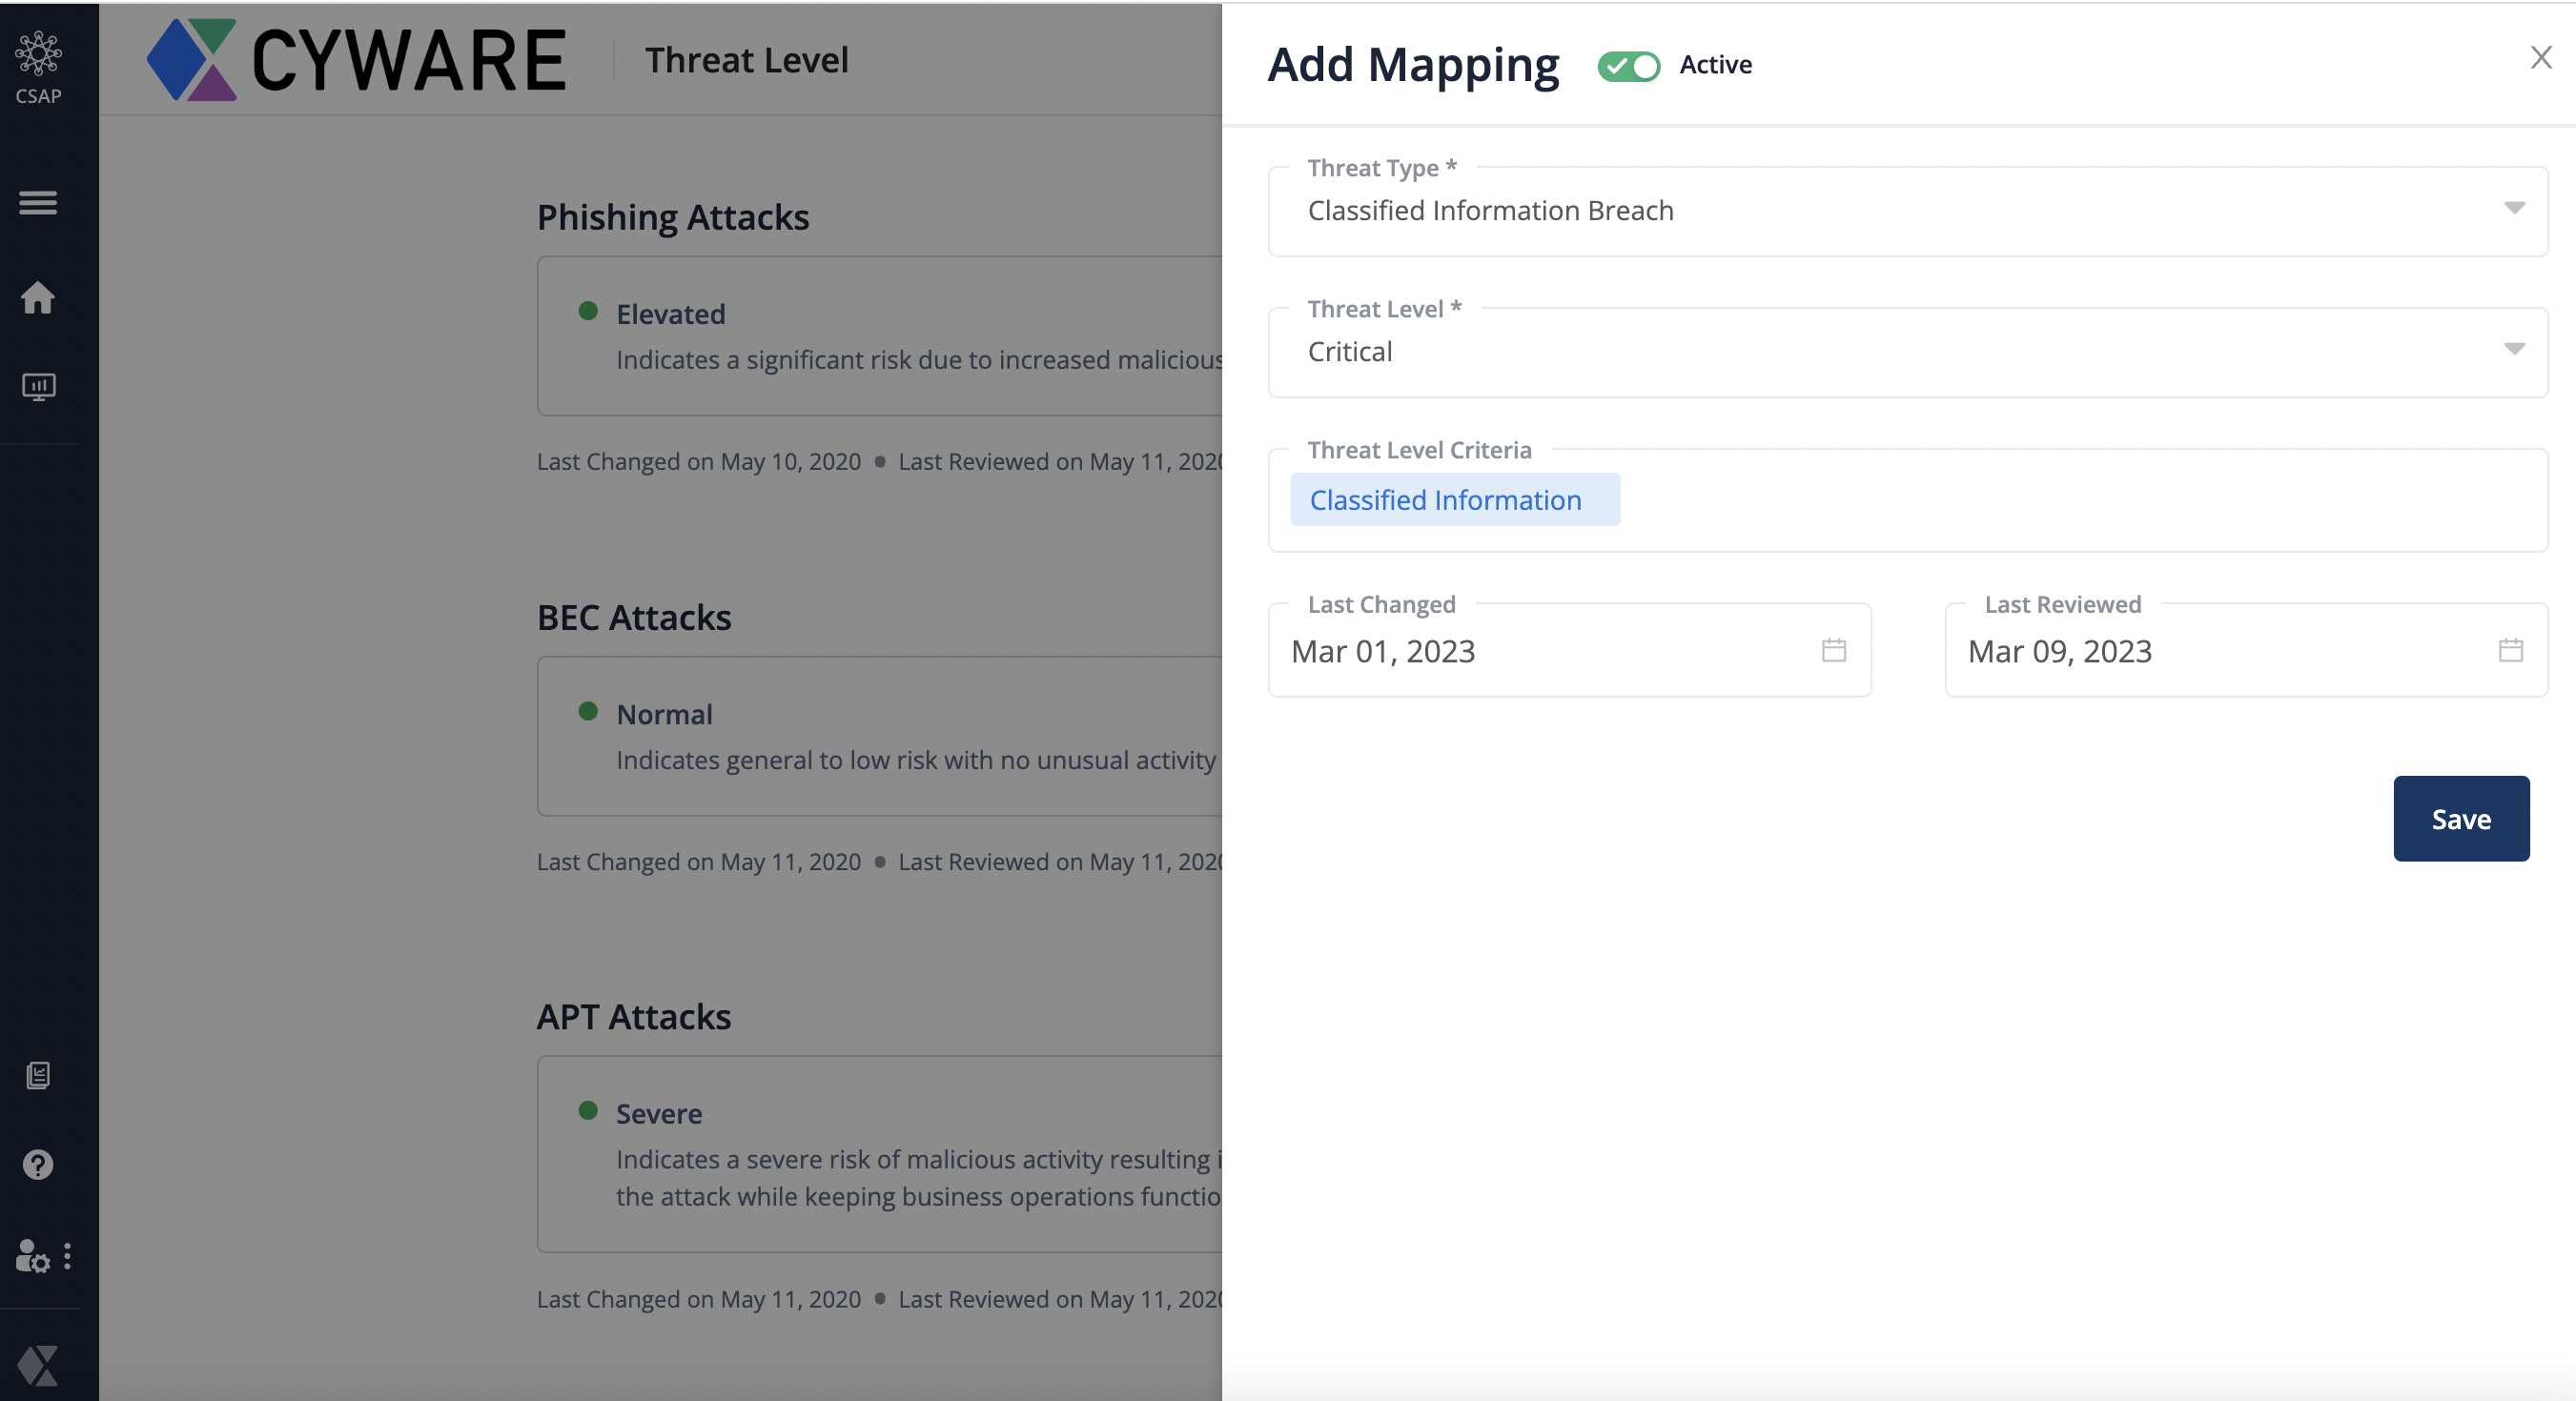
Enter the last changed and the last reviewed dates so that members can understand when the information was released and updated.
Click Active to use this mapping.
Click Save.
Map Threat Levels
This section details the procedure to map threat levels.
Click on the Mapping button.
Note
Fields marked with * are mandatory.
Field name | Definition |
Threat Type* | Function Allows you to select the threat type you wish to map. Threat type configured in the settings module will be available for selection here. Activity Use the drop-down menu to pick a threat type. |
Threat Level* | Function It allows users to define the threat level. Threat levels configured in the settings module will be available for selection here. Activity Use the drop-down menu to define a threat level. |
Last Changed | Function It allows users to document the date of the change. Activity Mark a change date. |
Last Reviewed | Function Allows users to document the date of the review. Activity Mark a review date. |
Once done, click on Save.
Widget Management
The Widget Management page contains the settings for widgets that are used in the Dashboard. You can view all system widgets that are available, by default, or create your own custom widgets using custom fields.
Create Custom Widgets
You can create custom widgets for your dashboard.
Before you Start
You must have the View and Create/Update permissions for the Settings feature.
Steps
To create a custom widget, do the following.
Navigate to Management > Settings > Other Settings > Widget Management > Custom Widget and click Create.
Enter a title for the widget. For example, Alert vs Intel.
Activate the widget status using Active/Inactive.
Select a widget type (available options include Hero or Chart).
Select a category for the widget. For example, Alert.
Specify axial data values for the hero widget and chart.
Choose a graphical representation to depict the data.
Note
If you selected Hero, specify a Value. If you selected Chart, specify a Chart Type. You can also see a preview of the widget after selecting the data values
Once you are finished, click Create to create the widget in the defined category.
Note
You can only create custom widgets for custom fields.
License Management
License Management displays the license details, such as the license key, expiry date, tenant name, tenant code, and the application version. You can also view the licensed components that display the type and number of accounts. Click Sync Now to view the latest component data.
Before you Start
Ensure that you have Create and Update permissions for License Management.
Note
Only root admins can view License Management.
Steps
To update the license, follow these steps:
Go to Administration > Settings > Other Settings.
Click License Management.
From License, click the vertical ellipsis, and click Update.
Enter a new license key, and click Save.
The license key is updated and you can view the corresponding expiry date.
Configure MCL Settings
Member Contribution Level (MCL) is a factored scoring mechanism that allows analysts to automatically generate confidence statements for the intel shared by members. An example of a confidence statement is, "The source of this threat intel is a new provider who is somewhat reliable, and the information in this threat Intel can't be reviewed for accuracy." The confidence statement in the threat intel submission helps analysts understand the credibility of the intel shared by the members. You can set preferences in the MCL to define Information Accuracy (IA), Source Reliability (SR), and Reporting Frequency (RF) to determine the MCL confidence statement.
Configure MCL Parameters
MCL is automatically generated based on the configuration of IA, SR, RF, and CA. Based on the MCL value generated, analysts can configure the MCL levels and automatically attach them to the confidence statement. Configure the Weightage Configuration and Statement Configuration parameters to generate a MCL confidence statement.
Configure Weightage for MCL Level
Configure weightage for each MCL level to automatically generate a confidence statement. The weightage configuration consists of a value with a percentage range. You can configure the value and percentage range. When the MCL level is between a specified percentage range, the associated value is automatically added to the confidence statement which helps analysts to determine the MCL of the member.
Steps
Click Edit to add MCL levels, and select Weightage Configuration.
Enter the name of the MCL level in the Category, such as Exceptional Contributor.
Enter the minimum measurement limit for the MCL level in From, such as 10%.
Enter the maximum measurement limit for the MCL level in To, such as 15%.
Click Update to save the changes.
Click Add More Choices to add multiple MCL Levels.
Click Remove to delete the MCL Level.
Configure MCL Statement
MCL statement is an automatically generated confidence statement attached to a threat intel submission. The statement helps you understand the frequency, accuracy, and reliability of the threat intel shared by the members. You can generate your own confidence statement by configuring the placeholders mentioned in the following steps.
Before you Start
Ensure you have configured values for Information Accuracy, Source Reliability and Reporting Frequency.
Steps
Click MCL > Edit to create your MCL confidence statement and select Statement Config.
In Body, use the placeholders
{{submission_type_value}}, {{source_reliability_value}}, {{reporting_frequency_value}}, and {{information_accuracy_value}}, such as The source of this threat intel is a frequent provider who is usually reliable, and the information in this threat intel is probably accurate.Click Update to save the changes.
Contribution Average
CA is an average value of the number of intel received from the number of organizations or entities. For example, if you receive a total of 100 intel from 3 organizations, the CA value is 33.
Information Accuracy
IA is an assessment of the accuracy of the alert shared by analysts based on member rating. This parameter has five values that can be modified and configured by the analyst against every organization or entity. Based on the member rating, analyst can configure IA value to automatically attach it to the MCL confidence statement. For example, if IA value is 4, then the confidence statement automatically takes the value as is probably accurate.
Click Edit to modify the IA value.
In the Value field enter the name of the IA value. For example, PROBABLY ACCURATE.
In the Value (Confidence Statement) field enter the confidence statement value that describes the accuracy level for shared alerts. For example, is probably accurate.
In the Weight field enter weight to rate the accuracy level of the shared intel. For example, 4.
Click Update to save the changes.
Source Reliability
SR is a value that allows analysts to evaluate the reliability of the intel shared by the member. This parameter has five values that can be modified and configured against every organization or entity by the analyst. Based on the rating, analysts can configure SR value and automatically attach it to the MCL confidence statement. For example, if SR value is 4, then confidence statement automatically takes the value as who is usually reliable.
Click Edit to modify the SR value.
In the Value field enter the name of the SR value. For example, USUALLY RELIABLE.
In the Value (Confidence Statement) field enter the confidence statement value that describes the source reliability level for the shared intel. For example, who is usually reliable.
In the Weight field enter the weight to rate the source reliability level of the submitted intel by member. For example, 4.
Click Update to save the changes.
Reporting Frequency
RF is the value that will allow the analyst to evaluate the frequency of intel submissions by the members. This is an average value of the number of submissions to the number of members in an organization. This parameter has four values and analysts can create or modify existing values. Based on the CA percentage, RF is derived against every submission made by the member. For example, the confidence statement automatically takes frequent value when the RF value is between 76% and 122% of the CA value.
Click Edit to modify or add more RF categories.
In the Category field enter the name of the category. For example, frequent.
In the Form field enter the minimum percentage of CA for the category. For example, 76%.
In the To field enter the maximum percentage of CA for the category. For example, 126%.
Click Add More Choices to add new categories.
Click Remove icon to delete the category.
Click Update to save the changes.
Organization Configuration
This module of MCL Settings contains the Source Reliability weight of each organization. You can also view and update the weight. You need to have the View and Create or Update permissions to access the features in the Settings module. These permissions can be assigned only to a Role.
Use the Filter button to search for categories or filter them as per their organizations.
Click Edit icon to configure the organization.
The Organization field displays the organization name.
In the Source Reliability, select the Weight from the drop-down list to rate the source reliability level of the organization.
Click Update.
Configure Collaborate Preferences
Administrators can configure the various functions of the Analyst Portal and Member Portal by setting preferences. You can control the functions of different features on a granular level, maximize security awareness across users, enable security analysts to utilize these features, and comply with the requirements of your security team.
Configure Analyst Portal Preferences
You can configure and manage preferences for a few important Analyst Portal modules. To configure these preferences, you must be an admin or a root admin.
Steps
To configure Analyst Portal preferences, follow these steps:
Go to Administration > Configuration, and click Analyst Dashboard.
Click Edit and configure the following preferences:
Inactivity Timeout (in minutes): Enter the time in minutes before a user session is terminated due to inactivity, thereby freeing up server resources. The default value is 15 minutes.
Session Timeout (in days): Enter the time in days before a session is terminated for a user. The default value is one day.
Data Retention Policy: Select the number of years for which retains data of your organization.
Default Doc Library Folder for Third Party Files: The default folder in the Doc Library for third-party files. To specify your preferences, click Change path. Click the breadcrumb trail to navigate to a folder path or search for the folder using filters in Search or filter results. Click Create Folder to create a new folder and assign the recipient groups. Click Select Path to set the specified folder as the default path.
Allow Analyst to create Tags: Turn on the toggle to allow analysts to create new tags and associate them with alerts. The default value is Yes.
Default Doc Library folder for files attached to Alerts created via Member Submission: The default Doc Library folder for attachments from member submissions that were created as alerts. To specify your preferences, click Change path. Click the breadcrumb trail to navigate to a folder path or search for the folder using filters in Search or filter results. Click Create Folder to create a new folder and assign the recipient groups. Click Select Path to set the specified folder as the default path.
Allow Self Destruction of Alerts: Turn on the toggle to allow analysts to create alerts that are automatically deleted after a specified time. Members will no longer be able to view alerts that have self-destructed. The default value is No.
File Size Upload Limit (in MB): Enter the maximum upload size of a file in megabytes. This limit applies to file uploads in both the Analyst and Member Portals. For example, if the file size is limited to 50 MB, you can only upload files of size 50 MB or less. The default value is 100 MB. To increase the maximum configurable file size, contact Cyware support.
Default Doc Library Folder for Export Alert: To specify your preferences for the default Doc Library folder for exporting alerts, click Change path. Click the breadcrumb trail to navigate to a folder path or search for the folder using filters in Search or filter results. Click Create Folder to create a new folder and assign the recipient groups. Click Select Path to set the specified folder as the default path.
Default Doc Library Folder for Indicators related to Alerts: To specify your preferences for the default Doc Library folder for indicators related to alerts, click Change path. Click the breadcrumb trail to navigate to a folder path or search for the folder using filters in Search or filter results. Click Create Folder to create a new folder and assign the recipient groups. Click Select Path to set the specified folder as the default path.
Refresh Custom Dashboards (in minutes): Enter the time in minutes to configure a refresh schedule for the data on the Analyst Portal. This will periodically fetch the latest and most relevant data in the dashboard. The default value is 30 minutes.
Export survey responses with respondent details: Turn on the toggle to enable the export of survey responses along with the respondents' email addresses. The default value is Yes.
Auto Deliver Threat Defender OSINT Content: Select the recipient groups who will receive the Threat Defender Library OSINT content automatically.
Click Update.
Configure Notifications
Configure and manage users who can receive reports and feedback as email notifications in the CSAP Analyst Portal.
Steps
Navigate to Management > Configuration and select Notifications.
Click Edit and set the following preferences.
Weekly Report Recipients: Enter the email addresses of users who can receive weekly reports for CSAP user activity. You can type multiple email addresses separated by a comma (,).
Alert Feedback Recipient: Enter the email addresses of users who can receive feedback related to alerts. Any member feedback on alerts is also sent to these email addresses. You can type multiple email addresses separated by a comma (,). The default value is feedback@cyware.com.
Support Query Recipient: Enter the email addresses of users who can receive CSAP Analyst Portal support queries. You can type multiple email addresses separated by a comma (,). The default value is support@cyware.com.
Unauthorized Login Notification Recipients: Enter the email addresses of users who can receive notifications related to unauthorized sign-ins or sign-in attempts on the CSAP Analyst Portal. You can type multiple email addresses separated by a comma (,).
Click Update.
Configure Email Alerts
The Email Alerts tab enables only an admin or root admin to set and manage preferences related to alerts that are sent to CSAP users as emails.
Steps
Navigate to Management > Configuration and select Email Alerts.
Click Edit and set the following preferences.
Show Alert Category in the Subject Line: Toggle this option to show or hide the alert category in the email subject heading. By default, it is set to No.
Sender Name in Email Alert: Enter the name of the entity sending the email. This name is displayed as the sender's name in all emails sent from the CSAP Analyst portal. For example, Acme Corporation Limited. The default value is Cyware Labs.
Subject Line Prefix: Enter the prefix of the email subject heading. The prefix text set here appears before the email subject line.
Show Unsubscribe URL in Email Alert: Toggle this option to show or hide the URL to unsubscribe from email alerts in the body of the email. By default, it is set to No.
Show TLP in Subject Line: Toggle this option to show or hide the Traffic Light Protocol (TLP) in the email subject heading. By default, it is set to No.
Subject for Member Welcome Invite: The text for the email subject heading that is sent to Members upon being invited to CSAP Member Portal. To specify your preferences, type a prefix, in alphanumeric format, into the text field. By default, the invite text is set to Welcome to Cyware Enterprise! Your Account has been created.
Subject for Analyst Dashboard User Welcome Invite: The text for the email subject heading that is sent to privileged users upon being invited to CSAP Analyst Portal. To specify your preferences, type a prefix, in alphanumeric format, into the text field. By default, the invite text is set to Welcome to Cyware Situational Awareness Platform (CSAP).
Allow Members to Unsubscribe from Email Notifications: Toggle this option to enable or disable members having the option to unsubscribe from email notifications. Note that certain emails, such as Invite, OTP, or forgot password, cannot be disabled by members. By default, it is set to No.
Daily Alerts Report: Toggle this option to enable or disable a daily digest email report of alerts being sent to members. By default, it is set to No.
Add Description to Daily Alert Report: Toggle this option to enable or disable descriptions for alerts in the daily digest email.
Click Update.
Configure Mobile App or Web Portal Preferences
Administrators or root administrators can set and manage preferences related to Member Portal, on the web portal, and mobile app.
Steps
Go to Administration > Configuration > Mobile App/Web Portal.
Configure the following options and click Update.
Max Wrong OTP Attempts: The number of times a user can submit an incorrect one-time password (OTP) before the user account is locked. The default value is 5.
Member Portal Session Inactivity Timeout: The amount of time lapsed before a user session on the web app can be terminated due to inactivity, thereby freeing up server resources. The default value is 60 days.
Mobile App Inactivity Timeout: Specify the duration of the session timeout for the Cyware Enterprise mobile app. Members will be logged out automatically after this period. However, they will continue to receive notifications from Collaborate (CSAP) after timeout, unless they choose to manually log out from the app. The default value is 60 days.
Add Collaborators from Other Organizations: Turn on the toggle to allow members to add collaborators from other organizations. By default, the toggle is turned off.
Notify Members of Alert-Based Discussions on Messenger: Turn on the toggle to send email notifications to recipient group members when a new alert-based discussion is initiated in Messenger for the recipient group. By default, the toggle is turned off.
Deactivate Inactive Members Automatically: Turn on the toggle to automatically deactivate member accounts that have not logged into the Member Portal beyond the specified duration set in Inactivity Duration for Deactivation (in days). Root Admins and Admins will receive an email listing the deactivated accounts. If you disable this, accounts will not be automatically deactivated and must be deactivated manually. By default, the toggle is turned off.
Inactivity Duration for Deactivation (in days): Specify the number of days of inactivity after which a member account will be automatically deactivated. The duration can range from 90 to 999 days. The default value is 90 days. For more information on how the inactivity period is calculated, see Configurations.
Show Cyware Advisories in: Specify the location where alerts from Cyware advisories should be displayed in the Member Portal.
Alerts: Select this to display the alerts under the Alerts tab.
Network Advisories: Select this to display the alerts under the Network Advisories tab.
Note
For customers onboarding on version 3.8.9.0 or later, Alerts is selected by default. For customers upgrading from an earlier version to 3.8.9.0, the default remains Network Advisories.
Enable Member Directory and Actions Opt-Out: Turn on the toggle to allow members to choose whether to display their details in the Member Directory and whether they can be assigned tasks using the Actions module. By default, the toggle is turned off.
Enable Members to Manage Direct Message Preferences: Turn on the toggle to enable members to choose if they want other members to send direct messages to them on Messenger. Existing direct messages are not affected by this preference. If this is enabled, members can find this option in Profile Settings > Preferences. By default, the toggle is turned off.
Limit Directory Access and Messaging Across Groups: Turn on the toggle to limit members from viewing details of members outside their recipient groups in the Member Directory and Organization Directory, and from sending direct messages to them through Messenger in the Member Portal. By default, the toggle is turned off.
Automatically Unlock the Member Portal Locked Accounts (in mins): The number of minutes before a locked Member Portal account automatically unlocks. The default value is 60 minutes.
Allow Members to upload files to Doc Library: Turn on the toggle to allow or prevent members from uploading files to the Doc Library. By default, the toggle is turned off.
Allow Members to create Tags: Turn on the toggle to allow or prevent members from creating tags in the Member Portal. By default, the toggle is turned on.
Show File Owner in Doc Library: Turn on the toggle to show the names of users who own files and folders that are uploaded to the Doc Library. By default, the toggle is turned on.
Preset Recipient Groups for new users: The default recipient groups for Members. To specify your preferences, type the recipient group, in alphanumeric format, into the text field. Based on your input, recipient groups appear as autocomplete values. You can select the values that appear, or scroll up or down the shortcut menu to select your recipient group.
Bulk Alert Export: Turn on the toggle to allow or prevent members from exporting alerts, as a bulk action, and download them as a report in CSV file format. By default, the toggle is turned off.
Bulk Intel Export: Turn on the toggle to allow or prevent members from exporting intel, as a bulk action, and download them as a report in CSV file format. By default, the toggle is turned off.
Configure Alerts Settings
Admins or root admins can manage CSAP alert-related preferences on the CSAP Analyst Portal.
Steps
Navigate to Administration > Configuration and select Alerts.
Click Edit and set the following preferences:
Global Email Alert: Turn on the toggle to enable or disable Email Alert when creating an alert. Email alerts are used to send emails to the specified recipients with the alert information. By default, this is set to No.
Global Mobile Push Notification: Turn on the toggle to enable or disable push notifications to mobile devices when using the CSAP Member Portal mobile app. By default, this is set to No.
Alert Feedback: Turn on the toggle to allow or prevent members from providing feedback for alerts. By default, this is set to Yes.
Don't Show Images: Turn on the toggle to allow or prevent the usage of images in alerts. By default, this is set to Yes.
Default TLP Selection: Select a default Traffic Light Protocol (TLP) value for an alert. By default, this is set to WHITE.
Add Title Prefix in Direct Member Submissions: Turn on the toggle to enable or disable the ability to specify prefix text for the subject heading of intel emails that are directly published to members without an analyst review. By default, this is set to No.
Default Info Source for Alert Member Intel Submission: Select the default information source for member intel submissions. By default, this is set to Member Submission.
Confirmation pop-up before publishing: Turn on the toggle to show or not show a confirmation message that displays the number of recipients to whom the alert will be sent, before publishing an alert. By default, this is set to Yes.
Send Allowed Indicators to CTIX: Turn on the toggle to to either include or not include allowed indicators in the data sent from CSAP to CTIX. By default, this is set to No.
Send alert emails with recipients marked as bcc: Turn on the toggle to send alert emails with recipients marked as bcc instead of directly sending them to the recipient. By default, this toggle is turned off.
Alert lock time limit: Specify the time limit (in hours and minutes) during which an alert is locked for editing. Within this time limit, only the editor of the draft alert can edit it. After the time limit lapses, the alert is unlocked and any analyst can edit the alert. The default alert lock time limit is three hours.
Click Update.
Configure Member Submission Preferences
As an analyst with an admin or root admin user role, you can configure and manage preferences related to member submissions, such as intel and RFI submissions.
Steps
To configure member submission preferences, follow these steps:
In the Analyst Portal, go to Administration > Configuration > Member Submission.
Click Edit.
Choose and configure any of the following features:
Display Disclaimer on RFI Form?: Turn on the toggle to enable or disable the disclaimer on the request for information (RFI) form. Members can view this disclaimer while submitting RFIs.
RFI Disclaimer: Enter the disclaimer included with the request for information form. By default, the text is set to Please do not submit any personally identifiable information, including credit card or bank account information; social security, passport, or driver’s license number; date of birth; account PINs, passwords, or any other sensitive information in the report. This form should be used for requesting information that may be related to physical or cyber security. If it is life-threatening or emergency, close the app and call 911 or the emergency contact number of your country.
Directly Publish Alerts from RFI: Turn on the toggle to enable members to publish RFI as alerts without analyst review. Members can select recipient groups for the RFI alert. By default, this option is not enabled.
Display RFI Responder Details to Members: Turn on the toggle to enable the recipients of the RFI alert, as well as the RFI submitter, to view the details (name and email) of the RFI responders. By default, this option is not enabled.
Show RFI Responses to Other Members: Turn on the toggle to allow members to view RFI responses and comments from other members or analysts. By default, the toggle is turned off.
Display RFI Submitter in Alert: Turn on the toggle to enable the recipients of the RFI alert to view the details (name and email) of the RFI submitter in the Member Portal and alert email. By default, the toggle is turned off.
Allow Members to Share RFI With: Specify the recipients of the RFI alert if members can directly publish alerts from an RFI. By default, it is set to Only Recipient Groups.
If you select Recipient Groups or Member's Organization, the member can either choose to publish the alert to recipient groups of their choice or the organization that they belong to. If you select Recipient Groups or All Organizations, the member can choose to publish the alert to recipient groups of their choice or all organizations in the instance.
Note
While creating or updating recipient groups, if you want to manage the permissions in Allowed Member Submissions, it is recommended to set this to Only Recipient Groups. For more information, see Create Recipient Group.
Display Disclaimer on Intel Submission Form?: Turn on the toggle to enable or disable the disclaimer on the intel submission form. By default, this option is enabled.
Intel Submission Disclaimer: Enter the disclaimer that needs to be included with the intel submission form. By default, the text is set to Do not include any identifiable information or attribution. This form should only be used for sharing obfuscated threat indicators/observables (IP, URL, Filename, Hash, Domain Name, etc.).
Display Member Attribution in Analyst Portal: Turn on the toggle to enable Root Admins, Admins, and roles with the permission View Submitter Name in Anonymous Intel Submissions to view the submitter's name in intel submissions regardless of the submitter's attribution choice. If you turn this off, you can view the intel submitter's name only when they choose to share attribution. By default, this option is not enabled.
Intel Submission Option: Select the option to share intel with or without analyst review. Select Manual: Threat intel submitted by members should be held for analyst review or enrichment to share intel for analyst review. This option is selected by default. Select Automated: Threat intel submitted by members should be directly shared with other members, without analyst review to share intel directly without analyst review.
Allow Members to Share Intel With: Specify the recipients of the intel submission alert if members can directly publish alerts from an intel submission. By default, it is set to Only Recipient Groups.
If you select Recipient Groups or Member's Organization, the member can either choose to publish the alert to recipient groups of their choice or the organization that they belong to. If you select Recipient Groups or All Organizations, the member can choose to publish the alert to recipient groups of their choice or all organizations in the instance.
Note
While creating or updating recipient groups, if you want to manage the permissions in Allowed Member Submissions, it is recommended to set this to Only Recipient Groups. For more information, see Create Recipient Group.
Display Intel Submitter in Alert: Turn on the toggle to enable members to view who submitted the threat intel if attribution is provided during submission. Members can view this attribution in the alert details in the Member Portal as well as in the alert email. By default, this option is not enabled.
Content Review by Peer Members in Threat Defender Library: Turn on the toggle to enable members to submit Threat Defender Library content to other members of the organization for peer review. Subsequently, peer reviewers can forward the content to analysts for further review. If this is turned off, members can directly submit the content to analysts for review. By default, this option is not enabled.
Click Update.
Configure Intel Approver Flow Preferences
Administrators or root administrators can configure and manage preferences related to the workflow for approving threat intel in .
Steps
Go to Administration > Configuration and select Intel Approver Flow.
Click Edit and set the following preferences:
Intel Approval Workflow for Organization: Turn on the toggle to enable the intel submitted by members to be approved by a user with an intel approver role in the Member Portal. By default, this workflow is not enabled.
Sector Approval Workflow for Organization: Turn on the toggle to enable a user with a sector approver role within the Member Portal to approve the intel submitted by members. By default, this workflow is not enabled.
Intel Approval Workflow for Analyst: Turn on the toggle to enable analysts to approve intel submitted by members in the Analyst Portal. By default, this workflow is not enabled.
Intel Review Lock for Organization: Specify a default lock duration for intel checked out by a user with an intel approver or sector approver role in the Member Portal. During this time, other users will be unable to edit the intel. By default, it is set to 1 hour.
Intel Review Lock for Analyst: Specify a default lock duration for intel checked out by analysts in the Analyst Portal. During this time, other users will be unable to check out or modify the intel. By default, this duration is set to 1 hour.
Pending Intel Reminder Email for Organization: Enter the time after which users with an intel approver or sector approver role receive reminder emails, indicating that there is intel to be reviewed in the Member Portal. By default, the reminder is set to 0 hours and 30 minutes. This is the minimum default time. If you set both the hours and minutes to zero, no reminder emails will be sent, effectively disabling this feature.
Pending Intel Reminder Email for Analyst: Enter the set time after which users with an analyst role automatically receive reminder emails, indicating that there is intel to be reviewed in the Analyst Portal. By default, the reminder is set to 0 hours and 30 minutes. This is the minimum default time. If you set both the hours and minutes to zero, no reminder emails will be sent, effectively disabling this feature.
Click Update.
Configure Crisis Management Preferences
Administrators or root administrators can configure and manage preferences related to crisis management.
Steps
Navigate to Management > Configuration and select Crisis Management.
Click Edit. and set the following preferences:
Voice phone call gap (in minutes): The time, in minutes, that a voice phone call is sent to a user after the initial crisis notification alert. By default, it is set to 5 minutes.
SMS delivery gap (in minutes): The time, in minutes, that an SMS is sent to a user after the initial crisis notification alert. By default, it is set to 5 minutes.
Click Update.
Configure Organization Management Preferences
As an administrator or root administrator, you can manage preferences related to member roles within organizations in the Collaborate (CSAP) Member Portal.
Steps
In the Analyst Portal, go to Administration > Configuration, and select Organization Management.
Click Edit and set the following preferences.
Organization Level Member Administration: Turn on the toggle to enable member admin roles within organizations in the Member Portal. For more information about the member admin role, see Member User Roles. By default, this toggle is turned off.
Limit number of Users in an Organization: Turn on the toggle to limit the number of members that can belong to an organization through organization levels. For more information, see Organization Levels. By default, this toggle is turned off.
Sector Level Member Administration: Turn on the toggle to enable sector admin roles in the Member Portal. For more information about sector admins, see Member User Roles. By default, this toggle is turned off.
Click Update.
Configure Collaborate Features
Control and manage features that are made available to members in the Member Portal as well as to the users of the Analyst Portal.
Steps
To configure the features, follow these steps:
Go to Administration > Configuration and select Features.
Click Edit.
Choose and configure any of the following features:
Collaborate: This feature is available only for Cyware cloud-based deployments. Turn on or off the toggle to allow or block Collaborate in the Member Portal. Collaborate helps members interact with each other in real-time using Messenger or Collaborative Notes. By default, it is enabled.
Actions: Turn on the toggle to assign tasks to members, based on threat insights shared in alerts or as a course of normal security measures. By default, it is enabled.
Alert Delivery Options: Turn on the toggle to enable admins to select alert delivery options while adding members. These options include Member Portal, mobile, and email notification. By default, it is disabled.
Event Calendar: Turn on the toggle to allow members to access the event calendar. Turning on this feature also allows analysts to use Events as a category while creating alerts. By default, it is enabled.
Member Directory: Turn on the toggle to allow or block members to access the Member Directory. Member Directory includes information such as a member's name, job title, date joined, location, and organization. By default, it is enabled.
Organization Directory: Turn on the toggle to allow members to access the Organization Directory. Organization Directory contains the list and details of all organizations such as name, level, license usage, headquarters location, and total members. By default, it is enabled.
Request to Join: Turn on the toggle to allow or block members from requesting access to invite only groups that are relevant to them. By default, it is disabled.
RFI (Request For Information): Turn on the toggle to allow or block members to access the RFI module on the Member Portal. RFI helps members to get the required information collaboratively from members. By default, it is enabled.
Threat Assessment: Turn on the toggle to allow analysts to attach acknowledgment questions to alerts to get the status of the members impacted by a vulnerability, malware, or threat activity. Turning this on also allows members to respond to the threat assessment questions. By default, it is enabled.
Allowed Indicators: Turn on the toggle to allow members to view and use Indicators Allowed. By default, it is enabled.
ATT&CK Navigator: Turn on the toggle to enable the ATT&CK Navigator for both the Analyst and Member Portal. By default, it is enabled. In the Analyst Portal, the ATT&CK Navigator consists of the Alert, Intel, and TDL Heat Maps whereas in the Member Portal, only the Alert and TDL Heat Maps will be available.
The TDL Heat Map is available in only if the Threat Defender Library feature is enabled.
Note
If the Threat Defender Library is enabled, TDL Heat Map will continue to be available in the ATT&CK Navigator even if this configuration is switched off.
Tag Library: Turn on the toggle to allow or block members from accessing the Tag Library module on the Member Portal. Using Tag Library, members can view all the tags present in the application. By default, it is enabled.
Survey Request: Turn on the toggle to allow or block members to create survey requests in the Member Portal. If you do not enable this, members can not create survey requests. By default, it is enabled.
Browser Extension: This feature is available only for Cyware cloud-based deployments. Turn on the toggle to allow or block intel submissions made by members through the Cyware Threat Intel Crawler browser extension. If you do not enable this, Cyware Threat Intel Crawler is not available to members. By default, it is enabled.
TLP Version: Select a TLP version for your instance. supports both TLP 1.0 and TLP 2.0. By default, TLP 1.0 is selected. Select the required TLP version from the drop-down. By default, TLP 1.0 is selected.
Click Update to save the changes.
Configure Messenger
The Messenger is a secure messaging feature that enables members to start discussions on alerts, or specific topics and collaborate with each other. As an administrator, you can manage Messenger settings and preferences for members.
Steps
To configure Messenger settings, do the following:
In the Analyst Portal, navigate to Administration > Configuration > Messenger.
Click Edit. Use the following information while configuring preferences:
Email notifications for unread messages: Select how email notifications for unread messages are displayed. You can either choose to display only the total number of unread messages or include a preview of the message along with the total number.
Alert Related Messages: Turn on the toggle to enable members to start alert-related discussions. Enabling this option displays Alerts in the Messenger.
Group Messages: Turn on the toggle to enable members to be a part of group discussions. Enabling this option displays Groups in the Messenger.
Direct Messages: Turn on the toggle to enable members to have one-on-one discussions with other members. Enabling this option displays Direct in the Messenger.
Topic Related Messages: Turn on the toggle to enable members to start discussions based on specific topics. Enabling this option displays Topic in the Messenger.
Delete Messages: Turn on the toggle to allow members to delete messages after sending them.
Message deletion time limit: Configure the time limit within which members can delete messages they send on Messenger. For example, if you specify the message deletion time limit as 5 minutes, members can delete the messages they send within 5 minutes.
After making the changes, click Update. Your changes are now available for members in the Member Portal.
Configure Analyst Groups
Notice
This feature is available in v3.8.8.0 onwards.
Use Analyst Groups to organize users in the Analyst Portal into dedicated groups based on their roles or responsibilities. This structure helps you collaborate more effectively, streamline task assignments, and ensure that member submissions are routed to the right analysts.
Steps
To enable this feature, follow these steps:
Go to Administration > Configuration > Analyst Groups, and click Edit.
Display Analyst Groups: Turn on the toggle to display the Analyst Groups feature in the User Management section of the Analyst Portal. By default, this is turned off.
Set up Analyst Group: Create an analyst group and assign all Analyst Portal users to at least one group. You cannot proceed until every user has been assigned.
Use the Create Analyst Group & Assign Users option to get started.
Once you assign users to one group, you can create additional groups from the User Management section. For more information, see Create Analyst Group.
Enable Analyst Groups: Once all users are assigned, turn on this toggle to activate the feature across the Analyst Portal. You can now manage submissions and workflows based on the Analyst Groups structure.
To save your changes, click Update.
Configure Cyware Add-ons
Note
This configuration is available in v3.8.8.1 onwards. To enable this, contact Cyware support.
Enable and manage Cyware add-ons that help operationalize threat intelligence across . These add-ons support integrations, automation workflows, and advanced capabilities to streamline intelligence sharing, analysis, and response.
Steps
To configure Cyware Add-ons, follow these steps:
In the Analyst Portal, go to Administration > Configuration > Cyware Add-ons.
Click Edit.
Choose and configure the following feature:
Intel Operations (Cyware Orchestrate): Turn on the toggle to allow organizations to orchestrate and automate security workflows using playbooks, integrations, and advanced response capabilities. By default, this is turned off. For more information on how to enable CO for an organization, see Organization Details.
Click Update.
Manage Integrations
Configure and manage integrations with third-party applications. As an analyst, you can establish integrations with third-party applications to receive alerts that can be published to members from the Analyst Portal.
You can also configure open API credentials and permissions, and configure other settings in this section.
Share Alerts with Third-party Applications
Collaborate enables you to share alerts to third-party applications. This enables seamless integration and efficient sharing of threat advisories.
Steps
To share an alert with third-party applications:
Follow the usual steps to create an alert. For more information, see Create Alerts.
In the Finish section, select the checkbox for the required third-party application in Post the alert to other applications.
When you integrate Collaborate with threat intelligence platforms (TIPs) such as Intel Exchange, you can utilize the following JSON payload structure for further analysis. Additionally, you can also leverage this payload for webhook-based integrations.
The following JSON payload structure is an example of alert data sent to third-party integrations:
{
  "title": "July 25 Phishing Campaign Alert",
  "description": "Summary: while highlighting interesting and rare techniques that the attackers use. Additional Details: <b>Adversary:</b> ,<br> <b>Malware Families:</b> njRAT - S0385, VjW0rm, Houdini RAT, AsyncRAT, HCrypt,<br> <b>Attack IDs:</b> T1104, T1140, T1547, T1548, T1562, T1059.001,<br> <b>Industries:</b> T1104, T1140, T1547, T1548, T1562, T1059.001",
  "short_id": "887703b3",
  "intel_media": [
    {"media_file": "https://yourdomain.cywarestg.com/webapp/user/doc-library/03edfd01-2026-496e-8016-ea2af42e442e"},
    {"media_file": "https://yourdomain.cywarestg.com/webapp/user/doc-library/531f4279-66e9-4f33-97e7-2c0d0c604735"}
  ],
  "tags": ["phishing_alert","financial_sector"],
  "tlp": "AMBER",
  "tlp_v2": "AMBER",
  "indicators": "",
  "indicator_data": {
    "registry_key_path": ["HKEY_LOCAL_MACHINE\\Software\\Microsoft\\Windows\\CurrentVersion\\Run\\malicious_key, HKEY_LOCAL_MACHINE\\Software\\Microsoft\\Windows\\CurrentVersion\\Run\\another_malicious_key"],
    "urls": ["http://malicious-site.com/login","http://malicious-site2.com/login"],
    "ips": ["192.168.1.100","192.168.1.101"],
    "ipv6": ["2001:db8::1","2001:db8::2"],
    "emails": ["phishing@example.com","scam@example.com"],
    "domains": ["malicious-site.com","malicious-site2.com"],
    "sha512": ["a6f745008f97d1f2f70b0e2e5a7283e7e0d5e4e6b374dcd0b77c2f5e43d0c8409b6f3f3a9f9e4d8d5f5e8e4f6b7f5d9a", "b6f745008f97d1f2f70b0e2e5a7283e7e0d5e4e6b374dcd0b77c2f5e43d0c8409b6f3f3a9f9e4d8d5f5e8e4f6b7f5d9b"],
    "sha256": ["d6f83a5c0e4e5d7f5f7e8a4e5d8b6d5f3a4e5f7d9b5f7e9a5d8b6d5f3a4e5d6f","e6f83a5c0e4e5d7f5f7e8a4e5d8b6d5f3a4e5f7d9b5f7e9a5d8b6d5f3a4e5d6f"],
    "sha1": ["e5f7d8a6b5c3d2e1f7g5h4i3j2k1l0m9n8o7p6q5r4s3t2u1v0w9x8y7z6a5b4c3","f5f7d8a6b5c3d2e1f7g5h4i3j2k1l0m9n8o7p6q5r4s3t2u1v0w9x8y7z6a5b4c3"],
    "md5": ["1a2b3c4d5e6f7g8h9i0j1k2l3m4n5o6p","2b3c4d5e6f7g8h9i0j1k2l3m4n5o6p7"],
    "sha224": ["2b4c6d8e0a1b2c3d4e5f6g7h8i9j0k1l2m3n4o5p6q7r8s9t0u1v2w3x4y5z6a7b8","3c5d7e9f1a2b3c4d5e6f7g8h9i0j1k2l3m4n5o6p7q8r9s0t1u2v3w4x5y6z7a8b9"],
    "sha384": ["3c5d7e9f1a2b3c4d5e6f7g8h9i0j1k2l3m4n5o6p7q8r9s0t1u2v3w4x5y6z7a8b9","4d6e8f0a1b2c3d4e5f6g7h8i9j0k1l2m3n4o5p6q7r8s9t0u1v2w3x4y5z6a7b8c9"],
    "ssdeeps": ["12288:3f27e3c1e1c2d2c3f4e3a5d3e6f7e4d5e3a4c3a4e3a5d:12288:3e2f3d4c1e2f3e5d3a6f7g8h9i0","12288:3g27e3c1e1c2d2c3f4e3a5d3e6f7e4d5e3a4c3a4e3a5d:12288:3h2f3d4c1e2f3e5d3a6f7g8h9i0"],
    "ipv4_cidr": ["192.168.1.0/24","192.168.2.0/24"],
    "autonomous-system": ["AS12345","AS67890"],
    "file_paths": {"values": ["C:\\Users\\Public\\malware.exe","C:\\Users\\Public\\malicious_file.exe"]}
  },
  "observables": {}
}
Configure Intel Exchange (CTIX) Integration
Administrators can configure to send threat intel to . CTIX can further enhance the threat intel. To enable this threat intel transfer, configure integration with .
Before you Start
Ensure that you have the View and Create or Update permissions to the CTIX Integration module.
Generate API credentials for in the application and have them handy. For more information, see CTIX Open API.
Steps
To configure the integration, follow these steps:
Go to Administration > Integrations > Cyware Integrations > Intel Exchange (CTIX).
Use the following information to configure the integration:
Click Edit Credentials and enter the following details:
Enter the Access ID, Secret Key, and the Endpoint that you generated from the application.
Click Test & Update to test the connection and save the credentials.
Click Test Connection to test the connection with at any time.
Configure Flexera Integration
Administrators can configure to poll for information from Flexera and post them as alerts to members in the application.
Before you Start
Ensure that you have the View and Create or Update permissions to the Flexera module.
Ensure that you have the Authentication key of your Flexera account.
Alerts are posted to members present in the recipient groups configured in the alert rule.
Steps
To configure an alert rule for Flexera integration in , follow these steps:
Go to Administration > Integrations > Third Party Integrations > Flexera.
Click Edit Integration and use the following information:
Choose the Category and Info Source.
Select the TLP that should be associated with the alerts posted to members.
Select the User Recipient Groups. The members in these recipient groups will receive alerts with information received from Flexera.
Enter the Auth Key of your Flexera account.
In Daily Report Watch List Id, enter the daily value for the watch list item you want to track advisories from your Flexera account. Watch Lists represent a combination of vendors, products, and product versions for which you want to track advisories.
In Hourly Report Watch List Id, enter the hourly value for the watch list item you want to track advisories from your Flexera account. Watch Lists represent a combination of vendors, products, and product versions for which you want to track advisories.
Activate this integration using the Active or Inactive toggle.
Select push or email notification to get notified about the alerts posted with information from Flexera.
Click Update to save your changes.
Configure Intel 471 Integration
Administrators can configure to poll for information from Intel 471 and post them as alerts to members in the application.
Before you Start
Ensure that you have the View and Create or Update permissions to the Intel471 module.
Ensure that you have the Authentication key and user name of your Intel 471 account handy.
Alerts are posted to members present in the recipient groups configured in the alert rule.
Steps
To configure Intel 471 integration in , follow these steps:
Go to Administration > Integrations > Third Party Integrations > Intel 471.
Click Edit Integration and use the following information:
Choose the Category and Info Source.
Select the TLP that should be associated with the alerts posted to members.
Select the User Recipient Groups. The members in these recipient groups will receive alerts with information received from Intel 471.
Enter the Auth Key and Username of your Intel 471 account.
Activate this integration using the Active or Inactive toggle.
Select push or email notification to get notified about the alerts posted with information from Intel 471.
Click Update to save your changes.
Configure Abuse IPDB Integration
Administrators can configure AbuseIPDB in to enrich IP address information from AbuseIPDB. The analysts can enrich any indicator details while creating alerts in Analyst Portal.
Before you Start
Ensure that you have the View and Create or Update permissions to the AbuseIPDB module.
Ensure that you have the secret key and endpoint URL of your AbuseIPDB account.
While creating alerts, analysts can use AbuseIPDB to enrich any IP addresses included in the alerts. will fetch information for the IP address from AbuseIPDB and display the results.
Steps
To configure AbuseIPDB integration in , follow these steps:
Go to Administration > Integrations > Third Party Integrations > Abuse IPDB.
Click Edit Credentials and use the following information:
Enter the Secret Key and Endpoint URL of your AbuseIPDB account.
In Check for IP reports in the last n days, enter the number of days that you want to check for IP reports from AbuseIPDB.
In Validity of the data stored in DB (Days), enter the number of days that will look for information for an IP address first in the database, instead of checking in the AbuseIPDB database.
Click Update to save your changes.
Configure MISP Integration
Administrators can configure to post threat intel information from to the MISP application.
Before you Start
Ensure that you have the View and Create or Update permissions to the MISP module.
Ensure that you have the API key and URL of your MISP account.
While posting alerts, analysts can select MISP and send threat intel.
Steps
To configure MISP integration in , follow these steps:
Go to Administration > Integrations > Third Party Integrations > MISP.
Click Edit Credentials.
Enter the Key and URL of your MISP account.
Click Save to save your changes.
Configure Respond (CFTR) Integration
Administrators can integrate into for members to report incidents. The reported incidents are assigned to security analysts for further investigation. Ensure that the version is updated to v3.4.3.6 to utilize this feature.
Note
To configure integration and enable incident reporting, contact Cyware support.
Before you Start
Ensure that you have the View, Configure, and Update permissions to the Respond Integration module in Roles and Permissions.
Generate API credentials for in the application. For more information, see Configure Open API.
Steps
To configure the integration, follow these steps:
Go to Administration > Integrations > Cyware Integrations > Respond (CFTR).
To configure the integration, click Configure, and use the following information:
Enter the Access ID, Secret Key, and Endpoint that you have generated in the application.
Click Update to save the configuration.
To test the connection of with , click Test Connectivity.
Configure Threat Stream Integration
Administrators can configure to post threat intel information from to the Threat Stream application.
Before you Start
Ensure that you have the View and Create or Update permissions to the Threat Stream module.
Ensure that you have the API key, trusted circle, and user name of your Threat Stream account.
While posting alerts, analysts can select Threat Stream and send threat intel.
Steps
To configure Threat Stream integration in , follow these steps:
Go to Administration > Integrations > Third Party Integrations > Threat Stream.
Click Edit Credentials.
Enter the API Key, Trusted Circle, and Username of your Threat Stream account.
Click Update to save your changes.
Configure Automated RSS Alerts
Using the Automated RSS alerts, analysts can automatically publish RSS feeds as alerts from the Analyst Portal without having to create them manually. Members will receive these alerts on Alerts in the Member portal.
These alerts are directly published to members who are part of the configured recipient groups and categories.
Before you Start
Ensure that you have the View and Update permissions to the Automate RSS Alerts module.
Steps
To configure automated RSS alerts, follow these steps:
Go to Administration > Integrations > Third Party Integrations > Automated RSS Alerts.
Select the RSS feed source from the list to update the configuration. Use the following information:
Edit the Category and Info Source details. You cannot modify the URL.
Select the preferred User Recipient Group(s) for the automated RSS alert created from this source. Members in the selected recipient groups can view the alerts created by this source.
Select the required TLP. The TLP selected here does not have a conflict with the TLP assigned for individual recipient groups. Automated RSS alerts are published to members under the selected TLP.
Activate this integration using the Active or Inactive toggle.
Click Update to save the changes.
Configure CSAP Open API
Use 's open APIs to engage with the services programmatically and enable any automation or integration with other systems in your environment. As an analyst, you can generate open API credentials for yourself, other analysts, and members of .
Create Open API Roles
Create roles to control and restrict member access to features. Assign the role to members while generating API credentials.
Steps
To create open API roles, follow these steps:
Go to Administration > Integrations > CSAP Integrations > Open API Permission.
Click Create Role or clone a default role by clicking Clone This Role. The default roles are Viewer and Admin. Use the following information:
Enter a name for the role in Role Name.
Select permissions for the role by using the toggle.
Select Active to activate the role
Click Create Role. You can now use the role while generating open API credentials for members.
Generate Open API Credentials
To gain Rest API access to endpoints, you have to generate API credentials for your API user from the Analyst Portal. Assign a role to control and restrict members' access to features. Analysts have access to all features.
Steps
To generate open API credentials, follow these steps:
Go to Administration > Integrations > CSAP Integrations > Open API Credentials.
Click Generate API Credentials. Use the following information while generating credentials:
Title: Enter the title for credentials. This title acts as an identifier for the generated credentials. For example, API Credentials for John Doe.
Select Analyst to generate API credentials for another analyst.
User: Enter the name and select the analyst user for whom you want to generate credentials.
If you want to share the credentials with the selected users through email, select Share via Email.
Note
Access to all alert-related open APIs is determined by the role and permissions associated with the selected analyst user.
Select Member to generate API credentials for members.
Organization: Choose an organization and select the member from the organization.
Member: Enter the name and select the member user for whom you want to generate credentials.
Role: Assign a role that you created in Integrations > Open API Permissions or choose an existing role to control and restrict members' access to features.
(Optional) Allowed IP Addresses: Enter the allowed IP addresses to make sure that members can access endpoints only from the specified IP addresses.
Click Generate to generate the credentials. You can now view the credentials. The credentials are also shared with the selected user if you have selected Share via Email.
Click Copy All to copy and save the Access ID, End Point, and Secret Key.
Click Download the .CSV to download the credentials. Ensure that you save the credentials for your reference because you cannot generate the same credentials again.
View Credential Details
After generating credentials for analysts or members, you can view the details in Open API Credentials.
Analyst: In this section, you can view all the credentials generated by analysts in the Analyst Portal.
Title: Displays the title provided for the API credentials.
Generated for: Displays if the credentials were generated for an analyst or a member.
Generated by: Displays the email address of the analyst who generated the credentials.
User: Displays the email of the user (analyst or member) for whom the credentials are generated.
Generated on: Displays the date and time when the credentials were generated.
Click the credentials to view more details such as when the credentials were last used, and the total number of API calls made using the credentials.
Member: In this section, you can view all the credentials generated by members in the Member Portal.
Title: Displays the title provided for the API credentials.
Generated by: Displays the email of the member who generated the credentials.
Organization: Displays the member's organization.
Generated on: Displays the date and time when the credentials were generated.
Click the credentials to view more details such as the name of the member, when the credentials were last used, the total number of API calls made, and other details.
Configure Microsoft Teams in CSAP
Notice
This feature is available in Collaborate (CSAP) v3.7.1.0 onwards.
If you use Microsoft Teams as a collaborative tool, integrate Teams channels in to publish alerts as messages in the respective channels. Analysts can post alerts to Microsoft Teams in the following ways:
Create a new alert, and select the checkbox for Microsoft Teams in the alert creation form, and select the Teams channel.
Create an alert template and add active Teams channels in the template. When you create alerts from this template, the alert is posted to the respective Teams channels.
Auto-publish alerts from Cyware advisory and partner advisories to Microsoft Teams.
The following image shows how a Microsoft Teams channel is integrated with :
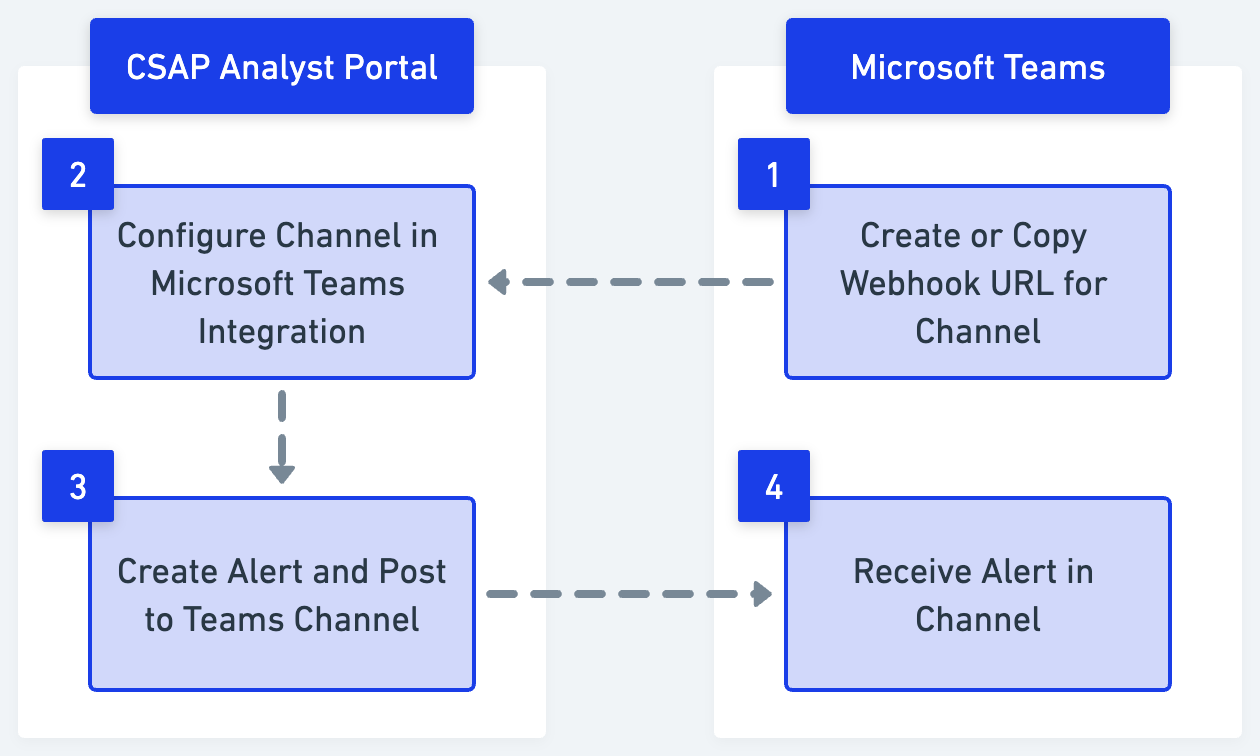
Create Incoming Webhooks in Microsoft Teams
Create an Incoming Webhook to your Microsoft Teams channel to enable to share alerts in the channel. The webhook provides a unique URL which is used to integrate the channel in . To add an Incoming Webhook to a Teams channel, see Create Incoming Webhooks. If you have already created an Incoming Webhook in the channel, copy the unique URL and integrate the channel in .
Integrate Microsoft Teams Channel in Collaborate
Configure Microsoft Teams channels in to receive alerts as messages in the Teams channel. Analysts can configure a maximum of 25 channels in the Microsoft Teams integration.
Before you Start
Ensure that you have the View and Create permissions for Microsoft Teams in Roles and Permissions.
Ensure that you have the Incoming Webhook for the Microsoft Teams channel you want to add.
Steps
To configure a Teams channel in the Analyst Portal, follow these steps:
Go to Administration > Integrations > Third Party Integrations > Microsoft Teams.
Click Configure Channel and use the following information:
Enter the name of the Teams channel. The name can have up to 50 characters. This is a mandatory field.
Enter the Incoming Webhook URL that you copied from the Microsoft Teams channel. This is a mandatory field.
Click Test Connection to send a test message to the Teams channel that you want to send alerts to.
Turn on the Status toggle to make the channel active in the Analyst Portal. By default, the toggle is turned on. You can have a maximum of 10 active channels. You can send alerts only to active channels.
Turn on the Publish Automated Alerts toggle to auto-publish alerts from RSS, Cyware, and Partner advisories to the channel. By default, the toggle is turned off.
Select Post Alert title with URL to share the title of the alert along with the alert URL to the Microsoft Teams channel. When members click the URL, they can view the complete alert in the Member Portal. Members can view the alert in the Member Portal only if they are part of the recipient group.
Select Post complete alert content to share the complete alert details to the Microsoft Teams channel. You can view the alert title, summary, additional information, category, TLP, and threat indicators of the alert in the Teams channel.
Click Configure Channel to add the channel to the Analyst Portal. You can now post alerts to the channel while creating alerts. In the published alert, you can view details of the Teams channel the alert is posted to in the Other Details section. For more information, see Post Alert to Other Applications.
Manage Microsoft Teams Channels
Administrators can view and edit the details of integrated Microsoft Teams channels. Go to Administration > Integrations > Microsoft Teams and use the following information:
To delete a channel, hover over the channel name and click Delete.
To edit a channel, hover over the channel name and click Edit.
Search for a channel by its name and view details.
Configure ThreatConnect Integration
Administrators can integrate with ThreatConnect to publish alerts to ThreatConnect using webhook for comprehensive threat analysis.
Before you Start
Ensure that you have the View and Create permissions for the ThreatConnect module.
Ensure that you have the incoming webhook URL, username, and the password of your ThreatConnect account.
Steps
To integrate with ThreatConnect, follow these steps:
Go to Administration > Integrations > Third Party Integrations > ThreatConnect.
To configure the integration for the first time, click Configure, or to edit an existing integration, click Edit, and follow these steps:
Integration Name: Enter the name of the integration. For example, Collaborate ThreatConnect Integration.
Webhook URL: Enter the webhook URL from ThreatConnect.
Username: Enter the username for your ThreatConnect account.
Password: Enter the password for your ThreatConnect account.
Test Connection: Click Test Connection to check the connectivity between and ThreatConnect.
Status (Optional): Turn on this toggle to activate the integration. By default, this is turned on.
Publish Automated Alerts (Optional): Turn on this toggle to auto-publish alerts from RSS, Cyware, and Network advisories to ThreatConnect. If automatic publishing of alerts from RFI or Intel submissions is enabled in Configurations, those alerts will also be automatically published to ThreatConnect. For more information about enabling direct submissions, see Configure Member Submission Preferences. By default, this is turned off.
Click Configure.
You can now post alerts to ThreatConnect while creating alerts. For more information, see Post Alert to Other Applications.
Manage Digital Risk Protection Integrations
Digital Risk Protection (DRP) is a proactive approach to cybersecurity that involves monitoring, threat identification, and threat mitigation. In Collaborate, members can use incident reports, domain watchlist alerts, credential watchlist alerts, and dashboards to defend against threats that target digital assets and sensitive information.
As an analyst, you can configure integrations with trusted providers to enable members to monitor the digital environment for risks and vulnerabilities. Members can subsequently monitor their organization's digital presence, which includes websites, domain registrations, and other online assets.
Configure CybelAngel
Notice
This feature is available in Collaborate (CSAP) v3.7.6 onwards and is available only for Cyware cloud-based deployments.
Integrate CybelAngel with Collaborate (CSAP) as part of Digital Risk Protection (DRP) to enable members to access real-time data as part of incident reports, credential watchlisting, and domain watchlisting. After you configure this integration, members of Collaborate can view it as part of Digital Risk Protection in the Member Portal, which helps them mitigate and monitor digital threats using incident reports, credentials, and domain watchlists. For more information, see Digital Risk Protection.
Before you Start
Ensure that Digital Risk Protection as a feature is enabled for your Collaborate instance. Contact Cyware Support for assistance.
Ensure you have View and Update permissions for CybelAngel in Roles & Permissions.
Ensure you have the CybelAngel client ID and client secret for authentication.
Steps
To integrate CybelAngel with Collaborate, follow these steps:
In the Analyst Portal, go to Administration > Integrations.
In Digital Risk Protection, click CybelAngel.
If you are configuring this integration for the first time, click Configure Integration. If you have previously configured the integration, click Edit Integration. Use the following information while configuring this integration:
Integration Name: Enter the name for the integration. By default, the integration name is CybelAngel. You can enter a name based on your preference. This name is displayed in the Member Portal in Digital Risk Protection.
Client ID: Enter the client ID from CybelAngel. For more information about API credentials in CybelAngel, see Get your API Credentials.
Client Secret: Enter the client secret from CybelAngel.
Polling Interval: Enter the frequency at which Collaborate automatically polls data from CybelAngel. By default, the polling interval is set to 12 hours. The minimum interval is 1 hour and the maximum interval is 168 hours.
Integration Logo: Upload the logo for the integration which will appear in the Member Portal in Digital Risk Protection.
To test the connection with CybelAngel and configure the integration, click Configure.
You can now enable CybelAngel for organizations as part of Digital Risk Protection settings. For more information, see Organization Details.
View Credential Details
After configuring or updating the integration, you can view all the credential details in Integrations > Digital Risk Protection > CybelAngel.
Client ID and Client Secret: Displays the CybelAngel client ID and secret that was previously configured.
Polling Interval: Displayed the configured polling interval in hours. The polling interval is the frequency at which Collaborate automatically polls data from CybelAngel.
Last Poll: Displays the time at which the data was last polled from CybelAngel. If there were any failed polls, you can download the logs for the same.
Last Successful Poll: Displays the time at which the data was last polled successfully from CybelAngel.
Test Connectivity: Click to test the connection from Collaborate to CybelAngel.
Manage Sharing Communities
Threat intelligence sharing is the cornerstone of all collaboration-driven security strategies. In addition to publishing alerts from the Analyst Portal to the Member Portal, admins can also leverage CSAP to exchange alerts with their network of peers, vendors, and clients. The Sharing Community feature enables automated sharing of alerts between two different organizations that use CSAP, via secure API endpoints. The feature enables collaboration between different organizations with shared security interests by allowing them to put a common front against attackers through threat knowledge sharing.
Navigate to Integrations > CSAP Integrations > Sharing Community.
Alert Sharing Flow Between Communities
The following flowcharts demonstrate the Alert sharing process between two CSAP organizations.
Organization I creates API credentials and shares them with Organization II.
Organization I defines the Rule Conditions for receiving Alerts.
Organization II uses the credentials to create a Sharing Community.
Organization II defines the Rule Conditions for Sharing Alerts.
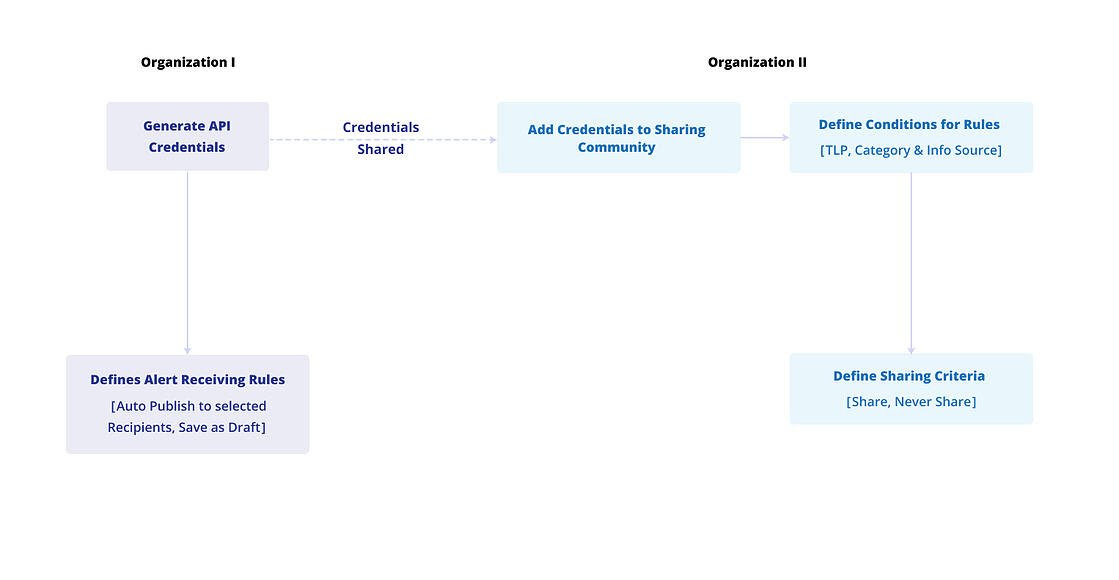
Organization II creates an Alert and if Rules are met either the Alert will Never be shared or it will be Shared with Organization I. This is based on the Rule Conditions defined by the Admin.
Similarly, when Organization I receives the Alert, it will either be Auto Published to Recipients or Saved as Draft based on Conditions defined by the Admin.

Add a new Sharing Community
Add the Open API Credentials shared by the organization that has invited you to a Sharing Community. Once the credentials as successfully configured, you will join the Sharing Community and will be able to share Alerts with the Organization.
Click on Add a New Entity.
Fill in the Access ID, Secret Key, and Endpoint details in the Create a New Entity form.
Note
Remember to select the Active checkbox. Leaving the checkbox unchecked will result in API Details and Sharing Community application being inactive. Inactive applications cannot be viewed in the API Details section and the respective API details cannot be used to add a Sharing Community.
Once done, click on the Validate button.
Edit Sharing Community Details
Click on Edit Community to make updates in the Sharing Community credentials. Credentials are updated to rectify wrong entries and in case of validation failure.
Update the Access ID, Secret Key, and Endpoint details in the Update an Entity form.
Once done, click on the Validate button.
Share Alerts with Communities
Alerts can be shared with Communities that are added to the Sharing Community module of CSAP.
Create an alert from the Alerts module and fill the required details.
Select the Communities in the Share with other Communities region in the Finish tab. The Communities that meet the Rules and Conditions are selected, others will be deselected.
Rules
You can configure rules to automate alert sharing and receiving tasks when the defined condition occurs. This will help organizations and communities streamline manual tasks and will also enable simplifying complex workflows for alert sharing and receiving.
With the current implementation, analysts can use Rules to share and receive alerts.
You can create two types of rules.
Alert Sharing Rules: This rule type automates the alert sharing process between two CSAP organizations.
Alert Receiving Rules: This rule type automates the process to receive alerts from sharing communities.
You can access the Rules tab from the Community Sharing module of the Management section.
How do Rules help automate sharing tasks?
This section demonstrates the alert sharing process between two CSAP organizations.
An Organization 1 creates API credentials and shares them with Organization 2.
Organization 1 defines the Rule Conditions for receiving Alerts.
Organization 2 uses the credentials to create a Sharing Community.
Organization 2 defines the Rule Conditions for Sharing Alerts.

Organization 2 creates an Alert and if Rules are met either the Alert will Never be shared or it will be Shared with Organization 1. This is based on the Rule Conditions defined by the Admin.
Create an Alert Sharing Rule
Click on the Rules tab and click Create.
Choose Alert Sharing as a trigger for the rule.
Select category and TLP as a logical condition for the rule to run. Based on the selected category, you can also add fields to the condition. You can view the conditions as logical queries in the custom query builder.
Choose appropriate action to run when the conditions are met. For alert sharing rules you choose to share or not share alerts with the selected Trusted Security Circles.
After finishing, click Submit. The rule is successfully created and active now.
How do Rules help automate receiving tasks?
This section demonstrates the alert receiving process between two CSAP organizations.
An Organization 1 creates API credentials and shares them with Organization 2.
Organization 1 defines the rule conditions for receiving alerts.
Organization 2 uses the credentials to create a Trusted Sharing Community.
Organization 2 defines the rule conditions for sharing alerts.
Organization 2 creates an alert and if rules are met either the alert will never be shared or it will be shared with Organization 1. This is based on the rule conditions defined by the admin.
Similarly, when Organization 1 receives the Alert, it will either be auto-published to recipients or saved as a draft based on conditions defined by the admin.

Create an Alert Receiving Rule
Click on the Rules tab and click Create.
Choose Alert Receiving as a trigger for the rule.
Select the required source communities and TLP to define conditions for the rule to run. You can view the conditions as logical queries in the custom query builder.
Choose appropriate action to run when the conditions are met. For alert receiving rules you choose to auto publish alerts or save alerts as drafts with the selected recipient groups.
After finishing, click Submit. The rule is now successfully created and active.
View, Edit, or Clone Rules
You can manage rules from the Rules tab. Hover mouse pointer over a rule on the list to view the below options.
Click on the View Rule button to view details of a rule.
Click on the Clone Rule button to clone an existing rule, make minor changes, and quickly make it active.
Click on the Edit Rule button to modify the details of a rule.
Tip
The Connections data for a rule shows the number of Trusted Sharing Communities or Recipient Groups associate with a rule.
Advisory Management
A security advisory is a report that contains details about the latest security trends, malware, security principles, IOCs, vulnerability details, and more. Administrators can use Advisory Management to share security advisories with members. By subscribing to these advisories. members are continuously updated with the latest alerts and advisory feeds from trusted third-party sources. It also helps them expand the information-sharing horizon across multiple teams and organizations.
Advisories in are divided into the following types:
Cyware Advisory: Includes the default threat feed details provided by Cyware. Admins can make these feeds active or inactive, as well as control the distribution of these feeds by specifying the recipient groups to which the alerts are sent. Members, in turn, can leverage the feedback loop of information by initiating alert-based discussions and creating and assigning actions to other users. For more information on managing Cyware advisories, see Manage Cyware Advisory.
Network Advisories: Includes feeds from organizations that are in partnership with Cyware. Through this collaboration, partner feeds are bundled with , enabling the sharing of alerts from specialized sources. With a goal to provide users with timely and accurate threat intelligence information, Cyware provides integration with prominent threat feed providers such as Flashpoint, Risk IQ, Sectrio, and Polyswarm. Administrators can enable or disable these feeds for members, as well as specify distribution by assigning specific recipient groups. For more information on managing Partner advisories, see Manage Network Advisories.
RSS Advisory: Includes open-source feeds from trusted sources, such as government agencies, security blogs, organizations within the security industry, and more. RSS feeds are broken down by category and can be individually made active or inactive for member access. For more information on managing RSS advisories, see Add Custom RSS Advisory Sources.
Tip
How is the RSS Advisory different from the Automated RSS Alerts?
RSS Advisory includes feed sources that administrators can activate or deactivate for members on the Analyst Portal. Members can manage the active feed sources from the Member Portal. Members can directly leverage the information provided by these feed sources.
Automated RSS Alerts are delivered to members as alerts.
Manage Cyware Advisory
As an administrator, you can manage Cyware advisories for all users. This includes publishing Cyware advisories as alerts and controlling publishing preferences, such as delivering alerts with or without notification, auto-publishing alerts or saving as drafts, and others. Additionally, you can select recipient groups to share the alerts with.
Steps
To manage Cyware advisories, follow these steps:
Sign in to the Analyst Portal.
Go to Administration > Advisory Management > Cyware Advisory.
To activate or deactivate Cyware feeds, use the Status toggle.
Note
When you turn on the Status toggle, the Network Advisories tab appears in the Member Portal, allowing users in recipient groups with auto-delivery of Cyware alerts to access it. For more information, see Advisory Management.
To manage how advisories are published as alerts based on categories, click Update in Publish Options, and use the following information:
Auto Publish: Select the categories from the drop-down for which advisories are automatically published to the Member Portal as alerts. By default, all available categories are selected.
Save as Draft: Select the categories for advisories that you want to save as drafts in the Analyst Portal for review before publishing them as alerts.
Click Update to save changes.
Note
The categories supported for Cyware Advisory are Informational, Malware Advisories, and Vulnerability Advisories.
In Auto-deliver Cyware Advisory, select the recipient groups to whom you want to deliver Cyware Advisory alerts. You can choose from Invite Only Groups or Public Groups.
To edit the auto-delivery preferences, hover over a recipient group, click the vertical ellipsis, and click Edit.
To enable the delivery of Cyware Advisory alerts to the recipient group, turn on the Cyware Feeds toggle.
To specify whether users receive notifications when Cyware advisory alerts are delivered, click the Auto Delivery Type and select Auto-deliver Alerts without Notification or Auto-deliver All Alerts with Notification.
To specify how you want the notifications to be sent, select or clear the Mobile App and Email in Alert Notifications.
To add alert tags to Cyware advisory alerts, you can search for tags or add new tags in Alert Tag(s). Alternatively, you can manually select alert tags from the Popular Tags field, or use Select All to add all tags to Cyware advisory alerts.
Click Update to save changes.
Manage Network Advisories
Network advisories are threat intelligence providers who share real-time cybersecurity advisories with members of .
Before you Start
Ensure that you have View and Update permissions for Partner Feed. By default, admins and root admins have these permissions.
Ensure that you configured in Administration > Integrations > Cyware Integrations.
Steps
To manage network advisories, follow these steps:
In the Analyst Portal, go to Administration > Advisory Management > Network Advisories.
Select the advisory provider that you want to manage and use the following information:
To enable the advisory provider for the selected recipient groups, turn on the Active toggle.
Note
Members can view the Network Advisories tab if at least one advisory provider or Cyware Advisory is enabled. For more information, see Advisory Management.
To manage how the alerts from the partner are published, click Publish Options:
To set an alert to draft mode for review before publishing, select Save as Draft.
To automatically publish an alert, select Publish.
For the CISA advisory provider, you can select the types of CISA advisories to publish as Partner Alerts in Advisory Type. You can choose multiple advisory types from the following options: Alert, Analysis Report, Cybersecurity Advisory, ICS Advisory, and ICS Medical Advisory.
Note
The CISA advisory provider is available in v3.8.4 and later. In earlier versions, you may see CISA as an advisory provider option, but you cannot use it to receive threat intelligence.
To automatically publish the alerts from this network advisory to , select Post to CTIX.
Select the recipient groups that can view the network advisories in User Recipient Group(s). The recipient groups you select here will also gain access to the corresponding advisory provider folder in Doc Library > Network Advisories. For more information, see Manage Doc Library Files and Folders.
To enable push notifications for the mobile app when alerts from this advisory are published, select Mobile App Notification.
To enable email notifications when alerts from this advisory are published, select Email Notification.
After you have made changes, click Update.
Add Custom RSS Advisory Sources
Notice
This feature is available in CSAP v3.7.2.0 onwards.
RSS advisories are open-source advisories from trusted sources, such as government agencies, security blogs, organizations and other sources in the cybersecurity industry. They continuously share the latest information as feeds, including cyber threats and events, as well as other critical updates.
RSS feeds are available both in the Analyst and Member Portal in the RSS Feeds and Feeds sections respectively. Analysts can enable required RSS sources to make them available in CSAP. Additionally, analysts can also add new RSS sources in the CSAP Analyst Portal. Advisory sources are grouped into different advisory categories based on the kind of information they share.
You can use RSS feeds in the Analyst Portal to create alerts and share them with members.
Before you Start
Ensure you have the View, Create and Update permissions for RSS Feeds in User Management.
Ensure you have configured advisory categories in Settings. For more information, see Advisory Settings.
Ensure that the new source does not already exist in the RSS Advisory section. Use the search option to verify.
Steps
To add new RSS advisory sources in the Analyst Portal, do the following:
Sign in to the Analyst Portal.
Click Administration > Advisory Management in the lower-left corner and navigate to RSS Advisory.
In the upper-right corner, click Add New. Use the following information while adding new RSS advisory sources:
Source name: Enter the name of the advisory source. For example, Veracode, and Naked Security.
URL: Enter the URL of the RSS advisory source. Make sure that the URL is valid and it does not already exist as part of other RSS sources.
Note
You cannot edit the URL after you have added the source.
Description: Enter a description that gives more context about the advisory source.
Category: Select the advisory category to which the source belongs. A few examples of advisory categories are Vulnerabilities, Security News, Personal Blogs and others. You can add custom advisory categories in Advisory Settings. For more information, see Advisory Settings.
Image: Upload the image for the source. You can view this image in the RSS Advisory section in the Analyst Portal. Supported image formats are jpeg, jpg and png.
Select the checkbox for Verify SSL to validate the SSL certificate of the URL. If the SSL certificate is not valid, the RSS source is not added. Recheck the URL and try again. By default, this checkbox is selected.
Review the details of the RSS advisory source, and click Submit. The advisory source is now added. Navigate to the category of the source, and turn on the toggle for the source to enable it in CSAP.
Manage RSS Advisory Sources
To manage RSS advisory sources, you must have the View and Update permissions. You can choose and subscribe to required feeds for members and analysts. You can perform the following actions to manage categories:
You can edit the custom RSS advisory sources that you have added by clicking the source > Edit. You can edit the source name, description, category and image of the source. You can also select the Verify SSL checkbox if you have not previously verified the SSL certificate of the URL.
Turn on the Enable in Member Portal toggle to ensure that the Feeds section is available in the Member portal.
Turn on the toggle for individual RSS sources that you want to enable in CSAP. After making the changes, click Update to save your changes. Members can view and follow active RSS advisory feed sources.
Search for existing RSS sources using the search option.
Once members subscribe to an RSS source they can directly leverage the information and view them as advisories in RSS Feeds in the Member portal. Analysts can view the same RSS Feeds in the Analyst Portal.