Getting Started with Analyst Portal
CSAP is a situational awareness platform and is used to share human-readable threat alerts, self-created or automated, from deployed security tools such as threat intelligence platforms (TIPs), SIEMs, ITSMs, and external sources such as regulatory bodies, CVE or NVD databases, and RSS Feeds.
The following illustration shows the workflow of CSAP:
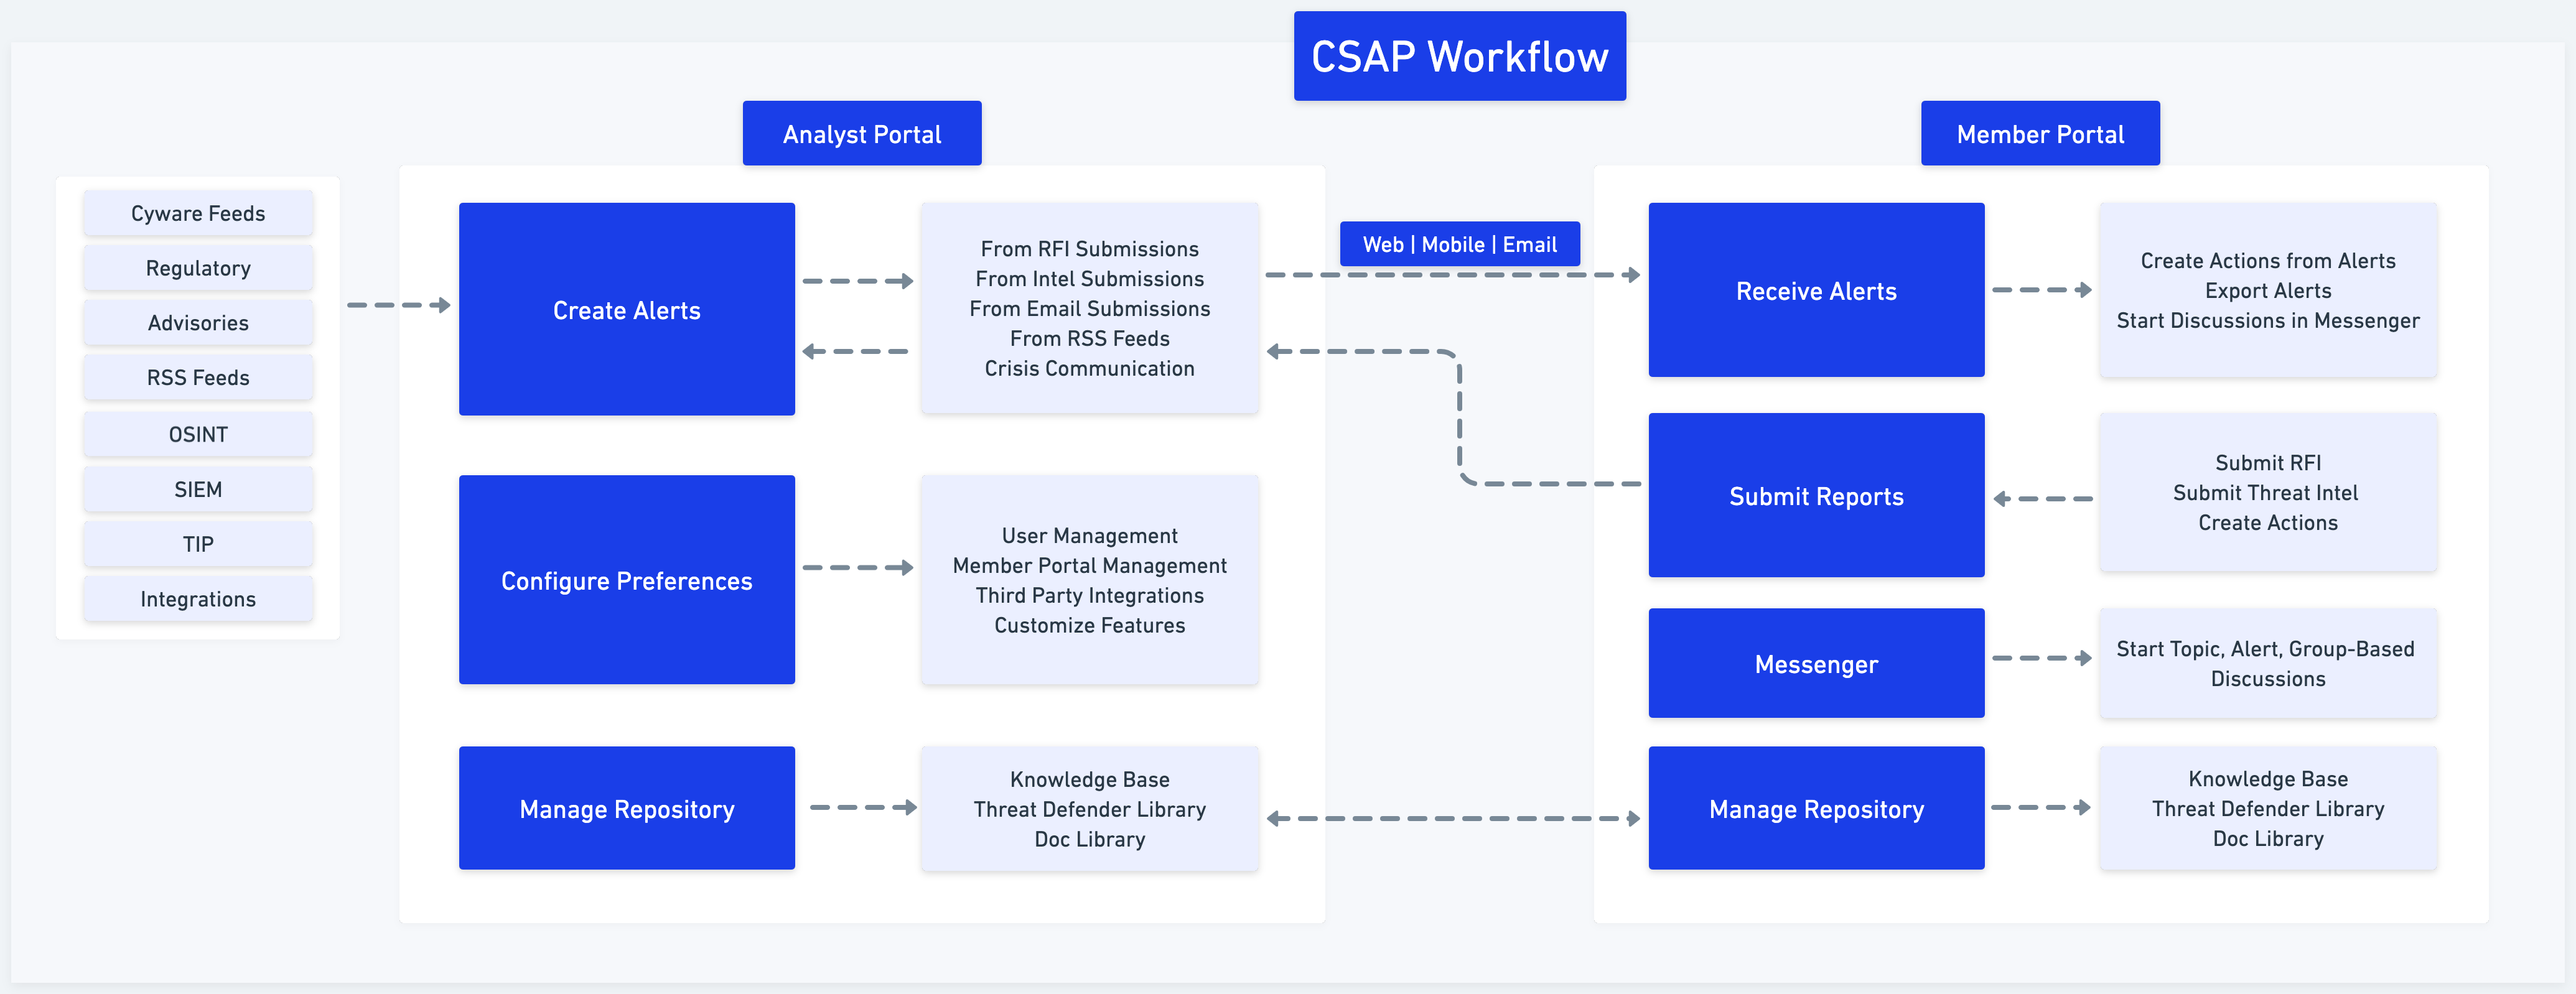
Analyst Portal
The CSAP Analyst Portal is used extensively by Administrators and Analysts to:
Create and distribute actionable information,
Configure and manage CSAP Member Portal and Cyware Enterprise Mobile App applications.
Create and manage a repository for a variety of information that enables collaboration between teams in an organization.
Create Alerts
CSAP Alerts are human-readable, tactical, technical, or informational notifications about current vulnerabilities, exploits, and other security issues relevant to a product, industry, or organization. Analysts can create and share actionable alerts with members. For more information, see Alerts.
Configure Preferences
Administrators can configure the various functions of the CSAP Analyst Portal and CSAP Member Portal by setting preferences. They can control features on a granular level to maximize security awareness across analysts and members. For more information, see Manage Collaborate Settings and Configure Collaborate Preferences.
Manage Repository
Analysts and administrators can create and manage a vast repository of information including various files, folders, documents, attachments, pictures, videos, or any other media information. The information is used in alerts, sharing content, or collaborating with different team members. For more information, see Doc Library.
Analysts can also create and manage content or files in the Threat Defender Library for threat detection, threat hunting, or threat remediation. For more information, see Threat Defender Library.
Analysts can create and manage a library of knowledge-base articles to improve self-service, give greater access to more articles, and offer regular updates. For more information, see Knowledge Base
Learn all about the administrative features in CSAP Analyst Portal to manage all the key configurations to onboard users and enable users to get started with the application.
Basic Configurations
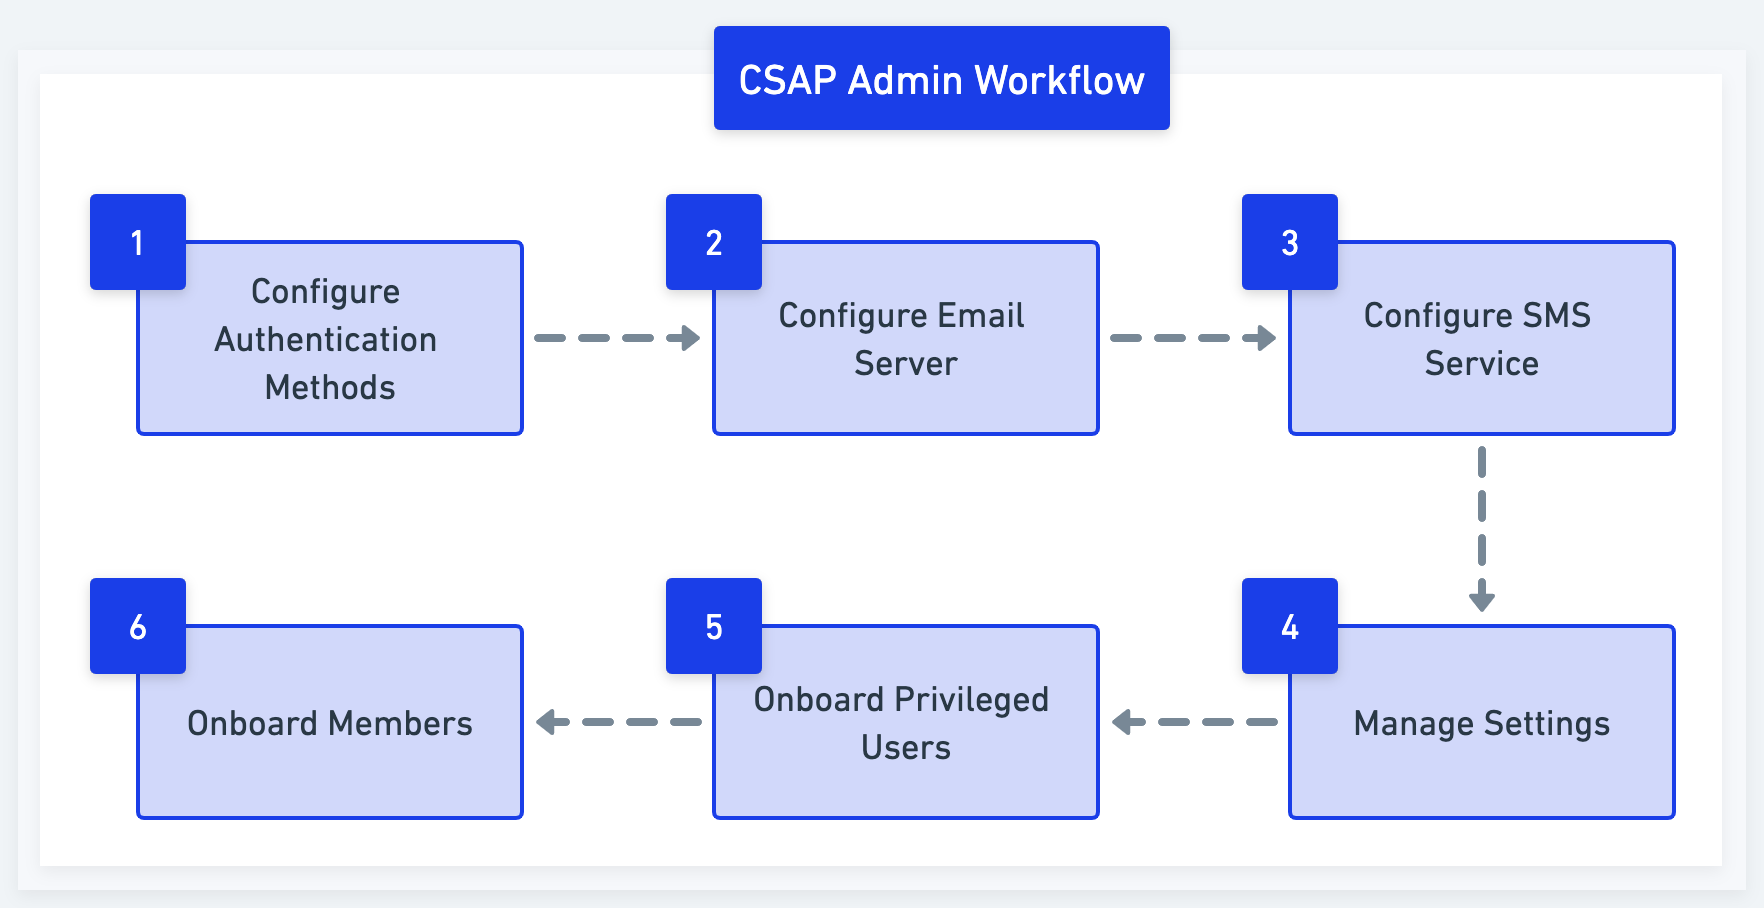
This section highlights the necessary configurations that you must perform to get started with the Analyst Portal. You can also review and configure other platform-specific settings as required. For more information, see Other Configurations.
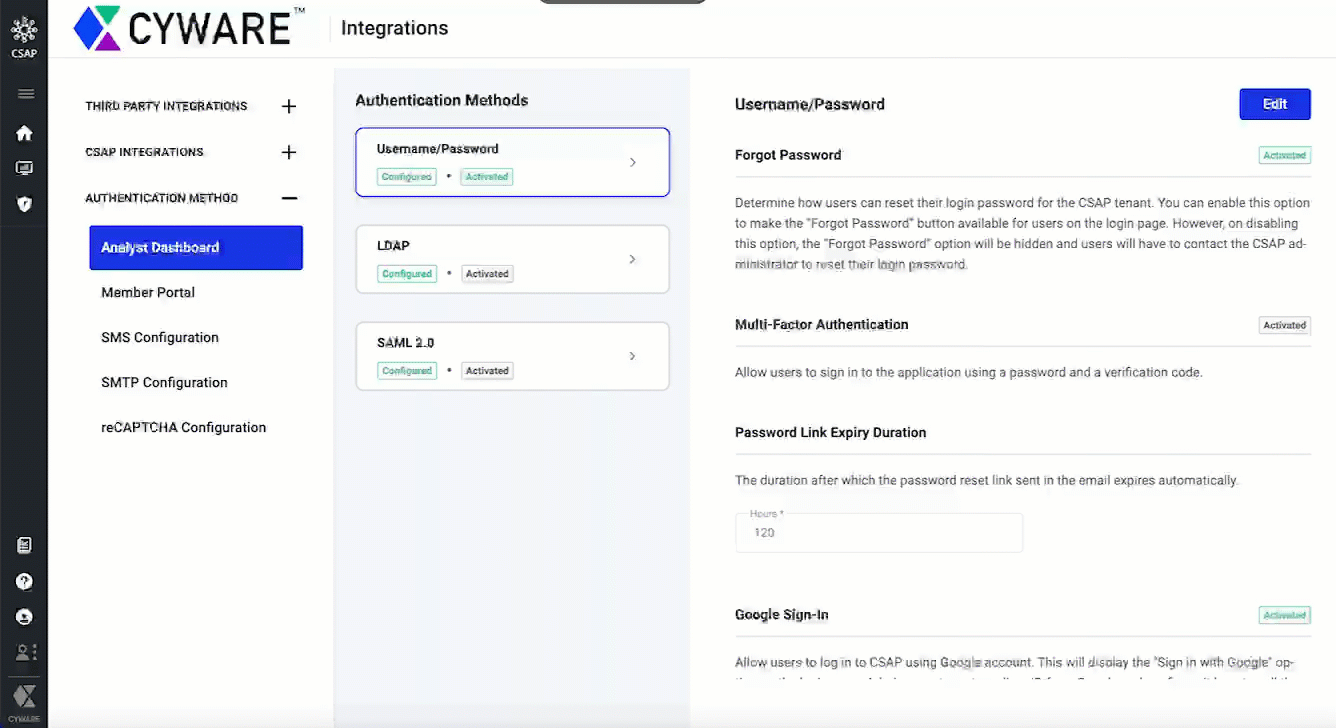
Step 1 | Authenticate users to sign in to the Analyst Portal by configuring your preferred authentication methods such as LDAP, Username-Password, SAML, or Google Sign-In. | |
Step 2 | Configure an email server to send out communication emails from the application. | |
Step 3 | Configure SMS gateway services with the Analyst Portal for sharing OTP through SMS. | |
Step 4 | Authenticate users to sign in to the Member Portal by configuring your preferred authentication methods such as LDAP, Username-Password, SAML, or Google Sign-In. | |
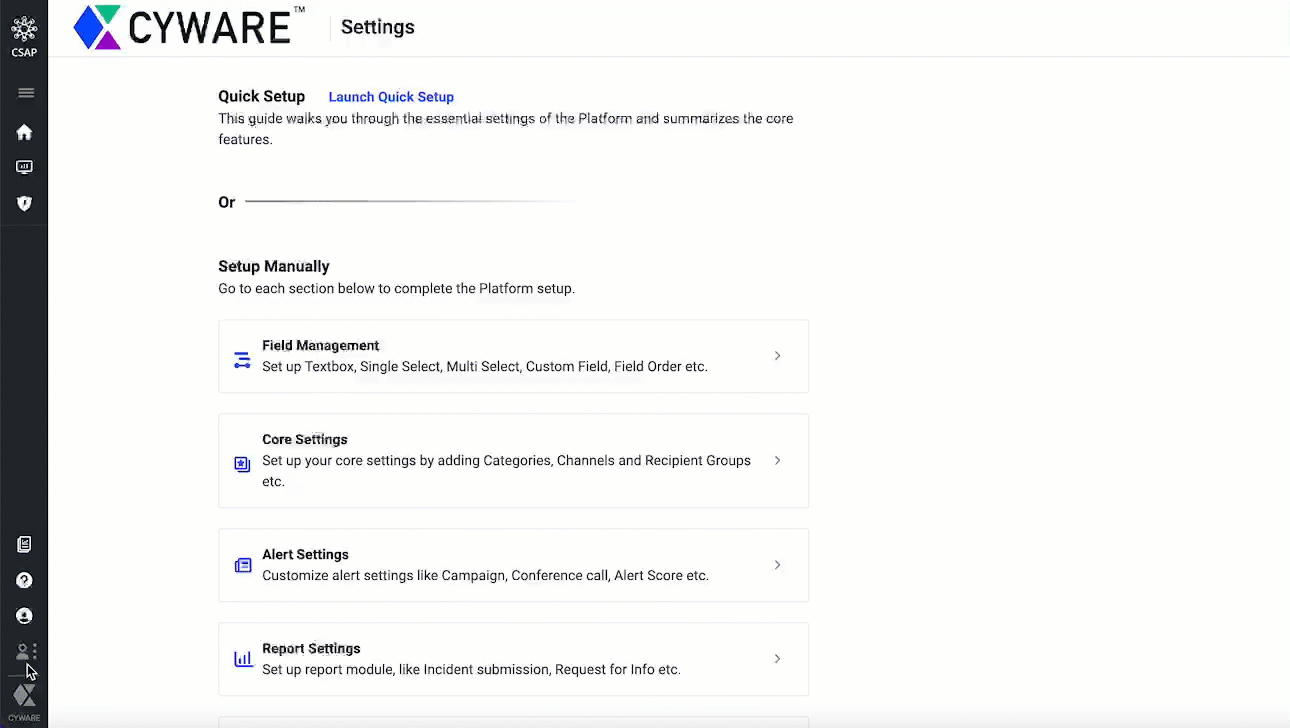
Step 5 | Configure the features in the Analyst and Member Portals. | |
Step 6 | Configure user groups to define the Role-Based Access Control (RBAC) of the features. | |
Step 7 | Create and onboard users into the CSAP Analyst Portal. | |
Step 8 | Create and onboard members into the CSAP Member Portal. |
Other Configurations
Configure the various functions of the Analyst Portal and the Member Portal by setting preferences. You can control the functions of different features on a granular level and maximize security awareness across users. | |
Configure automated sharing of alerts between different organizations that use CSAP, via secure API endpoints. | |
Configure and manage CSAP integration with third-party applications. | |
Generate OpenAPI credentials to integrate CSAP with other applications and access the features using CSAP Open API. | |
Add the indicators such as IP, domain, URL, email, and hashes, that you think are safe to your allowed lists. | |
Share security advisories with members so that they are updated with the latest alerts from trusted third-party sources. | |
View your license details, such as license key, expiry date, tenant name, tenant code, and the application version. You can also view the components that display the usage of user accounts for the Member Portal. |
User Interface Overview
This topic provides an overview of the common elements of the CSAP Analyst Portal User Interface (UI). The common UI elements are placed in the side menu bar.
Side Menu Bar
The side menu bar on the left of the Analyst Portal UI provides access to all features and the admin panel for quick access. Users can customize the side menu bar to quickly access frequently used features.
The important elements and functions of the side menu bar are:
Menu
You can access all modules of the application from the menu. The modules are categorized into the following groups:
Quick Access: Groups the modules for quick access such as RSS feeds, Crisis Management, and Survey capabilities of the CSAP Analyst Portal.
Member Reporting: Groups the modules that enable members to make submissions to the CSAP Analyst Portal such as Intel Submissions, Email Submissions, and Request for Info.
Knowledge Center: Groups the modules that allow analysts to create and store the content of different types such as Doc Library, Knowledge Base, ATT&CK Heatmap, Request Management, and more.
You can perform the following activities to manage the modules in the menu:
Search for a module.
Collapse or expand the groups.
Pin a module to the application navigator for quick access.
Admin Panel
The admin panel includes all the features and configurations performed by the administrator in one place, such as user and user group management, advisory management, configurations, open API, community sharing, and more.
Analyst Profile
The user profile gives you a holistic view of your personal information, such as name, email address, and user role, in the application. You can update your password.
Manage Analyst Profile
View and manage your profile details on the Analyst Portal.
From the sidebar, click Profile.
View details such as name, default page limit and landing page, email address, and user role.
To update your profile information, use the following information:
Full Name: Update your name as required.
Default Page Limit: Choose how many records to display on each page across the Analyst Portal. The page limit you set here applies across all modules in the Analyst Portal, such as Alerts, intel and RFI listing, TDL, Knowledge Base, and more. You can select 10, 25, 50, or 100 records. The default value is 10.
You can override this limit within a module using pagination controls. Your selection stays active until you refresh or switch to another module.
Default Landing Page: Select the landing page for your user in the Analyst Portal.
Click Update to save your changes.
To change your password, click Change Password, enter the required details, and click Update. You will be notified through email regarding the password change.
Click Log Out to sign out of the application.