Knowledge Centre
View and manage knowledge repositories. You can store media and other files in these repositories.
Doc Library
The Doc Library is a secure place to store text, image, and video files where analysts and members can store important files and download them from the web and mobile platforms. Analysts can grant access to documents only to specific groups and assign TLP suggesting the sensitivity of the concerned data.
Using the Doc Library:
Analysts can create a folder structure, organize content in the Analyst Portal, and share important documents, files, or attachments with members in the Member Portal.
Analysts can define access and restrict permissions using recipient groups for the information included in the doc library. This enables a group of members to access certain specific files while they are restricted access from others.
Analysts can include attachments from the doc library in alerts.
Members can access information or files shared by analysts.
Create a Doc Library Folder
Create a folder in the Doc Library to organize your content and share it with members.
Note
If the Analyst Groups feature is enabled, a toggle appears at the top of the Doc Library with Home and All Files views. The Create Folder button is available only in the Home view.
If the Analyst Groups feature is not enabled, the toggle does not appear, and the Create Folder button is available in the single default view.
Before you Start
You must have the View, Create, and Update permissions for the Doc Library.
Steps
To create a Doc Library folder, follow these steps:
Sign in to the Analyst Portal.
Go to Main Menu > Doc Library.
Note
If the Home | All Files toggle is visible, ensure you are in the Home view. By default, the toggle is set to All Files.
Click Create Folder in the upper-right corner and use the following information:
Enter a name and a description for the folder.
Select the analyst groups who can access this folder. If you do not select any analyst groups, the folder will be accessible to all Analyst Portal users.
Note
This field is visible only if the Analyst Groups feature is enabled in Configurations > Analyst Groups. For more information, see Configure Analyst Groups.
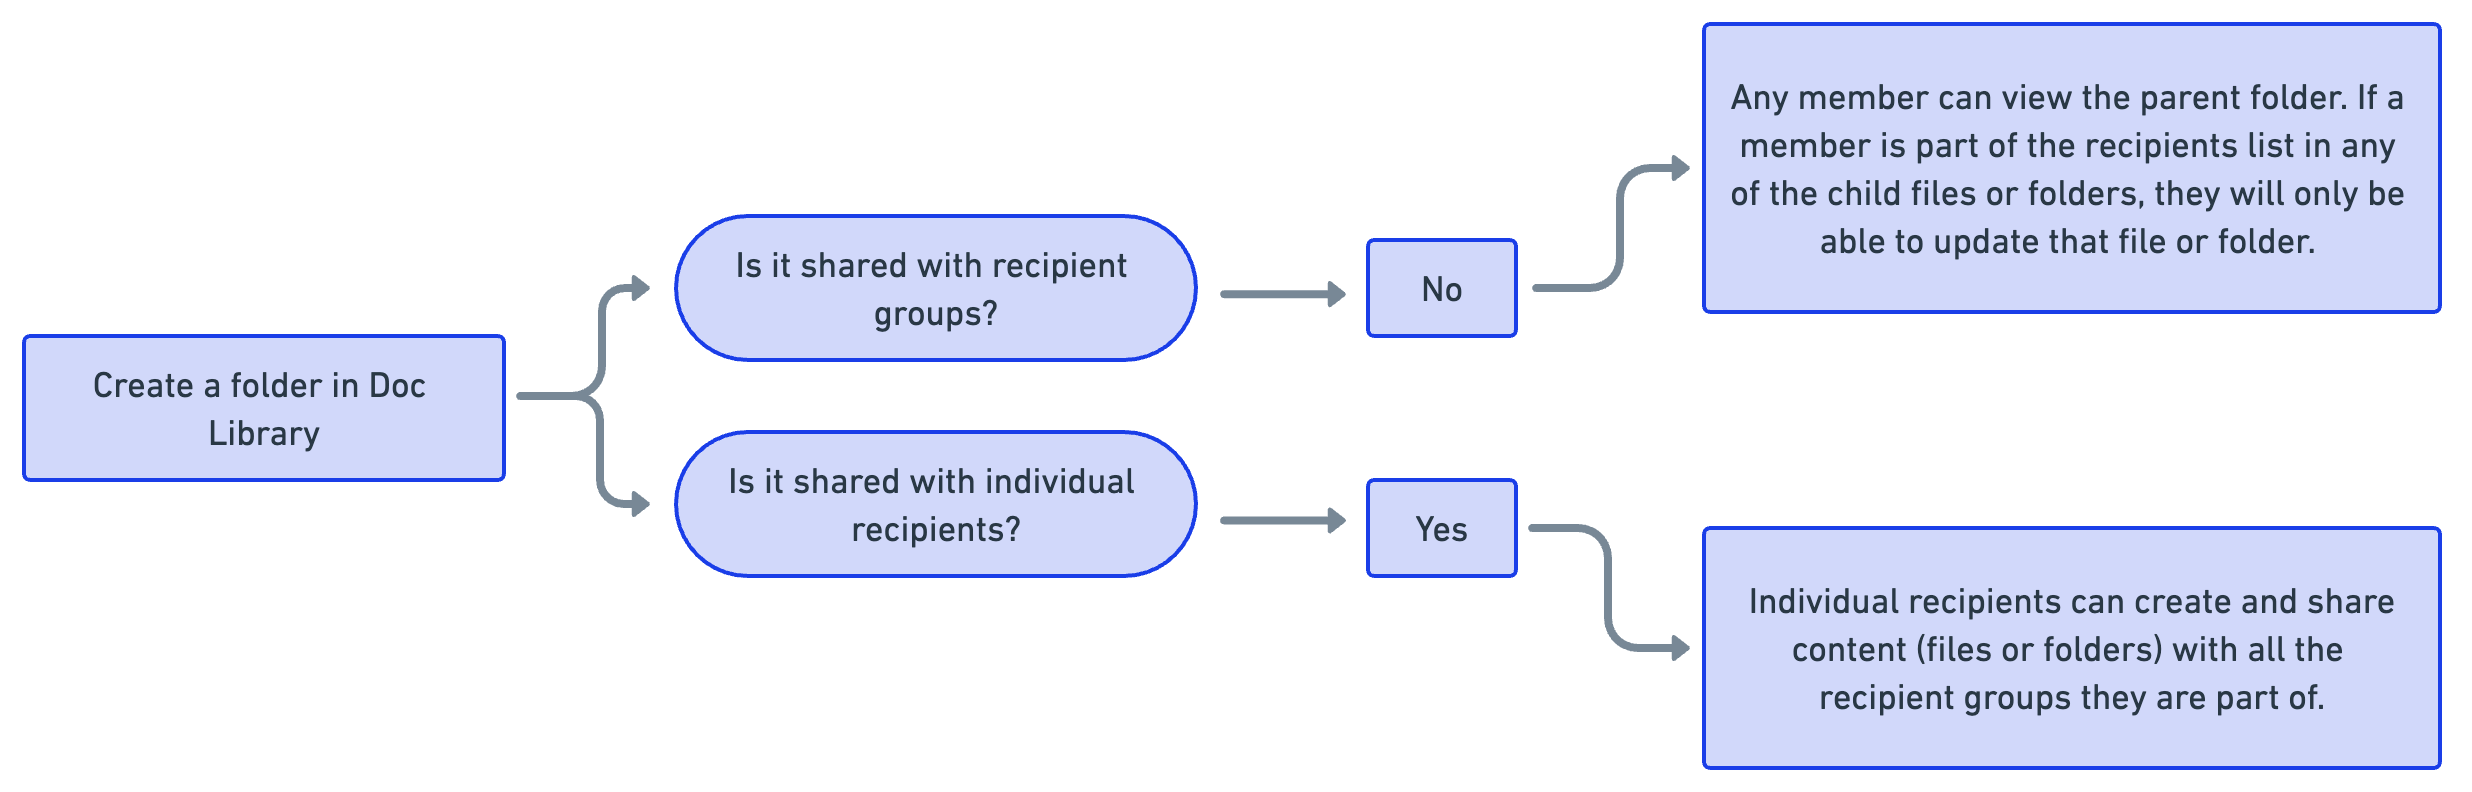
Select the recipient groups who can access this folder. You can choose to add public groups, invite-only groups, or system groups. You can also specify the permissions for each recipient group. By default, the recipient groups will be able to view your Doc Library folder. You can specify if they can update your folder by selecting or clearing the Update checkbox.
Select the individual recipients who can access this folder. By default, the individual recipients will be able to view your Doc Library folder. You can specify if they can update your folder by selecting or clearing the Update.
Note
You can choose to show or hide the name of the file and folder owner in the Doc Library. For example, if you are creating a folder and don't want viewers to see that you are the owner, you can configure this in Configure Mobile App or Web Portal Preferences.
Review the details, and click Create.
Doc Library Permissions
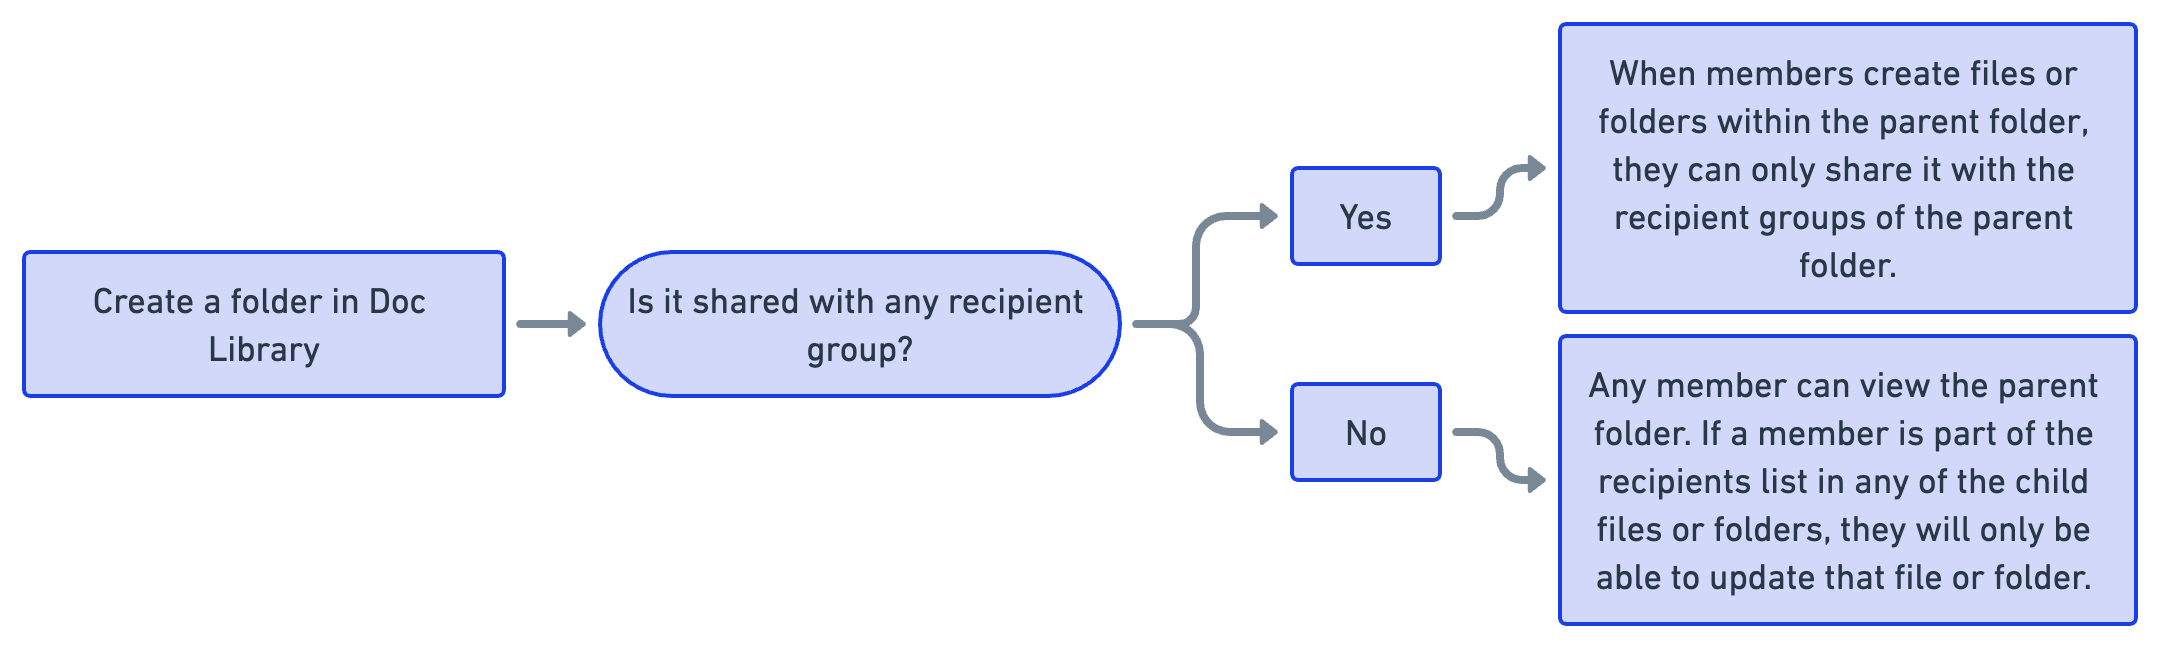
When you create files and folders in the Doc Library, you can choose to share it with recipient groups and individual recipients. By default, recipients have view permissions for content that is shared with them. When you select Update, these recipients will be able to create files or folders within the parent folder. The following sections describe how permissions are defined in various scenarios:

Configure Default Doc Library Folders
As an analyst, you can configure default Doc Library folders for the following:
For exported alerts
For indicator files uploaded to a published alert
For third-party files
For files attached to alerts created from member submissions
Steps
In the Analyst Portal, navigate to Administration > Configuration > Analyst Dashboard.
Click Edit. Click Create Folder to create a new folder. Click Select Path or Change path (if you have previously selected a path) to specify a folder path.
In Default Doc Library Folder for Third-Party Files, select the default folder in the Doc Library for third-party files.
In Default Doc Library Folder for files attached to Alerts created via Member Submissions, select the default folder for Doc Library content associated with alerts published from member submissions such as Intel Submissions or Requests for Information (RFI).
In Default Doc Library for Export Alert, select the default folder when you export alerts in Alerts.
In Default Doc Library for Indicators Related to Alerts, select the default folder for when you upload indicator files to an alert and publish it.
Click Update.
Set Permissions for Doc Library Folders
When creating or updating a folder in the Doc Library, you can assign upload or view permissions for the recipient groups that are added. The update permission allows members within a recipient group to upload files and modify the folder, whereas the view permission only allows the viewing and downloading of files that currently exist in the folder. This provides improved access control for folders within the doc library, enabling you to maintain folder content and quality.
Steps:
Navigate Main Menu and select Doc Library.
Perform one of the following actions:
To create a new folder, in the top-right corner, click Create Folder.
To update an existing folder, hover and click Edit next to the folder.
Select the recipient groups to add to your folder.
If you have already selected the recipient groups, you can specify permissions against every group. Select or clear the Update to specify whether you want the members of that recipient group to be able to make updates.
Click Create or Save to save your changes.
Update Doc Library Folders
Edit the doc library folders in the Analyst Portal.
Note
If the Analyst Groups feature is enabled, a toggle appears at the top of the Doc Library with Home and All Files views. You can edit folders only from the Home view.
If the Analyst Groups feature is not enabled, the toggle does not appear, and you can edit folders from the single default view.
Before you Start
You must have the Update permission for the Doc Library.
Steps
To update a folder in the Doc Library, follow these steps:
Go to Main Menu and select Doc Library.
Note
If the Home | All Files toggle is visible, switch to the Home view.
Select a folder and click Edit.
Update the fields and click Update.
Edit the details such as file name, description, tags, TLP, and more.
Use the Active toggle to mark it as active or not active.
Click Inherit Recipient Groups to include the recipient groups of the parent folder. You need not add recipient groups manually for files separately.
Click Update to save your changes.
Configure Doc Library File Size Upload Limit
Administrators and root administrators can configure the maximum file size limit for the files that analysts upload to the doc library.
Steps
Navigate to Management > Configuration and click Analyst Dashboard.
Click Edit.
In File Size Upload Limit (in MB), enter the maximum limit for the files. The maximum limit that you can configure is 100 MB.
Click Update to save your changes.
Upload Files to the Doc Library
You can upload one file or multiple files at a time. When you bulk upload files, they will all have the same TLP and recipient groups, thereby batching the task and reducing the time to completion.
Before you Start
Ensure you have View, Create, and Update permissions for the Doc Library.
Steps
To upload files to the Doc Library, follow these steps:
Go to Main Menu > Doc Library.
Click Upload Files.
Use the following information while uploading files:
Drag and drop your files or click Browse to select the files from your computer. For more information on the supported file extensions and file name format, hover over the information icon. The maximum file size that members can upload can be configured. For more information, see Configure Doc Library File Size Upload Limit.
Note
If you are uploading a file that already exists in the Doc Library, you have the option to replace the original file or add it as a new file by renaming it.
Description: Enter a description for your files.
Analyst Groups: Select the analyst groups who can access these files. If no analyst groups are selected, the files will be accessible to all Analyst Portal users.
Note
This field appears only if the Analyst Groups feature is enabled in Configurations > Analyst Groups. For more information, see Configure Analyst Groups.
Select Recipient Groups: Select the recipient groups who can view this file.
Select Individual Recipients: Select the individual recipients who can view this file.
Tag Group: Select a Tag Group to associate with your files. For more details, see Create a Tag Group.
Tags: Enter tag names to add new or existing tags to the files. Tags help you classify and identify content in the Doc Library. You can also search for tags. To refine your search, you can use the following filter options:
Starts With: Shows tags that begin with your input.
Exact Match: Shows tags that exactly match your input.
Contains: Shows tags that contain your input anywhere within the tag name.
TLP: Select a TLP for your files.
Select Notify All Users in Recipient Group of New File Uploaded to send an email notification to all recipients about the file.
To upload the file to the Doc library, click Save. Ensure to turn on the Active toggle to make the file active and visible in CSAP.
Update Doc Library Files
Update doc library files to edit or modify any required details.
Before you Start You need to have the View and Create/Update permissions to access the Doc Library. Permissions can only be assigned to a role.
Steps:
Navigate to Main Menu, and select Doc library.
From the list, select a folder and then select a file, hover, and click Edit.
Edit the details such as file name, description, tags, TLP, and more.
Use the Active toggle to activate or deactivate the file in the doc library.
Click Inherit Recipient Groups to include the recipient groups of the parent folder. All the recipient groups that are present in the parent folder are added to this file. You need not add recipient groups manually for files separately. All the members of the recipient groups will have access to these files.
Click Update to save your changes.
Move Doc Library Files and Folders
You can move content (files and folders) in the Doc Library to other folders or the root directory. You can also choose to bulk move content in the Doc Library.
Steps
To move files and folders in the Doc Library, do the following:
Navigate to Main Menu and select Doc Library.
Select the files and folders that you want to move and click Move to. You can choose one or more files and folders in the following ways:
To move the folders to the root directory, in the upper-right corner, click Move Here.
Alternatively, you can specify a new folder as a target destination by clicking Create Folder. You can specify a folder name and the recipient groups that can access it. Click Create. Click the target folder to which you want to move your Doc Library folders and then click Move Here. The folders or files have now been moved to the target folder.
Note
You can only move files and folders that have the status Active. Additionally, you cannot move files and folders into a folder that has the status Inactive.
Manage Doc Library Files and Folders
As an analyst, you can perform the following actions in the Doc Library:
To create a new Doc Library folder, click Create Folder. For more information, see Create a Doc Library Folder.
To upload a file or document to the Doc Library, click Upload Files. For more information, see Upload Files to the Doc Library.
Views in the Doc Library
If the Analyst Groups feature is enabled, a view switcher appears at the top of the Doc Library with the following options:
Home: Displays files and folders created by you or shared with the analyst groups you are part of. You can create new folders and manage content from this view.
All Files: Displays all files available in the Doc Library that you have permission to view based on the analyst groups you are part of.
If the Analyst Groups feature is not enabled, the toggle is hidden, and only a single unified view is displayed.
The Doc Library listing has the following columns:
Name: View the name of the file or folder.
Last Updated: View the date and time the file or folder was last updated.
Uploaded By: View the user who uploaded the file or folder. A indicates Analyst, and M indicates Member.
Analyst Groups: View the list of analyst groups that have access to the file or folder.
Note
This column appears only if the Analyst Groups feature is enabled.
TLP: View the TLP associated with the file. A file can only be associated with one TLP.
Recipient Groups: View the list of recipient groups that have access to the folder or file.
Tags: View the list of tags associated with the uploaded file.
Download/Preview: View the number of users who have downloaded or previewed the file or folder.
Location: View the location of the file and folder. Home signifies that the file or folder is located in the root directory.
Status: View whether the file or folder is in Active or Inactive status.
Click the vertical ellipsis of files and folders to view the following options:
To view all the alerts associated with a file, click Associated Alerts.
To make changes to a file or folder, click Edit.
To preview file attachments, click Preview. This option is browser-dependent, and the preview window may not load if your browser does not support the file type. In that case, the file will be downloaded. The supported preview formats for most browsers are .pdf, .txt, .jpg, . jpeg, .png, .mp4, .json, and .xml.
To share files or folders directly with other analysts, click Copy URL for Analysts. To share files or folders with members, click Copy URL for Members. The receiver can directly locate the file or folder in the Doc Library using the shared link.
To move a file or folder, click Move and then select the file path to which you want to move the file or folder.
To change the status of empty Doc Library folders and make them inactive, click Mark Inactive.
To download a file to your local device, click Download.
To remove a file or folder from the Doc Library, click Delete. Based on the permissions defined for your role, you can delete files and folders uploaded by both members and analysts. Members are notified by email when you delete content added by them. You can delete up to 10 files and folders simultaneously.
Note
You can delete folders only if they are empty.
Manage Network Advisories Folder
Notice
This enhancement is available in v3.8.6 onwards.
When third-party providers publish alerts, attachments from those alerts are automatically stored in the Network Advisories folder. Subfolders are automatically created for each information source, ensuring that attachments are organized within these child folders for easy access.
Note
It is recommended to avoid uploading files or manually creating subfolders within the Network Advisories folder to maintain its structure.
Recipient Group Access
Assign recipient groups to an advisory provider in Advisory Management to give them access to the corresponding subfolder in the Network Advisories folder. If you remove a recipient group from an advisory provider, the recipient group loses access to any newly uploaded files but can still access previously uploaded content until it is removed. For more information on adding recipient groups to advisory providers, see Manage Network Advisories.
Note
It is recommended not to add recipient groups directly to the Network Advisories folder or its subfolders to ensure proper folder access. Instead, you can manage recipient group access at any time through Advisory Management.
ATT&CK Navigator
MITRE ATT&CK is a globally accessible knowledge base of adversary tactics and techniques based on real-world observations. It is used as a foundation for the development of specific threat models and methodologies in an organization.
Alert Heat Map: Use this heat map to visualize the defensive coverage and number of detected tactics and techniques based on alerts created in the Analyst Portal.
Intel Heat Map: Use the Intel Heat Map to visualize the defensive coverage and frequency of detected tactics and techniques based on intel submitted by members in the Member Portal
TDL Heat Map: Use the TDL Heat Map to visualize the defensive coverage and frequency of detected tactics and techniques based on threat defender content available in the Threat Defender Library (TDL).
If Threat Defender Library (TDL) is enabled for you, TDL Heat Map will continue to be available even if ATT&CK Navigator is disabled in Administration > Configuration. For more information, see Configure Collaborate Features.
Manage ATT&CK Navigator
Use the MITRE ATT&CK framework in to detect and analyze threats to your organization based on alerts, intel submissions, and TDL content.
Note
If the Threat Defender Library (TDL) is enabled, TDL Heat Map will remain available even if ATT&CK Navigator is disabled in Administration > Configuration.
Before you Start
You must have the View, Create, and Update permissions to access the ATT&CK Navigator.
From the Main Menu, go to the ATT&CK Navigator. Use the following information while managing the ATT&CK Navigator:
Select the ATT&CK Matrix type (Enterprise, ICS, and Mobile) to view the heat maps accordingly.
Select Intel Heat Map, Alert Heat Map, or TDL Heat Map to visualize data based on alerts, intel, or TDL content.
Select Hide Cells with Zero Count to hide the cells that do not have data in the matrix.
To download the heat map as a PDF on your local system, click Download. Any filters you apply or techniques you expand before downloading will be included in the PDFs.
Use the filter to filter alert heat map data by Info Source, Modified Date, and Publisher.
The heatmap uses a red color scale to represent the frequency of detected techniques and sub-techniques. The higher the color intensity, the larger the frequency of the technique or sub-technique used.
View Alert Heat Map
The heatmap displays tactics and techniques based on alerts created from the Analyst Portal. While creating an alert, the analysts can fill in the tactic, technique, and sub-technique details that correspond to the alert. These alerts are correlated and mapped in the ATT&CK Navigator.
For example, if you select Persistence as the tactic and Application Shimming as the technique while creating an alert, the same can be visualized in the alert heatmap.
The columns in the heatmap are organized based on tactics defined by MITRE. The number of times a particular tactic is reported in an alert is displayed near the tactic name.
The rows in the heatmap are organized based on techniques defined by MITRE. The number of times a particular technique is reported in an alert is displayed near the technique name. Additionally, you can also view the sub-techniques associated with the corresponding tactic-technique pair.
Before you Start
You must have the View and Create/Update permissions to access ATT&CK Navigator
From the Main Menu, go to ATT&CK Navigator, and select Alert Heat Map.
Select a tactic to view the list of alerts associated with the tactic.
Select a technique to view the list of alerts associated with the tactic and technique pair.
Select a sub-technique to view the list of alerts associated with the corresponding tactic, technique, and sub-technique.
Select the ATT&CK Matrix type (Enterprise, ICS, and Mobile) to view the corresponding alerts.
View Intel Heat Map
The heatmap displays tactics and techniques based on threat intel submissions from the Member Portal. While creating and sharing threat intel, the members can fill in the tactic and technique details that correspond to the intel. The intel submissions are correlated and mapped in the Intel ATT&CK Navigator.
For example, if you select Privilege Escalation as the tactic and Access Token Manipulation as the technique while creating and sharing intel, the same can be visualized in the Intel Heat Map.
The columns in the heatmap are organized based on tactics defined by MITRE. The number of times a particular tactic is reported in intel submission is displayed near the tactic name.
The rows in the heat map are organized based on techniques defined by MITRE. The number of times a particular technique is reported in intel is displayed near the technique name.
Before you Start
You must have the View, Create, and Update permissions to access ATT&CK Navigator.
From the Main Menu, go to ATT&CK Navigator, and select Intel Heat Map.
Select a tactic to view the list of intel submissions associated with the tactic.
Select a technique to view the list of intel submissions associated with the tactic and technique pair.
Select a sub-technique to view the list of intel submissions associated with the corresponding tactic, technique, and sub-technique.
Select the ATT&CK Matrix type (Enterprise, ICS, and Mobile) to view the corresponding intel submissions.
View TDL Heat Map
The TDL Heat Map displays tactics, techniques, and sub-techniques based on content created in the Analyst and Member Portal. While creating TDL content, you can fill in the tactic and technique details that correspond to the content. This content is correlated and mapped in the ATT&CK Navigator.
Note
If Threat Defender Library (TDL) is enabled, TDL Heat Map will remain available even if ATT&CK Navigator is disabled in Administration > Configuration. For more information, see Configure Collaborate Features.
For example, if you select Persistence as the tactic and Application Shimming as the technique while creating the content, the same can be visualized in the TDL Heat Map.
The columns in the heat map are organized based on tactics defined by MITRE. The number of times a particular tactic is reported in the TDL content is displayed near the tactic name.
The rows in the heatmap are organized based on techniques defined by MITRE. The number of times a particular technique is reported in the TDL content is displayed near the technique name. Additionally, you can also view the sub-techniques associated with the corresponding tactic-technique pair.
Before you Start
You must have the View, Create, and Update permissions to access ATT&CK Navigator.
From the Main Menu, go to ATT&CK Navigator, and select TDL Heat Map.
Select a tactic to view the list of TDL content associated with the tactic.
Select a technique to view the list of TDL content associated with the tactic and technique pair.
Select a sub-technique to view the list of TDL content associated with the corresponding tactic, technique, and sub-technique.
Select the ATT&CK Matrix type (Enterprise, ICS, and Mobile) to view the corresponding TDL content.
Knowledge Base
Use the Knowledge Base to create and store documents such as policies, guidelines, handbooks, or standard operating procedures that are relevant to your organization. Analysts and members can access these resources to exchange knowledge, enhance awareness, or seek assistance on various issues.
Every Knowledge Base article is associated with a unique URL. As an analyst, you can:
Share the links with other analysts or members.
Attach the links to alerts and publish them to members.
Create a Knowledge Base Article
Create an article to build your organization's Knowledge Base (KB).
Before you Start
Ensure you have the View, Create, and Update permissions to access Knowledge Base.
Steps
Go to the main menu, and select Knowledge Base.
To create a KB article, click Create.
Title: Enter the title of the article.
Description: Enter the Description for the article.
Category: Select a category for the article. By categorizing articles, you can locate information related to specific topics or areas of interest within the organization. For more information about KB categories and sub-categories, see Knowledge Base Settings.
(Optional) Sub-category: Based on the selected category, you can select an appropriate sub-category for the article.
Recipient Groups: Select a recipient group for the article. The members in these recipient groups can access the KB article.
TLP: Select a TLP for the article.
(Optional) Attachments: Include attachments from the document library or upload documents from the computer.
(Optional) Tag Groups: From Tag Group, select the required tag group and associate it with the article. For more details, see Create a Tag Group.
(Optional) Tag: Enter tags to associate tags to this article. To refine your search, you can use the following filter options:
Starts With: Shows tags that begin with your input.
Exact Match: Shows tags that exactly match your input.
Contains: Shows tags that contain your input anywhere within the tag name.
Turn on the Active toggle to mark the article as active.
Click Publish. The article is now available for the recipients.
Note
You can also choose to save the article as a draft at any point by clicking Save as Draft. Ensure you have filled in the mandatory fields to save the article as a draft.
Manage Knowledge Base Articles
View list of all available Knowledge Base (KB) articles. You can view details such as KB ID, name, title, category, and status. Ensure you have the View and Update permissions to access Knowledge Base.
On the listing page, you can view details such as the KB ID, Updated On, Updated By, Status , and more.
Click the vertical ellipsis of an article to copy the URL or view and edit it.
To share published and active articles with communities, click Community Sharing. This article is now available as a draft for the sharing communities. For more information about sharing communities, see Manage Sharing Communities.
Every article is associated with a unique link. Click Copy URL to copy and share the Knowledge Base article.
Note
The URL of the KB article does not change when any updates are made to the article.
Use Filters to search for items based on status, category, TLP, recipient group, tags, and more.
Allowed Indicators
Add the indicators such as IP, domain, URL, email, and hashes, that you think are safe to your allow lists.
Add Allowed Indicators
Add allowed indicators in CSAP Analyst Portal. These indicators will be parsed as allowed indicators while creating alerts. This enhances the information on safe indicators that can be shared in an alert and helps members make informed decisions.
Navigate to Indicators Allowed from the main menu.
Click Add Indicators to add new indicators.
Enter all the indicators. You can add indicators such as IPs, Domains, URLs, Emails, Hashes, etc. Users can also add multiple indicators separated by commas.
Click Add .
Note
Indicators that are allowed are automatically identified and categorized when publishers add threat indicators to alerts that are published from the CSAP Analyst Portal.
Manage Allowed Indicators
As an analyst user, you can manage the indicators added to the allowed list in .
Before you Start
You must have the View, Create, and Update permissions to access the Indicators Allowed module. Permissions can only be assigned to a role.
Choose IP, Domain, URL, Email, MD5, SHA1, and SHA256 to view allowed indicators according to categories.
Click Refresh to refresh the list for the latest allowed indicators.
Click Filter to show or hide the filter and search tool. Enter search keywords on the filter and search tool to perform filter, search, and sort actions.
Click Export to save the allowed indicators to your computer in .CSV format. Analysts can export details of Indicators submitted by users along with the organization details, indicator type, and count.
Click Add Indicators to add new Indicators. See Add Allowed Indicators.
Status Users can deactivate or activate an indicator using the toggle for the respective Indicator.
Click the indicator Count to view the list of members who have allowed the indicator.
Tag Library
Tags are text labels that you can assign to Collaborate components such as situational awareness alerts, intel reports, doc library files, knowledge base documents, surveys, and more. It identifies the information available within an alert. For example, you can use an indicator tag name to specify valuable threat indicator information to members.
You can use tags for publishing situational awareness alerts. Published alerts contain threat indicators to alert members, while others include information about security breaches, vulnerabilities, security strategies, suggested actions for threats, and more. To connect similar sets of alerts, you can view the Tag Library. It helps you create a tagging mechanism or tag cloud that is specific to your organization. You can add the required number of tags to an alert to correlate a wide variety of information.
Some benefits of tags are:
It notifies members about the different types of sensitivity in the alert content. For example, you can use a vulnerability tag to inform members about the CVE information and proof of concept for vulnerability mitigation.
It prompts members about the importance of information and correlates alerts to the appropriate tags.
You can label them as security incidents, vulnerabilities, malware, threat actors, IoCs, and more while creating an alert. You can then view these tags to identify similar alerts logged in Collaborate.
Analysts or members can add a maximum of 50 tags at a time to alerts, Doc Library files, alert templates, and so on.
Create Tags in the Analyst Portal
To create tags, you must first enable this configuration in Administration > Configuration. For more information, see Configure Analyst Portal Preferences.
In the Analyst Portal, you can create tags while creating alerts and alert templates, creating tag groups, and Knowledge Base articles, adding files to Doc Library, and creating surveys.
While creating new tags, use the following information:
To add individual tags, type the tag name in the Tags field, and click Add tags.
To add multiple tags, type the tag names and separate each tag with a comma or semicolon. Click Add tags to add the tags.
Manage Tags in the Analyst Portal
To view and delete tags, you must have View permissions for Tag Library in Administration > User Management > Roles & Permissions.
Go to Tag Library from the main menu.
View all tags, tags created by other analysts, tags created by you, and all tags associated with tag groups.
To view a CSV report of all tags, click Export. The report will be available in your email inbox.
To view the number of alerts associated with tags, click the number next to the tag name.
To delete tags, hover over the tag you want to delete, click the vertical ellipsis, and click Delete.
To filter and search for tags, click the Open Filters and type or select the name of the tag you want to view.
Tag Types
Tags are classified into the following categories:
Cyware Tags: Cyware provides users with an array of frequently used tags from the cyber security space. Users can assign these quick tags to match the relevant information shared with members. Analysts have curated these tags based on trends, popularity, criticality, technical correctness, and a wide range of usability.
User Tags: Tags created by members of the CSAP Member Portal are called user tags. CSAP members can add tags while they submit intel reports and add documents to the doc library.
Tenant Tags: Tags specific to an organization are called tenant tags. Analysts can create these tags.
Tag Groups: Tag groups are a collection of tags. Use tag groups to apply multiple tags to an alert, a knowledge base article, or a doc library file at once.
Create a Tag Group
A tag group is a collection of tags. Analysts can apply a tag group to alerts, doc library files, or knowledge base articles, and all the associated tags are applied.
Analysts can create and use tag groups in the Analyst Portal. Tag groups are not available in Member Portal.
Analysts can use tags groups to quickly add a group of tags instead of applying multiple tags individually. Tag groups can be created based on domains, departments, organizations, members, specific threats, campaigns, or more.
Steps
To create a tag group, follow these steps:
Go to Main Menu and click Tag Library.
Click Tag Groups and then click Create.
Enter a name and description for your tag group. For example, to bundle tags under operating system names, enter a tag group name Windows OS and enter a description, Tag group created to manage all tags under the Windows operating system.
In Tags, select the tags that you want to group together. Type the first three letters of the tag, and the system shows you tags available with these letters. To refine your search, you can use the following filter options:
Starts With: Shows tags that begin with your input.
Exact Match: Shows tags that exactly match your input.
Contains: Shows tags that contain your input anywhere within the tag name.
If not available, you can create a tag. In this example of group tag, you can group tags such as Windows 8, Windows 98, Windows 10, Windows NT, and Windows Vista under the group tag Windows OS.
Note
You can group a maximum of 15 tags under one tag group.
Configure Threat Levels
Analysts can configure and use threat levels to indicate the current level of malicious cyber activity and reflect the potential/actual damage caused by the threats. Threat levels are determined and communicated to members based on the specific organization's security requirements.
Security teams can determine and update threat levels based on various parameters such as likely damage due to the threat, the targets of the threat, preventive measures that are in place, and other crucial data such as the lethality and criticality of a threat.
Threat levels can be customized for a specific organization's security requirements. This information is displayed to members on the Member Portal.
Threat levels include:
Threat Type - Analysts can map Threat Types to appropriate Threat Levels to display them in the CSAP Member Portal.
Threat Level - Analysts can map Threat Types to appropriate Threat Levels to display them in the CSAP Member Portal.
Threat Criteria - Analysts can map Threat Criteria to appropriate Threat Levels to display them in the CSAP Analyst Portal.
Help Text - Analysts can provide a description of the Threat Level indicator to members. Members can view the help text by clicking on the “?” icon from the Threat Level indicator slider in the CSAP Member Portal.

Create Threat Level Mapping
Map the threat criteria, level, and types to create a threat level mapping that will be displayed to members on the Member Portal.
The threat levels, types, and criteria can be used to create a bulletin of information that the member can use as a reference.
Before you Start
You must have the View and Create/Update permissions to access Threats Levels. Permissions can only be assigned to a role.
You must have created the Criteria, Levels, and Types from Settings. See Threat Levels.
Steps
From Main Menu, select Threat Levels.
Click New.
Select the Threat Type, Threat Level, and Threat Level Criteria.
The threat type can be, Classified Information breach, Critical Intel Sharing, Phishing Attacks, and so on.
The threat level can be high, low, medium, critical, elevated, and so on.
The threat level criteria can be classified information, and so on.
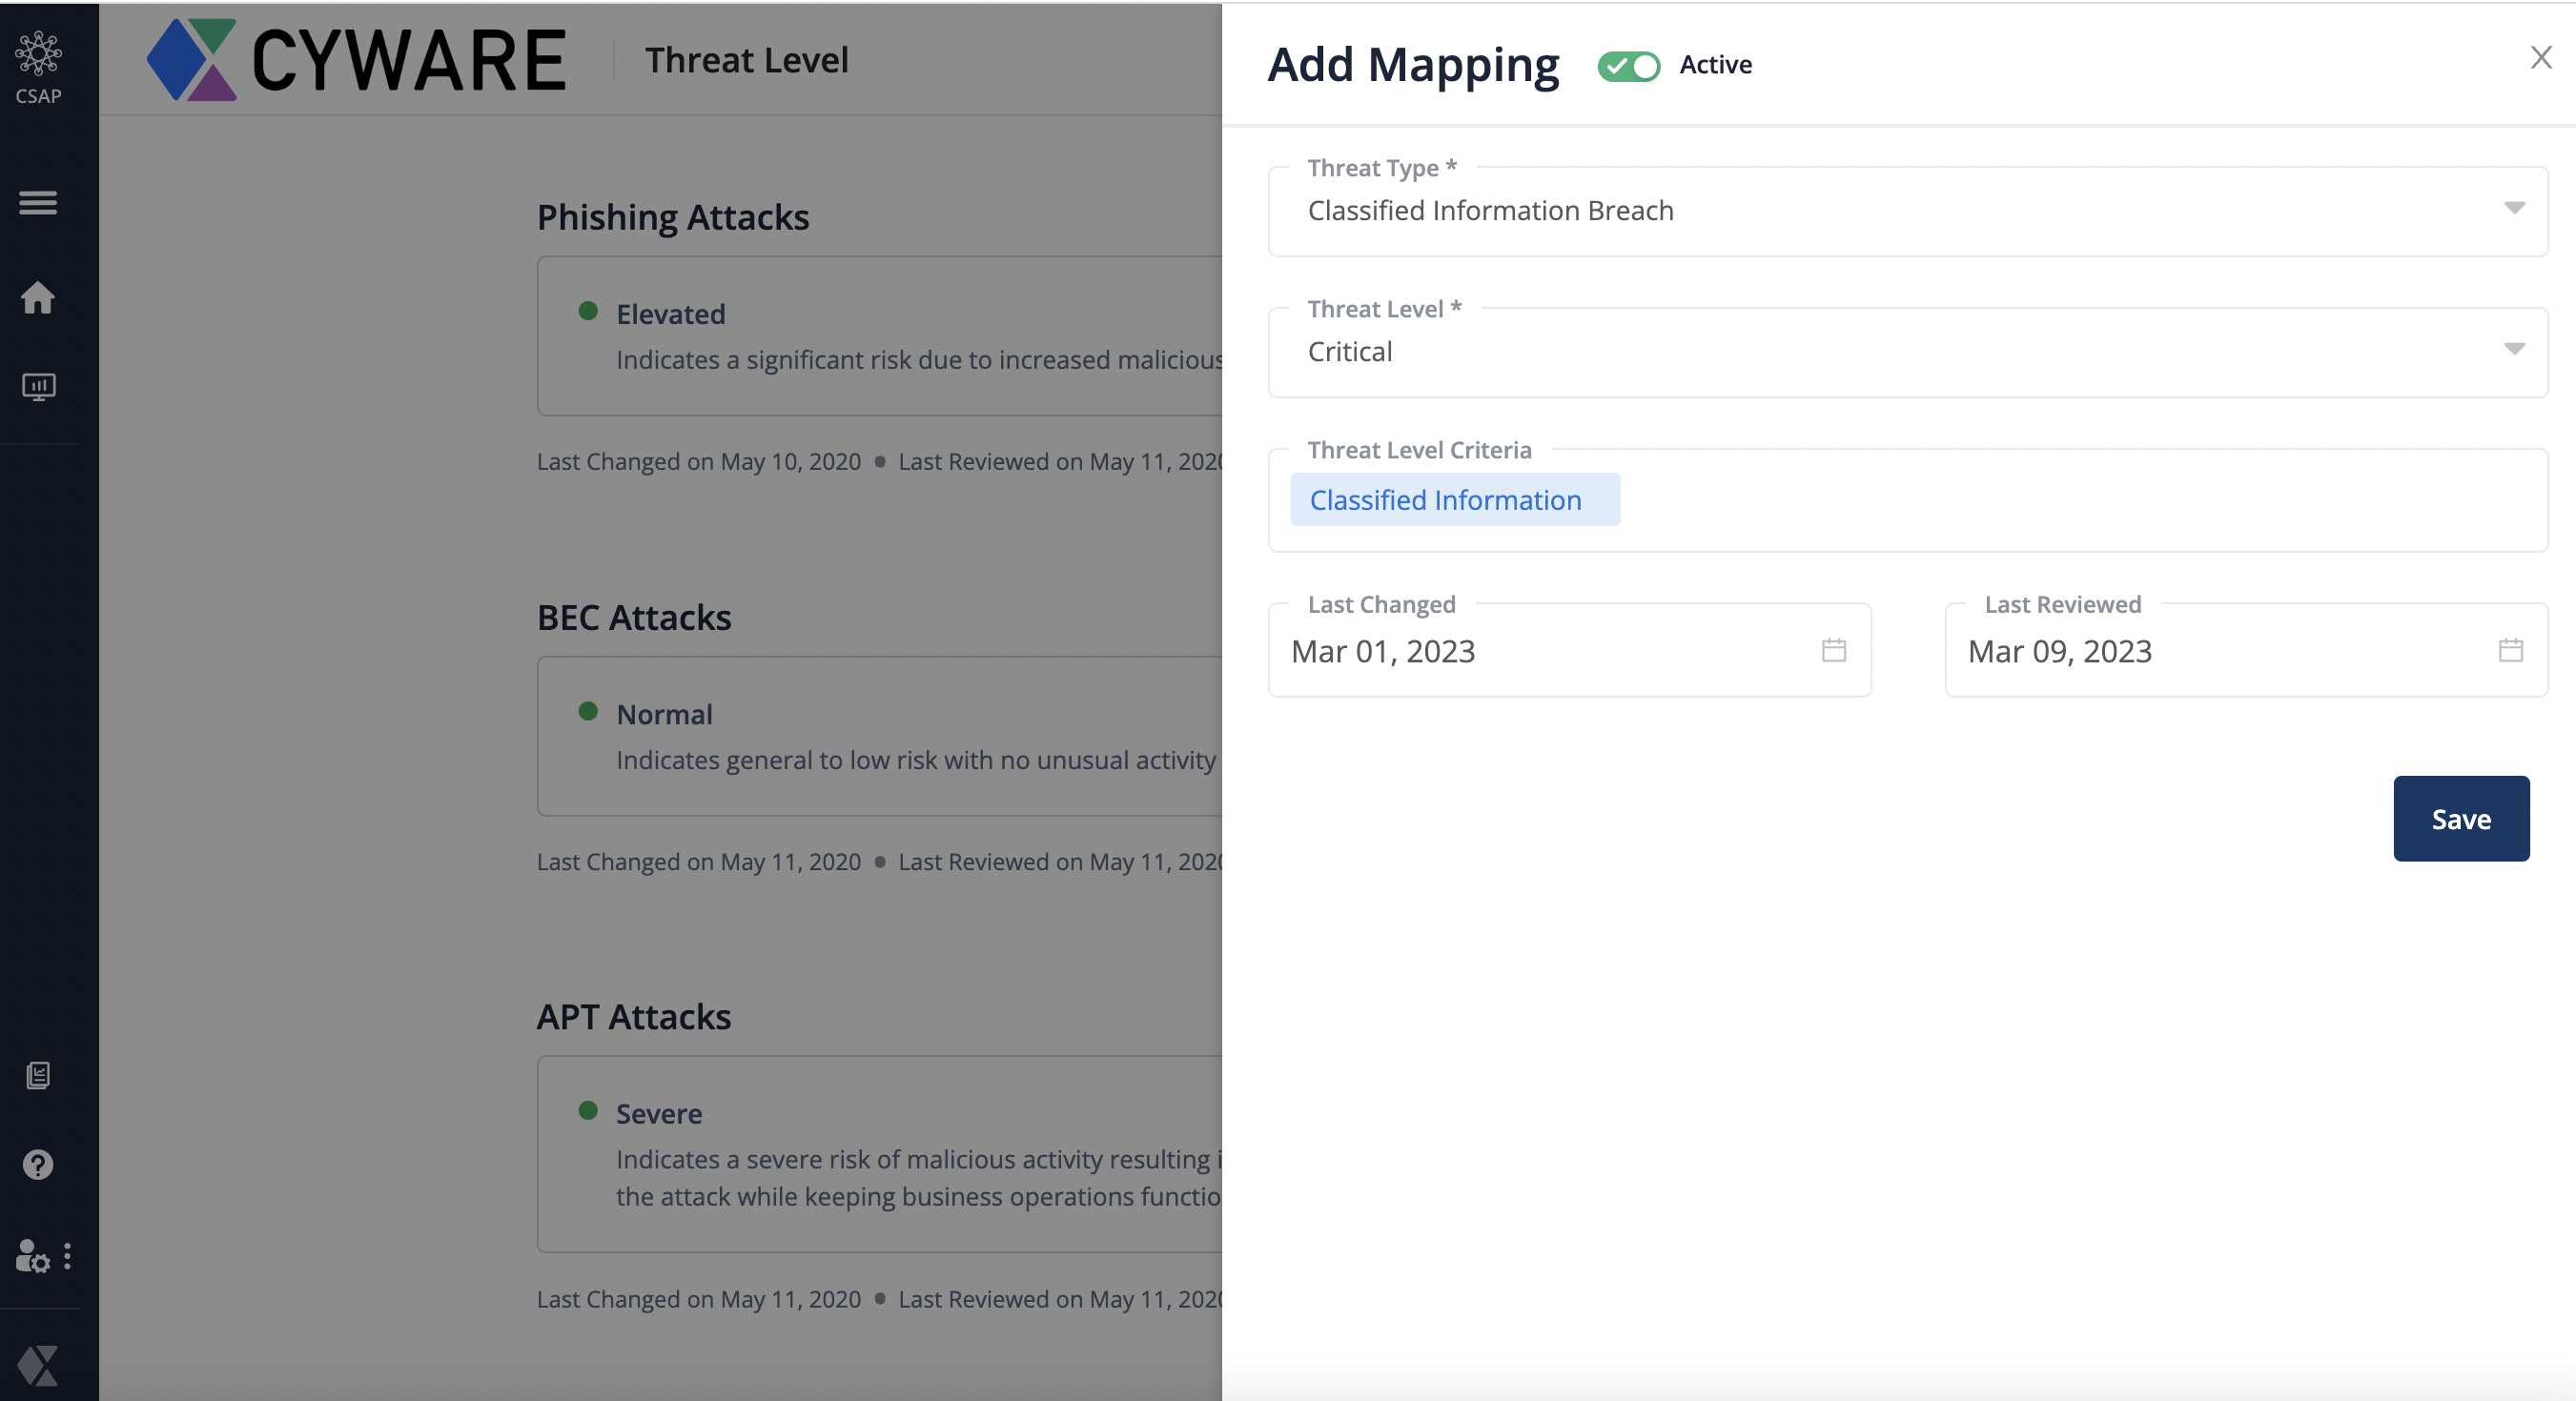
Enter the last changed and the last reviewed dates so that members can understand when the information was released and updated.
Click Active to use this mapping.
Click Save.
Request Management
Members can submit requests to join an invite-only recipient group from the Member Portal. Analysts and member admins can approve or reject members' requests to join the invite-only recipient groups.
Navigate to Request Management from the Main Menu.
Search for a specific member request. Analysts can also filter the requests by the name of the recipient group, organization, or the date of request.
You can view the member request details such as the name of the member, the recipient group that they want to join, the requested date, and the organization that they belong to.
Click Approve to accept the request. Member is added to the invite-only group.
Click Reject to decline the request. Member is not added to the invite-only group.