Navigating the Interface
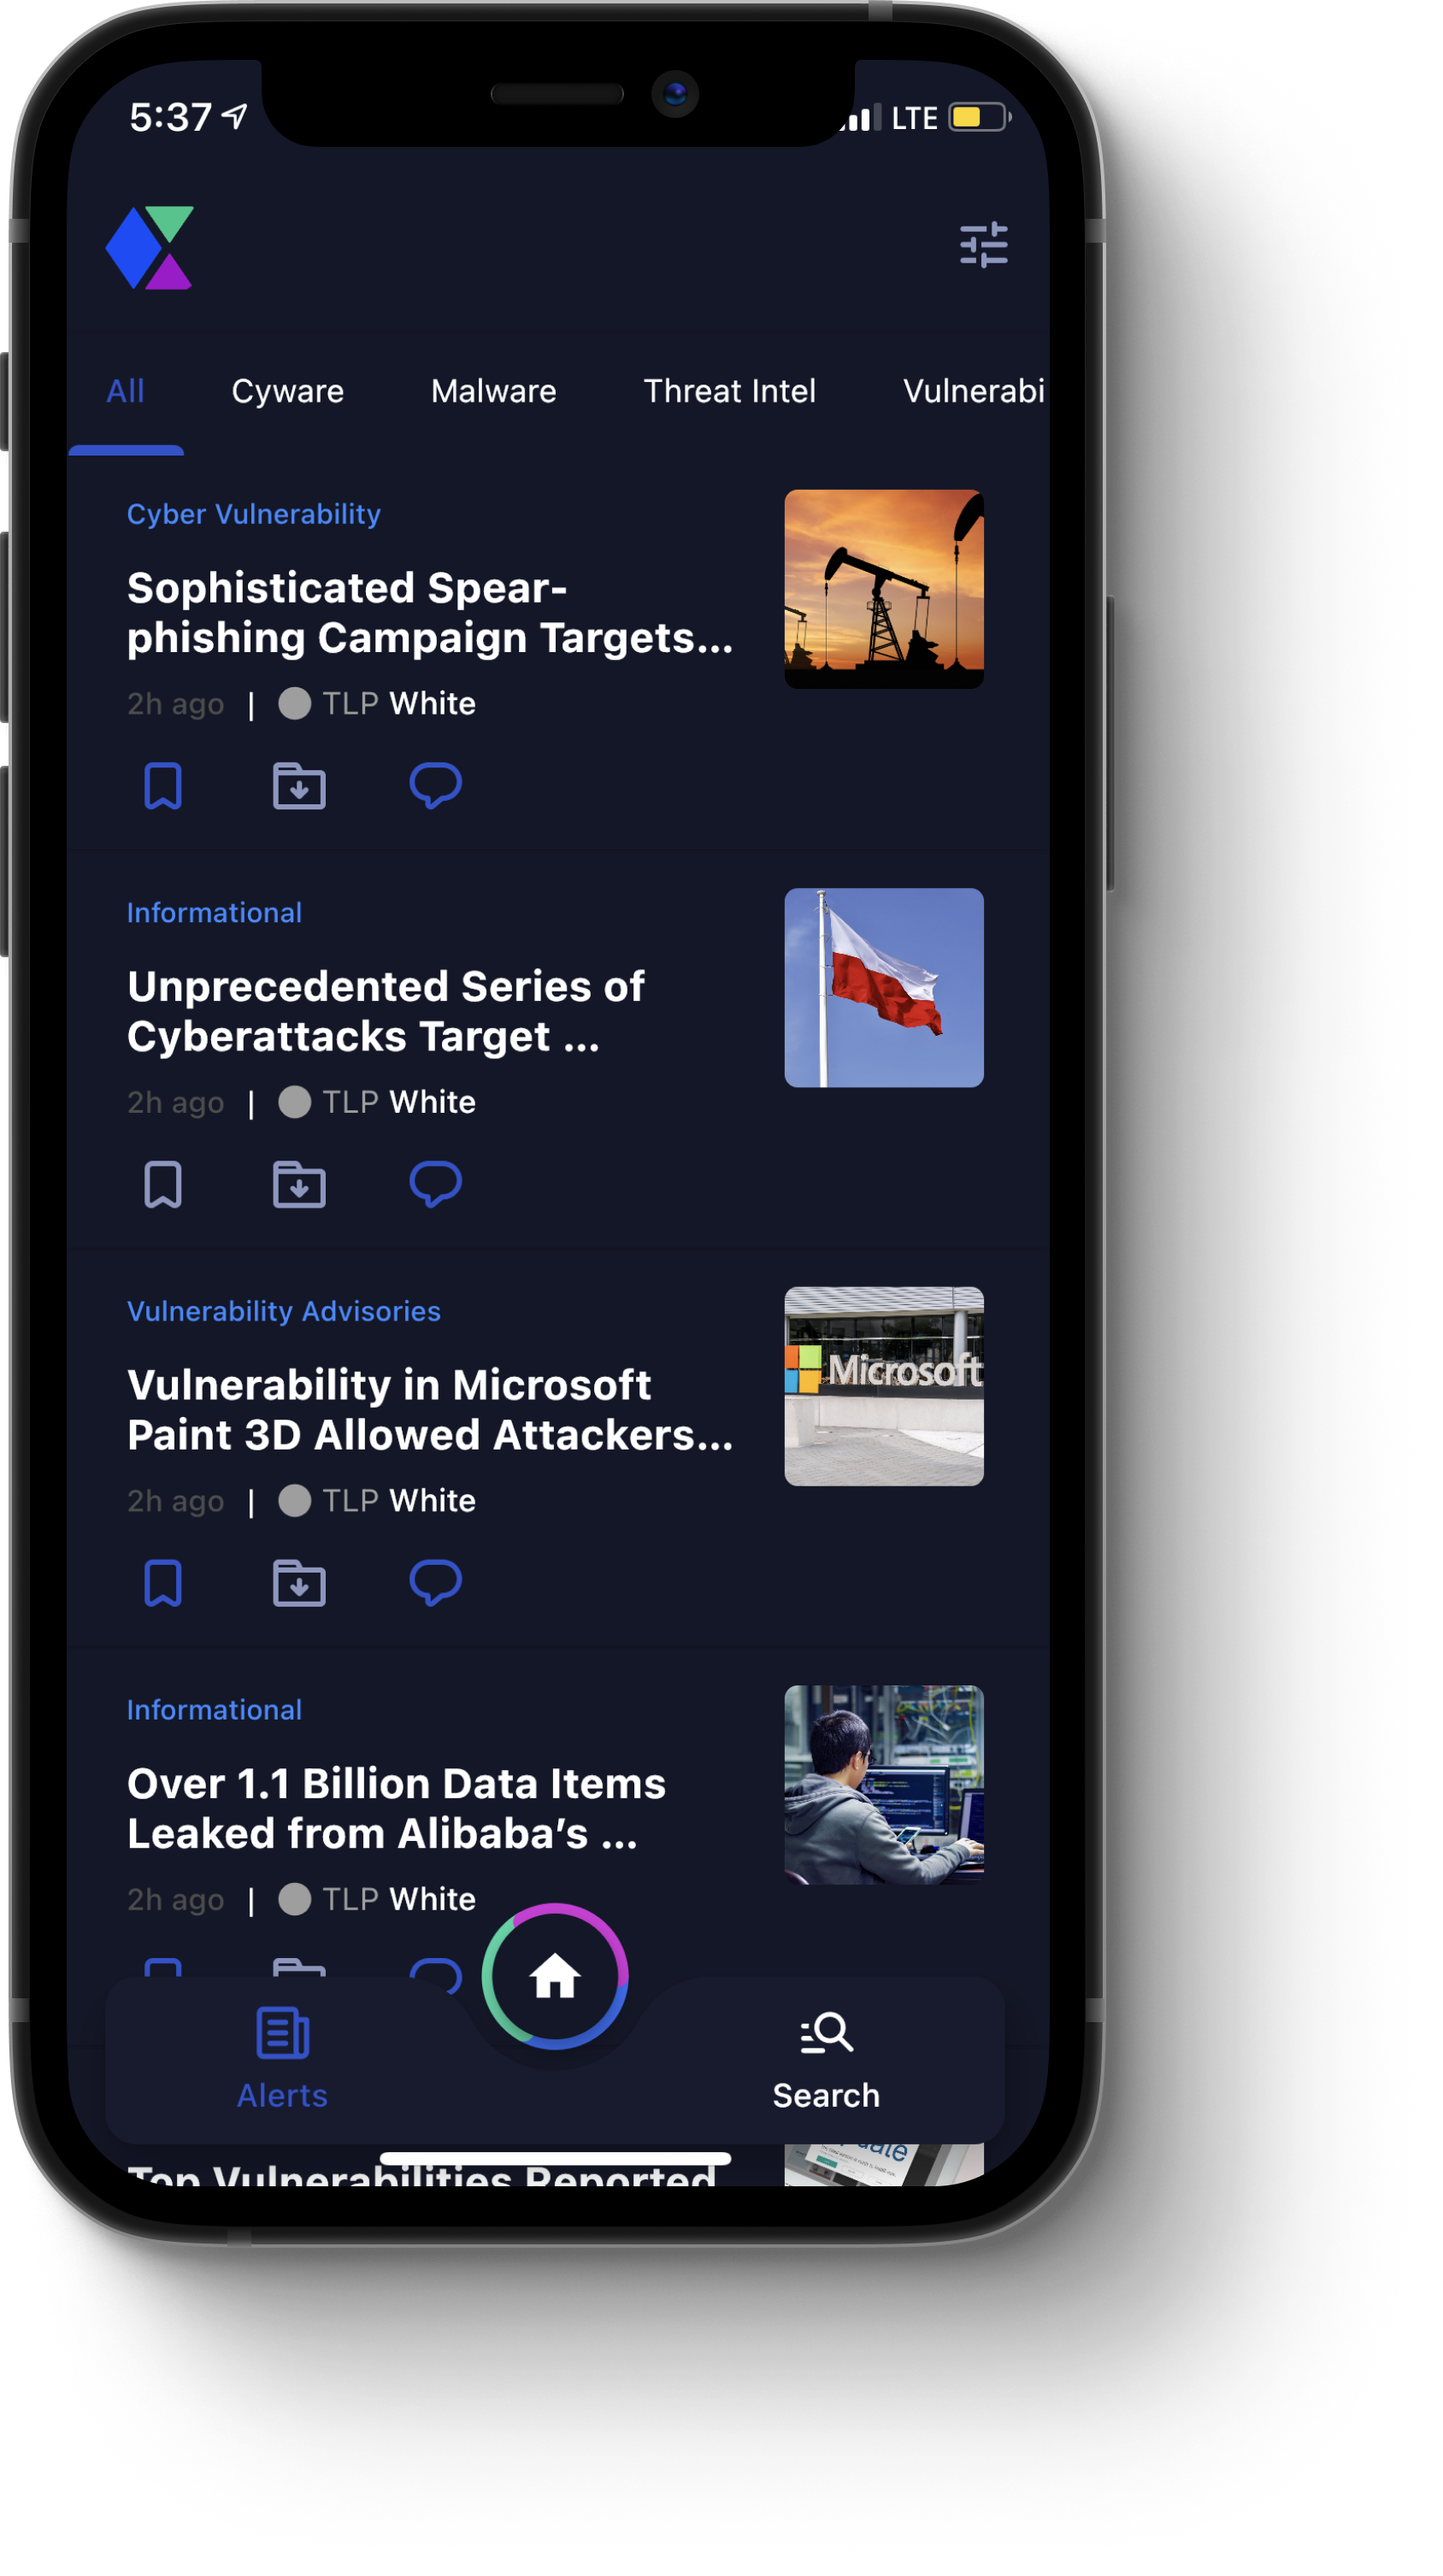
When you sign in to the CSAP Mobile App, the default landing page is the Alerts module, as shown in the following image.
In the top-left corner, tap the organization icon to expand the left-hand menu. The following options are available:
Profile. Your username, email address, and icon are displayed at the top of the left-hand menu. Tap Profile Setup to set up or make changes to your profile. For more information, see Profile.
Dark Mode. You can toggle the dark mode theme on or off to optimize readability and comfort.
Alerts Read. This ring chart displays the number of alerts you have read.
Surveys Read. This ring chart displays the number of surveys you have read.
Add Team. You can add multiple existing CSAP tenants to which you belong. To do so, tap the + icon, and follow the instructions for signing in to the organization and your user account. For more information, see Signing in to the CSAP Mobile App.
Note:
If you have multiple organizations as tenants within the CSAP Mobile App, you can switch between them, at any time, by tapping an organization icon in the left-hand menu.
When switching between multiple tenants, only one tenant will be active at a time.
This multi-tenant capability is only available in the CSAP Mobile App. For more information, contact the CSAP administrator for your organization.
The Home menu, located on the bottom of the screen, contains the following options:
Home. Tap this icon to expand the Home menu. The following options are available:
Actions. Tap this icon to open the Actions module, where you can create and view actions. For more information, see Actions.
Doc Library. Tap this icon to open the Doc Library module, where you can view and upload alert attachments, as well as other documents that have been uploaded by your organization. For more information, see Doc Library.
Events. Tap this icon to open the Events module, where you can view and respond to event invites and other items, such as webinars, conferences, or similar. For more information, see Events.
Indicators Allowed. Tap this icon to open the Indicators Allowed module, where you can view and add indicators (such as IP addresses, emails, hashes, and so on) that are trusted by your organization. For more information, see Indicators Allowed.
Knowledge Base. Tap this icon to open the Knowledge Base module, where you can view documents specific to your organization (such as policy guides, handbooks, and so on) by category. For more information, see Knowledge Base.
Member Directory. Tap this icon to open the Member Directory module, where you can view and interact with information regarding Members within your organization. For more information, see Member Directory.
Messenger. Tap this icon to open Messenger, where you can initiate or join discussions based on topic, groups, and alerts, or directly message other users. For more information, see Messenger.
Request For Information. Tap this icon to open the Request For Information module, where you can gather information from Analysts and other Members. For more information, see Request For Information.
Share Threat Intel. Tap this icon to open the Share Threat Intel module, where you can share threat intel reports with Analysts for review. For more information, see Share Threat Intel.
Survey. Tap this icon to open the Survey module, where you can participate in surveys by sharing opinions on a specific topic. For more information, see Survey.
Threat Levels. Tap this icon to open the Threat Levels module, where you can view the level of malicious cyber activity, as well as its potential impact or damage. For more information, see Threat Levels.
Alerts. Tap this icon to open the Alerts module, where you can view and interact with alerts in CSAP. For more information, see Alerts.
Note: If you are using another module, tapping this icon will return you to the Alerts module, which is the default landing screen in the CSAP Mobile App.
Search. Tap this icon to open the Search module, where you can search throughout CSAP using relevant keywords and defined parameters. For more information, see Search.
Alerts
The Alerts module is the default landing screen that displays when you sign in to the CSAP Mobile App.
If you are using another module, to navigate to the Alerts module, from the Home menu, tap the Alerts icon.
Alerts are grouped by categories, which display as tabs at the top of the screen. You can tap individual tabs to view all alerts for that category. By default, the All tab displays when you access the Alerts module, where all alerts are viewable.
You can tap a specific alert to view its details, as shown in the following image.
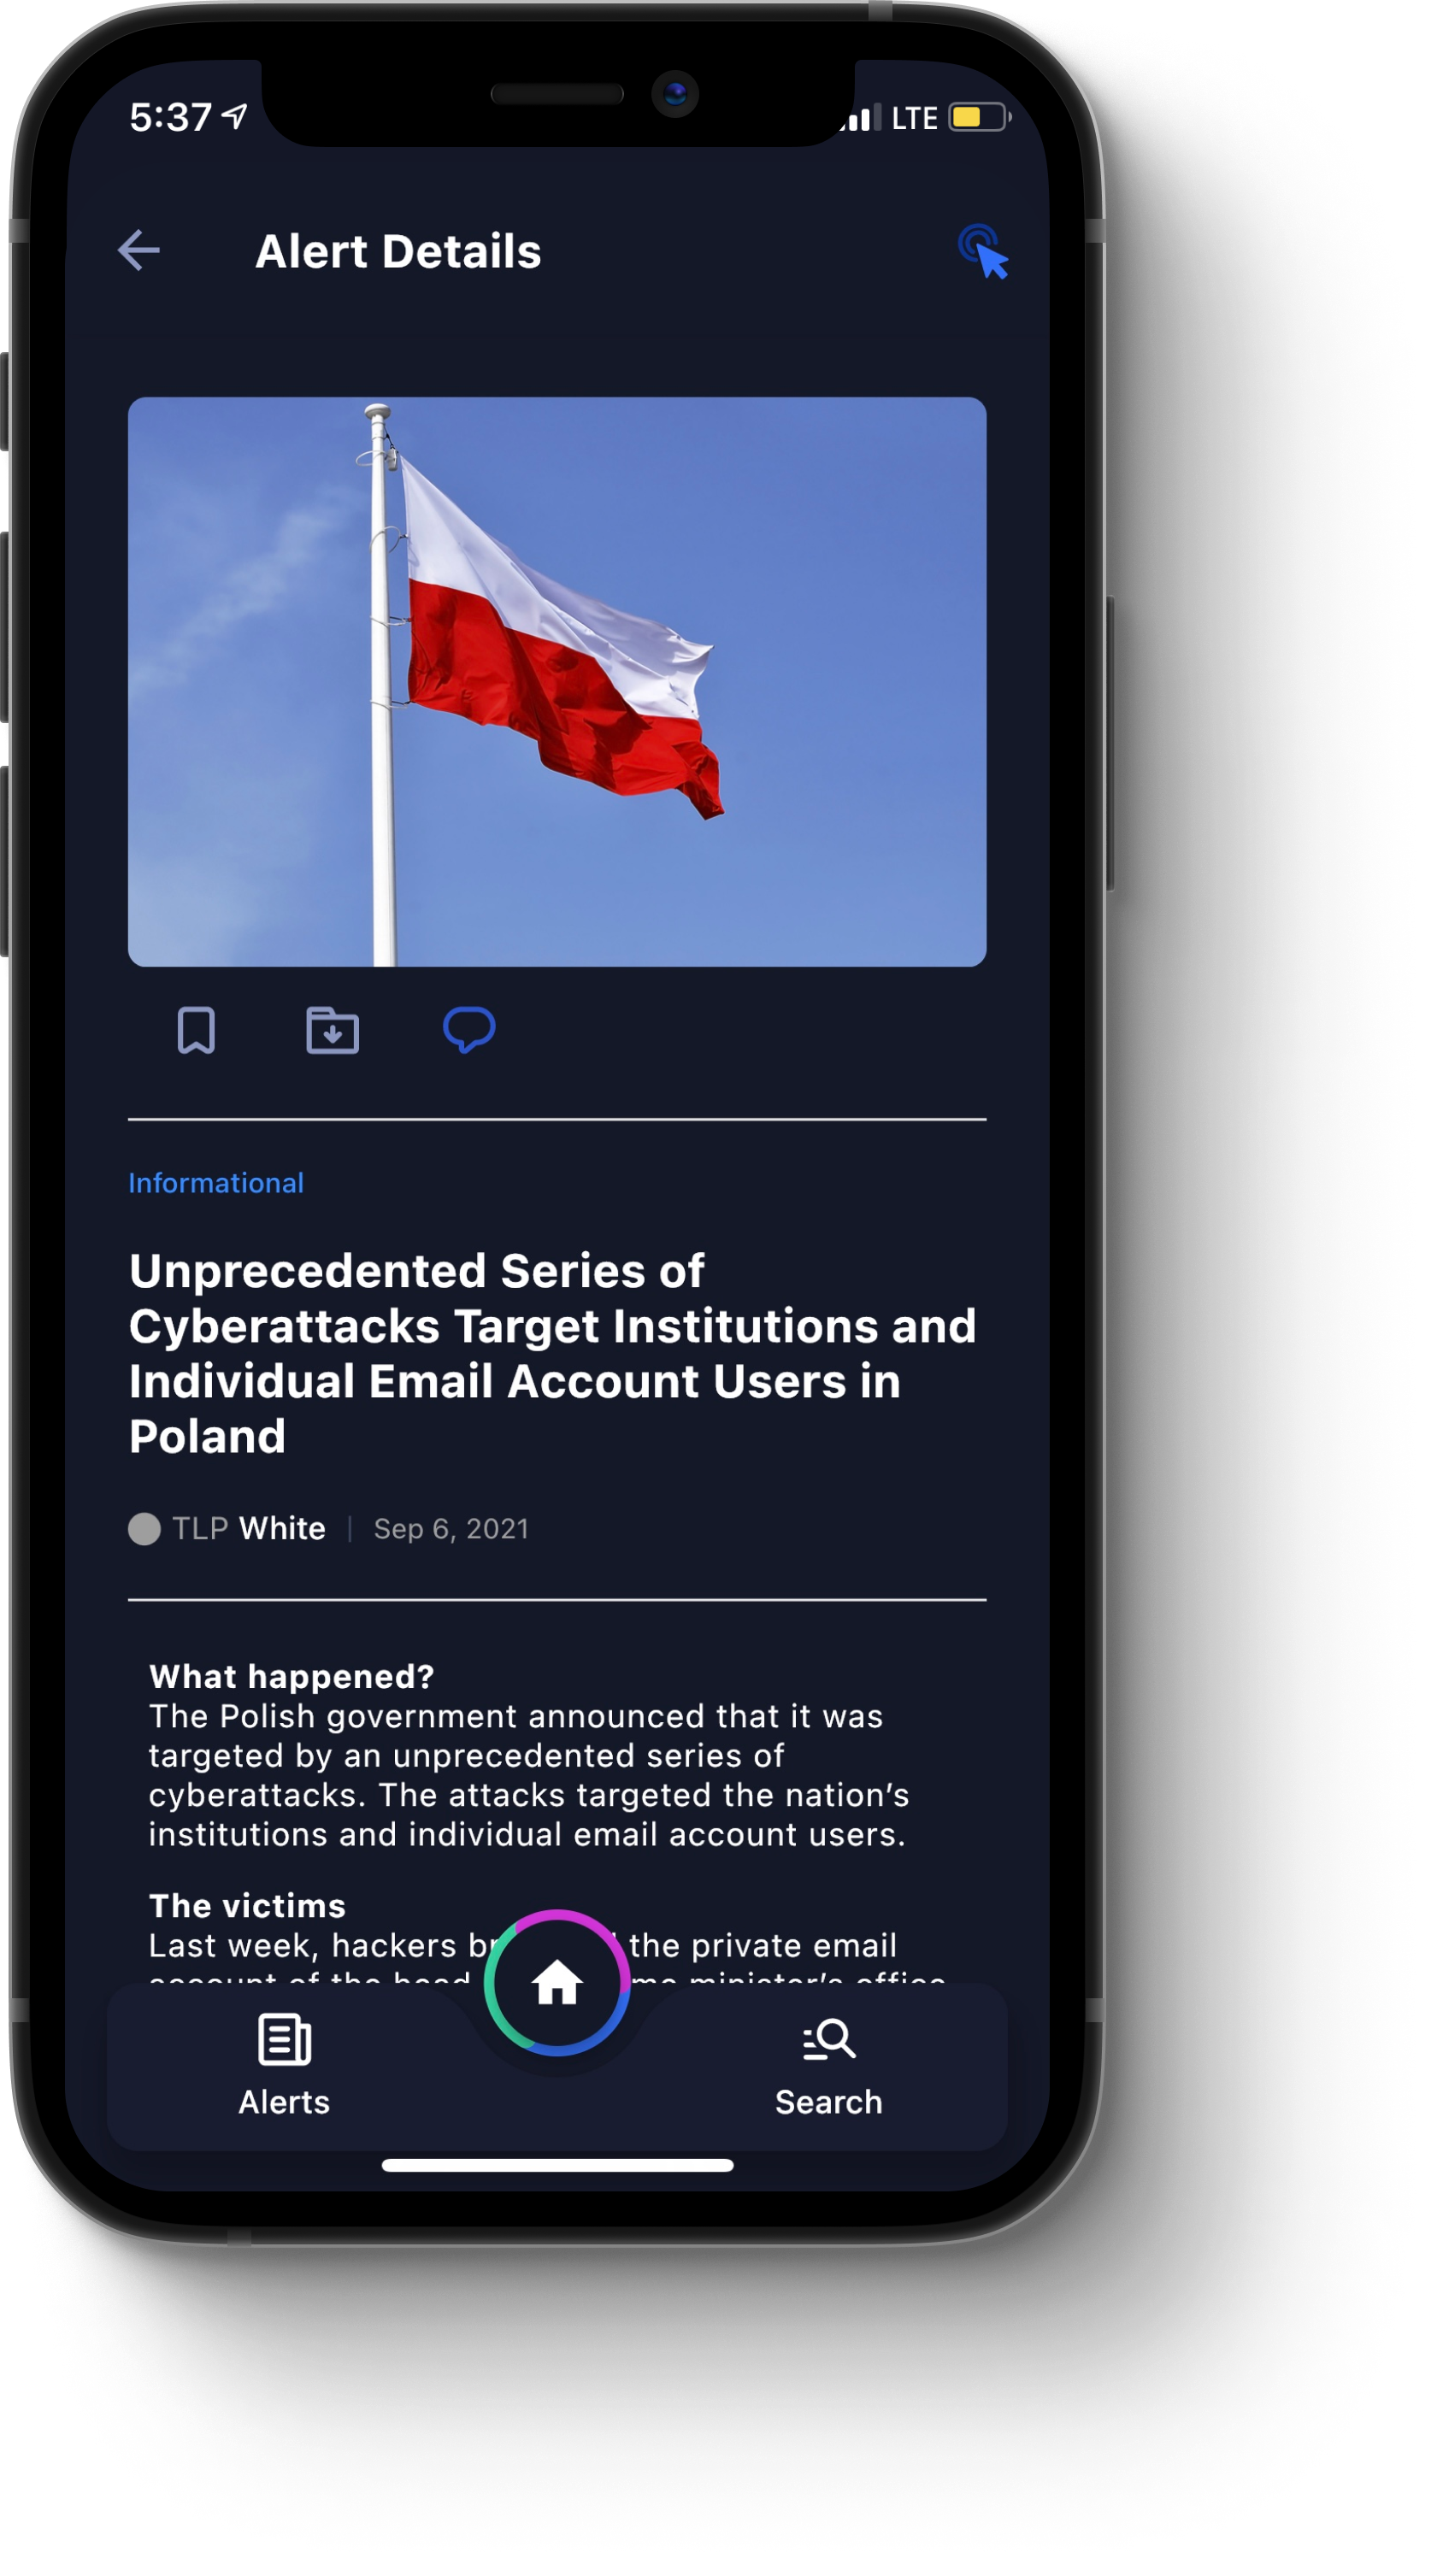
When viewing alert details, the following options are available:
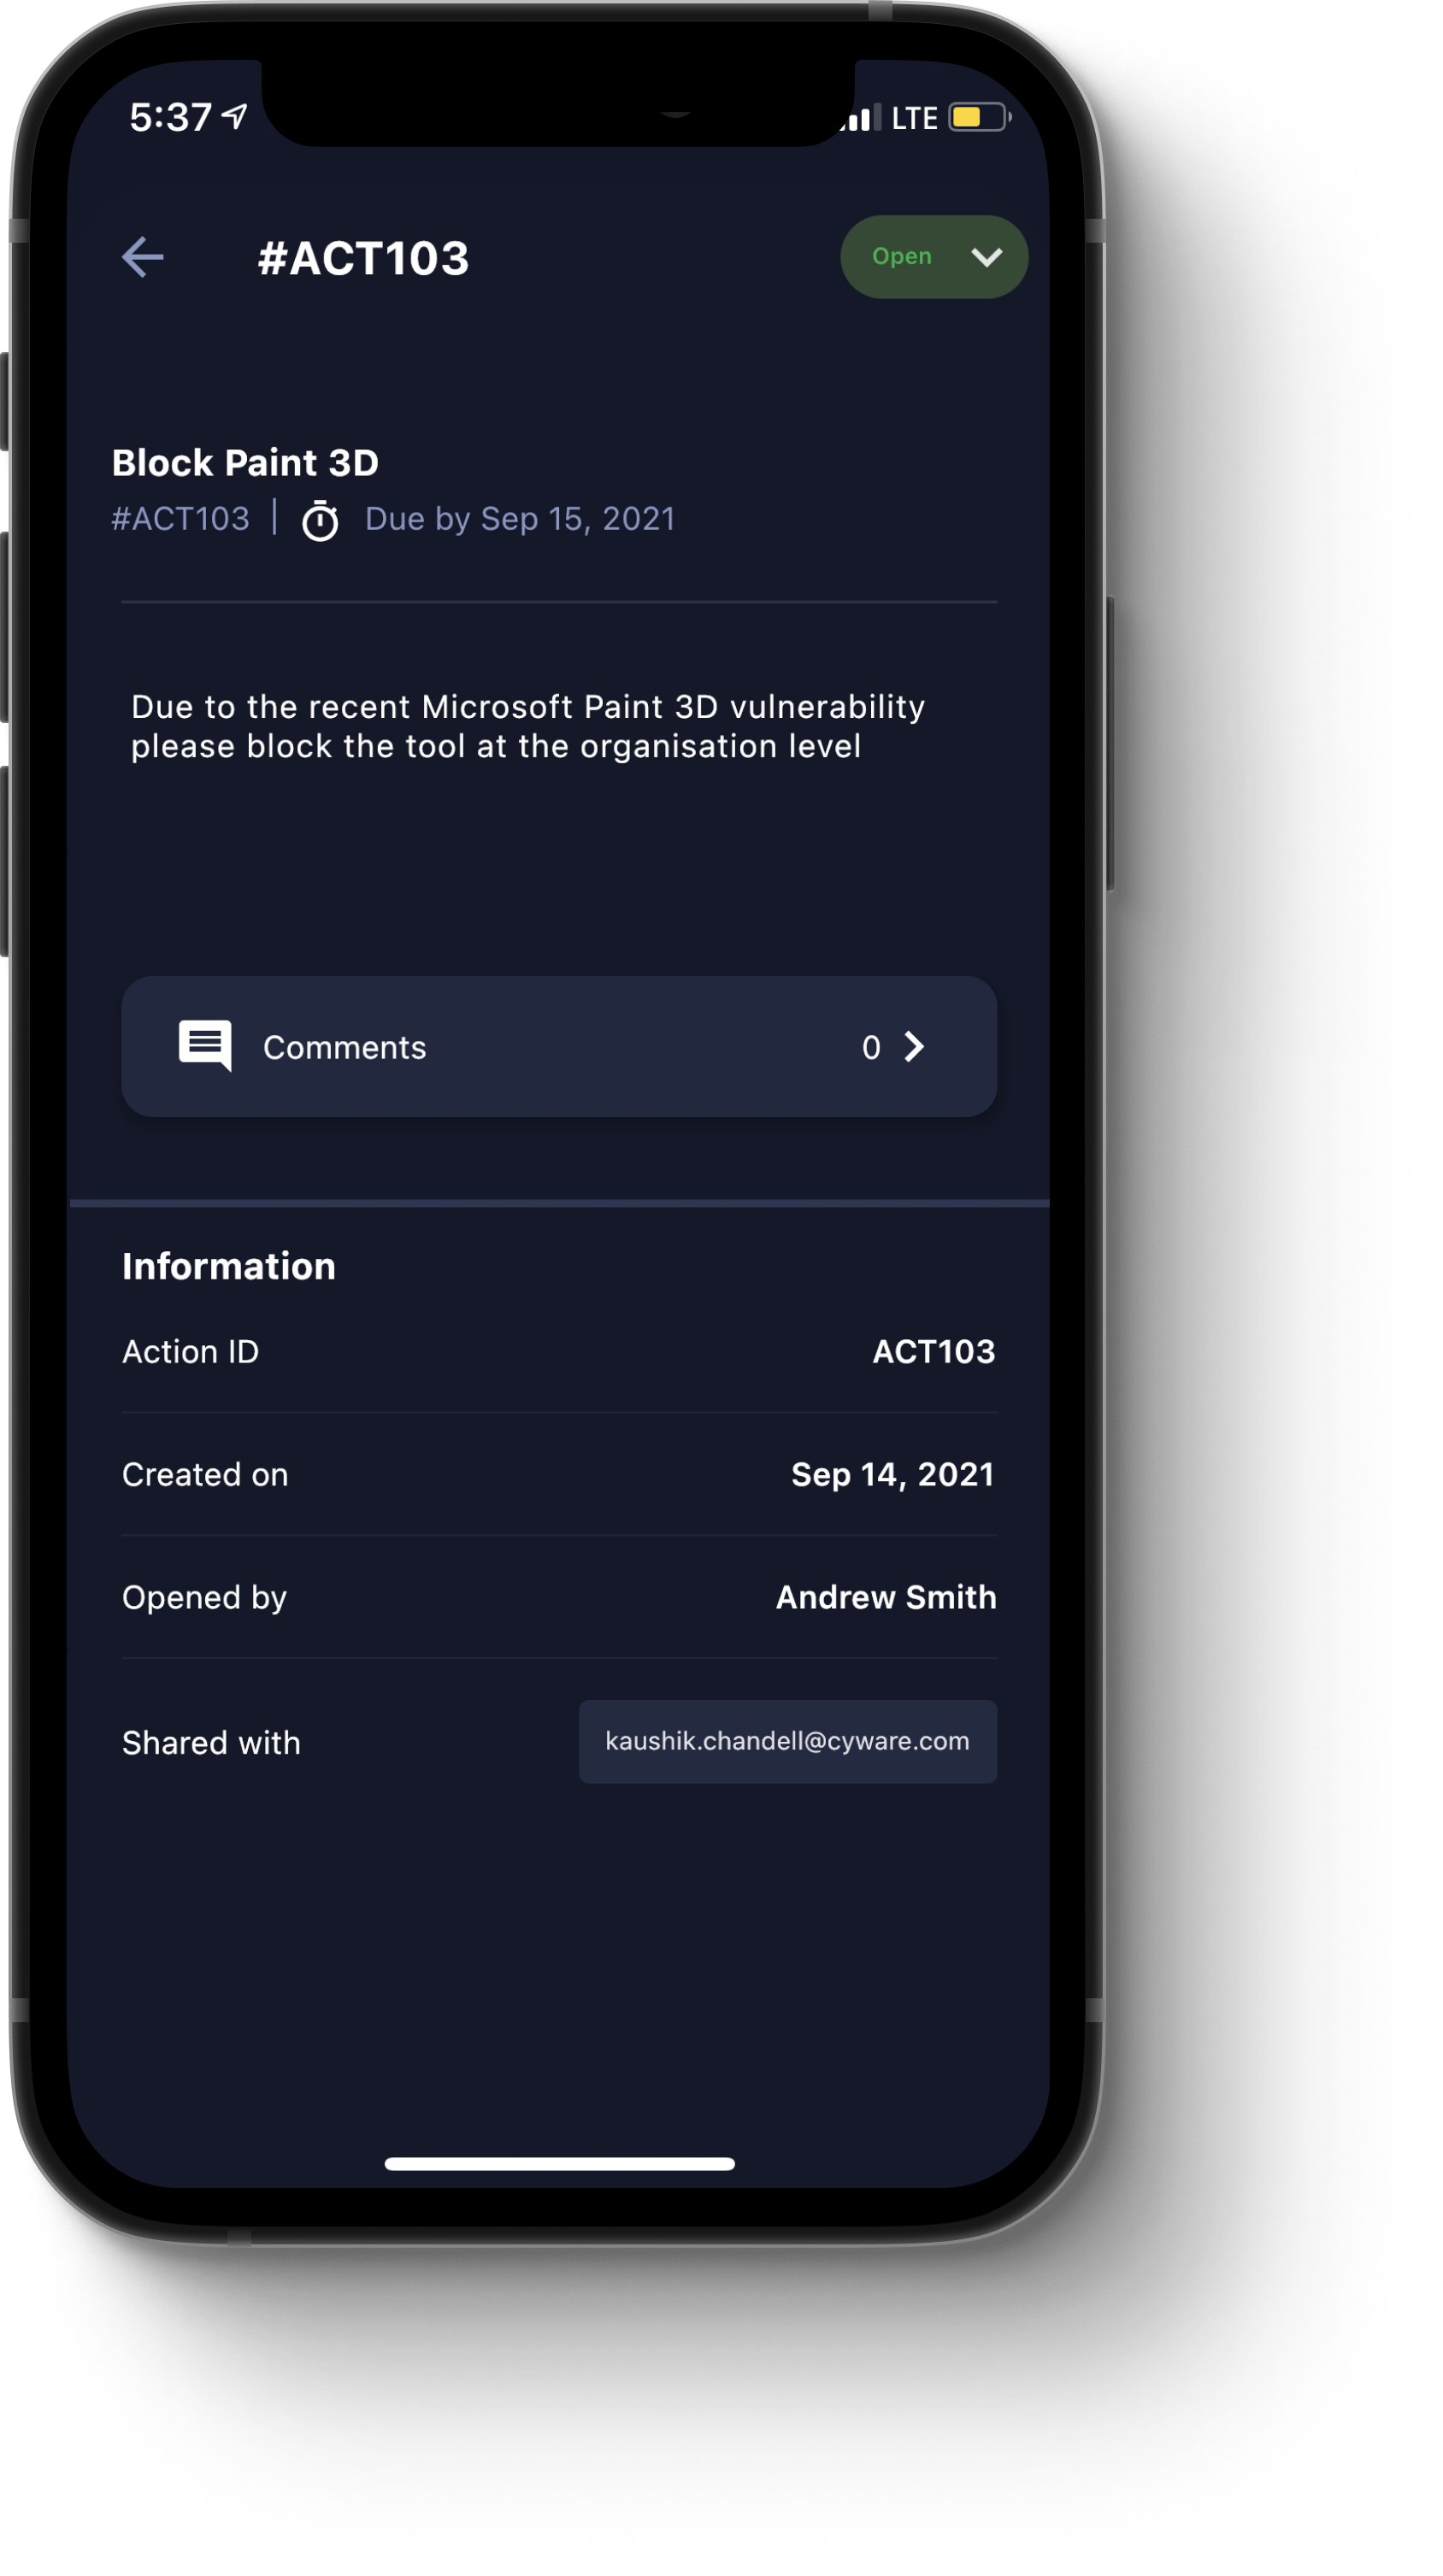
Actions icon. Tap this icon, located on the top-right corner of the screen, to open a dialog box where you can view actions that have been assigned to this alert. To create a new or recommended action, tap the plus icon (+). For more information, see Actions.
Bookmark icon. Tap this icon to bookmark an alert.
Archive icon. Tap this icon to archive an alert.
Discussion icon. Tap this icon to initiate a discussion on this alert. The discussion appears automatically under the Alerts tab in the Messenger module. For more information, see Messenger.
To filter for alerts, tap the filter icon on the top-right corner of the screen to open the Filter dialog box, where the following parameters are available:
All Alerts. Filters all alerts.
Bookmarked. Filter alerts you have bookmarked.
Archived. Filter alerts you have archived.
Category. Filter alerts by category.
TLP. Filter alerts by Threat Level Protocol (TLP). For TLP 1.0, the available options are RED, AMBER, GREEN, or WHITE. For TLP 2.0, the available options are RED, AMBER+STRICT, AMBER, GREEN, or CLEAR. The TLP version is set by administrators in the CSAP Analyst Portal.
Dates. Filter alerts by date. Available options include Today, Past Week, Past Month, Past Year, or Custom.
Once you have specified your filter parameters, tap the Show Result button to apply the filters.
Search
From the Home menu, tap the Search icon to open the Search module, as shown in the following image.
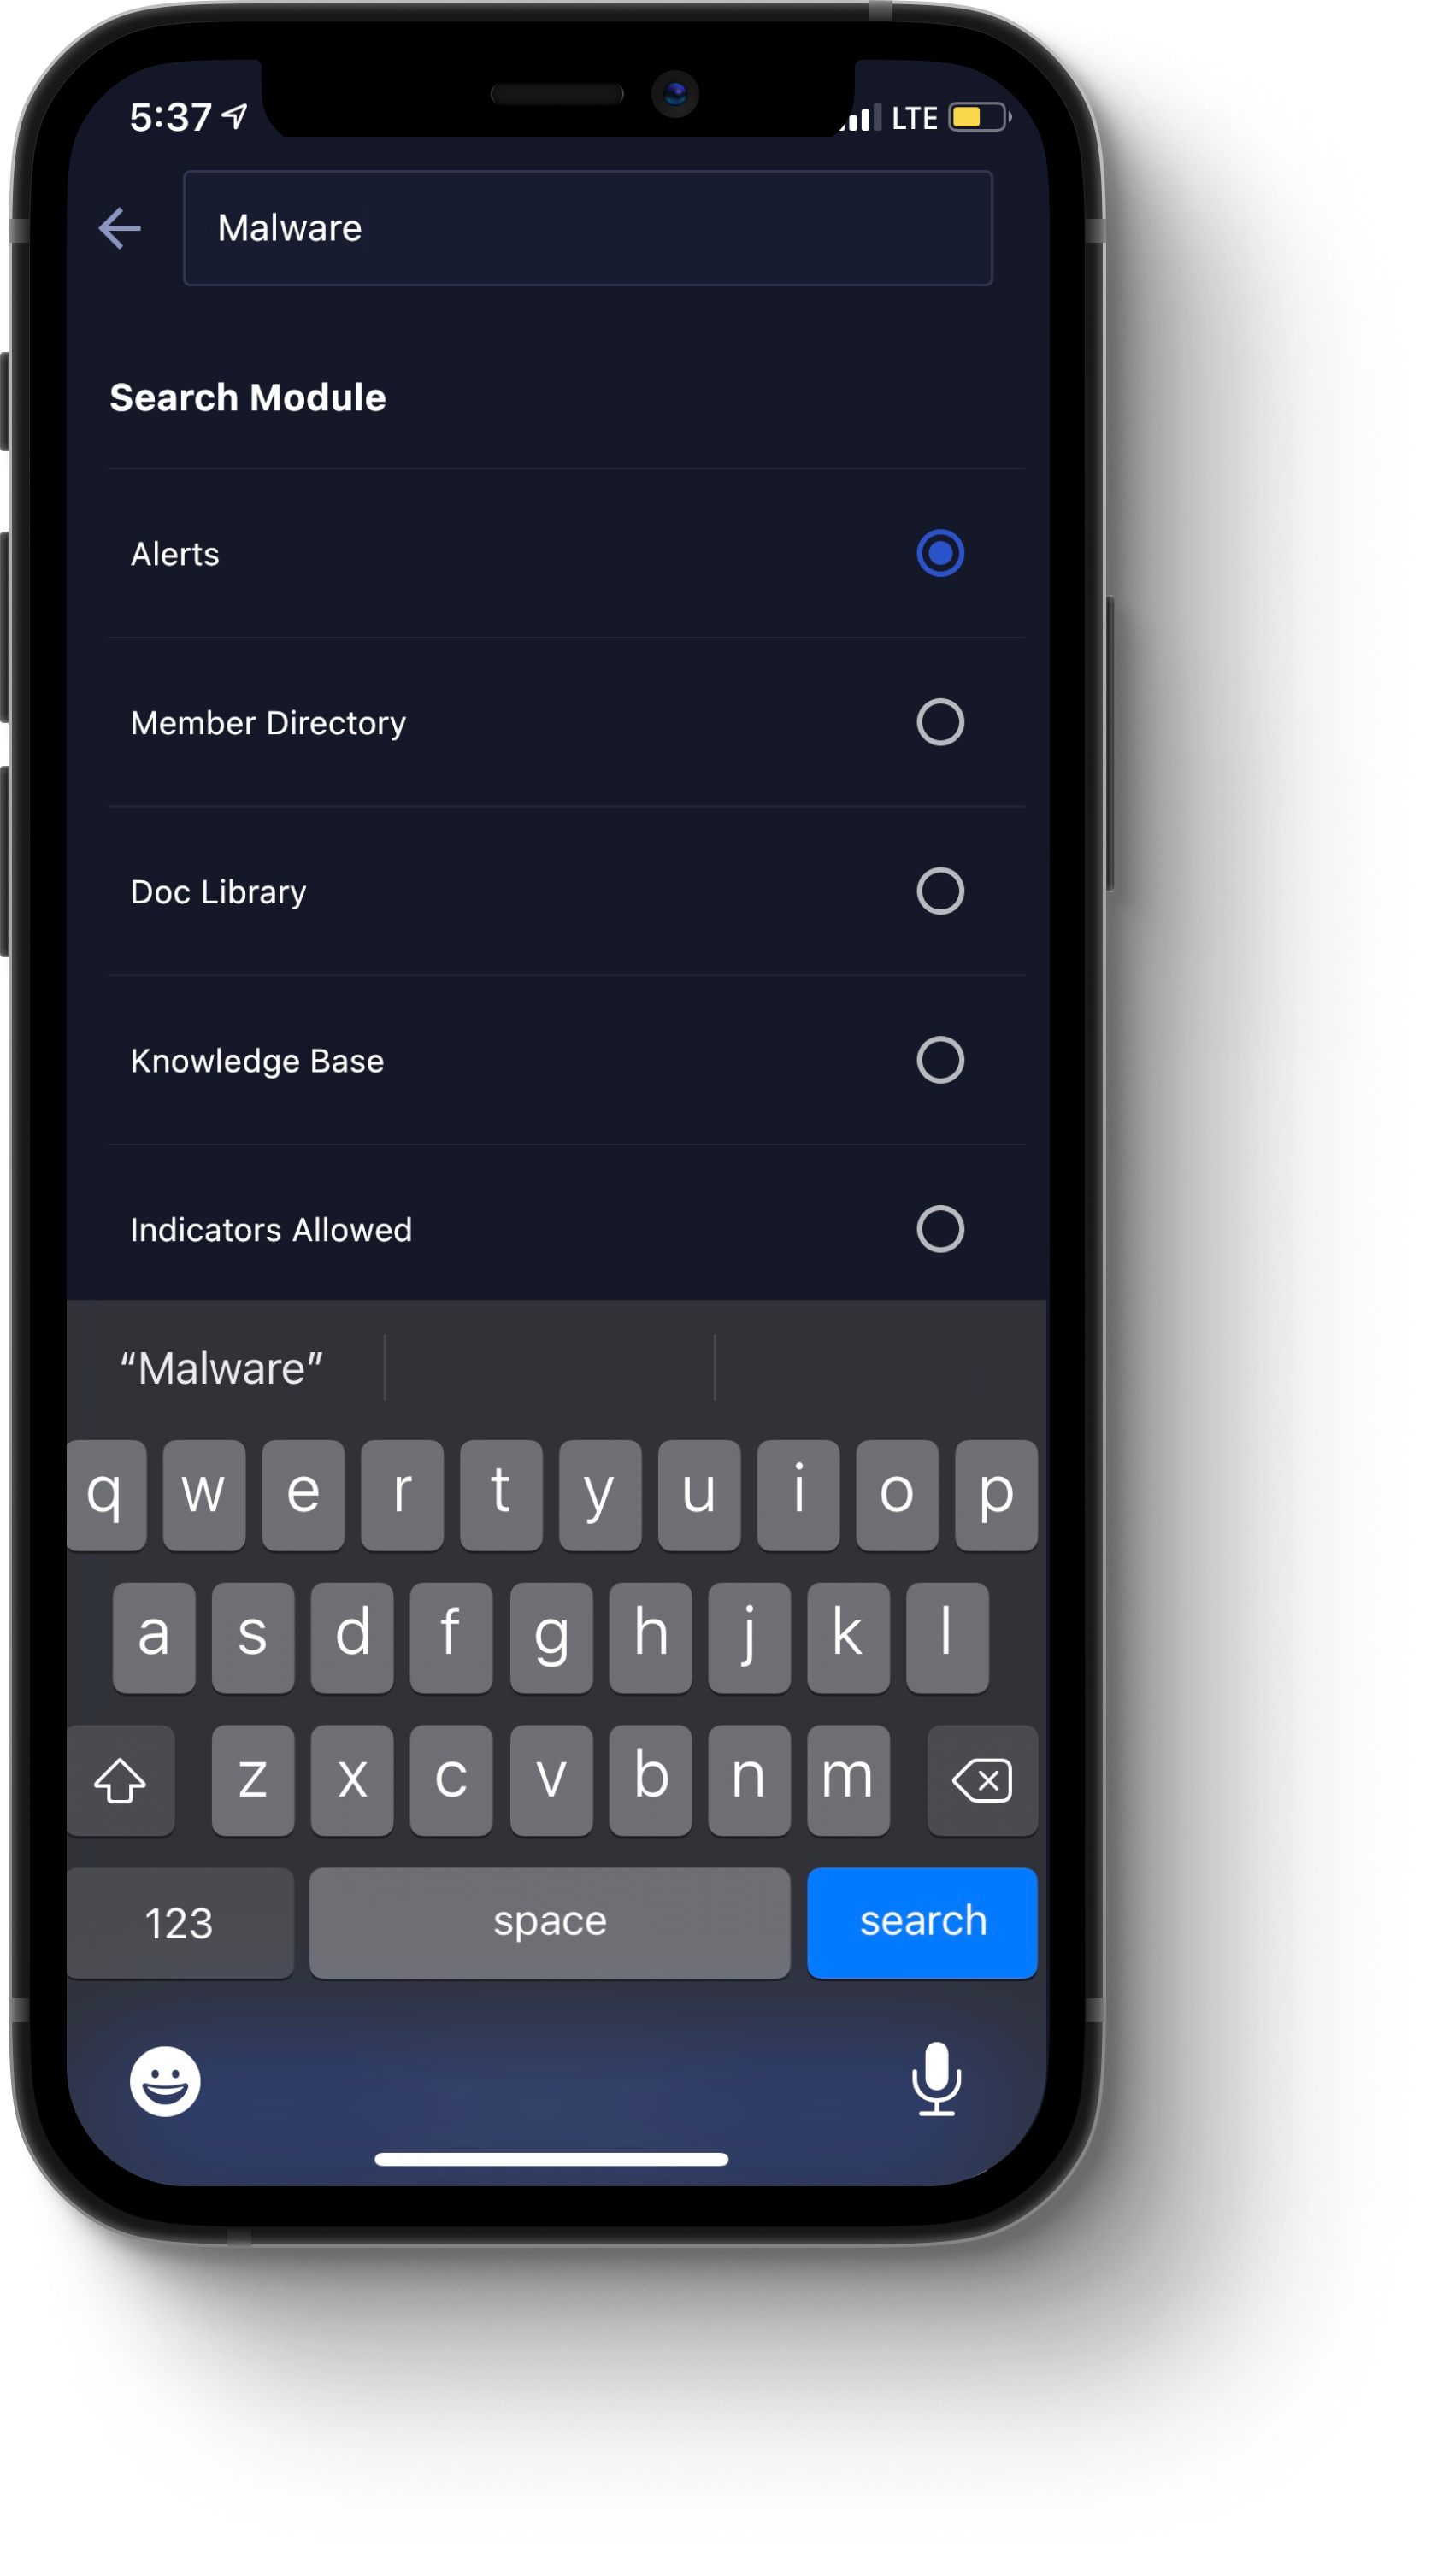
It contains the following components:
Note: As a best practice, enter values for each component in the order in which they appear.
Search bar. Type your query into the Search bar.
Search Module. In this section, tap one of the radio buttons to specify in which module you are searching. The following options are available:
Alerts. For more information on the Alerts module, see Alerts.
Member Directory. For more information on the Member Directory module, see Member Directory.
Doc Library. For more information on the Doc Library module, see Doc Library.
Knowledge Base. For more information on the Knowledge Base module, see Knowledge Base.
Indicators Allowed. For more information on the Indicators Allowed module, see Indicators Allowed.
Share Threat Intel. For more information on the Share Threat Intel module, see Share Threat Intel.
Actions. For more information on the Actions module, see Actions.
Keywords. In this section, tap one of the radio buttons to specify your keyword parameters. Available options include Any Keyword, All Keywords, or Exact Keyword.
Show Results. Once you are finished entering your search parameters, tap this button to execute your search.
RSS Feed
From the Home menu, when you tap the RSS Feed icon, the Actions module opens, as shown in the following image.
Add or Manage. Click this button to add or manage RSS feeds.
Follow. For each RSS feed you want to follow, click Follow. If you are already following an RSS feed, click Following to unfollow a particular feed.
Close. When you are finished, click the X icon to close the Feed Sources dialog box.
Filter. On the top of the screen, tap the Filter icon to open the Filter dialog box, where you can filter for documents by the following parameters:
All Feeds. Displays all feeds that you are following.
Bookmarked. Displays all feed alerts that you have bookmarked, for importance. To bookmark a feed alert, click the Bookmark icon for the required alert.
Archived. Displays all feed alerts that you have archived. To archive a feed alert, click the Archive icon for the required alert.
Initiate Discussion. To initiate or join a topic-based discussion, click the Messenger icon for the alert, and then select the relevant Recipient Group.
Actions
From the Home menu, when you tap the Actions icon, the Actions module opens, as shown in the following image.
It contains the following components:
Created By Me. Tap this tab to view actions that you have created.
Assigned To Me. Tap this tab to view actions that have been assigned to you.
Recommended. Tap this tab to view actions that have been recommended to you.
Plus icon (+). Tap this icon to open the New Action dialog box, where you can create a new action that can be assigned to you or another Member. Specify a Title, Description, a Member to whom you are assigning the action, and optionally, a due date. When you are finished, to publish the action, tap Create Action.
Filter icon. Tap this icon to open the Filter dialog box, where you can filter for actions by status. To do so, tap either the Open or Closed radio button. Once you have specified a status, tap the Show Result button to apply the filter.
Doc Library
From the Home menu, tap the Doc Library icon to open the Doc Library, module, as shown in the following image.
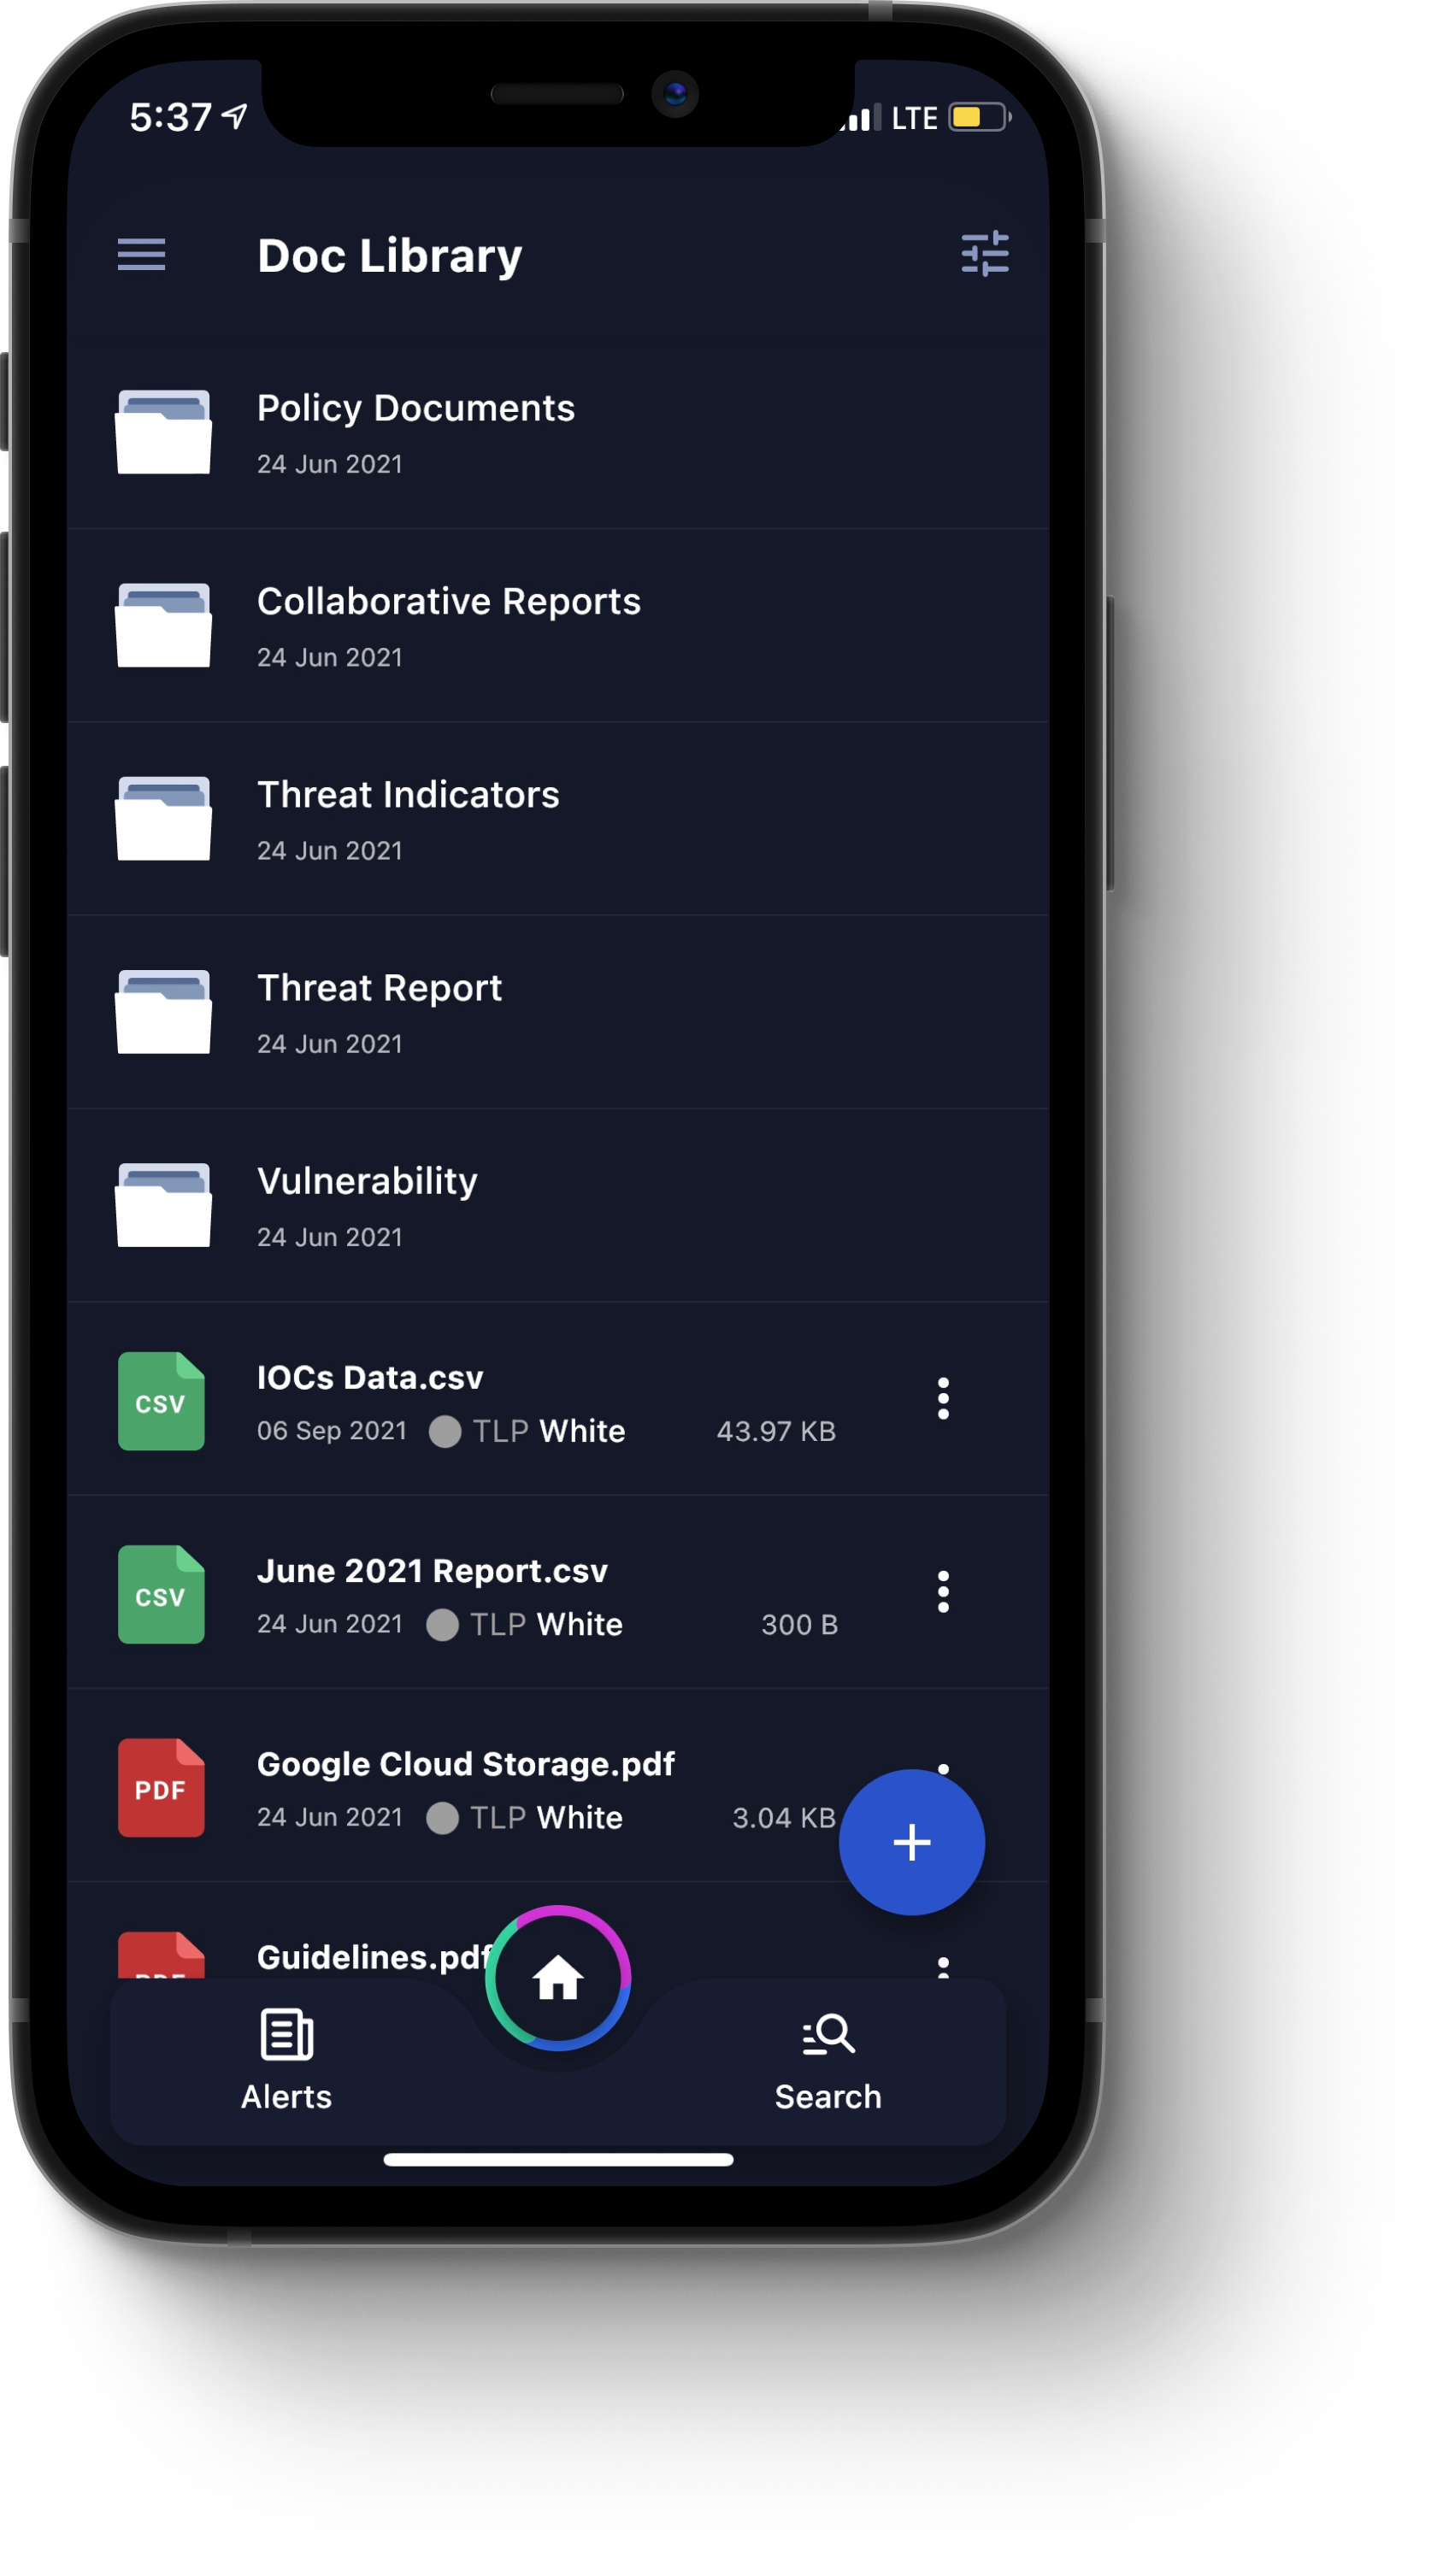
You can tap a folder to view its contents, such as images or documents.
You can tap a file to view a preview if the previews are supported by the underlying OS. Alternatively, you can tap the More icon and select Download to download the file to your mobile device. The download option is available only on Android devices.
Select Delete to delete a file that you have uploaded. You cannot delete files and folders that are created and shared with you by other members.
If you are the creator of a Doc Library folder, you can tap the More icon and select Edit to change the folder name and permissions for your Doc Library folder. Note that you cannot make changes to folders that you did not create.
On the top-right corner of the screen, tap the Filter icon to open the Filter dialog box, where you can filter for documents by the following parameters:
Sort By. Available options include Title or Upload Date.
File Format. Available options include all file formats supported by your CSAP configuration. For more information, contact the CSAP administrator for your organization.
TLP. For TLP 1.0, the available options are RED, AMBER, GREEN, or WHITE. For TLP 2.0, the available options are RED, AMBER+STRICT, AMBER, GREEN, or CLEAR. The TLP version is set by administrators in the CSAP Analyst Portal.
Groups. Available options include all Public, System, and Invite-Only groups for your CSAP configuration. For more information, contact the CSAP administrator for your organization.
Uploaded By. Available options include Admin or User.
Dates. Available options include Today, Past Week, Past Month, Past Year, or Custom.
Once you have specified your filter parameters, tap the Show Result button to apply the filters.
Events
From the Home menu, tap the Events icon to open the Events module, as shown in the following image.
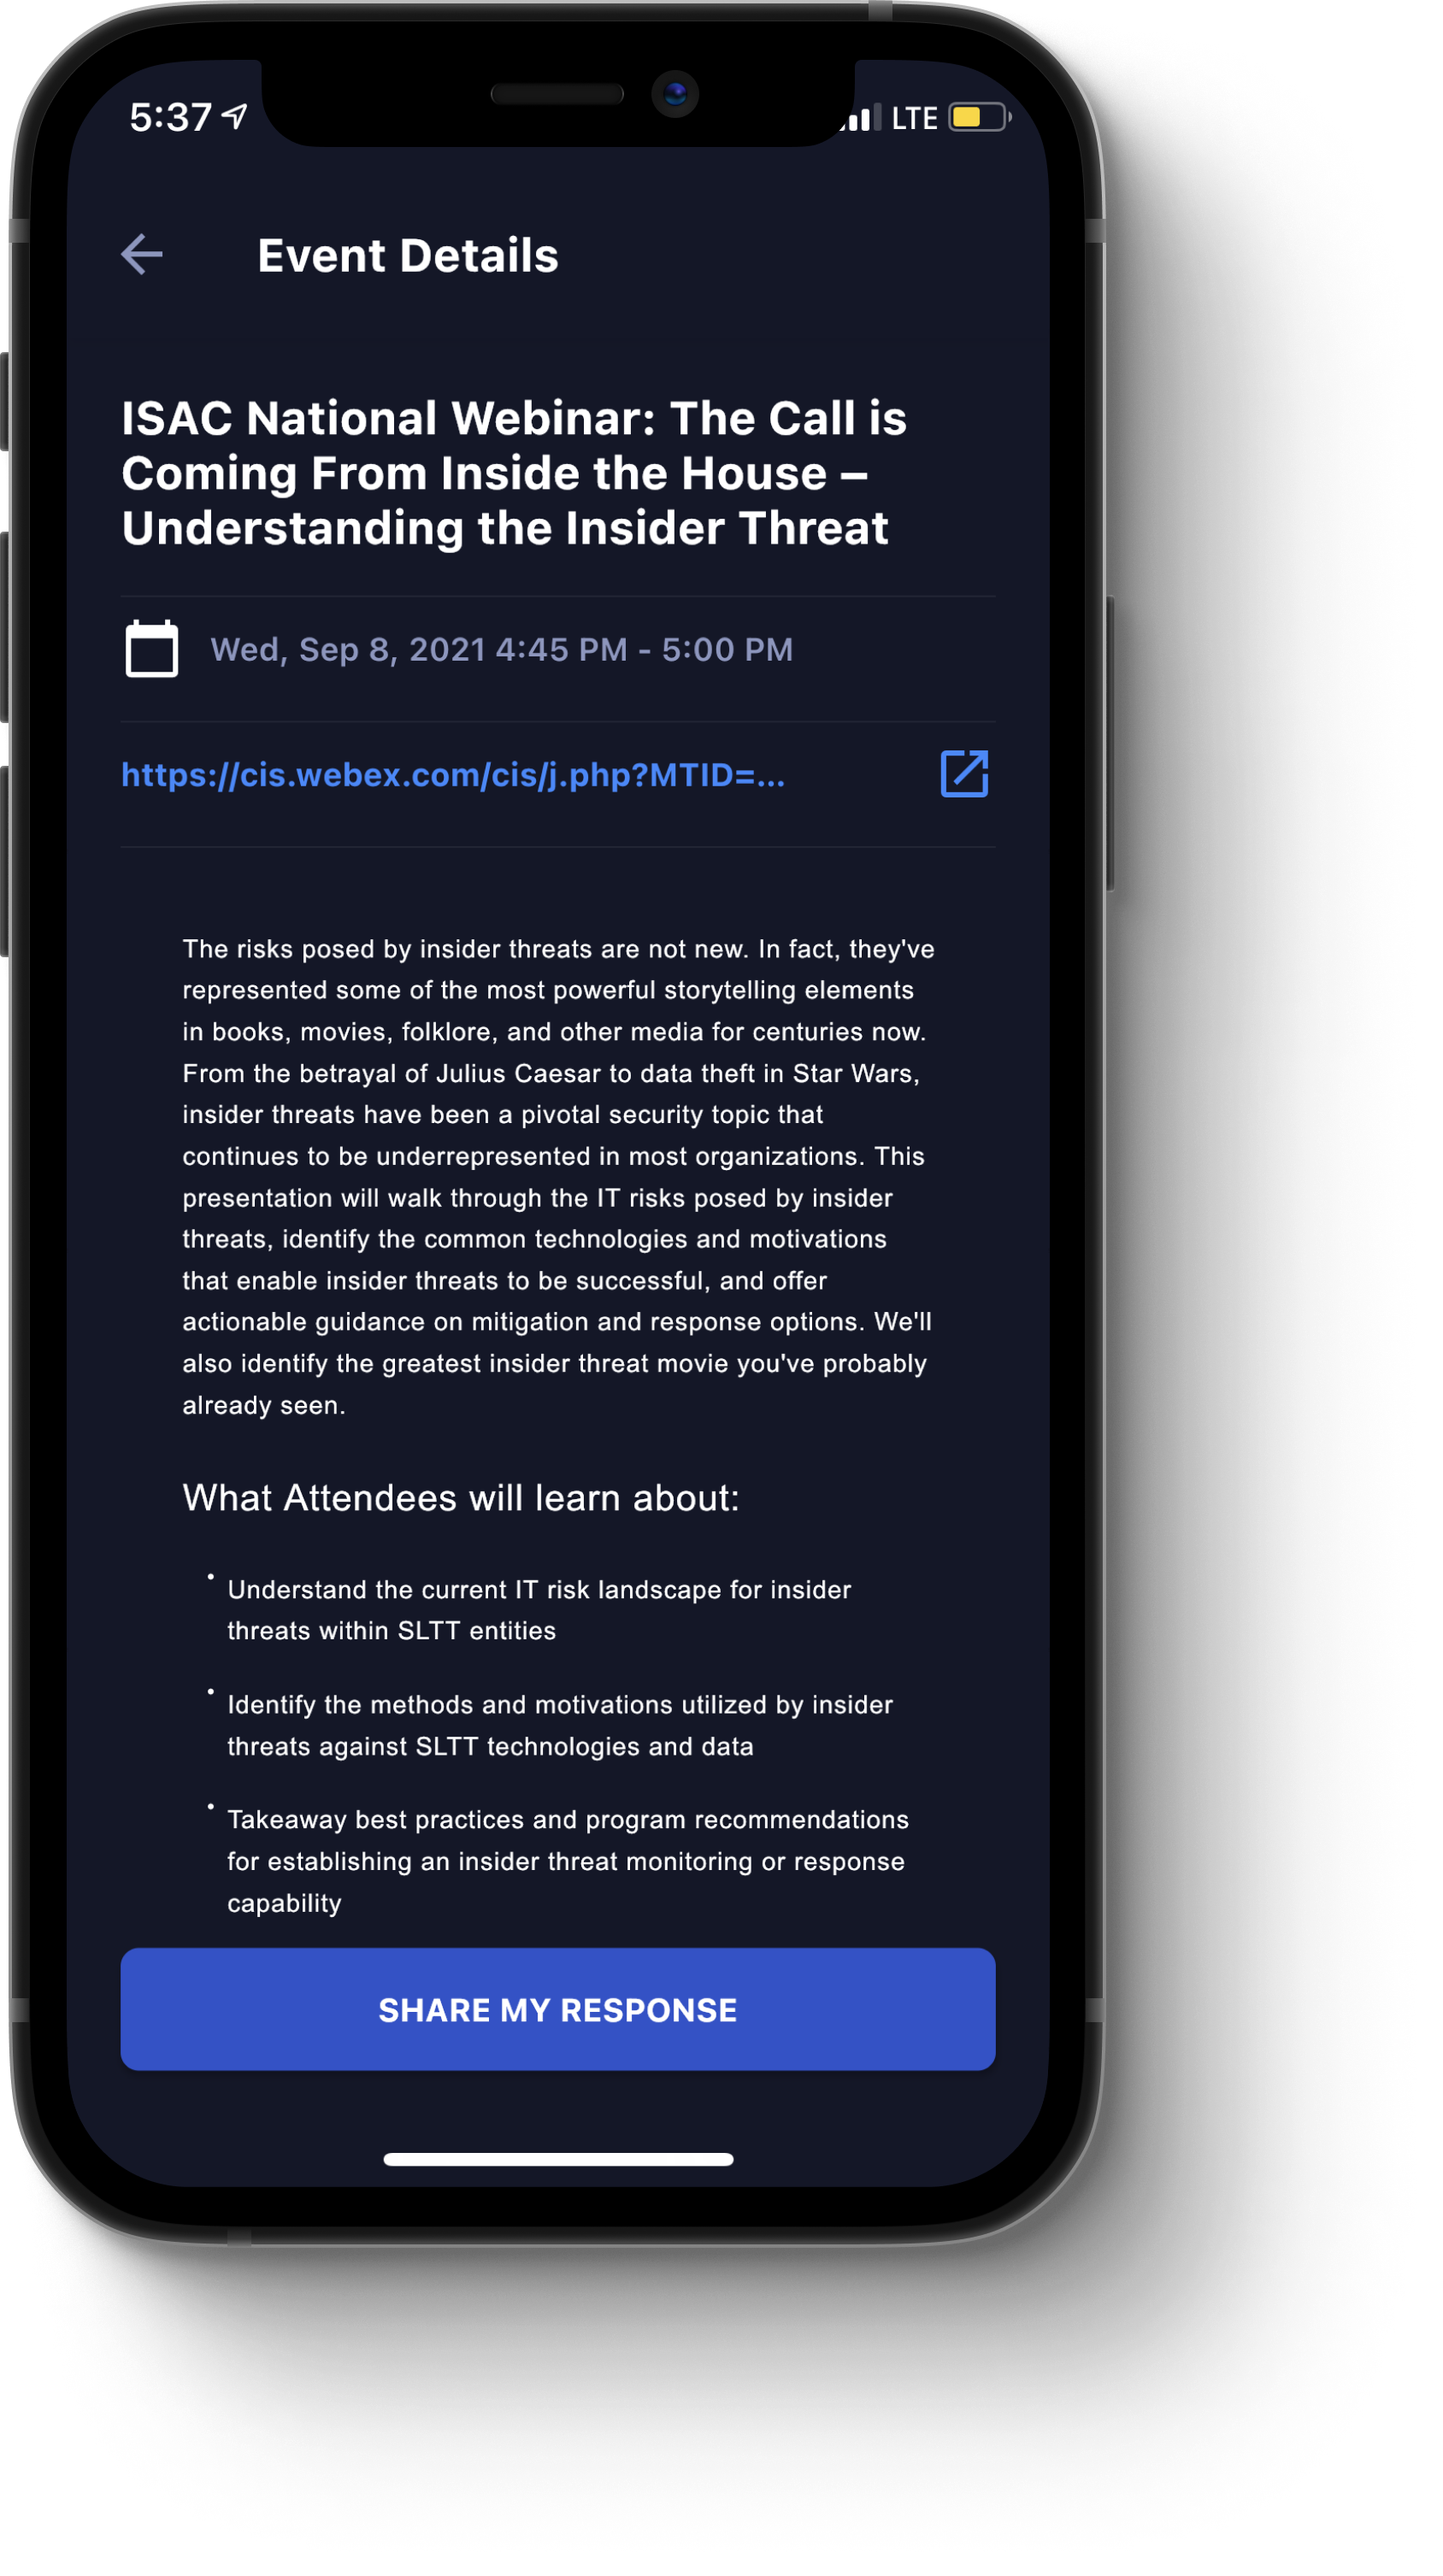
The Events module contains the following components:
Upcoming. Tap this tab to view a list of upcoming events. Tap a specific event to view its details. This tab displays, by default, when you open the Events module.
Ongoing. Tap this tab to view a list of ongoing events. Tap a specific event to view its details.
Past. Tap this tab to view a list of past events. Tap a specific event to view its details.
Calendar view icon. Tap this icon, located on the top-right corner of the screen, to toggle between a calendar view and a list view for events. The calendar view displays all upcoming, ongoing, and past events, at a glance. Tap a specific event to view its details.
Indicators Allowed
From the Home menu, tap the Indicators Allowed icon to open the Indicators Allowed module, as shown in the following image.
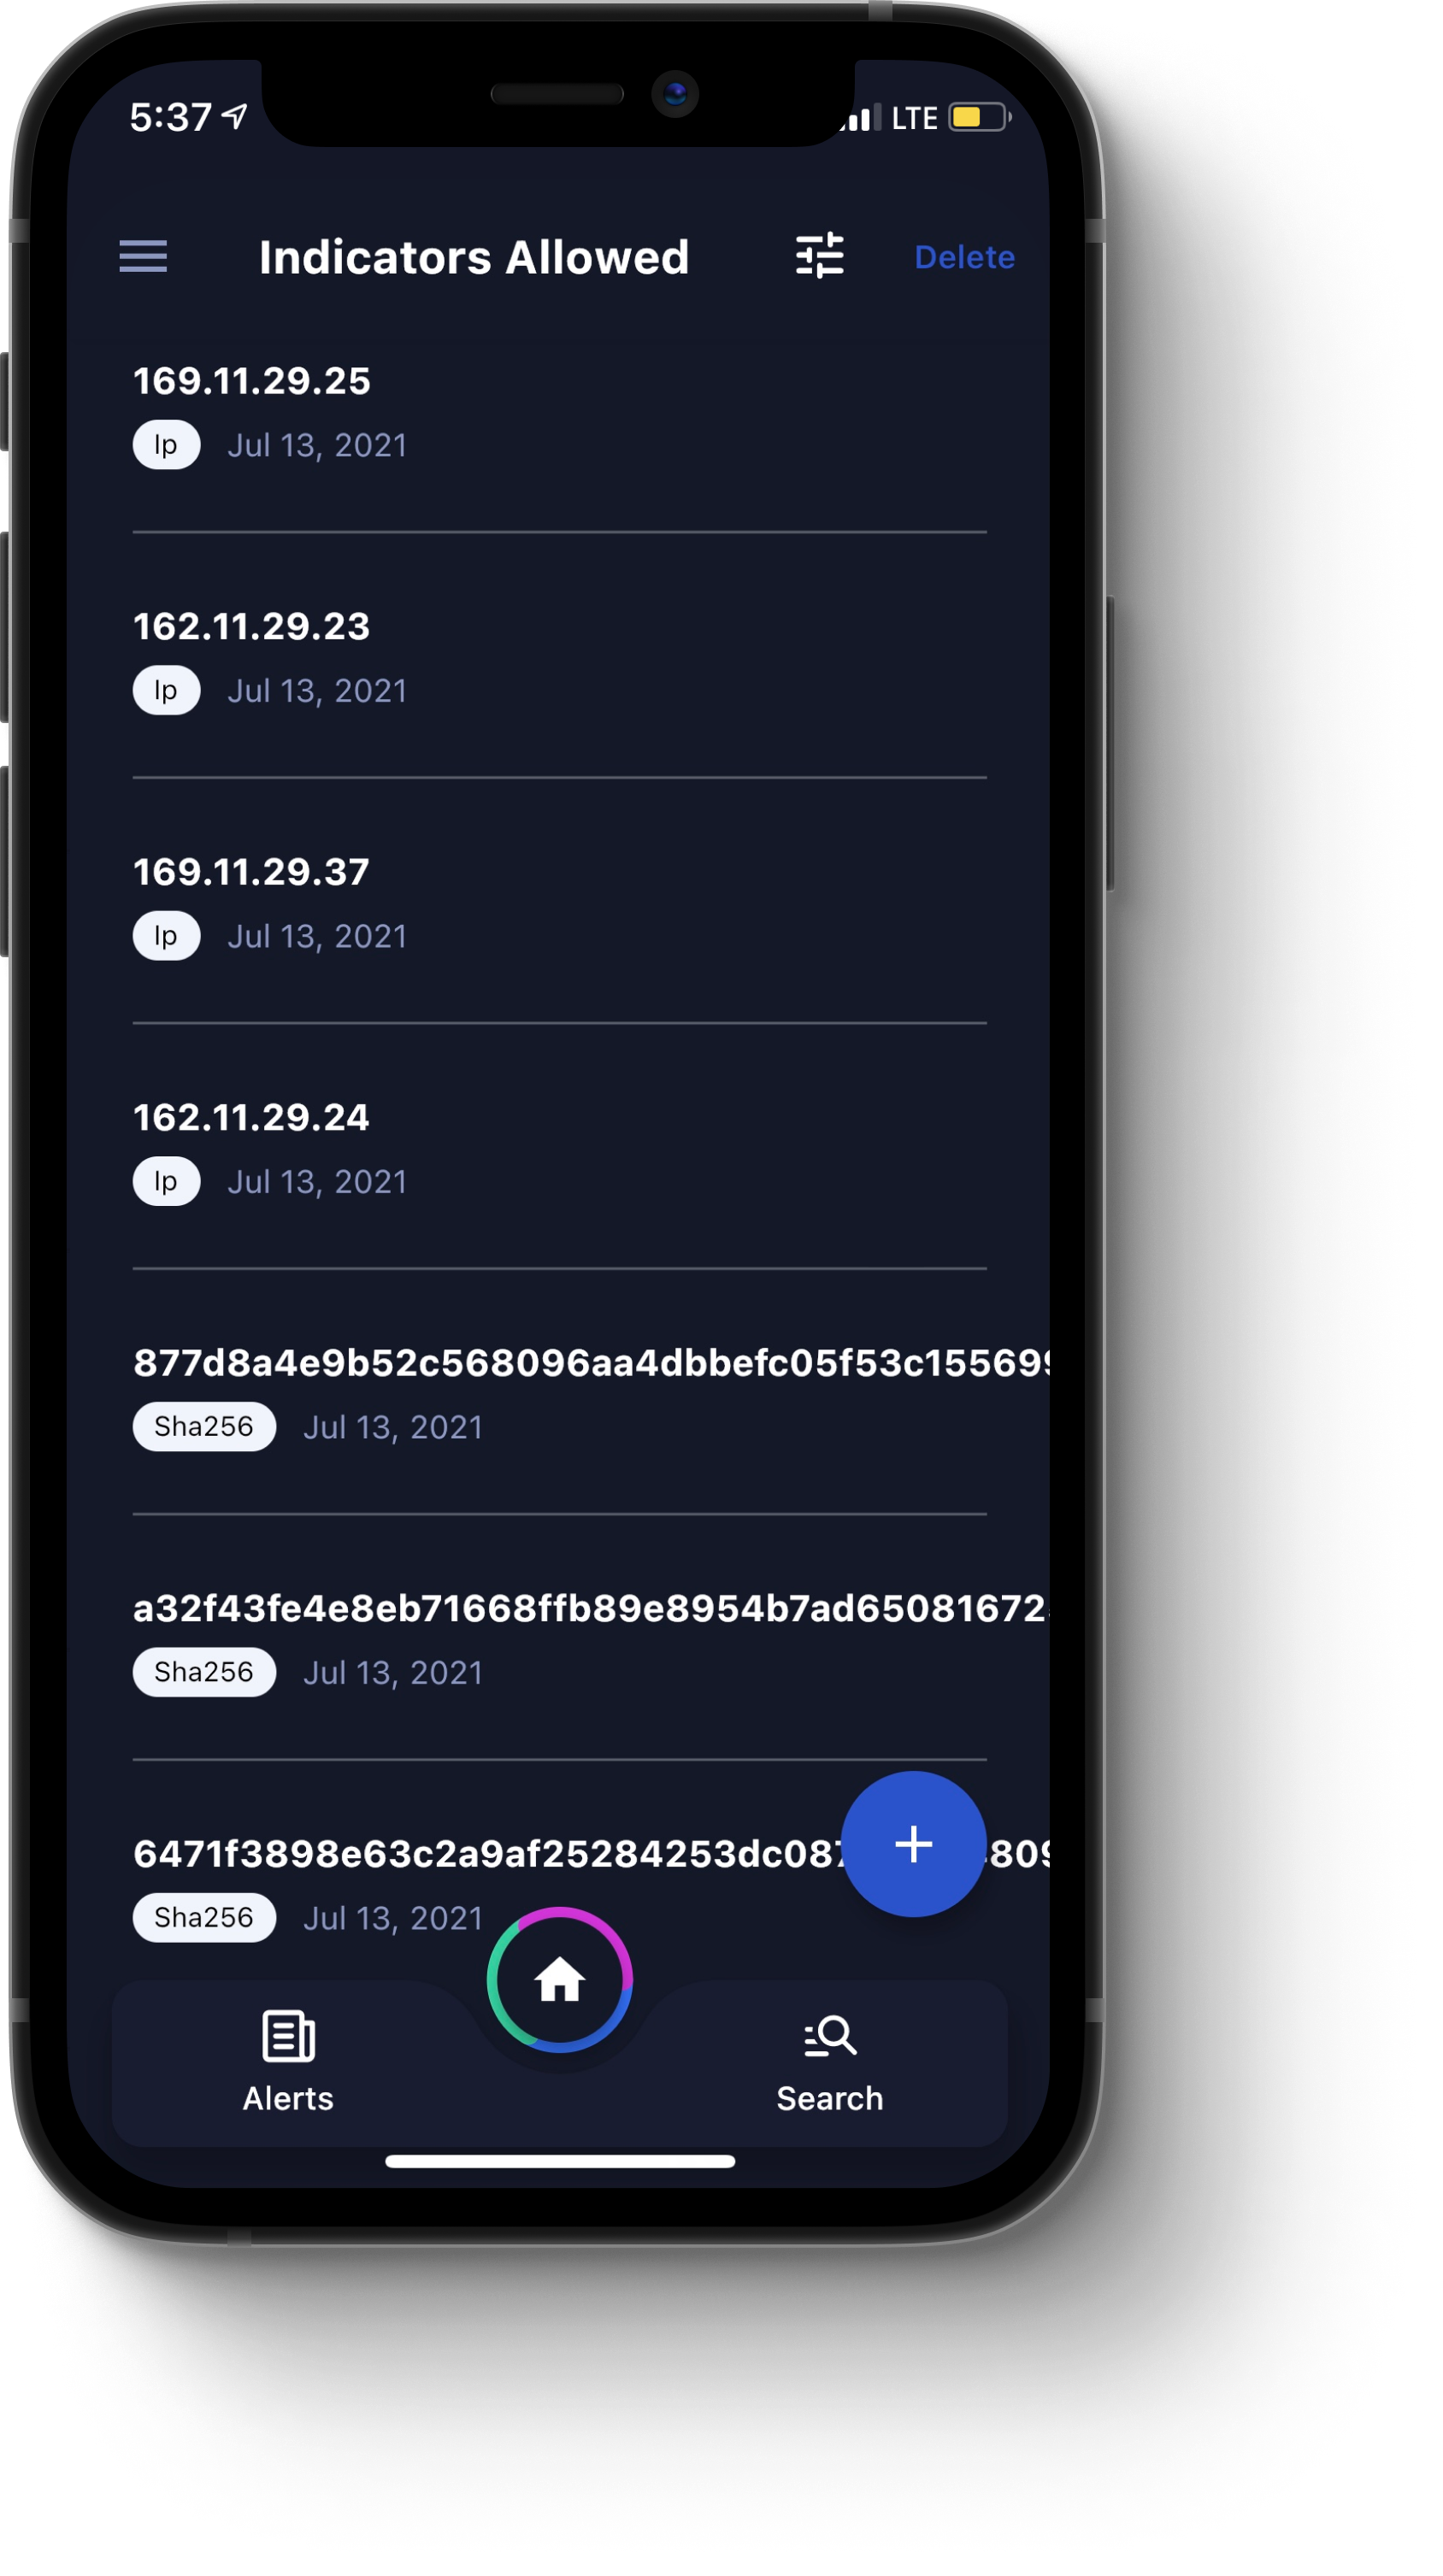
A list of allowed indicators displays, showing each indicator, its type (such as Domain, IP, Email, Hash, and so on), and the date it was vetted.
Additionally, the following options are available:
Plus icon (+). Tap this icon to open the Add Indicators dialog box, where you can add new indicators. Provide each indicator, separated by commas (,). When you are finished, to add the indicators, tap Add. A message displays, notifying you that your indicators were successfully added.
Filter icon. Tap this icon to open the Filter dialog box, where you can filter for indicators by type. Once you have specified your filter parameters, tap the Show Result button to apply the filter.
Delete. Tap this button to open a dialog box, where you can select indicators to be deleted. To delete an indicator, tap the minus icon (-) next to it. A message displays, asking you to confirm your choice. You can tap Yes, Delete or Cancel.
Alternatively, to delete all indicators, on the top-left corner of the screen, tap Clear all. A dialog box opens, asking you to confirm that you want to delete all indicators. You can tap Yes, Delete or Cancel.
When you are finished, on the top-right corner of the screen, tap Done.
Knowledge Base
From the Home menu, tap the Knowledge Base icon to open the Knowledge Base module, as shown in the following image.
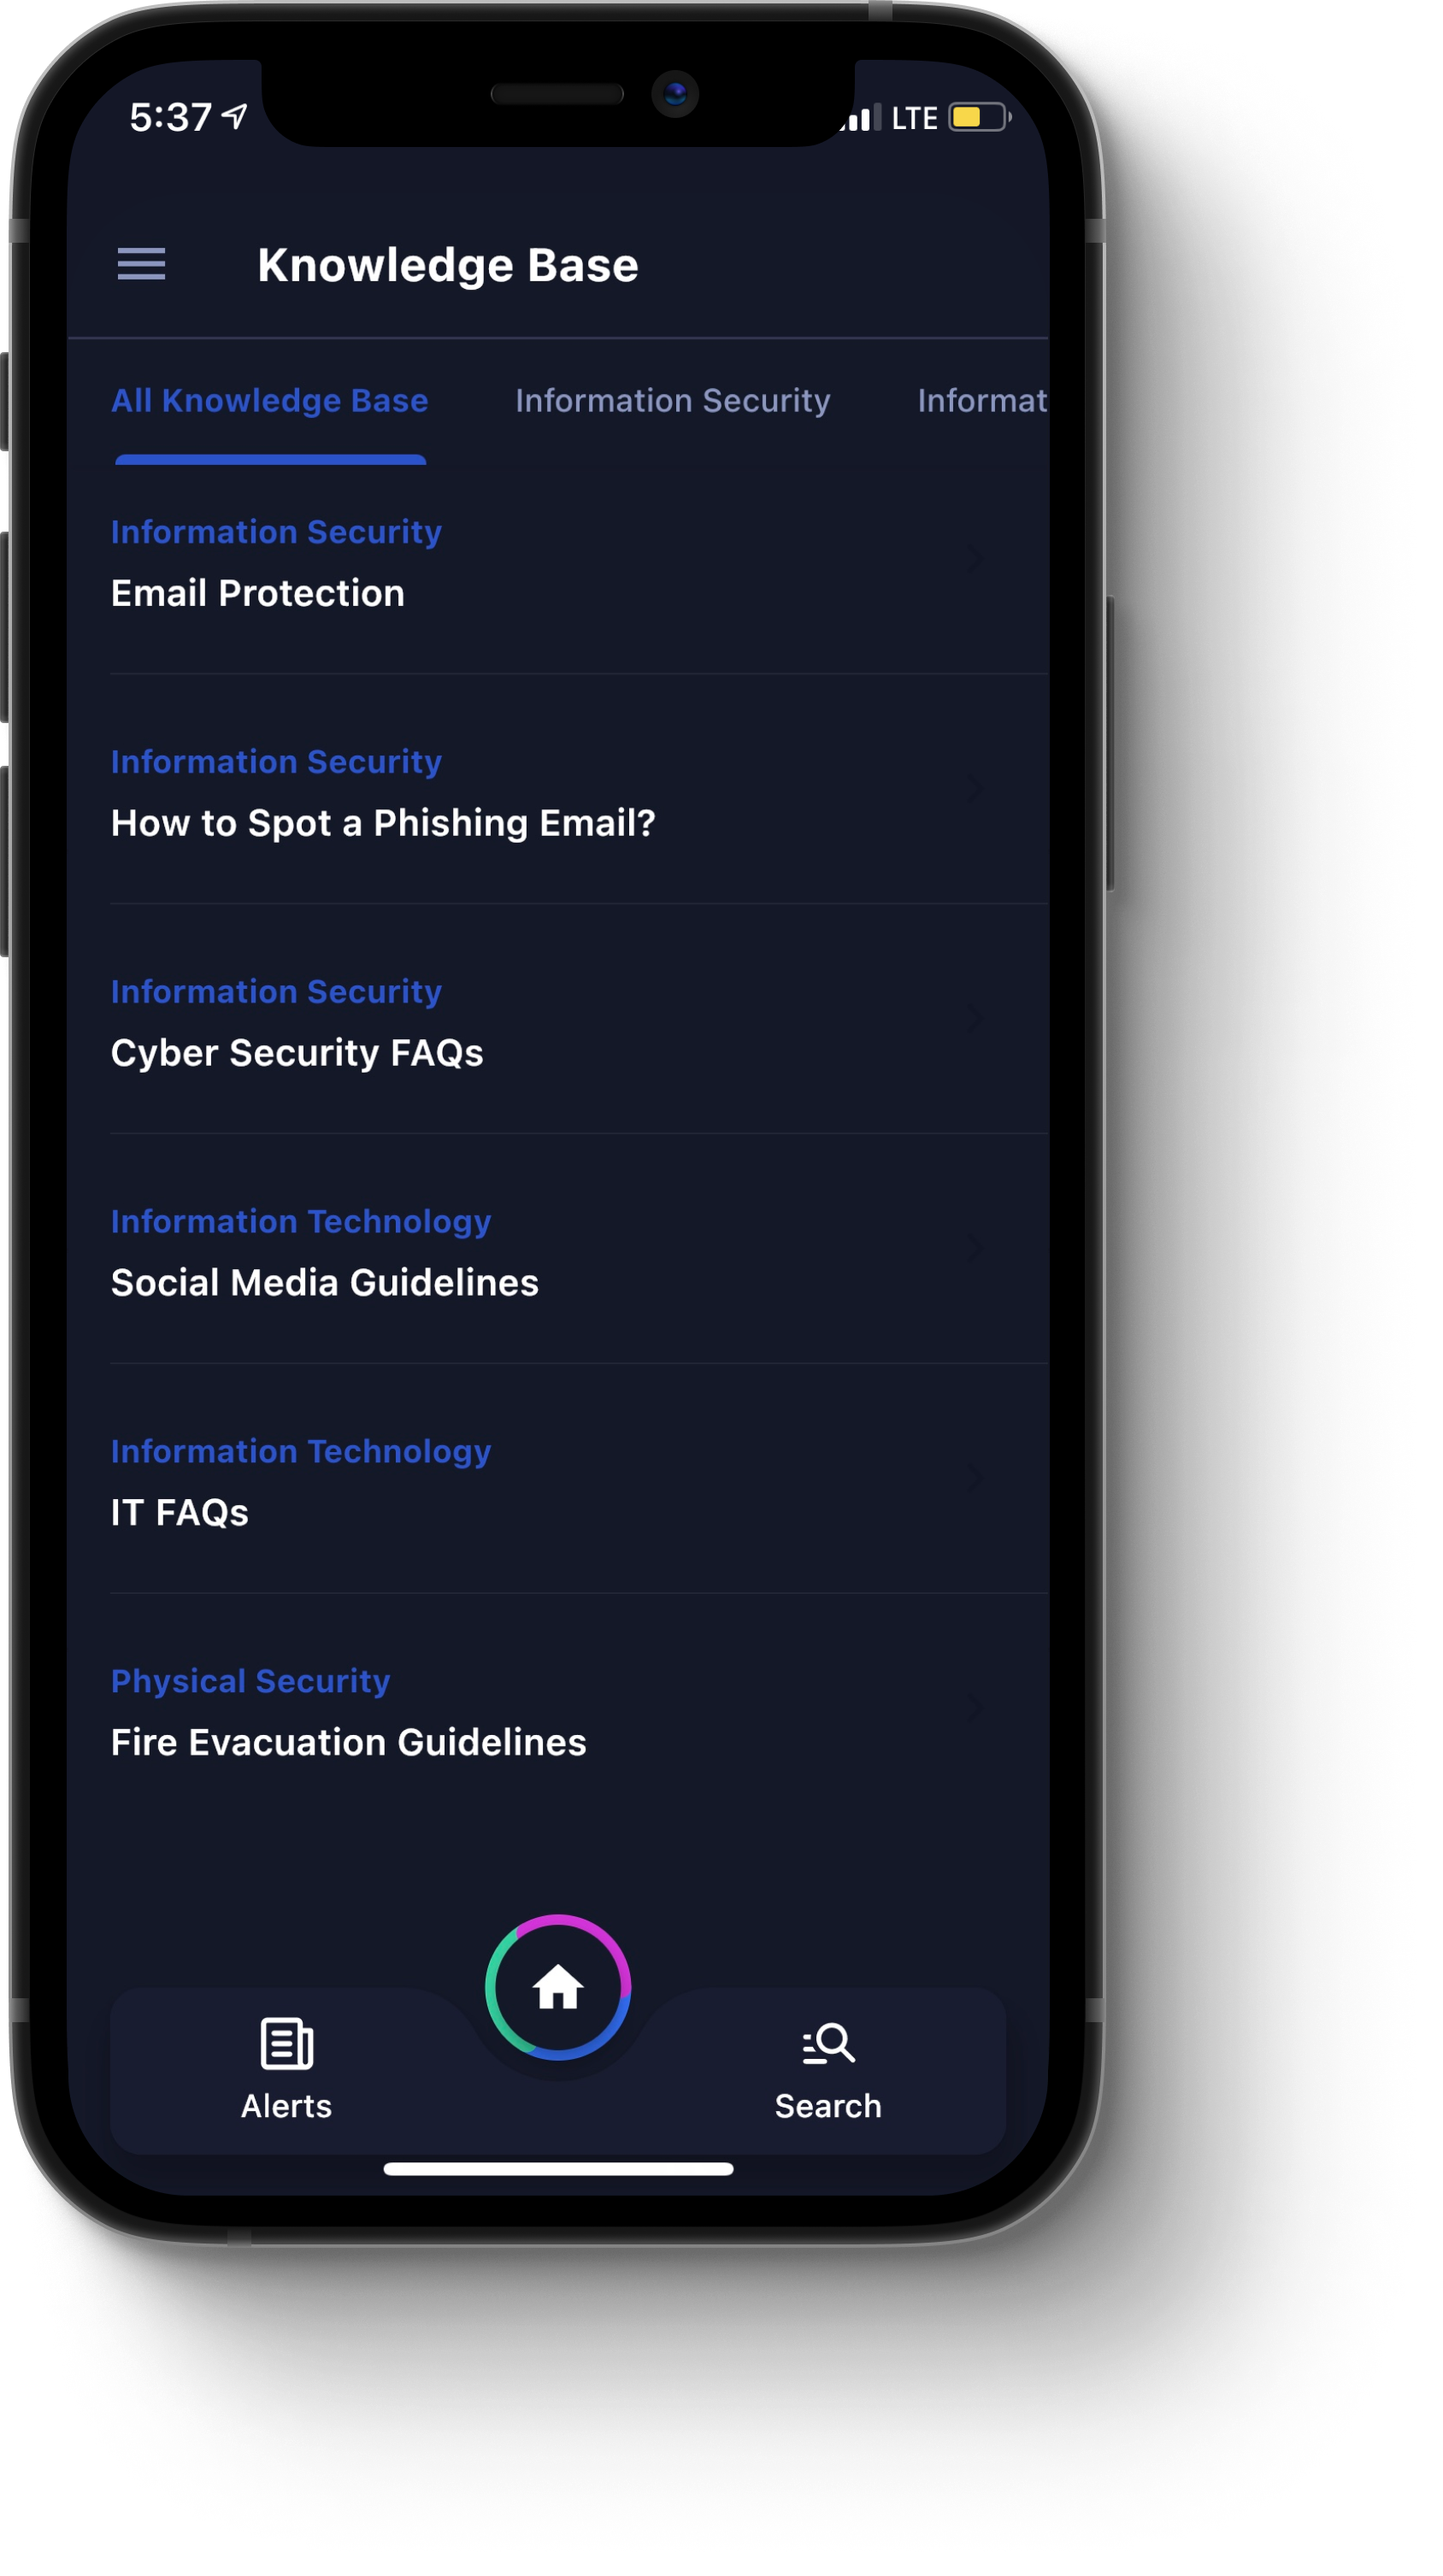
Here, you can view all of the documents or articles that your organization has uploaded, such as handbooks, policy guidelines, standard operating procedure, and so on, broken out by category.
By default, when the Knowledge Base opens, the All Knowledge Base tab displays all documents for your organization. You can swipe between category tabs to search for more specific Knowledge Base articles.
Member Directory
From the Home menu, tap the Member Directory icon to open the Member Directory module, as shown in the following image.
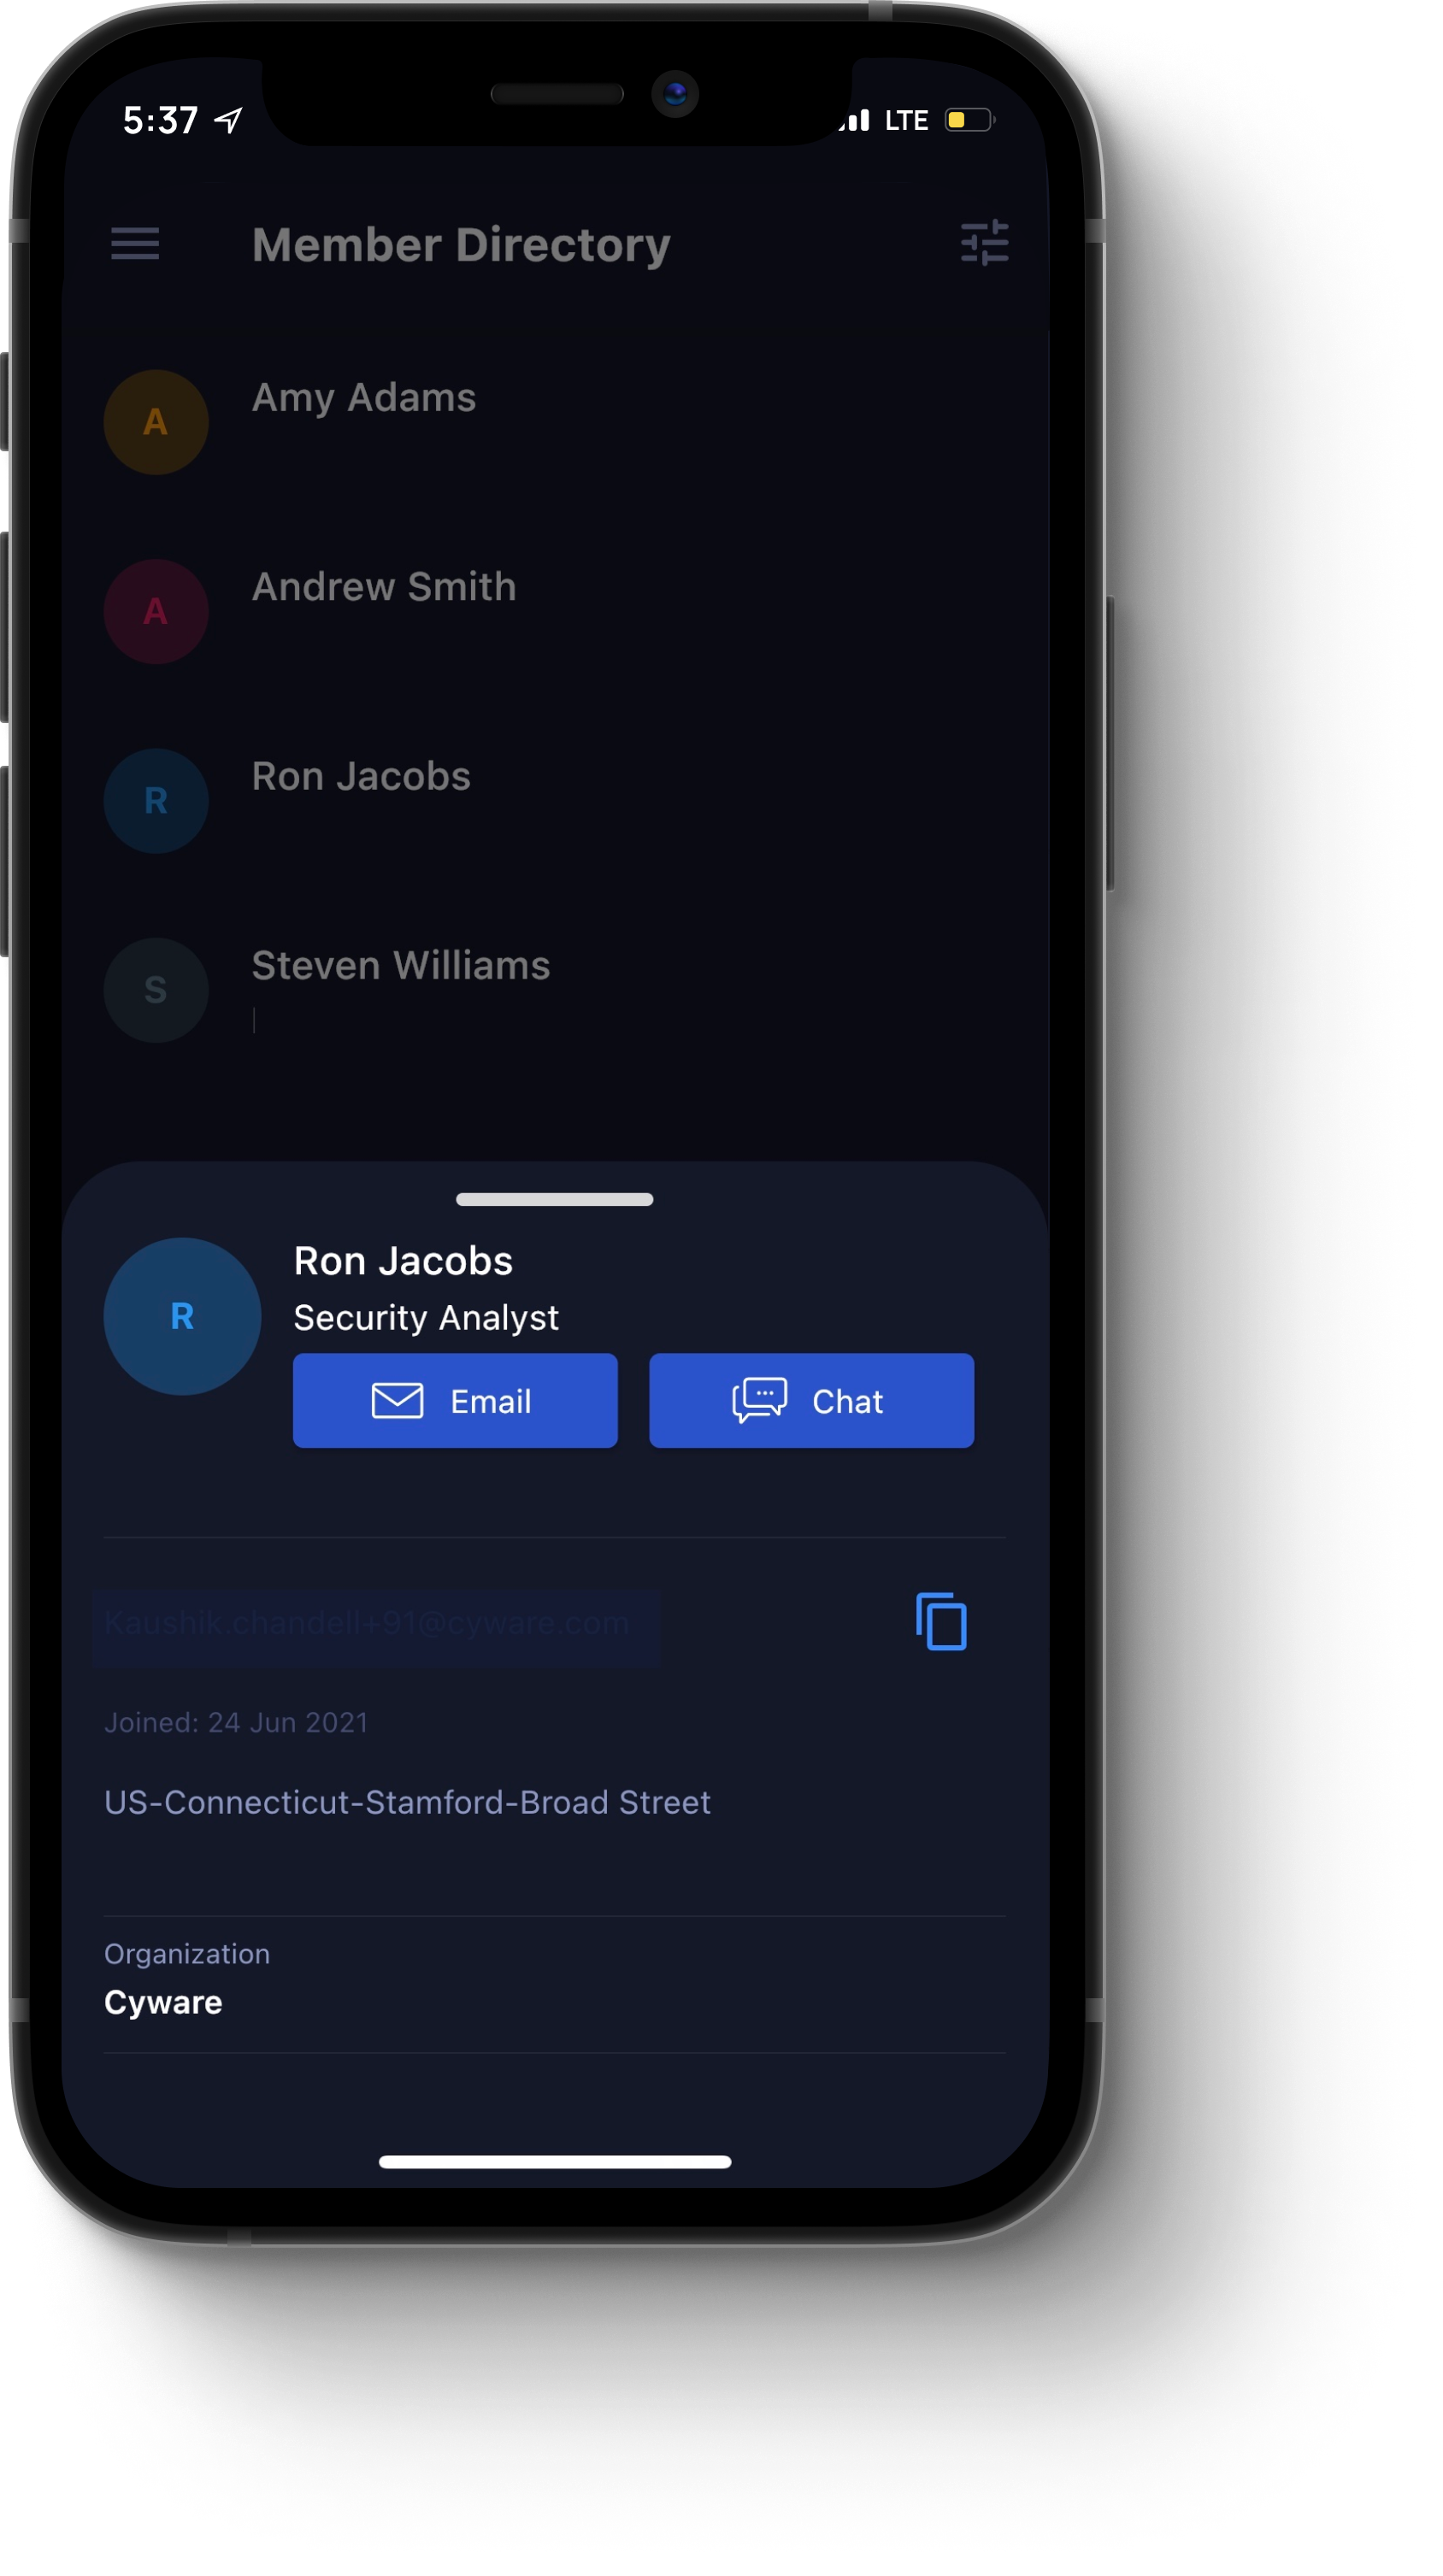
You can tap an entry for an individual Member to view their name, job title, date joined, location, and organization. You can also tap Email to send the Member an email, or tap Chat to initiate a direct discussion with that user. The discussion appears automatically in the Messenger module. For more information, see Messenger.
Additionally, you can tap the filter icon, located on the top-right corner of the screen, to open the Filter dialog box, where the following parameters are available:
Sort By. Available options include Name, Organization, and Location.
Start With. Available options include the letters of the alphabet, categorized A-Z.
Location. Available options include all regions and locations within CSAP.
Once you have specified your filter parameters, tap the Show Result button to apply the filters.
Messenger
From the Home menu, tap the Messenger icon to open the Messenger module, as shown in the following image.
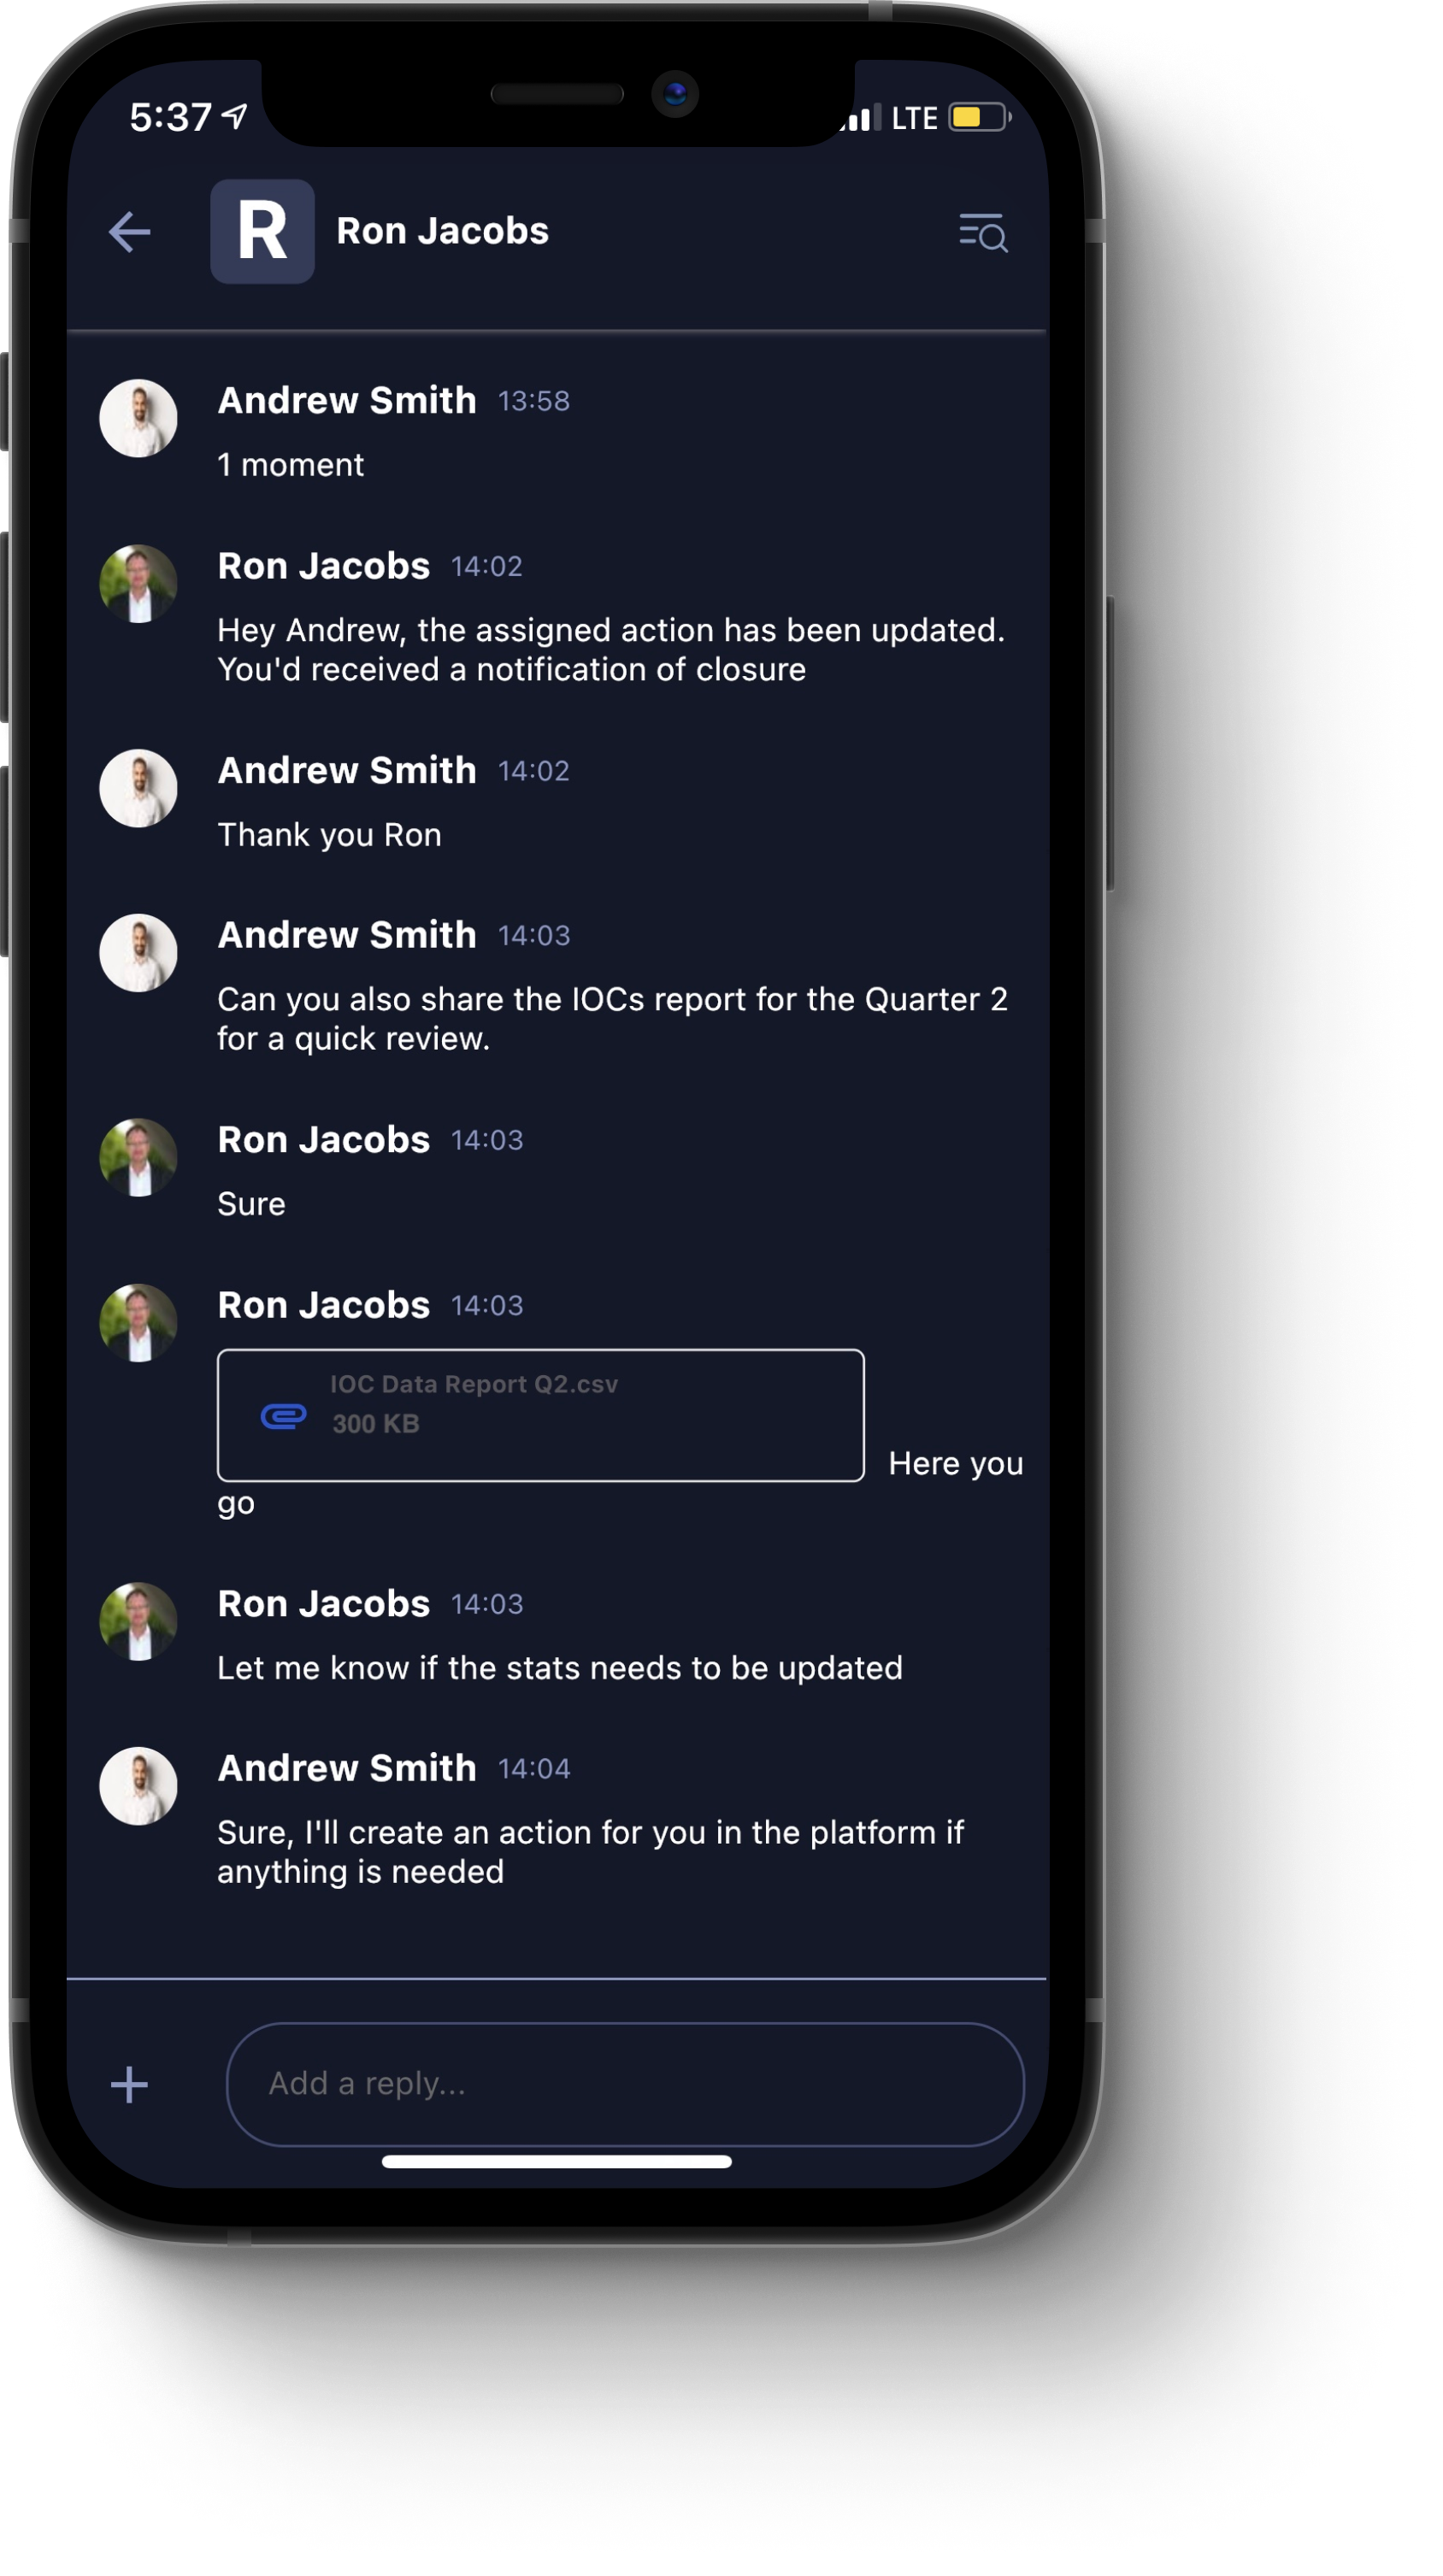
The Messenger module contains the following components:
Alerts. Tap this tab to view discussions related to alerts. To join an alert-based discussion, tap it and type your message into the text box.
Groups. Tap this tab to view discussions related to groups. To join a group-based discussion, tap it and type your message into the text box.
Direct. Tap this tab to view direct messages to other Members.
Topics. Tap this tab to view discussions related to specific topics. RSS alert based discussions can be accessed from here. To join a topic-based discussion, tap it and type your message into the text box.
New message icon. On the bottom-right corner of the screen, tap this icon to open a dialog box, where you can select one of the following options:
Create New Group. Tap this icon to open the New Group dialog box, where you can create a custom messaging group. Enter a Group Title and Group Description. When you are finished, to create the group-based discussion, tap Create Group.
Send Direct Message. Tap this icon to open the New Message dialog box, where you can search for Members to whom you can send a direct message. Note that you must have the name or email ID of an existing Member to send a direct message.
Create New Topic. Tap this icon to open the New Topic dialog box, where you create a discussion based on a custom topic. Enter a Title and Description, specify the TLP, and then specify the Group to which this topic will apply (for example, Public Group, Recipient Group, or Custom Group). When you are finished, to create the topic-based discussion, tap Create Topic.
Status icon. On the top-right corner of the screen, tap this icon to set the availability status for your user account. You can select one of the following: Online, Away, Do Not Disturb, or Offline.
Reply to Messages. Tap Reply to for specific message to respond to a specific message in an individual or group chat.
Preferences. In the top-right corner of the Messenger, click the ellipsis (...) icon and select Preferences, where the following options are available:
Mobile App (Push-notification). Select to receive messenger push notifications. Choose Alerts, Groups, Direct Messages, or Topics, to receive notifications only for the required items.
Email Notifications. Select to receive email notifications about unread messages in the messenger for Alerts, Groups, Direct Messages, or Topics.
Click Done to save changes.
Profile
To view and make changes to your user profile, in the top-left corner, tap the organization icon to expand the left-hand menu and then tap Profile Setup.
The user profile page opens, as shown in the following image.
Note: You cannot make changes to your user privileges. This can only be done by a CSAP administrator in the CSAP Member Portal Web App or CSAP Analyst Portal.
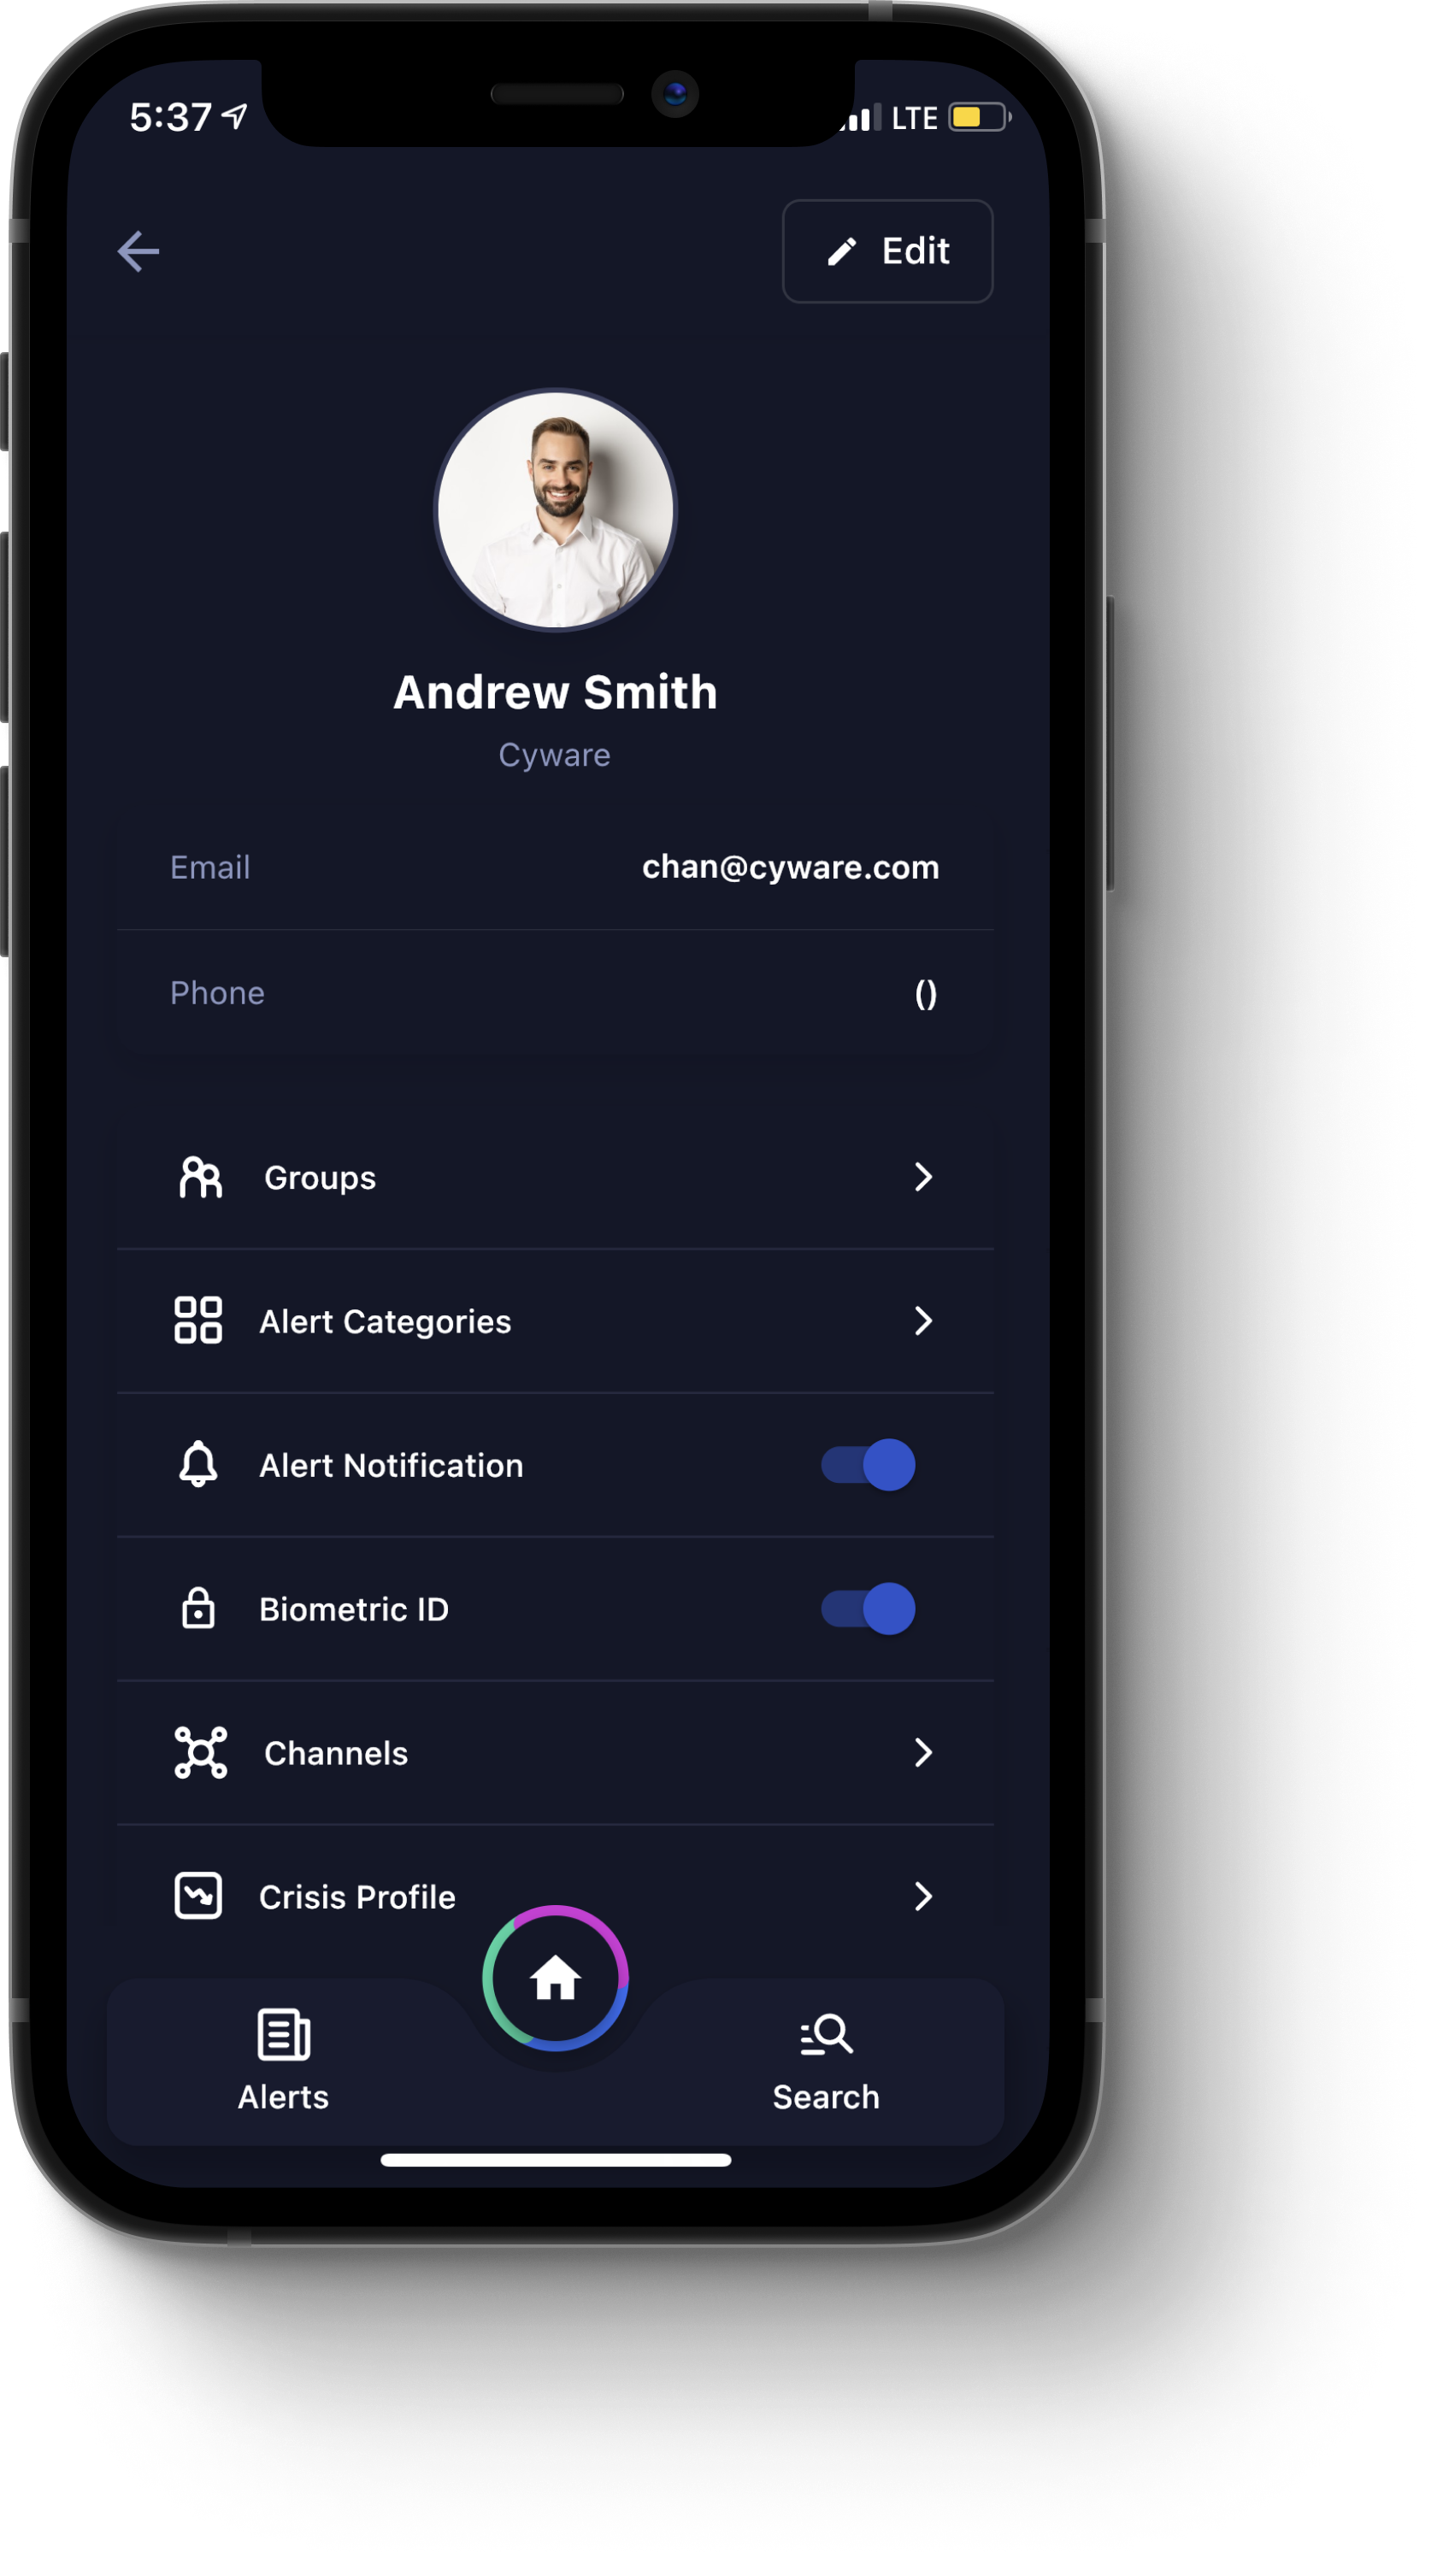
The user profile page contains the following components:
Edit. Tap this button to open the Profile Info dialog box, where you can edit the information in your user profile. The following options are available:
Name. Your first and last name.
Email. The email address for your organization at which you can be contacted.
Contact Number. A phone number at which you can be contacted.
Job Title. Your job title within your organization.
Location. The region for which you receive alerts that are relevant to you.
Twitter. The URL for your Twitter® account.
LinkedIn. The URL for your LinkedIn® page.
Street. The street address of your workplace.
City. The city in which your workplace is located.
State/Province. The state or province in which your workplace is located.
Zip/Postal Code. The ZIP or postal code for your workplace.
Country. The country in which your workplace is located.
Update Information. Tap this button to save and update your profile information. The Profile Info dialog box closes, and you are returned to your user profile.
Email. The email address displayed for your user profile.
Phone. The phone number displayed for your user profile.
Request to Join. You can request to join a recipient group. To request to join a Recipient Group, click Request To Join. An icon displays, indicating that access to the group has been requested. If you want to cancel your request, click Cancel. Once your request to join has been approved by a Member Admin, an icon displays, indicating that you have joined the Recipient Group.
Requested. You can view all the recipient groups you have requested to join here.
Joined. You can view all the recipient groups that have approved your request to join.
Alert Categories. Tap this option to specify the categories for which you want to receive alerts. Toggle available categories on or off from either the System Default or Optional tabs. Optionally, you can tap Clear All to unsubscribe from all alert categories. When you are finished making your changes, tap Apply.
Biometric ID. Toggle this option on or off to enable or disable biometric authentication. When you enable Biometric ID, you are prompted to enter a pattern. The next time you access the CSAP Mobile app, you are prompted to authenticate with the pattern you have specified.
Channels. Tap this option to manage your channels. Available options include My Channels, Default Channels, Shared Channels, and Archived.
Tap the plus (+) icon to open the Create New Channel dialog box, where you can create a new channel. Enter a Channel Name, assign Tags, specify whether you want to receive email or mobile notifications, whether you want to share this channel with your organization, and whether you want to share this channel globally. When you are finished, to create the channel, tap Create Channel.
Crisis Profile. Tap this option to open the Crisis Profile dialog box, where you can view and edit the information for your Crisis Profile. Specify your Business Hours, Contact Numbers, and Set Priority Order. When you are finished, tap Save to update your information and close the Crisis Profile dialog box.
Customize. Tap this option to open the Customize dialog box, where you can edit the following information:
Show Profile in Directory. Toggle this option on or off to show or hide your user profile in the Member Directory. For more information, see Member Directory.
Allow Others to Initiate DM. Toggle this option on or off to enable or disable the ability for other Members to send you a direct message. For more information, see Messenger.
Default Channel upon login. Tap this option to open a dialog box, where you can select the default channels that display when you sign in to the CSAP Mobile App. When you are finished, tap Save Changes to update your preferences and close the dialog box.
Join/Leave Network. Tap this option to join or leave an organization. To add an organization, tap Add Network and follow the instructions for signing in to the organization and your user account. For more information, see Signing in to the CSAP Mobile App.
Note:
If you have multiple organizations as tenants within the CSAP Mobile App, you can switch between them, at any time, by tapping an organization icon in the left-hand menu.
When switching between multiple tenants, only one tenant will be active at a time.
This multi-tenant capability is only available in the CSAP Mobile App. For more information, contact the CSAP administrator for your organization.
Privacy Policy. Tap this option to view Cyware's Privacy Policy.
Terms and Conditions. Tap this option to view Cyware's Terms and Conditions.
Request For Information
From the Home menu, tap the Request For Information icon to open the Request For Information module, as shown in the following image.

The Request For Information module contains the following components:
Open. This tab displays all requests for information (RFI) that are still open.
Closed. This tab displays all RFIs that have been closed by an Analyst or other Member.
Plus icon (+). Tap this icon to open the New Request dialog box, where you can create a new RFI. Provide information in the relevant fields for the Basic Details tab and Additional Info tab. In the Preview tab, you can preview the contents of your RFI. To submit the request, tap Submit RFI.
Filter icon. Tap this icon to open the Filter dialog box, where you can filter for RFIs by the following parameters:
Reported Date. The date range for which the RFI was submitted. Available options include Today, Past Week, Past Month, Past Year, or Custom.
No. of Attachments. The number of attached files that an RFI contains. Available options include 1, 2, 3, 4, or 5.
TLP. For TLP 1.0, the available options are RED, AMBER, GREEN, or WHITE. For TLP 2.0, the available options are RED, AMBER+STRICT, AMBER, GREEN, or CLEAR. The TLP version is set by administrators in the CSAP Analyst Portal.
Once you have specified your filter parameters, tap the Show Result button to apply the filters.
Share Threat Intel
From the Home menu, tap the Share Threat Intel icon to open the Share Threat Intel module, as shown in the following image.
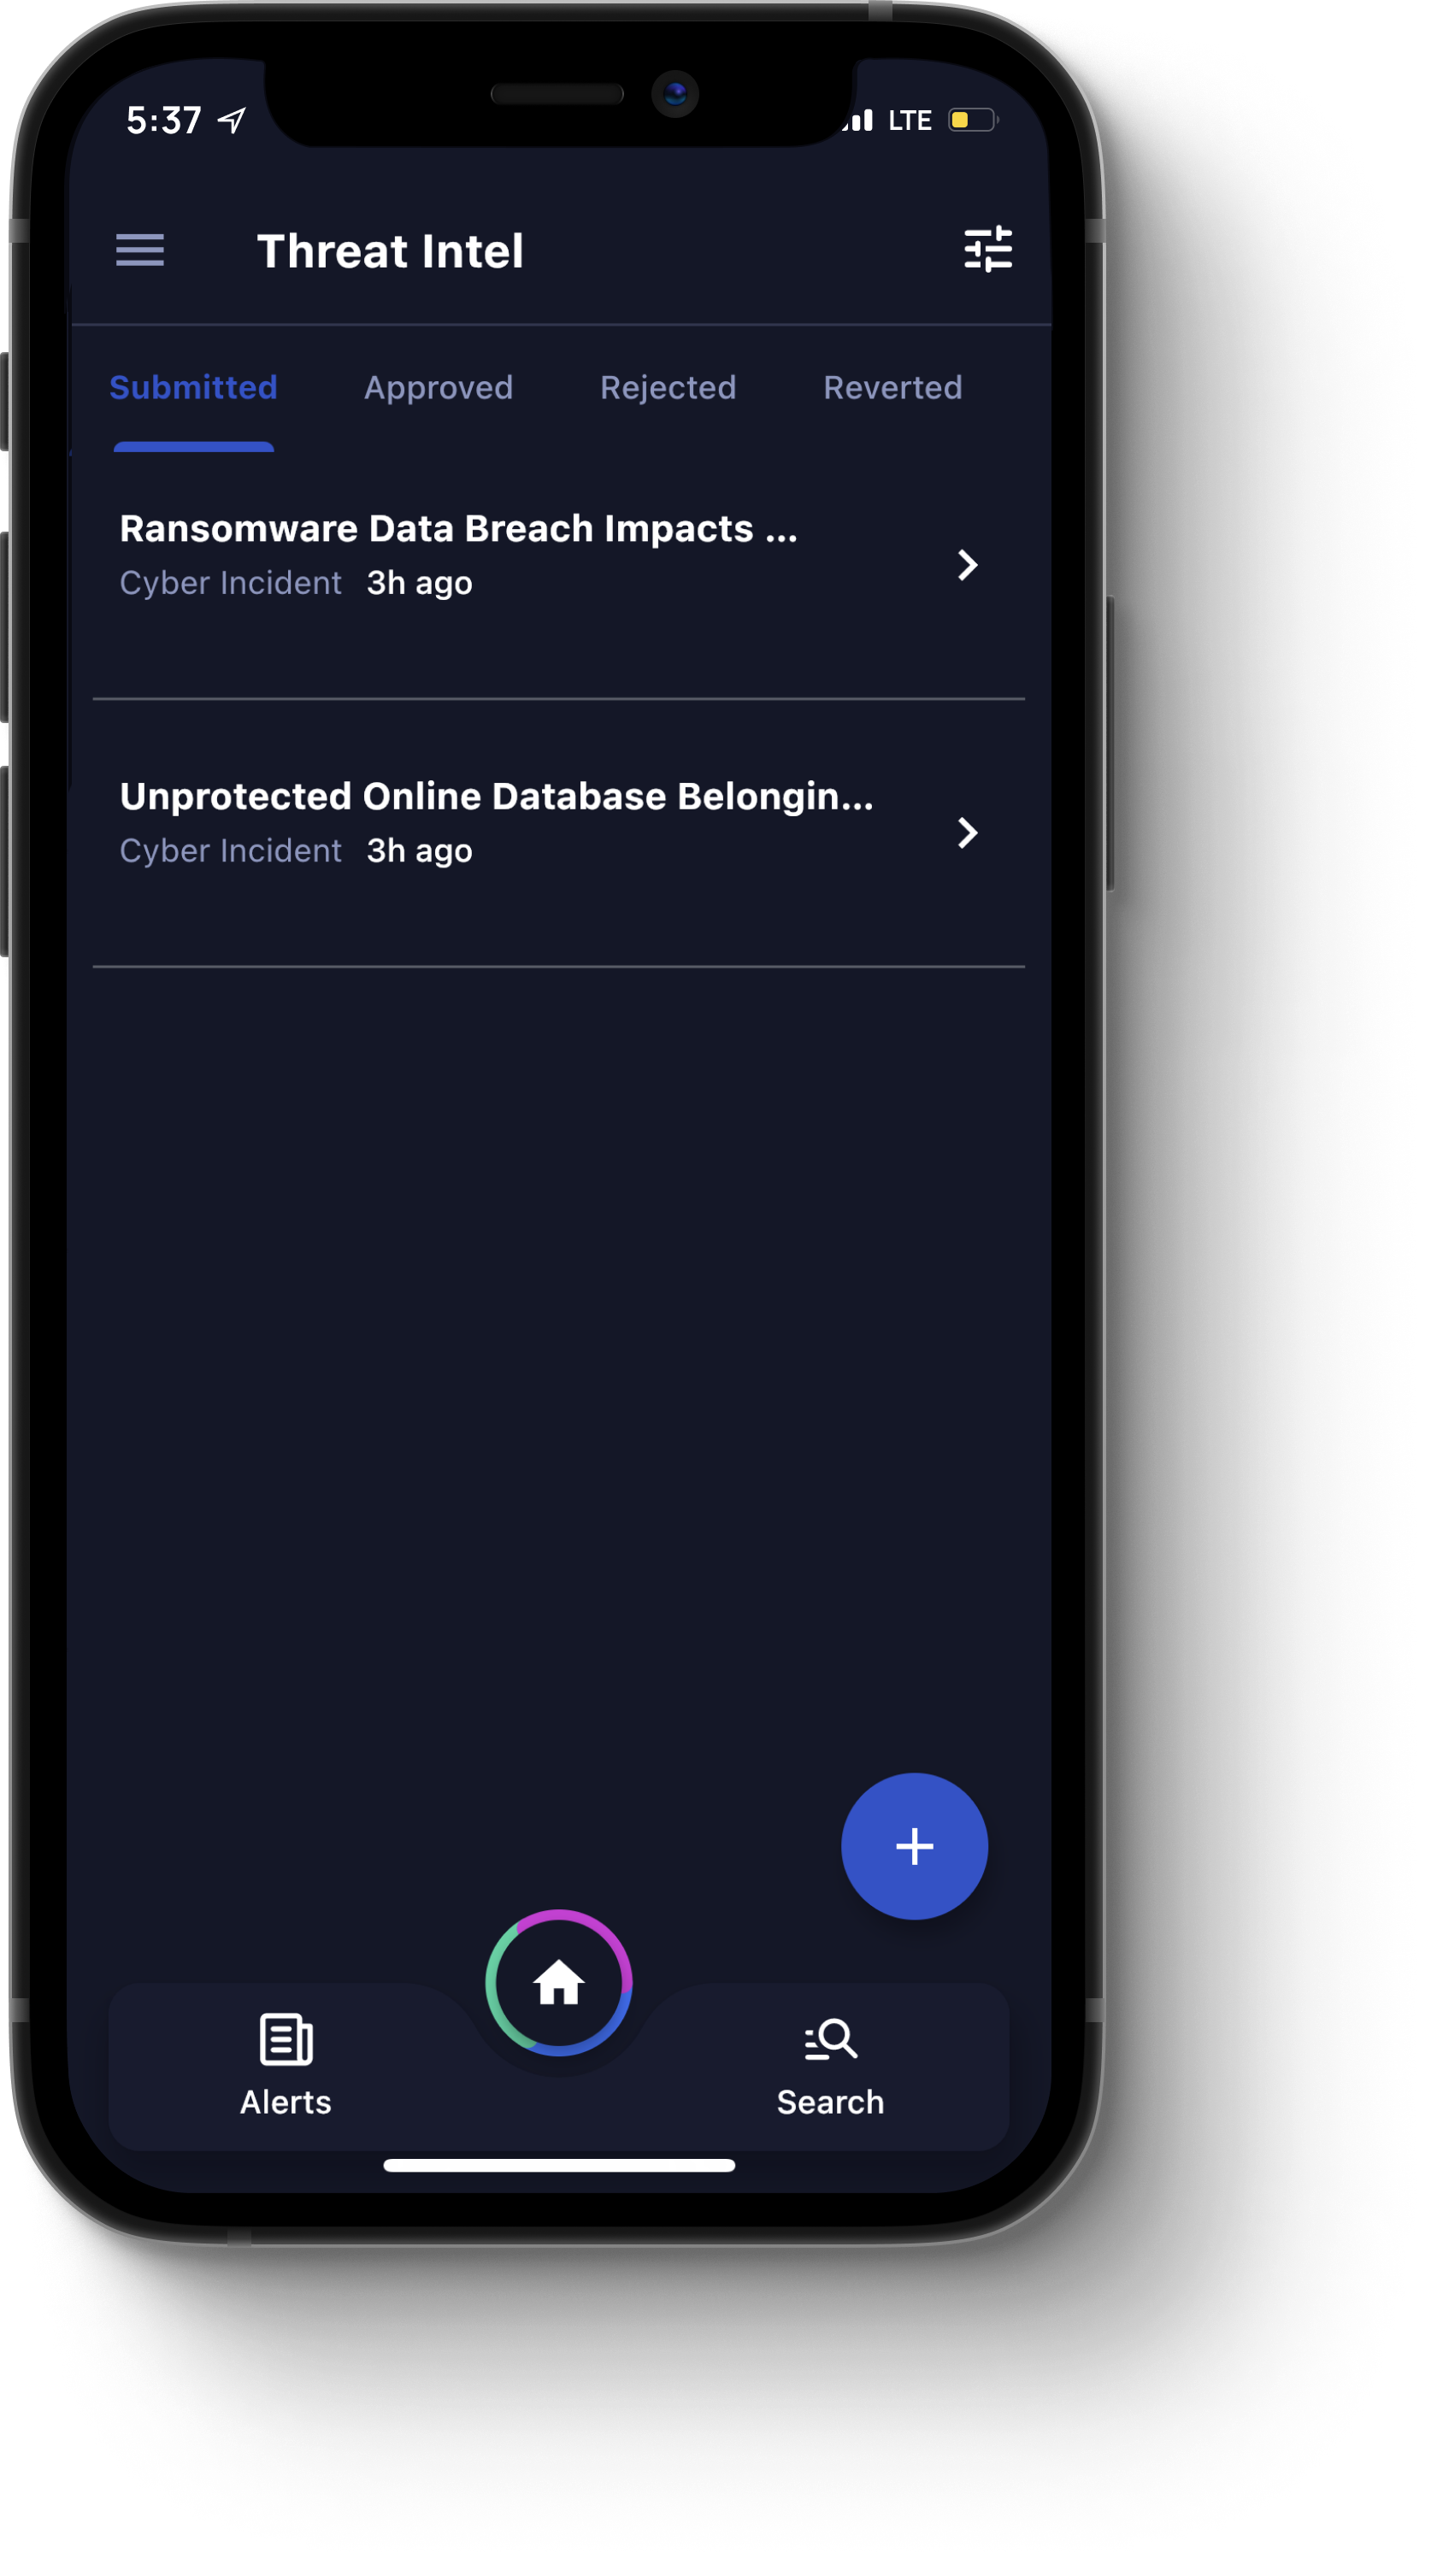
The Share Threat Intel module contains the following components:
Submitted. Tap this tab to view threat intel that has been submitted by Members.
Approved. Tap this tab to view threat intel that has been approved by an Analyst, Intel Approver, or Sector Approver.
Rejected. Tap this tab to view threat intel that has been rejected by an Analyst, Intel Approver, or Sector Approver.
Reverted. Tap this tab to view threat intel that has been reverted to the Member for more information.
Plus icon (+). Tap this icon to open the Select Category dialog box, where you can begin creating a new threat intel packet for submission to an Analyst, Intel Approver, or Sector Approver. Once you select your category, provide information in the relevant fields for the Basic Details tab and Additional Info tab. In the Preview tab, you can preview the contents of your threat intel packet. To submit the request, tap Submit Intel.
Note: Do not provide any personally identifiable information when submitting threat intel.
Filter icon. Tap this icon to open the Filter dialog box, where you can filter for threat intel by the following parameters:
Incident Date. The date range for which the threat occurred. Available options include Today, Past Week, Past Month, Past Year, or Custom.
Reported Date. The date range for which the threat intel was submitted. Available options include Today, Past Week, Past Month, Past Year, or Custom.
No. of Attachments. The number of attached files that a threat intel packet contains. Available options include 1, 2, 3, 4, or 5.
TLP. For TLP 1.0, the available options are RED, AMBER, GREEN, or WHITE. For TLP 2.0, the available options are RED, AMBER+STRICT, AMBER, GREEN, or CLEAR. The TLP version is set by administrators in the CSAP Analyst Portal.
Once you have specified your filter parameters, tap the Show Result button to apply the filters.
Survey
From the Home menu, tap the Survey icon to open the Survey module, as shown in the following image.
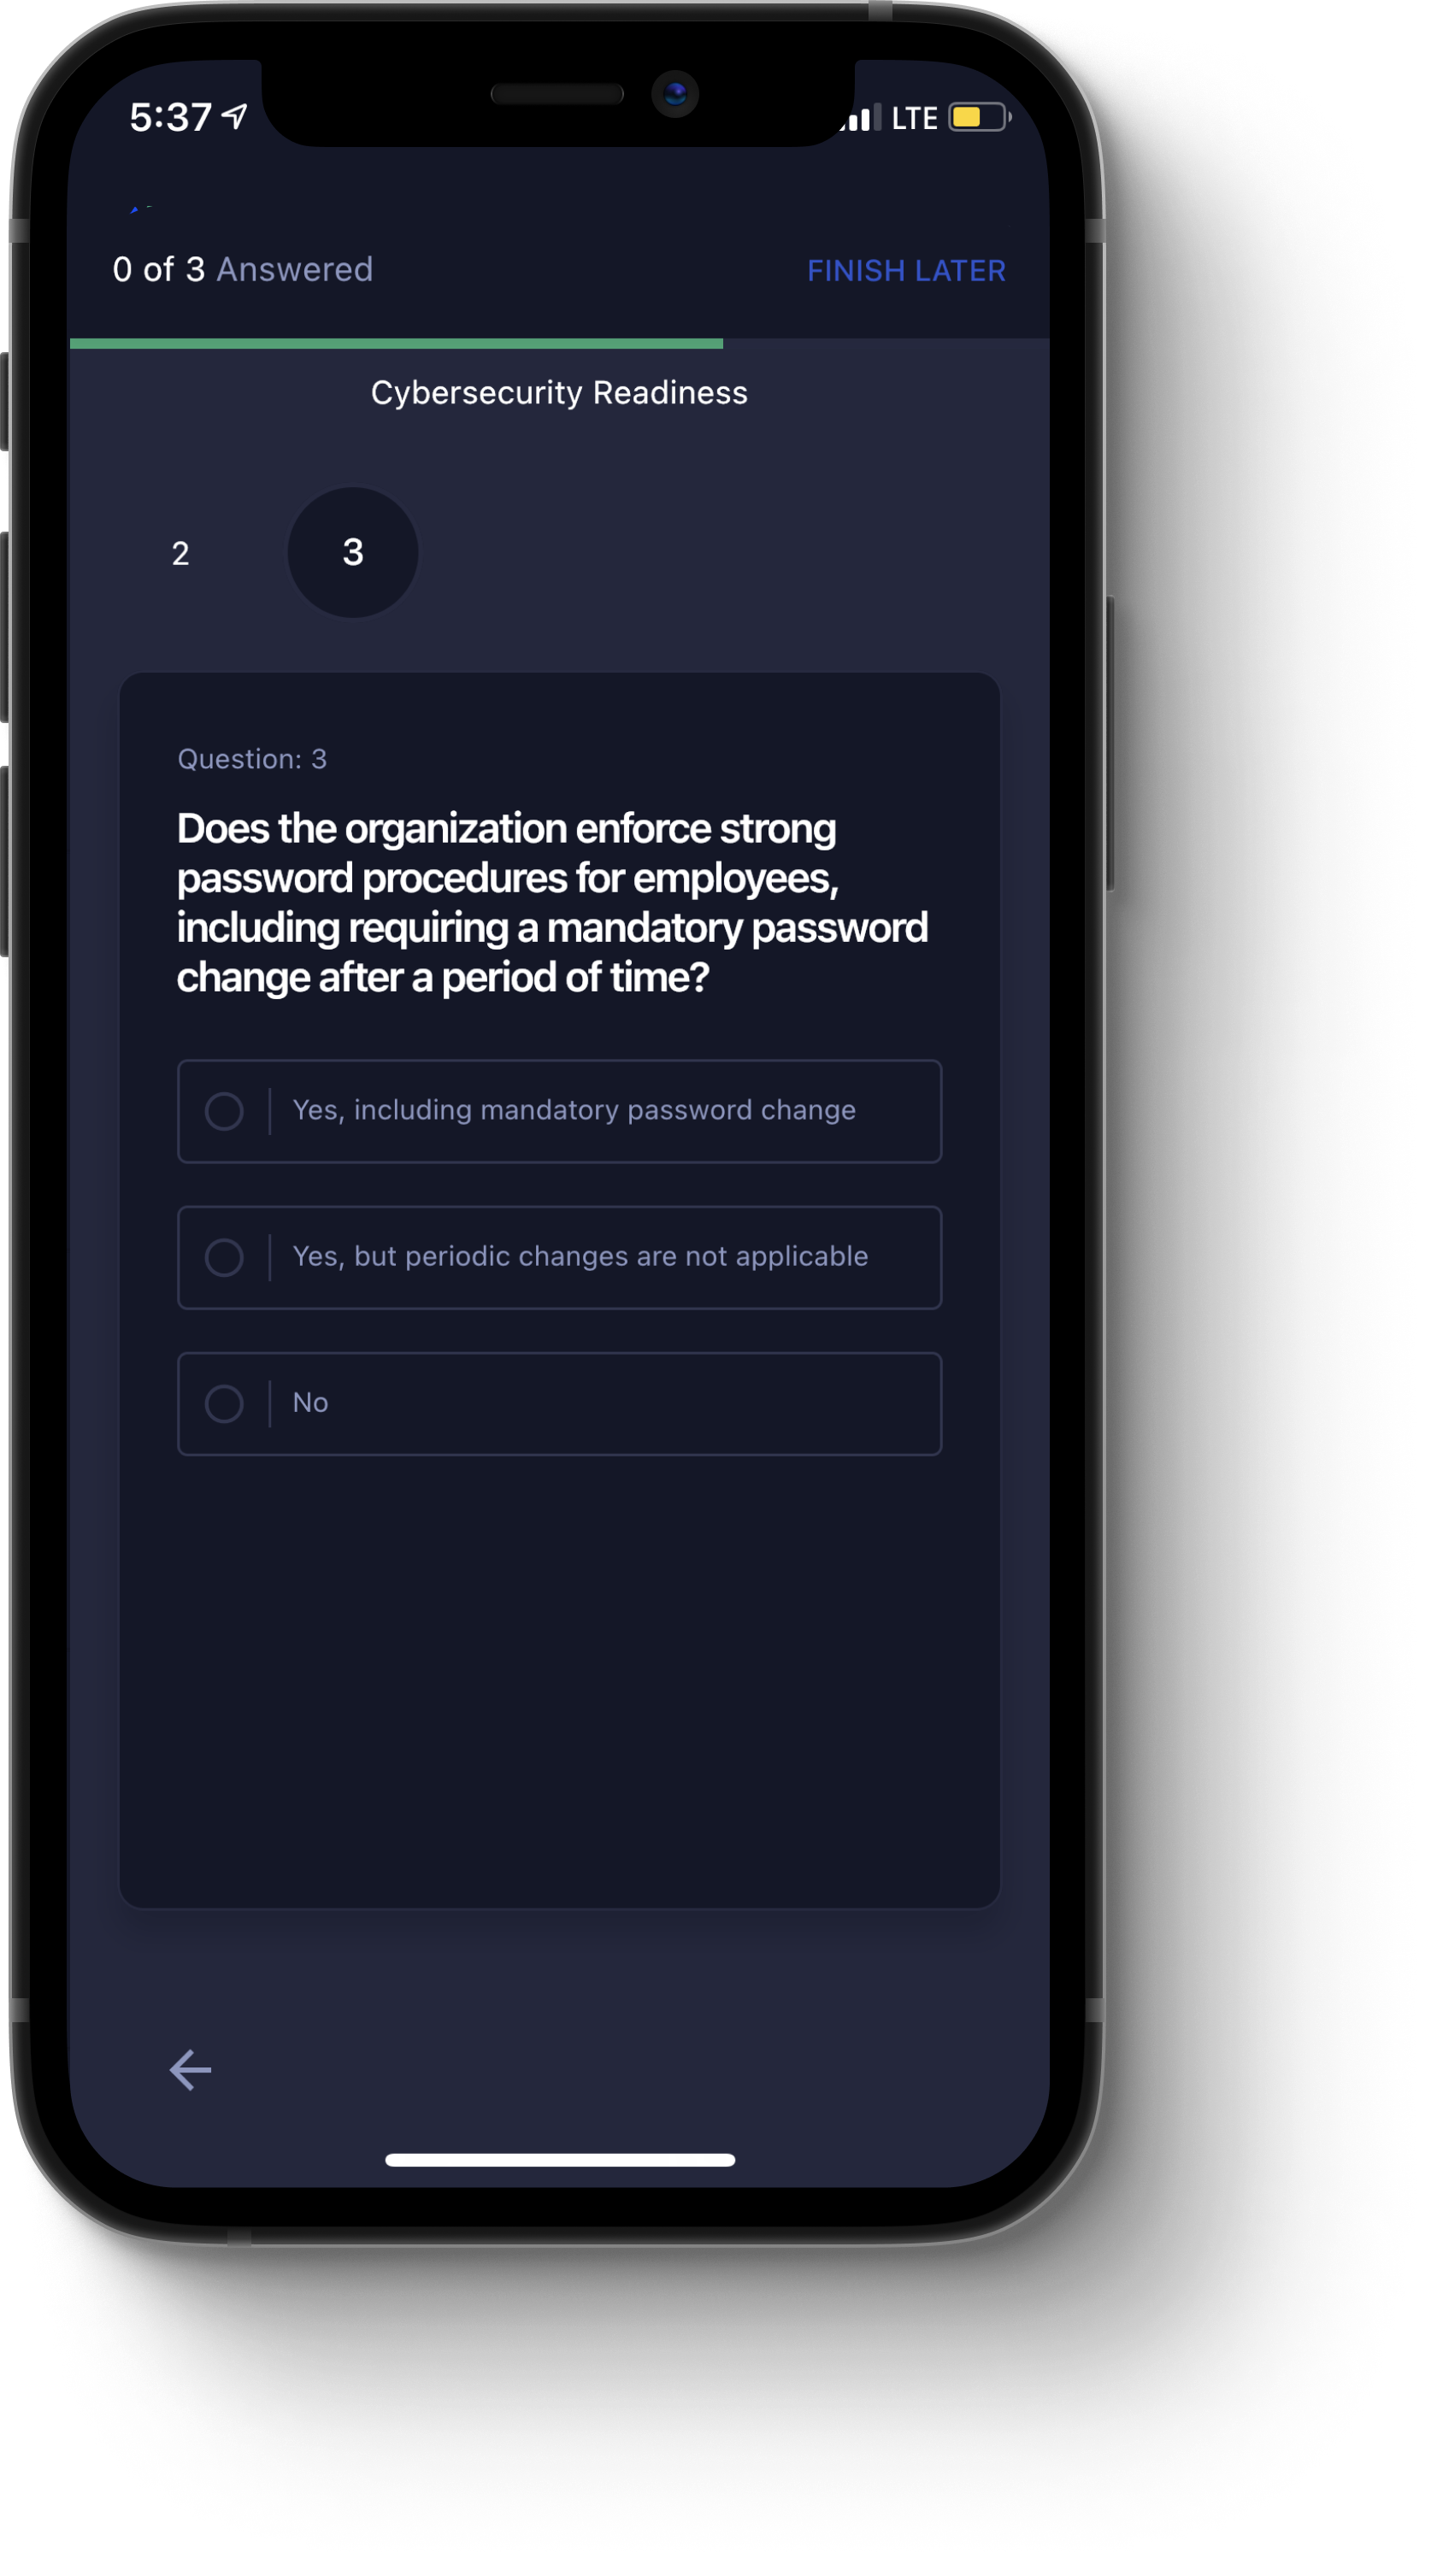
The Survey module contains the following components:
All Surveys. Tap this tab to view all surveys.
My Submissions. Tap this tab to view surveys you have submitted.
Plus icon (+). Tap this icon to open the Request Survey dialog box, where you can request a survey to be published. Enter the question, as well as the options for response. When you are finished, tap Request Survey.
Filter icon. Tap this icon to open the Filter dialog box, where you can filter for surveys by the following parameters:
Survey Type. Options include New, Completed, or Skipped.
Survey Status. Options include Open or Closed.
Once you have specified your filter parameters, tap the Show Result button to apply the filters.
Threat Levels
From the Home menu, tap the Threat Levels icon to open the Threat Levels module, as shown in the following image.
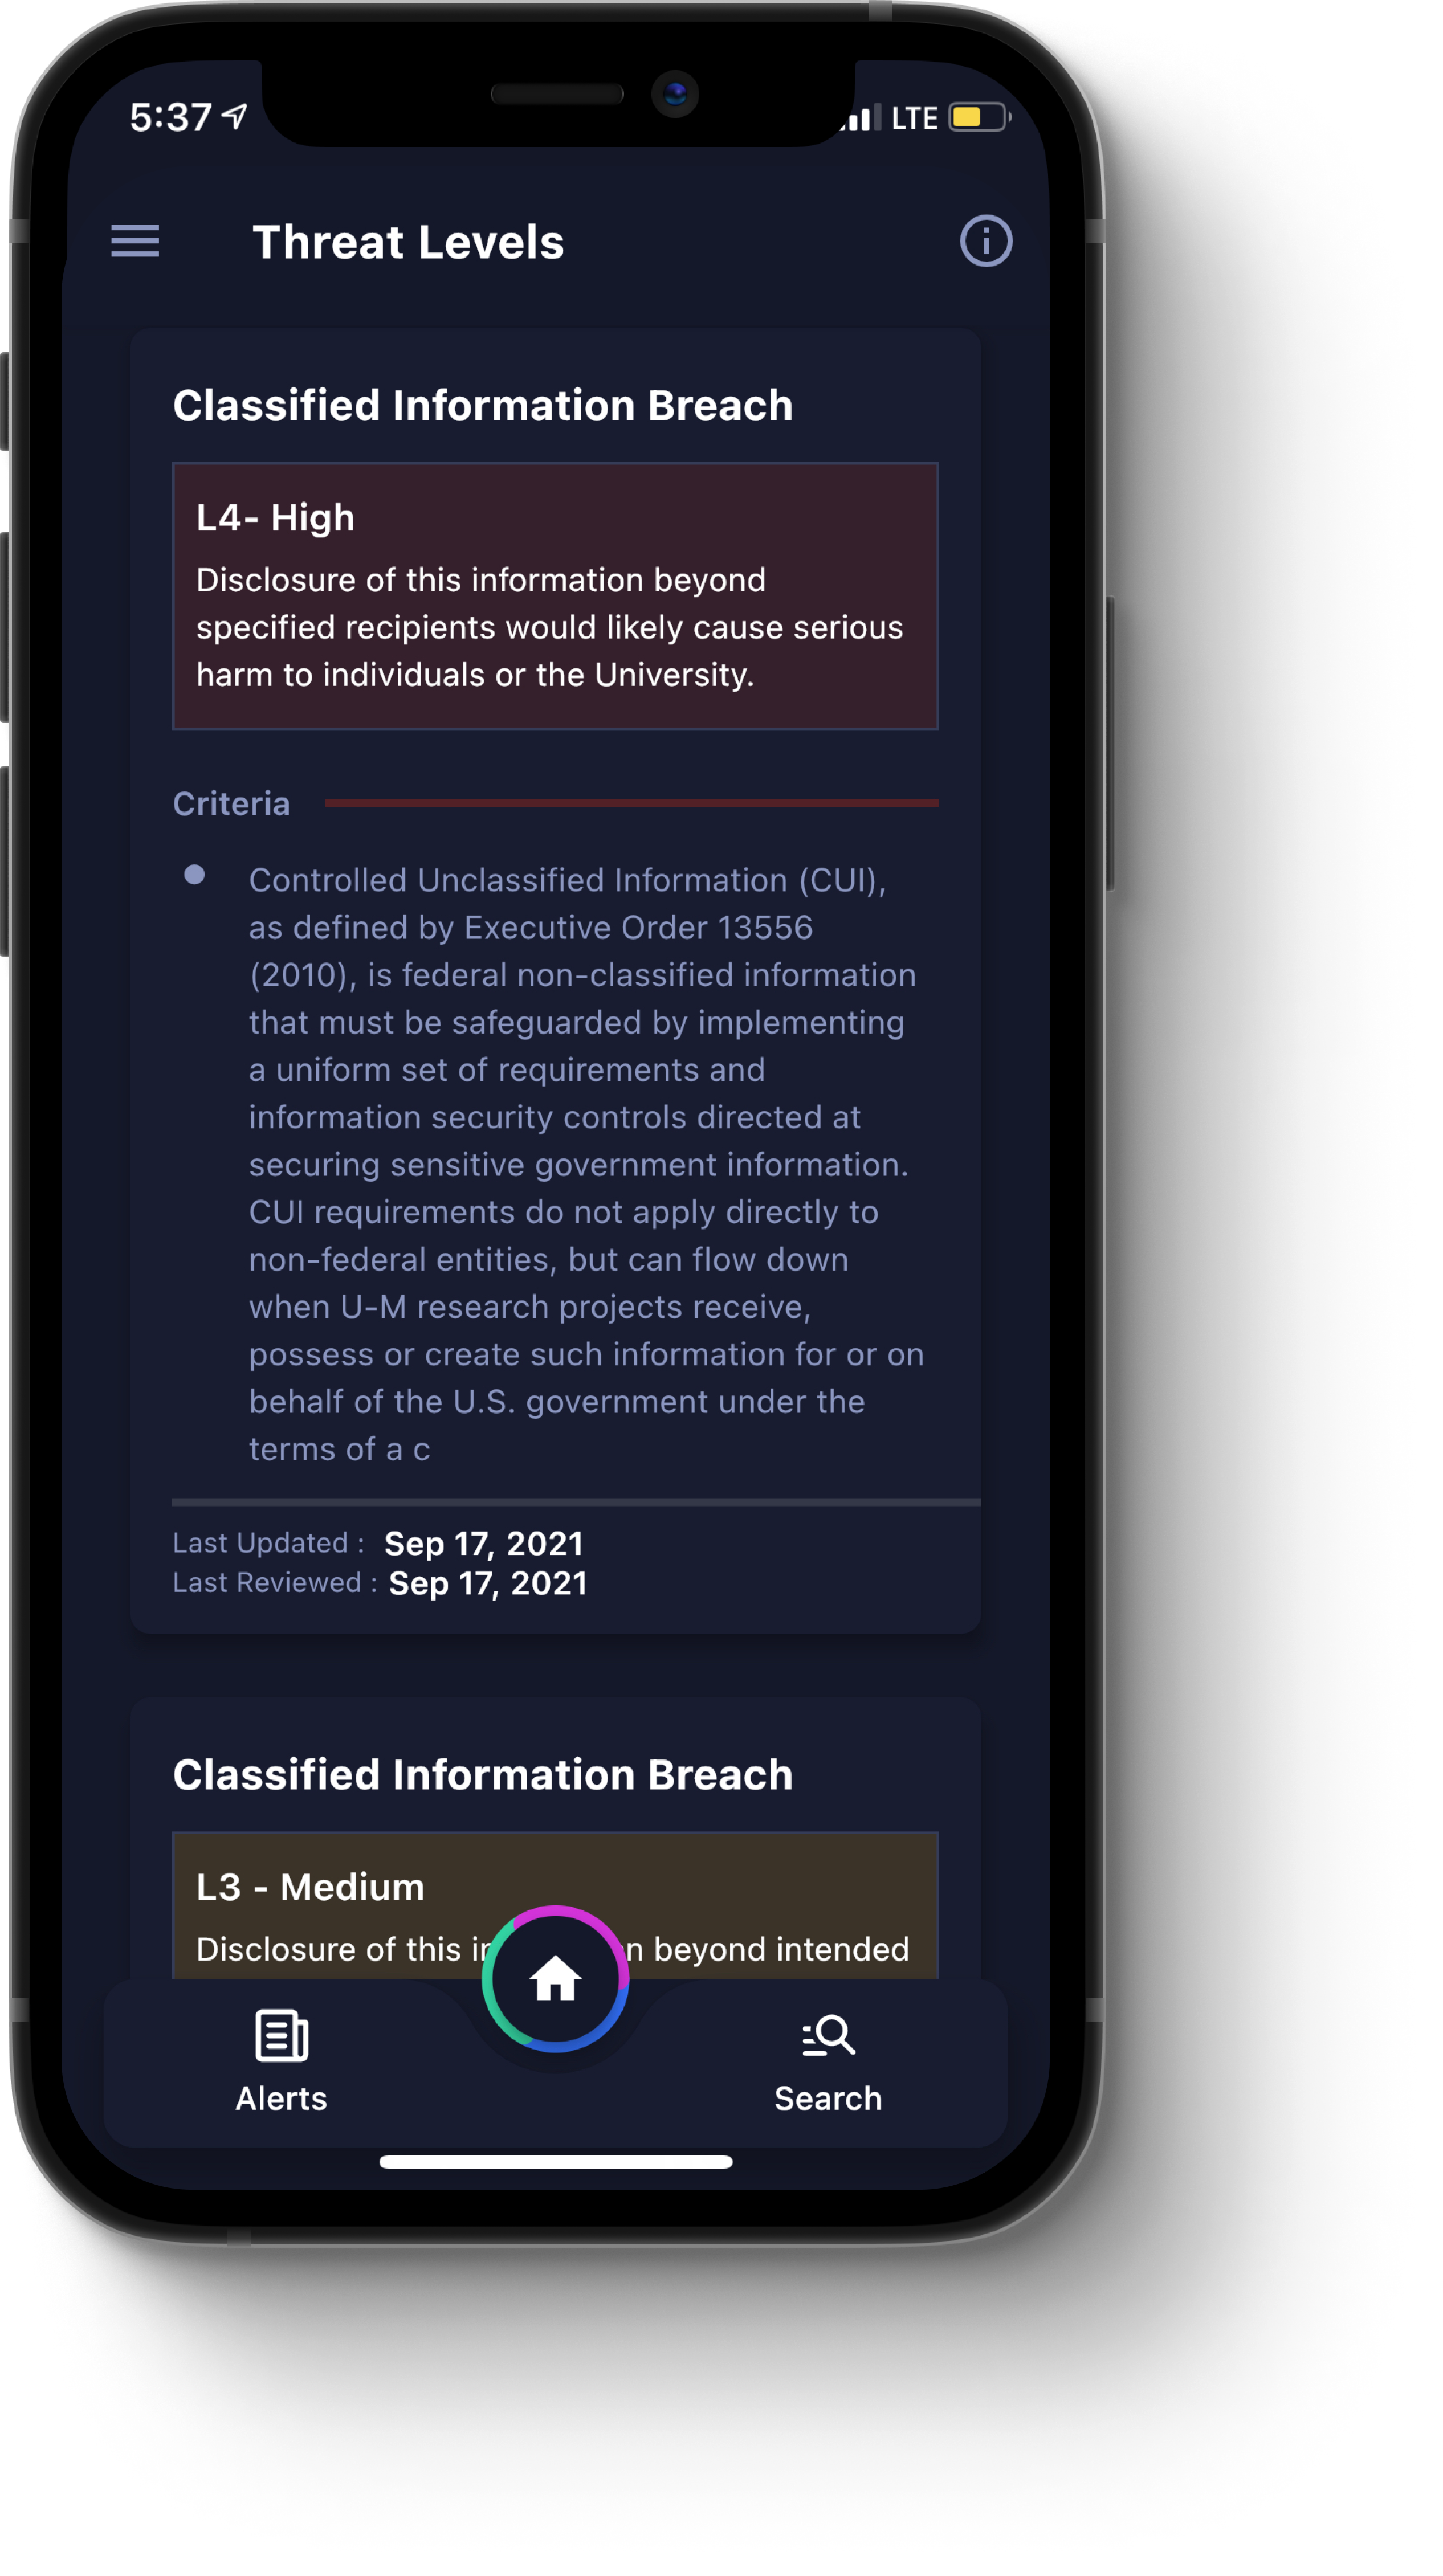
In this module, you can view the current level of malicious cyber activity or events in a way that reflects the potential and/or actual damage to your organization.
Each entry contains a date when it was last updated, as well as a date when it was last reviewed.