Key Features
Learn about the key features of such as alerts, Threat Defender Library, RSS Feeds, and more.
Alerts
helps you share real-time situational awareness alerts on the latest incidents, breaches, malware, and vulnerabilities to members over email, web, and mobile platforms.
As an analyst, you can:
Create alerts with a title, summary, Traffic Light Protocol (TLP), category, and recipients.
Add required and additional information to the alert like images, campaigns, attachments, and other details. For attachments, you can select files from your computer, or the Doc Library.
Add threat indicators necessary to identify elements in the alert.
Enable members to respond to organization-specific threats by attaching Threat Defender Library (TDL) content.
Recommend actions to members based on threat insights shared in the alert.
Attach threat assessments for members impacted by a cyber threat.
Create Alerts
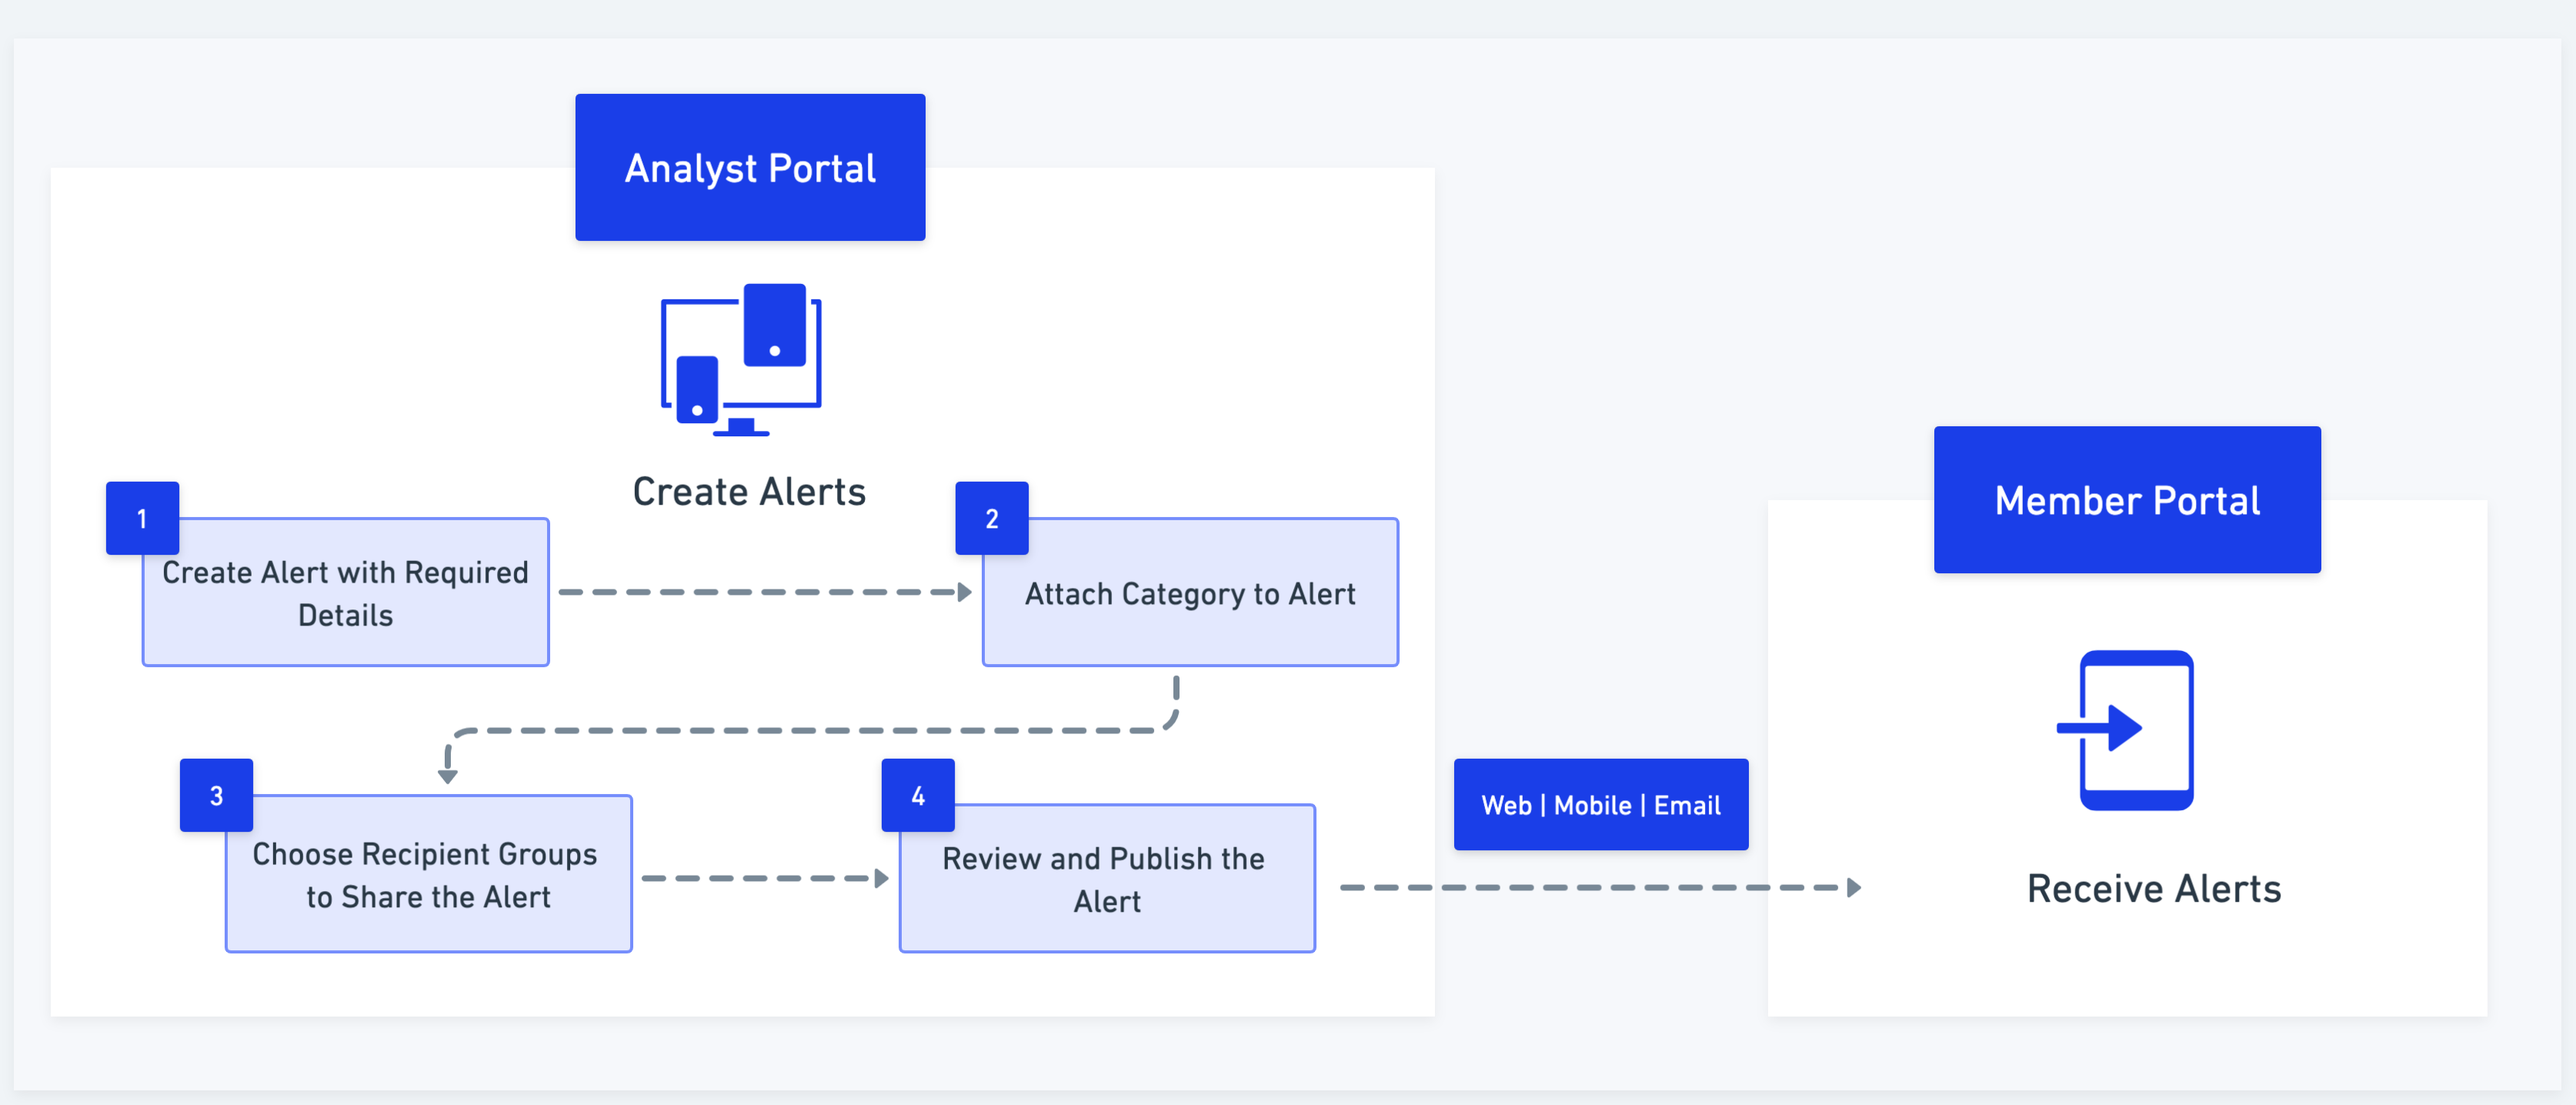
Collaborate (CSAP) helps you create real-time situational awareness alerts, and share them with members. The following image shows the alert creation process:
Note
Alerts published in Collaborate remain active indefinitely until they are manually marked as expired by analysts
As an analyst, you can create alerts in the following ways:
Create New Alert
Create alerts with basic information such as title, summary, TLP, and category and share it with selected recipients. You can create an alert with mandatory fields or create an alert with additional details and attachments, based on your preference. To configure the fields in alert creation, see Field Management Settings. The following image shows you how to create a basic alert with mandatory information:
Before you Start
You must have View and Create permissions in the Alerts.
Configure recipient groups. To configure, see Recipient Group .
Configure categories. To configure, see Categories.
Steps
To create an alert with basic details, do the following:
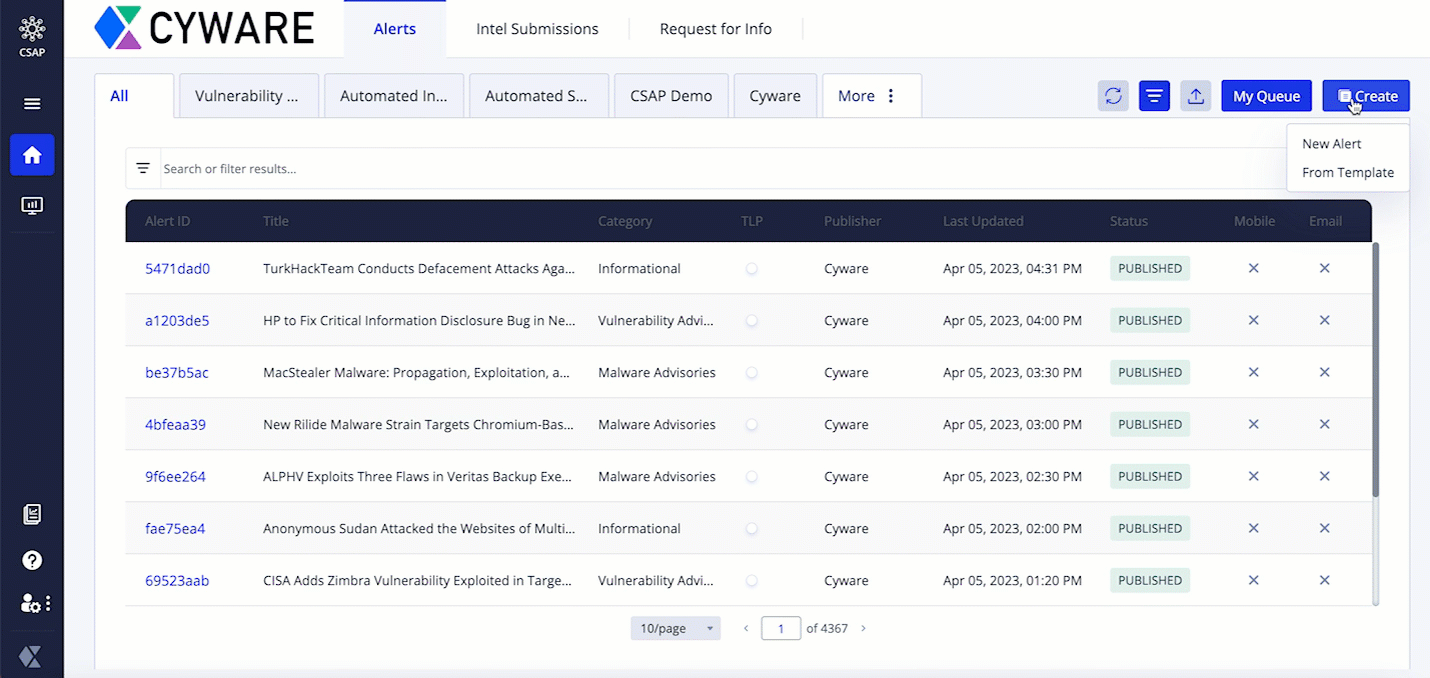
Sign in to the Analyst Portal, and click Home > Alerts.
Click Create and select New Alert. The alert creation form consists of the following sections:
Required: Add the alert title, summary, category, and TLP, which are mandatory fields for creating alerts. To know more about this, see Add Required Information to the Alert.
Additional: Add additional information to the alert such as references and linked alerts. The category you choose in the Required section affects the fields in this section. To know more about this, see Add Additional Information to the Alert.
Indicators: Add indicators to the alert. To know more about this see, Add Indicators to the Alert.
Recipients: Add recipients of the alert. This is a mandatory field during alert creation. To know more about this, see Add Recipients to the Alert.
Attachments: Upload media attachments or add media from Doc Library. To know more about this, Add Attachments to the Alert.
Threat assessment: Add a threat assessment to the alert to send alert-specific assessments to the members. This is an optional section. To know more about this, see Add Threat Assessment.
Recommended actions: Recommend actions to members based on the alert. This is an optional section. To know more about this, see Recommend Actions to Members.
Threat Defender: Add content from the Threat Defender Library. To know more about this, see Attach TDL Content.
Finish: Finish alert creation by configuring publishing preferences. To know more about this, see Finish Alert Creation.
Note
At any point, you can save the alert as a draft by clicking Save as Draft. You can access the drafted alert on the alert details page in Alerts. Drafted alerts have the status DRAFTED.
After publishing alerts, you can update, export, print, and perform other actions on published alerts. To know more about this, see Manage Alerts.
Create Alert From Template
Use pre-configured alert templates to quickly create alerts without having to enter repetitive data for similar alerts.
Before you Start
You must have View and Create permissions in the Alerts module.
Configure alert templates. To configure, see Create Alert Templates.
Configure recipient groups. To configure, see Recipient Group .
Configure categories. To configure, see Categories.
Steps
To create alerts from templates, do the following:
Sign in to the Analyst Portal, and click Home > Alerts.
Click Create and select From Template.
Select a template from the list and add details to the alert. Use the information in Create New Alert to add details to the alert apart from the template.
Fill up the required alert details and publish the alert.
Add Required Information to the Alert
Add required information such as alert title, alert summary, category, campaign, alert TLP, and alert image in the Required section of the alert creation form. By default, alert title, summary, category, TLP, and recipient groups are mandatory fields in alert creation. To configure fields in the alert creation form, see Field Management Settings.
Before you Start
Configure recipient groups. Only admin and root admin roles can create and update recipient groups. For more information, see Recipient Group .
Configure categories. Only admin and root admin roles can create and update categories. For more information, see Categories.
Steps
To add required information while creating alerts, follow these steps:
In the alert creation form, click Required.
Enter the required information for the alert. Use the following information while adding details:
Title: Enter an alert title within 150 characters. Members can search for alerts based on keywords present in the alert title. An example of an alert title is, ImBetter: New Information Stealer Spotted Targeting Cryptocurrency Users.
Summary: Enter a text summary for the alert which describes what the alert is about. Members can search for alerts based on keywords present in the alert summary.
If you add IOCs in the summary, click Defang to add text to the IOCs so that it is not potentially malicious or harmful when members unintentionally click them in the shared alert. For example, IP address 192.158.1.38 becomes 192[.]158[.]1[.]38 after it is defanged. If you do not want to defang the IOC, click Fang. By default, IOCs are fanged.
Category: Select a category for the alert. The category gives information about the type of alert, for example, Vulnerability Advisories, Educational, RSS Alerts, Malware Advisories, and other categories. Admins and root admins can create and update all categories. For more information, see Categories.
Traffic Light Protocol (TLP): Select a TLP for the alert. TLP ensures that the alert information is shared with corresponding recipients. The default TLP value is based on what is configured in Configure Alerts Settings.
Note
The selection of the TLP corresponds with the TLP hierarchy of the recipient groups for the alert. For more information, see Add Recipients to the Alert.
Campaign (optional): Select an associated campaign for the alert. This field shows only active campaigns. For more information, see Create Campaigns.
Add an Alert Image (optional): Upload an image for the alert. You can upload an alert image with a maximum size of 1.5 MB. To use the default image, select Use Default Image. This field is displayed based on the configuration in Configure Alerts Settings.
Note
The recommended dimension for images is 750*250 px in a 3:1 aspect ratio. The accepted image size is greater than 3 KB and less than 2 MB.
After adding the required information, click Next. The next step is to add additional information to the alert. For more information, see Add Additional Information to the Alert.
Add Additional Information to the Alert
Analysts can add additional information such as references, recommendations, CVE IDs, threat actor details, severity, and any information that adds significance to the alert. The fields shown in this section are based on the category selected for the alert when you add the required details. Administrators can map additional fields to categories from Settings. See Create Custom Alert Categories.
Steps
To add additional information to the alert, do the following:
In the alert creation form, click Additional.
Add additional information to the alert. Use the following information while adding additional details:
Additional Info: Enter additional information related to the alert. Since the alert summary has a character limit of 150 characters, use Additional Info to add more information to the alert. You can de-fang and parse any reference URLs included in your additional information, and list them in their respective Reference fields.
If you add IOCs as additional information, click Defang to add text to the IOCs so that it is not potentially malicious or harmful when members unintentionally click them in the shared alert. For example, IP address 192.158.1.38 becomes 192[.]158[.]1[.]38 after it is defanged. If you do not want to defang the IOC, click Fang. By default, IOCs are fanged.
Linked Alerts: Add published alerts to the alert as additional information. Type your query and select the applicable alerts. Linked alerts appear as metadata, classified by the alert ID. Members can access linked alerts from the alert content.
References: Enter any reference links that can provide more information about the alert. You can add multiple reference links to an alert. Use Visible to Members to show or hide references to alert recipients.
After adding the additional information, click Next. The next step is to add indicators to the alert. To know more about this, see Add Indicators to the Alert.
Add Indicators to the Alert
Analysts can add threat indicators such as URLs, IPs, domains, hashes, and emails to provide context to the alert. This helps members to respond to existing or potential cyber threats. The Indicators section is mapped to the category selected for the alert. Administrators can map the Threat Indicators text box to categories from Settings. See Create Custom Alert Categories.
Note
Use the following section to manually add indicators to the alert. However, if you have a file containing indicators, attach the file in the Attachments section. To know more about this, see Add Attachments to the Alert. After the indicators are extracted, it is visible in the Indicators section.
Before you Start
Add required information such as alert title, summary, TLP, and category.
Steps
To add indicators while creating alerts, follow these steps:
In the alert creation form, click Indicators.
Add indicators to the alert. Use the following information while adding indicators:
Threat Indicators: Add IOCs in the threat indicators field. Enter IP addresses, URLs, hashes, and other IOCs. Click Visible to Members to show indicators to members.
Click Defang to add text to an IOC so that it is not potentially malicious or harmful when members unintentionally click it in the shared alert. To ensure proper defanging, ensure that you clear formatting if you are pasting URLs. For example, IP address 192.158.1.38 becomes 192[.]158[.]1[.]38 after it is defanged. Similarly, https://example.com becomes hXXps[:]//example[.]com after it is defanged.
If you do not want to defang the IOC, click Fang. By default, IOCs are fanged.
Parse Indicators: Click Parse Indicators to parse the indicators and check if they are on the allowed or blocked list on the Analyst and Member Portal. By default, any indicator that is not added will be placed on the blocked list. After parsing, you can view the total count of successfully parsed indicators in the Parsed Indicators section.
In , the indicators that are supported for parsing from Threat Indicators section are IPv6, IPv4, IPv4 CIDR, email ID, domain, URL, CVE, MD5, SHA1, SHA256, SHA224, SHA384, SHA512, ssdeep, file path, windows registry key, autonomous system, directory, and MAC address.
Note
While creating alerts from member intel submissions, you can parse IOCs extracted from attachments in the Indicators section. For more information, see Add Attachments to the Alert.
Attach Blocked IOCs: Attach blocked IOCs as CSV, XML, and JSON attachments to the alert. Members can download the blocked indicators as files to their computers from the alert.
Additional Indicators: Add email descriptions and email subjects as IOCs in this field. From the dropdown, select your preference, enter the content, and click Add. After adding, you can view the total count of successfully added indicators in the Additionally Parsed Indicators section. By default, the email subjects and descriptions you add will be considered blocked indicators. You can enter up to 1000 characters for an email subject and up to 1500 characters for an email description.
Note
If you post the alert to , some indicator types, such as SHA-224, SHA-384, ssdeep, file path, Windows registry key, autonomous system, directory, and MAC addresses may not ingest correctly. Upgrading to v3.6.2.1 will ensure proper handling of these indicators.
Related Alerts for IOCs: View alerts related to the parsed IOCs. After parsing an IOC, click View Related Alerts to view all published alerts with the same parsed IOC.
After adding indicators, the next step is to add recipients to the alert. To know more about this, see Add Recipients to the Alert.
Add Recipients to the Alert
Recipients are users who receive alerts created by analysts. Adding recipients is a mandatory step during alert creation. As a CSAP administrator, you can categorize members into different recipient groups for targeted sharing of alerts. For example, if there is a malware threat that is relevant to the finance team in your organization, you can configure the finance team as a recipient group and send an alert to them. A member can be associated with multiple recipient groups.
Before you Start
Configure recipient groups. To configure, see Recipient Group .
Steps
To add recipients to alerts, follow these steps:
In the alert creation form, click Recipients.
Note
Send alerts to recipient groups, individual recipients, or both, based on your preference.
Add the alert recipients. Analysts can send an alert to multiple recipient groups at the same time. To add recipients to the alert, use one of the following methods:
By Group set: Select a group set to add the associated recipient groups. Group sets allow the association of multiple recipient groups as a collection. To create a group set, see Create Groupsets for Recipient Groups.
By Traffic Light Protocol (TLP): Select a TLP value to add the associated recipient groups. Recipient groups in CSAP are associated with a TLP classification to ensure that the alert information is rightly shared with the intended recipients.
Note
Based on the TLP you select in the Required section (Add Required Information to the Alert), you can choose the corresponding TLP for the recipient groups. For example, if you choose TLP WHITE in the Required section, you can share the alert with RED, AMBER, GREEN and WHITE recipient groups. However, if you choose TLP RED in the Required section, you can only share the alert with RED recipient groups.
By Group Type: Select a type to add the associated recipient groups. There are three types of recipient groups namely Public Groups, Invite-only Groups, System Groups, and Org-based Groups. See Recipient Group .
If you want to send alerts to individual recipients, add individual users by their email addresses in the Select Individual Recipients.
Filter recipients based on location and organization from the added recipient groups. You can filter recipients, only if you choose a recipient group or individual recipients. Use the following information to filter recipients:
Locations: Select a country or region to send the alert to members operating from the specific geographic location. Configure member locations in Member Settings.
Organizations: Select an organization or organization type to send the alert to members operating from the specific organization or sector. Configure member organizations in Member Settings.
Configure preferences to send push notifications for the alert, and initiate notifications for mobile and email alerts. You can configure push notifications, only if you choose a recipient group or individual recipients.
Select Send Push Notifications to initiate mobile and email notifications for the alert. You can also select the notification type (Mobile and Email) for specific recipient groups and individual recipients added to the alert.
Select Don't send Notification to publish the alert without sending any notification to the recipients. This blocks all notifications for the alert, regardless of other notification configurations. For example, channel-specific push notifications enabled by members get disabled for the alert.
After adding recipients, the next step is to add attachments to the alert. To know more about this, see Add Attachments to the Alert.
Add Attachments to the Alert
Add attachments to enhance alert information and add credibility to the alert. Analysts can add attachments from the Doc Library or upload files from their computer to the alert. You can attach up to 20 files to an alert.
Before you Start
Select the TLP for the alert.
Add recipient groups to the alert.
Steps
To add attachments while creating alerts, follow these steps:
In the alert creation form, click Attachments.
Add attachments to the alert by selecting files from the Doc Library, or uploading files from your computer to the Doc Library.
Select Files from Computer: Click Upload to upload files from your computer. You can attach up to 20 files simultaneously. The file name can only have alphanumeric characters and () { } [ ] - _ +. The maximum file size is 100 MB. Some of the supported formats are .pdf, .txt, .doc, and other formats. To learn more about all supported formats, hover over the information icon.
You can modify the file name, provide a description, and add tags to the file while adding it to the Doc Library. The uploaded file is added to the Doc Library. By default, the file is saved in the root directory of the Doc Library. You can change this path and save the file by clicking Change Upload Path.
Doc Library: Click Browse to attach files directly from the Doc Library. You can sort the files in the Doc Library by their last updated date. To know more about this, see Upload Files to the Doc Library.
Select the checkbox for Send as Email Attachments to share the attachments with recipients in the email alert.
Note
If member intel submissions contain attachments, analysts can automatically extract IOCs from the attachments using Extract Indicators. The extracted IOCs are added to the Indicators section, where analysts can verify, and parse them as allowed and blocked indicators. The supported indicator types include SHA256, domain, SHA1, URL, IP address, email, MD5, IPv4, IPv6, and CIDR.
After adding attachments, the next step is to attach Intelligence Requirements (IRs). To know more about this, see Attach Intelligence Requirements.
Attach Intelligence Requirements
Notice
This feature is available in Collaborate (CSAP) v3.7.4 onwards.
Intelligence Requirements (IRs) are information requests for a specified period that help you gain insight over a period of time. While creating the alert, you can attach relevant IRs to enrich the information in the alert. For more information, see Intelligence Requirements.
Note
After the alert is published, you can view all the matched IRs in the alert details. You can also modify (add or remove) IRs attached to an alert directly from the alert details page in Matched IRs.
Steps
In the alert creation form, click Intelligence Requirements.
Click Attach IRs. You can browse all the published IRs, and select the IRs you want to attach with the alert.
After attaching IRs, the next step is to add threat assessments to the alert. To know more about this, see Add Threat Assessment.
Add Threat Assessment
Use threat assessments to get a pulse of how many members were impacted by a vulnerability, malware, or threat activity. Add threat assessment questions with response options along with an alert and publish them to members. You can also use pre-configured templates for threat assessments to save time. Based on the response provided by alert recipients, analysts can extract a consolidated report to assess the sector-wide impact. Threat assessment questions appear on top of the alert content in the CSAP Member Portal. You can include service-level agreements (SLAs) for threat assessments to send automatic reminders to members at specified intervals to respond to the assessment.
Before you Start
Add recipients to the alert.
Configure required threat assessment settings such as templates and SLAs. To know more about this, see Threat Assessment.
Add Threat Assessments from Templates
You can select threat assessments from pre-configured templates and attach them to your alert. This saves you time from entering repetitive data. To create pre-configured threat assessment templates, see Threat Assessment.
Steps
To add threat assessment from a template, follow these steps:
In the alert creation form, click Threat Assessment.
Turn on the Would you like to add threat assessment to this Alert? toggle and use the following information:
Select the template for the threat assessment, in the Choose from pre-configured threat assessment templates dropdown.
Edit the template to your preference. You can either have single-select or text-based questions for the assessment.
Select recipients for the threat assessment. The list is displayed based on your recipient selection in Recipients.
To review the location and organization filters you applied when selecting recipients, expand Additional Filters.
Choose a preconfigured SLA using the drop-down list. SLAs allow you to send automatic reminders at specified time intervals to members for responding to threat assessments. See Threat Assessment SLA.
The next step is to recommend actions to members. To know more about this, see Recommend Actions to Members.
Create a Threat Assessment
To create a threat assessment for the alert, follow these steps:
In the alert creation form, click Threat Assessment.
Turn on the Would you like to add threat assessment to this Alert? toggle and use the following information:
Click Create New and select a threat assessment type and an appropriate title for the assessment.
Choose the type of assessment questions. You can either have single-select or text questions for the assessment.
Choose a time of expiry for the threat assessment. Members cannot respond to an expired threat assessment.
Select recipients for the threat assessment. The list is displayed based on your recipient selection in Recipients.
To review the location and organization filters you applied when selecting recipients, expand Additional Filters.
Choose a preconfigured SLA using the drop-down list. SLAs allow you to send automatic reminders at specified time intervals to members for responding to threat assessments. See Threat Assessment SLA.
The next step is to recommend actions to members. To know more about this, see Recommend Actions to Members.
Recommend Actions to Members
In an alert, actions are tasks assigned or recommended to members. This is based on the insights shared in the alert or as a course of normal security measures. As an analyst, you can recommend actions to members while creating alerts. For example, when there is a phishing threat, analysts can create an alert recommending actions to prevent the phishing attack, such as checking for suspicious links, and other actions.
Before you Start
Add recipients to the alert. For more information, see Add Recipients to the Alert.
Steps
To create actions for the alert, follow these steps:
In the alert creation form, click Recommended Actions.
Turn on the toggle Would you like to recommend actions for this alert? to recommend one or more actions to members and use the following information:
Enter a title and description for the action.
Select the recipient groups or individual recipients to whom you want to recommend the action. You must select at least one recipient for the action. The recipient list displayed is based on your selection in the Recipients section. You can select all the alert recipients using Select All Recipient Groups. The recipients can view actions assigned to them in Actions in the Member Portal.
To review the location and organization filters you applied when selecting recipients, expand Additional Filters.
Click Add Recommended Action to add more actions to the alert. You can add a maximum of five actions while creating an alert.
After recommending actions, the next step is to add from the Threat Defender Library. To know more about this, see Attach TDL Content.
Attach TDL Content
Threat Defender Library (TDL) stores information and files utilized in threat detection, threat hunting, and threat defense. The unique content stored in TDL adds value to existing threat hunting and threat detection workflows thereby helping members to proactively defend against organization-specific threats.
For example, if there is a ransomware threat that has an identified malicious code, you can attach a specific rule (YARA, SIEM, or other supported rules) that impacts that specific malicious code. This helps analysts detect or respond to the ransomware. In this case, members can use the attached content from TDL to defend against the ransomware threat. For more information about Threat Defender Library, see Threat Defender Library.
Before you Start
Add content to the Threat Defender Library so that it is available while creating alerts. For more information, see Create TDL Content.
Alternatively, you can attach already existing content from the Analyst or Member Repo of TDL.
Steps
To attach TDL content to alerts, follow these steps:
In the alert creation form, click Threat Defender Library to attach content from TDL.
Click Browse and select the required TDL content from the list. You can attach up to 20 TDL content to an alert.
After attaching content from TDL, click Next. The next step is to finish alert creation. To know more about this, see Finish Alert Creation.
Finish Alert Creation
Use the Finish section to configure preferences for publishing the alert.
Before you Start
Add required information such as title, description, TLP, and category.
Add recipients to the alert.
Note
Alert publishers may encounter a speed bump that requires verification through authentication, and a confirmation pop-up before publishing the alert. To configure the authentication method, see Speedbump.
Steps
To finish the alert creation, do the following:
In the alert creation form, click Finish. Except for Share alert with communities, all other sections are minimized. Click each section to add details to the alert. Use the following information to complete the alert creation:
Tag Groups (optional): Enter tag group names to view and select suggestions for tag groups. Tag groups are created in the Tag Library. For more information, see Create a Tag Group.
Tags (optional): Enter tag names to add tags to the alert. You can add existing tags or create new ones. For more information, see Add Tags to Alerts.
Share alert with communities (optional): Select the communities you want to share the alert with. For more information, see Share Alert with Communities.
Add a conference call dial-in to the alert (optional): Choose a conference call number from the directory, or include conference call URLs in the alert. For more information, see Add Conference Call to Alert .
Post the alert to other applications (optional): Choose other applications you want to share the alert with. You can post alerts to CTIX, MISP, and other applications. For more information, see Post Alert to Other Applications.
Note
If you post the alert to , some indicator types such as SHA-224, SHA-384, ssdeep, file path, Windows registry key, autonomous system, directory, and MAC addresses may not ingest correctly. Upgrading to v3.6.2.1 will ensure proper handling of these indicators.
Add special handling instructions in the email footer (optional): Turn on the toggle for the special handling instructions you want for the alert. For more information, see Add Special Handling Instructions.
Additional Options (optional): Choose when to schedule alert publishing, expiry, and other options. For more information, see Schedule Alerts and Configure Additional Options.
Publishers (optional): Select the publishers to who the alert is submitted for review. Publishers review alerts and publish them to the recipients. The list of publishers displayed depends on the category selected for the alert. Publishers can only review alerts based on the categories assigned to their role. After the alert is published, you can view the publisher names in Other Details of the alert.
After adding details, click Preview & Publish. The alert is published and sent to the recipients of your choice. If you only have creator permissions, you have to submit the alert to a publisher for review. Click Submit to Publisher. If you are a publisher, see Publish Alerts.
Add Tags to Alerts
Tags are text labels that you can assign to identify information in alerts. Analysts can use tag groups to quickly add a group of tags instead of applying multiple tags individually. For more information on tags, see Tag Library.
Note
Administrators can make the tags field mandatory and allow analysts to add tags to all alerts published from the Analyst Portal.
Before you Start
If you want to add tag groups to the alert, create tag groups in the Tags Library
Add required details to the alert such as alert title, description, TLP, and category.
Add recipients to the alert
Steps
To add tags to the alert, do the following:
In the alert creation form, click Finish. Use the following information while adding tags and tag groups:
Tag Group: If you want to add tag groups to the alert, click Tag Group. Start typing the tag group name and select the required tag group to associate it with the alert. For more details, see Create a Tag Group.
Based on the tag groups selected, the Tags field is auto-populated.
Tags: If you want to add tags to the alert, start typing the tag name in Tags. You can create new tags or choose the required tags from the suggested tags. automatically suggests you create a new tag if it does not exist. To refine your search, you can use the following filter options:
Starts With: Shows tags that begin with your input.
Exact Match: Shows tags that exactly match your input.
Contains: Shows tags that contain your input anywhere within the tag name.
Note
After publishing the alert, you can modify (add or remove) tags directly from the alert details page.
After adding details, click Preview & Publish to publish the alert. If you only have creator permissions, and do not have publisher permissions, click Submit to Publisher to submit the alert for review.
Share Alert with Communities
enables automated sharing of alerts between two different organizations that use , via secure API endpoints. Analysts can share alerts with communities of their choice. For example, when an alert is configured with RED TLP, the rule can automatically share the alert with an ISAC community.
Before you Start
Add required information such as alert title, summary, TLP, and category.
Add recipients to the alert.
Steps
To share the alert with communities, follow these steps:
In the alert creation form, click Finish.
Click Share this Alert with Communities.
Select the communities you want to share the alert with. The list of communities displayed is based on the communities configured in Community Sharing > Credential Management.
Note
When you switch tabs, your selected communities may reset if active sharing rules apply. For more information, see Alerts.
The next step is to add conference call details to the alert. For more information, see Add Conference Call to Alert .
After adding details, click Preview & Publish to publish the alert. If you only have creator permissions, and do not have publisher permissions, click Submit to Publisher to submit the alert for review.
Add Conference Call to Alert
Analysts can include conference call URLs in the alert. Connect using online conferencing applications such as Zoom, Google Meet, and Microsoft Teams. Members can view the conference call information in the alert. To configure numbers in the conference call directory, see Add Conference Call.
Before you Start
Add required information such as alert title, summary, TLP and category.
Add recipients to the alert.
Steps
To add conference call dial-in to the alert, do the following.
In the alert creation form, click Finish.
Click Add a Conference Dial-in Button to this Alert.
Select one of the two options:
Select from Conference Call Directory: Select a conference directory from the dropdown. Add conference URL, number and conference call date and time. The conference number must be in the format {Dial-in Number}, {PIN}#.
Enter a new Conference Calling Number/URL: Add new conference call dial-in details (URL, number, date and time).
The next step is to select other applications to post the alert. For more information, see Post Alert to Other Applications.
After adding details, click Preview & Publish to publish the alert. If you only have creator permissions, and do not have publisher permissions, click Submit to Publisher to submit the alert for review.
Post Alert to Other Applications
You can post an alert you create in the CSAP Analyst Portal to CTIX, MISP, Flexera and other supported applications.
Before you Start
Make sure you have integrated the supported applications with CSAP. To know more about integrations, see Manage Integrations.
Steps
To post the alert to other applications, do the following:
In the alert creation form, click Finish.
Click Post the alert to other applications.
Select the checkbox for the applications you want to post the alert to.
The next step is to add special handling instructions. To know more about this, see Add Special Handling Instructions.
After adding details, click Preview & Publish to publish the alert. If you only have creator permissions, and do not have publisher permissions, click Submit to Publisher to submit the alert for review.
Add Special Handling Instructions
Analysts can attach special handling flags to alerts to share priority alerts with members allowing them to stand out from regular alerts. For example, you can create a special handling flag named Top Secret to share alerts containing confidential information with the member. Recipients of the alert can view special handling instructions on the footer section of the email alert.
Before you Start
Configure special handling instructions. See Special Handlings.
Add required details such as alert title, description, TLP, and category.
Add recipients to the alert.
Steps
To add special handling instructions to the alert, do the following:
In the alert creation form, click Finish.
Navigate to Add special handling instructions in the email footer section.
Turn on the toggle for the special handling instructions you want for the alert. Examples of special handling instructions include Financial, Top Secret, Disclaimer and other instructions.
The next step is to schedule alert publishing and other additional options. For more information, see Schedule Alerts and Configure Additional Options.
After adding details, click Preview & Publish to publish the alert. If you only have creator permissions, and do not have publisher permissions, click Submit to Publisher to submit the alert for review.
Schedule Alerts and Configure Additional Options
Analysts can schedule an alert to be published at a specific time and date. You can also schedule alert expiry, repetition, export and other details. Use the following sections to know more about all the alert scheduling options in Finish > Additional Options in the alert creation form.
Before you Start
Add required details to the alert such as alert title, description, TLP, and category.
Add recipients to the alert.
Steps
To schedule an alert for publishing, do the following:
In the alert creation form, click Finish.
Select Additional Options. Use the following information while configuring additional options:
Schedule this alert to be published on a specific date/time: Select the checkbox to set a date and time for publishing the alert
Self-Destruct this alert from user's devices and from the server: Select the checkbox to self-destruct an alert after a specific time. You cannot select this checkbox if you have selected the checkbox to expire the alert. This will remove the alert from CSAP Member Portal and Cyware Enterprise mobile app. For example, if the alert information is going to be redundant after a time period, you can choose to self-destruct the alert.
In the Analyst Portal, the alerts display page shows the alert with the title Self Destructed. You can no longer view alert details such as summary, category and other alert details. However, you can still view details like the date and time of self-destruction.
Schedule this alert to be expired on a specific date/time: Select the checkbox to expire the alert after a specific time. You cannot select this checkbox if you have previously selected the checkbox to self-destruct the alert. After an alert is expired, it cannot be edited or published. Analysts can view it as an expired alert, but the alert is deleted in the Member Portal. Unlike a Self Destructed alert, you can still see all details of an expired alert such as summary, category and other details in the Analyst Portal. To know more about expired alerts, see Expire Alerts.
Repeat this alert multiple times: Select the checkbox to repeat the alert between specified intervals. You cannot select this checkbox if you have previously selected the checkbox to self-destruct the alert.
Allow Recipients to Export This Alert: Select the checkbox to allow members to export this alert for offline analysis.
Allow Export as PDF: Select the checkbox to export the alert as a PDF for offline analysis.
Send Email to Publisher: Select the checkbox to send an email of the published alert to the publisher. By default, this option is mapped to TLP Controls > Send Email to Publisher in Alert Settings. To configure this setting in TLP Controls, see Alert Settings.
Note
In TLP Controls, for each TLP, the administrator can choose if an email notification is sent to publishers. Your selection in the Finish section overrides the selection defined in TLP Controls.
After adding details, click Publish. After an alert is scheduled for publishing, analysts can change the publish time by clicking the alert on the Alerts page. This allows publishers to change the schedule of the alert if the intel shared in the alert needs to be communicated at a different time.
Create Crisis Alerts
CSAP helps analysts create crisis alerts when there is a critical security incident such as a data breach, malware infection, ransomware attack or other incidents. Crisis alerts enable real-time communication with members and help you gauge the impact of the incident.
For example, if there is a data breach or ransomware attack in your organization, create a crisis alert to immediately mitigate the impact of the breach. Analysts can also track responses to the crisis communication sent to members.
Note
Crisis notification alerts are sent immediately and cannot be scheduled. The alert scheduling options are disabled for crisis alerts.
You can create crisis alerts in two ways:
From Alerts: You can create a crisis alert when you select Crisis Notification as the category in the alert creation form. Use the steps in the following section to know more about creating crisis alerts from Alerts.
From Crisis Management: You can also create a crisis alert by navigating to Crisis Management in the Analyst Portal. When you create an alert this way, the category is automatically set to Crisis Notification. For more information, see Create Crisis Alerts from Crisis Management.
Before you Start
You must have View and Create permissions in the Alerts.
Configure recipient groups. To configure, see Recipient Group .
Steps
To create a crisis alert from Alerts, do the following:
In the Analyst Portal, click Home > Alerts.
Click Create and select New Alert.
In the Required section, enter the mandatory details (title, summary, TLP, category). Make sure to select Crisis Notification as the category.
Note
Crisis Notification is available as a system category in the Analyst Portal. For information about system categories, see View System Alert Categories.
In the Recipients section, select the recipients for the crisis alert. After selecting the recipients, you can configure preferences to send push notifications for the alert on mobile, email, SMS, and voice (phone) calls.
If you select SMS Alert while configuring push notifications, you have the option to send an additional SMS alert which is sent in addition to the default crisis SMS. In the default crisis SMS, the member receives the alert title and a link to confirm their acknowledgment of the crisis alert. In the additional SMS alert, you can enter a custom message which helps you give more insight into the crisis.
Fill in the other required details for the crisis alert. For more information about adding details to alerts, see Create Alerts.
Click Preview & Publish to send crisis notifications to the recipients. Crisis notifications are sent in the form of email notifications, Member Portal notifications, voice calls, or SMS alerts. Analysts cannot disable these notifications for crisis alerts. Based on your configuration, a crisis alert is received as an email notification, Member Portal notification, voice call, or SMS alert.
Create Crisis Alerts from Crisis Management
You can also create a crisis alert by navigating to Crisis Management in the Analyst Portal. For more information about crisis management, see Crisis Management.
Before you Start
You must have the View, Create, and Update crisis management permissions in Crisis Management.
Configure recipient groups. To configure, see Recipient Group .
Steps
To create a crisis alert from Crisis Management, do the following:
Sign in to the Analyst Portal.
From the side bar, click Crisis Management. You can create a crisis alert in one of the following ways:
Click Create From Templates to create an alert from an existing template. If you are creating a crisis alert from an existing template, then the title, description, category, and TLP are filled automatically. See Crisis Management Settings.
Click Create New to create a crisis alert. Verify that Crisis Notification is selected as the Category for this alert.
Fill in the other required details for the crisis alert. For more information about adding details to alerts, see Create Alerts.
Click Preview & Publish to send crisis notifications to the recipients. Crisis notifications are sent in the form of email notifications, Member Portal notifications, voice calls or SMS alerts. Analysts cannot disable these notifications for crisis alerts. Based on your configuration, a crisis alert is received as an email notification, Member Portal notification, voice call, or SMS alert.
View Crisis Alerts in the Analyst Portal
View the list of crisis alerts published from the Analyst Portal in Crisis Management.
Analysts can view details such as alert ID, title, alert creation information, and recipient response.
Click Not Responded for an alert to view users who have not responded to the crisis alert.
Click Responded for an alert to view users who have responded to the alerts. You can view the responders' email address, and response method (web, mobile, email), along with the date and time of response.
Analysts can search for alerts or filter the search results by date range and location.
Create Alerts from Feeds
Notice
This feature is available in CSAP v3.7.1.0 onwards.
Create alerts from the RSS Feeds in the Analyst Portal. This feature enables analysts to create alerts from the relevant information in the RSS Feeds and share it with members.
Before you Start
You must have View and Create permissions in Alerts.
Steps
To create alerts from feeds, do the following:
Sign in to the Analyst Portal.
Click Main Menu, and click RSS Feeds.
Select the article from which you want to create an alert, and click Create Alert.
The alert title, summary and references are pre-filled from the RSS Feeds article.
The category is set to RSS Alert, and TLP is set to TLP: CLEAR by default.
If the article has an image, it is automatically added to the alert. If there is no image in the article, the default alert image is assigned to the alert.
The recipient group, by default, is set to All Users.
You can make changes to all fields, based on your preference. For more information about fields in the alert creation form, see Create Alerts.
Navigate to the Finish section, and click Preview & Publish to send the alert to the recipients. Based on your configuration in the alert, the alert is received as a mobile and email notification.
Schedule Events with Alerts
Schedule events through alerts, and share invites directly with members. You can create alerts for events such as summits, expert webinar series, meetings, or other events. Members can choose their attendance responses (Attending, Maybe, Not Attending) to events in the Member Portal. You can view these responses in the alert details in the Analyst Portal.
Before you Start
Ensure that you have the View and Create permissions for Alerts.
Steps
To schedule event invites from alerts, follow these steps:
Sign in to the Analyst Portal, and click Home > Alerts.
Click Create and select New Alert.
In the Required section, enter the mandatory details (title, summary, TLP, category). Make sure to select Event as the category. You cannot view the Indicators, Threat Assessment, and Recommended Actions sections after selecting Event as the category since these sections are not applicable to events.
Note
If you are unable to view the Event as a category, your role does not have access to the category. Contact your administrator to get access to an alert category.
In the alert creation form, click Additional. When the category is Event, the Schedule an Event form is enabled. You can create a single-day or multi-day event. Examples of single-day events are security conferences, single-day training events, panel discussions, and other events.
Multi-day events are ideal for recurring events, or events that happen periodically. If you want to schedule a multi-day event, select the I want to create a multi-day event checkbox. Use the following information while adding event details:
Time Zone: Specify a time zone for the event, and select one of the available options. For example, (GMT-05:00) Eastern Time (US and Canada).
Event Date: Select the date of the event. After selecting the date, you must select the event start and end times. For multi-day events, click More to add more event dates and times.
Place or Address: If it is an offline event, enter the address or place of the event.
Event URL: If it is an online event, enter the URL for the event. The format of the URL must be http://example.com.
Note
In the Preview and Publish section, you can view the event details. The event timing displayed here is based on the based on the time zone you select while creating the event.
Add recipients, and publish the alert. Participants receive an email reminder 10 minutes before a scheduled event.
View and Export Member Attendance Responses
After scheduling an event through alerts, you can view and export the member attendance responses. To view the attendance report for an event, follow these steps:
Sign in to the Analyst Portal, and click Alerts.
Hover over the published event alert, click the vertical ellipsis, and click View.
Click Event Attendance to view the attendance response for the event. You can view the attendance percentage for an event according to member responses.
Select the following filters to view information about single-day and multi-day event responses:
Entire Event: Select this filter to view a complete overview of responses for an event.
Custom Date/Time: Select a date and time to view responses specific to a particular date of a multi-day event.
Compare all Sessions: Select this filter to compare the responses for multi-day events. This helps analysts to know the availability of members on different dates of a multi-day event.
Click Export Attendance to export a .csv file containing the attendance information.
Publish Alerts
After filling in all the required details for an alert in the alert creation form, only analysts with publisher permissions can preview and publish the alert. If you are not a publisher, you can submit the alert for review. For more information about user roles in the Analyst Portal, see Role-Based Access Control.
As a publisher, you can:
Create and publish alerts
Review and publish alerts submitted by creators
Before you Start
You must have publisher rights to review and publish submitted alerts.
Steps
If you have publisher permissions, you can proceed to publish alerts that you have created. To review and publish an alert submitted by creators, follow these steps:
Sign in to the Analyst Portal and click Alerts.
Click My Queue to view all the alerts submitted by creators for review and publishing. You can now view all alerts with SUBMITTED status.
Note
As a publisher, you can view submitted alerts based on the categories assigned to your role. For example, if you have Cyber Incident and Collective Intelligence assigned to your role, you can only review and publish alerts that have these two categories.
In the Alert ID column, click the alert ID of the alert you want to review. Alternatively, you can also click the vertical ellipsis of the alert and click Edit to open the alert and review it.
After reviewing the alert, navigate to the Finish section in the alert creation form.
Click Preview & Publish to preview the alert and publish it. The alert is now published and sent to the recipients.
If the alert requires revisions, provide feedback in the Revert Comments section and click Revert. The status of the alert is now modified to Reverted.
Manage Alerts
Use the following information to know more about the supported options for an alert after it is published. Click the vertical ellipsis of an alert to see the following options:
View: View the details of a submitted, draft, or published alert. You can also click the unique alert ID to view the details of an alert.
Copy: Copy the details of the alert to a new alert. Use the information in Create Alerts to make the required changes and publish the alert. To know more about this, see Copy Alerts.
Update: Update alert details. When you update the alert and republish it, the old alert expires. To know more about this, see Update Alerts.
Edit: Edit a published alert. You can only edit a published alert within an hour of publishing. This feature allows analysts to make changes or corrections to the published alert.
Note
Both Edit and Update options let you make changes to a published alert, but the Edit option is unavailable one hour after publishing the alert.
Copy URL: Copy the alert URL to share the alert link.
Expire: Expire an alert. After an alert is expired, it cannot be edited or published. Analysts can view it as an expired alert, but the alert is deleted in the Member Portal. To know more about this, see Expire Alerts.
Community Sharing: Select the communities to share alerts with. automatically selects communities for sharing alerts based on the conditions configured in the rules. For example, when an alert is configured with RED TLP, the rule can automatically share the alert with an ISAC community. You cannot view communities that do not allow sharing alerts. To manage and add sharing communities, see Manage Sharing Communities.
Send Mobile Notifications: Send mobile push notifications of the alert to the recipients. You can only view this option if you have not enabled mobile notifications during alert creation. To know more about this, see Send Notifications for a Published Alert.
Send Email Notifications: Send an email push notification of the alert to the recipients. You can view this option if you have not enabled email notifications during alert creation. To know more about this, see Send Notifications for a Published Alert.
Print and Export: Print or export the alert for offline analysis. To know more about this, see Print and Export Alerts.
Additionally, you can manage alerts in the following ways:
Click Open Filters to search and filter keywords for alert information. You can filter alerts based on title, category, TLP, status, recipient group, creator, publisher, and more. By default, the list shows alerts published in the last 7 days.
Click Export Alerts to export all alert details in the selected channel in .csv, .xml, and .json formats. You will receive the link to the exported file in your email, from which you can download it. The link can only be used once and expires in 72 hours from the time you receive it.
The background process may take a short while to compile the report based on data in the alerts.
Note
When you export the list of alerts in the .csv format, the alert IDs in the exported sheet are now in the format A-alert ID. For example, if the alert ID is 570e638b in , the alert ID in the exported CSV sheet is A-570e638b. This prevents the alert IDs from being converted to scientific notations after export.
Click My Queue to view all the alerts submitted by creators for review and publishing. To know more about reviewing alerts, see Publish Alerts.
Click Create to create a new alert or an alert from a template. Only analysts with creator permissions can create an alert. To know more about creating alerts, see Create Alerts.
View Alerts
Use the following sections to know more about alerts displayed on the alerts details page:
View Alerts in Channels
Alerts are displayed and grouped according to the channels they belong to. Channels group alerts based on info sources, recipients, and tags. Click All to view all alerts created in the Analyst Portal. To know more about channels, see Create a Channel in the Analyst Portal.
View Alert List
The alert list displays the following information:
Alert ID: View the unique alert ID. Click to open the alert details page.
Title: View the alert title that is added during alert creation. Both analysts and members can use keywords in the alert title to search for the alert.
Category: View the categories that are assigned to alerts published from the Analyst Portal. Examples of categories are Cyber Incident, Malware Advisories, Informational, and other categories.
TLP: View the TLP associated with the alert. An alert can only be associated with one TLP.
Publisher: View the name of the alert publisher.
Last Updated: View the date and time the alert is published, edited, or updated.
Status: View the status of the alert. Alerts can have the following status:
PUBLISHED: Indicates published alerts. Alerts that are edited within an hour of publishing also have the status PUBLISHED.
DRAFTED: Indicates alerts saved as drafts. In the alert creation form, when you click Save as Draft, the alert is saved as a draft.
EXPIRED: Indicates alerts that are expired. The alert is deactivated and can no longer be edited or published.
SUBMITTED: Indicates alerts that are submitted by creators for review.
SCHEDULED: Indicates alerts that are scheduled to be published at a specified time.
REVERTED: Indicates alerts that are reverted to creators by publishers while reviewing.
Mobile: Displays if mobile notifications are enabled for the alert.
Email: Displays if email notifications are enabled for the alert.
View Alert Details
To view alert details, click the alert of your preference or hover over an alert, click the vertical ellipsis, and click View. Use the following information to view the details:
To view the alert title, description, alert ID, and more, select Alert Content. If the alert is matched with any Intelligence Requirements (IRs), you can also view them in this section. Additionally, you can click Add to match IRs to the alert.
To view the list of recipients of the alert and the associated publishing preferences, select Other Details. You can also find the total number of recipients when the alert was published and the current count of recipients in this section.
To view the Threat Defender Library content attached to the alert, select Threat Defender. To view files in detail, hover over a file, click the vertical ellipsis, and click View.
To view the feedback details provided by recipients for an alert, select Feedback. You can view the engagement count, number of readers, content and relevancy rating, and feedback comments. Additionally, you can filter the results based on details such as content rating, engagement, organizations, and more.
To export the feedback details in .csv format, click Export CSV. You will receive the link to the exported file in your email from where you can download it. The link can only be used once and expires in 72 hours from the time you receive it.
Copy Alerts
Copy alert details of a published or expired alert to create a new alert.
Before you Start
You must have View and Create permissions in Alerts.
Steps
To copy an alert, do the following:
Sign in to the Analyst Portal and click Alerts. The alert list is displayed.
Click the vertical ellipsis of the alert you want to copy, and click Copy. The alert details are copied to a new alert.
Make the required changes and publish the alert. To know more about creating and publishing alerts, see Create Alerts.
Edit Alerts
After an alert is published, you can edit it up to one hour after it is published. After one hour, you get the option to update the alert. For drafted alerts, you can edit the required alert details except for the Indicators, Threat Assessment, and Recommended Actions sections. While you are editing a drafted alert:
The alert creation form is locked for other analysts, which allows you to make changes to the alert for a specified time limit. This time limit is configured in Administration > Configuration. For more information, see Configure Alerts Settings.
Note
Save your changes before this time limit lapses to ensure your changes are not lost. You will receive a reminder to save your changes.
If another analyst is currently editing a draft alert, the alert is locked and you will not be able to edit the alert. This lock indicates the remaining time for the other analyst to complete their edits. After the specified time has lapsed, the alert will be unlocked and ready for you to edit. Additionally, you can view the name of the analyst currently editing the alert, along with the remaining time.
Steps
To edit an alert, do the following:
Sign in to the Analyst Portal and click Alerts. The Alerts list is displayed.
Click the vertical ellipsis of an alert you want to update, and click Edit.
Make the required changes to the alert in the available sections. Sections that are disabled are not available for you to make edits.
If you are prompted to save changes and continue as a reminder, click OK.
After updating details, click Preview & Publish. You can also choose to save the alert as a draft or expire the alert.
Update Alerts
You can update the details of an alert after it is published. When you update the alert and republish it, the original alert expires. If you do not want to expire the original alert after updating, it is recommended that you use the Copy option and reuse the alert details. The updated and published alert will have a unique alert ID.
Steps
To update alert details, do the following:
Sign in to the Analyst Portal and click Alerts. The Alerts list is displayed.
Click the vertical ellipsis of the alert you want to update, and click Update.
Make the required changes to the alert. You can make changes to any field in the alert creation form.
After updating details, click Publish. The updated alert is published and sent to recipients while the original alert expires.
Expire Alerts
Expiring an alert means you are deactivating the alert. You can expire or deactivate both published and drafted alerts. After an alert has expired, it cannot be edited or published. You can still view details, copy details to create a new alert, and copy the URL of an expired alert. You can also schedule an alert expiry in the alert creation form. To know more about this, see Schedule Alerts and Configure Additional Options.
Steps
To expire an alert, follow these steps:
In the Analyst Portal, go to Home > Alerts. The alerts list is displayed.
Click the vertical ellipsis of the alert you want to expire, and click Expire. A confirmation pop-up is shown. You can expire the alert by clicking Yes.
Note
When you expire an alert on the Analyst Portal, the alert gets archived from the Member Portal for all recipients. Additionally, alert-based discussions on Messenger for this alert will no longer be available for members.
Send Notifications for a Published Alert
After publishing an alert, you can send mobile and email push notifications to the recipients. You cannot view the Send App Notification and Send Email Notification options if you have already sent push notifications for an alert while creating it.
Steps
To send push notifications for a published alert, do the following:
Sign in to the Analyst Portal and click Alerts. The Alerts list is displayed.
Click the vertical ellipsis for an alert to view the following options:
Select Send Mobile Notification to send a mobile notification to the alert recipients.
Select Send Email Notification to send an email notification to the alert recipients.
Print and Export Alerts
After publishing an alert, you can print or export alert details. You can export the alert in JSON or XML formats.
Note
You can only export and print a published alert.
Steps
To print and export alert details, do the following:
Sign in to the Analyst Portal, and click Home > Alerts. The alerts list is displayed.
Click the vertical ellipsis for an alert to view the following options:
Click Print to print the alert.
Click Export as XML to export a published alert in XML format. In the exported XML file:
Field names that have special characters are displayed with an underscore. For example, if the field name is CVE-ID, in the XML file, it is displayed as cve_id.
Field names that begin with numbers or the word xml are displayed with an underscore in the beginning. For example, _123 and _xml.
Fields that are empty have the value None. For example, if you have not specified the severity field in the alert, the XML file displays <severity>None</severity>.
Click Export as JSON to export a published alert in JSON format.
Auto Publish Alerts
CSAP integrates with Cyware advisory and third-party applications (partner advisories) such as Flashpoint, PolySwarm, RiskIQ, and other applications to automatically publish the latest information such as cyber threats and events in the form of alerts. To know more about managing advisories in CSAP, see Advisory Management.
Alerts v2
In , alerts help you keep members informed about cyber threats, vulnerabilities, and incidents in real time. You can publish alerts across email, web, and mobile platforms to ensure timely and actionable intelligence reaches the right recipients.
Note
The new alert creation form is available in v3.8.7 onwards.
What are the use cases of Alerts?
By including key details such as indicators of compromise (IOCs), threat assessments, and response recommendations, alerts help members understand the severity and impact of a threat.
You can link relevant intelligence requirements (IRs) and past alerts to provide historical context, identify patterns, and improve threat analysis, allowing members to make informed decisions.
Sharing alerts across internal teams, trusted communities, and partner organizations enables coordinated security actions, ensuring a collective defense approach against emerging threats.
Create Alerts
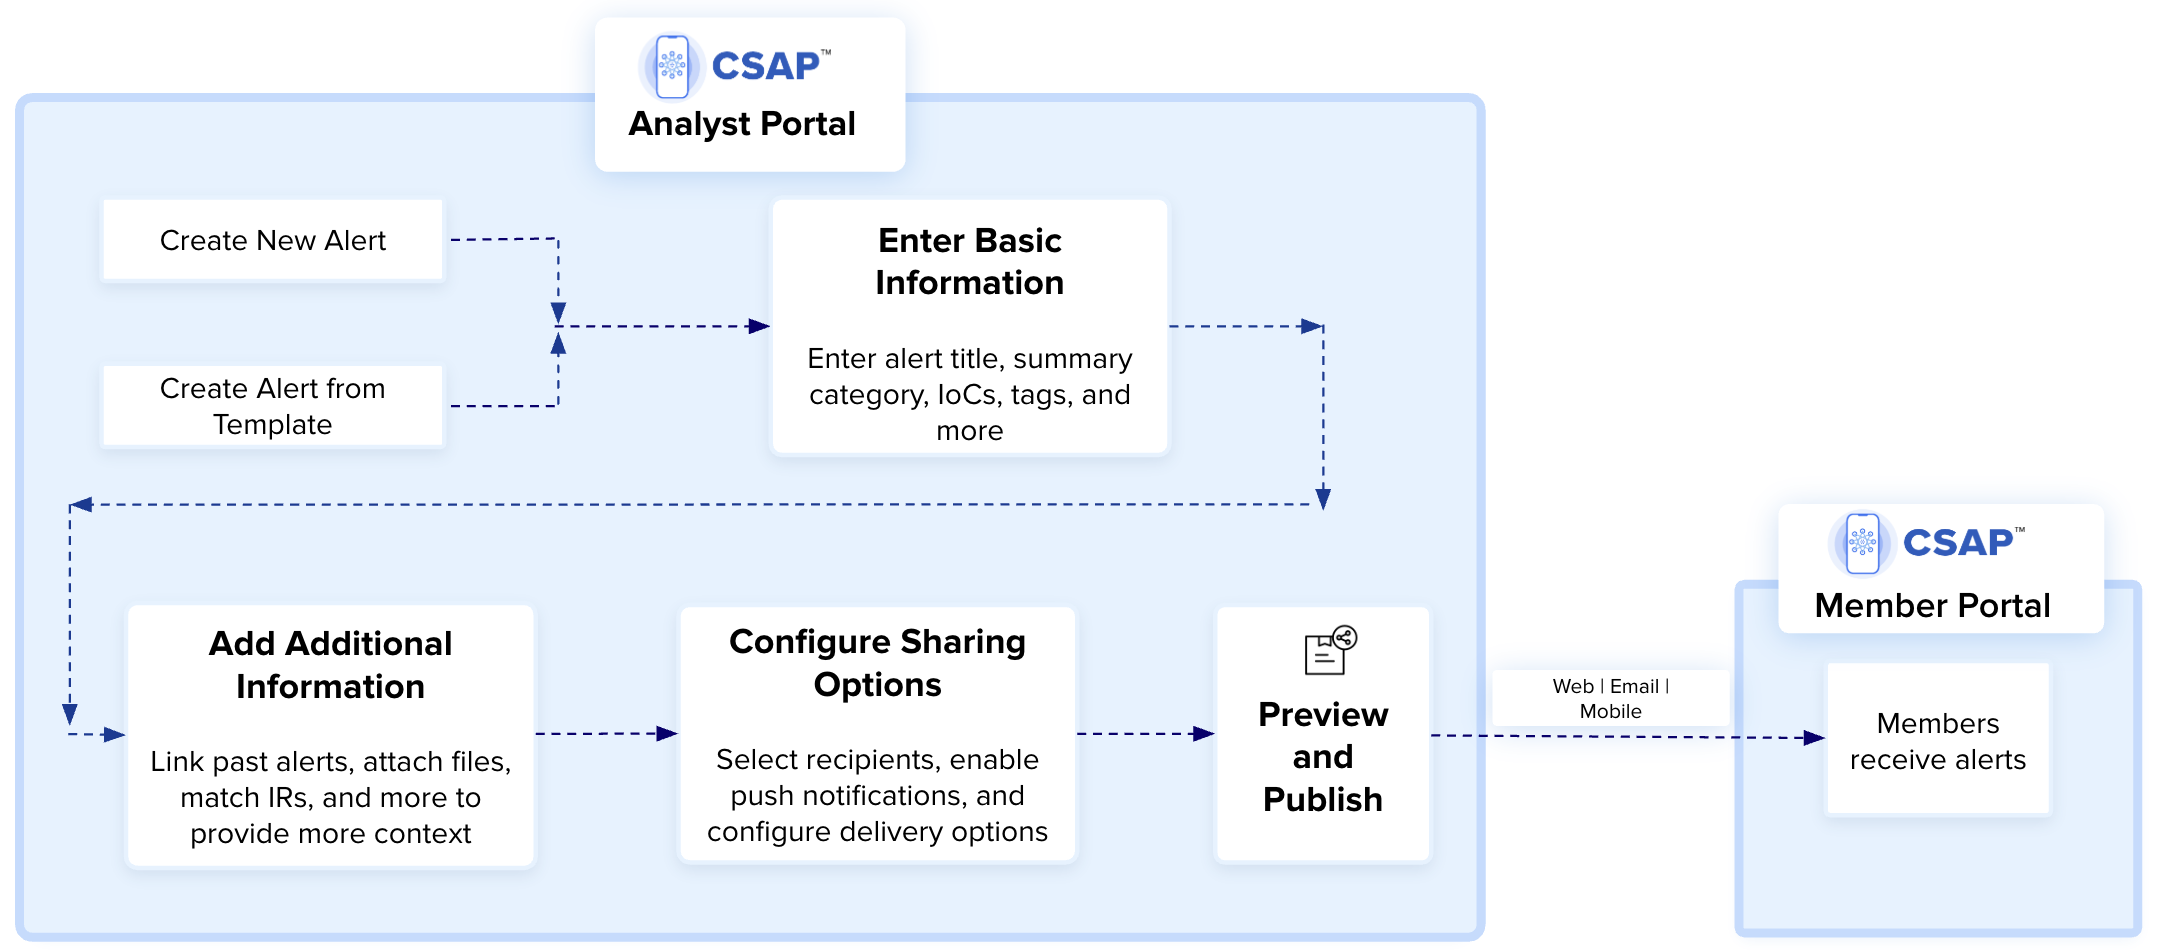
helps you create real-time situational awareness alerts and share them with members. The following image shows the alert creation process:
Note
Alerts published in remain active indefinitely until they are manually marked as expired by analysts.
As an analyst, you can create alerts in the following ways:
Create New Alert: Enter key details and share the alert with selected recipients. You can create an alert by filling in the required fields and optionally adding more details and attachments. For more information, see Create New Alert.
Create Alert From Template: Use predefined alert templates to generate alerts quickly without re-entering repetitive information. For more information, see Create Alert From Template.
Create New Alert
Create alerts with basic information such as title, summary, TLP, category, indicators of compromise (IOCs), tags, and more, and share them with selected recipients. You can create an alert with mandatory fields based on the selected category or create an alert with additional details using custom fields. To configure the fields in alert creation, see Field Management Settings.
Note
The new alert creation form is available in v3.8.7 onwards. To view the steps for the previous alert form, see Create Alerts.
Before you Start
Ensure that you have the View and Create permissions in Alerts.
Configure recipient groups. For more information, see Recipient Group .
Configure categories. For more information, see Categories.
Steps
To create a new alert, follow these steps:
Sign in to the Analyst Portal and click Home > Alerts > Switch to New Version.
Click Create Alert and use the following information:
Basic Information: Enter key details, such as the alert title, summary, category, IOCs, tags, and more to define the alert. Depending on the category you select, relevant custom or system fields mapped to it may appear to ensure that all relevant information is captured. For more information, see Enter Basic Information.
Additional Information: Enhance the alert with supporting details, such as linked alerts, attachments, intelligence requirements, and more to provide better context for recipients. For more information, see Add Additional Information.
Sharing Options: Select recipients, enable push notifications, and configure distribution settings. You can share the alert with communities and external apps, and apply restrictions or special handling instructions to control visibility and access. For more information, see Configure Sharing Options.
Preview and publish the alert to ensure it includes complete and accurate information before notifying the intended recipients.
Enter Basic Information
Add basic information such as the alert title, summary, category, IOCs, and tags to define the alert. Based on the selected category, additional fields may appear to capture all relevant details. To customize the fields in the alert creation form, see Field Management Settings.
Before you Start
Ensure that you have configured categories. Only admin and root admin roles can create and update categories. For more information, see Categories.
If you want to add tag groups to the alert, create tag groups in the Tags Library. For more information, see Tag Library.
Steps
To create an alert with basic information, follow these steps:
In the alert creation form, click Basic Information.
Use the following information to enter the required information for the alert:
Title: Enter an alert title within 150 characters. Members can search for alerts based on keywords present in the alert title. For example, ImBetter: New Information Stealer Spotted Targeting Cryptocurrency Users.
Summary: Enter a text summary for the alert that describes what the alert is about. Members can search for alerts based on keywords present in the alert summary.
If you add indicators of compromise (IOCs) in the summary, click Defang to add text to the IOCs so that it is not potentially malicious or harmful when members unintentionally click them in the shared alert. For example, IP address 192.158.1.38 becomes 192[.]158[.]1[.]38 after it is defanged. If you do not want to defang the IOC, click Fang. By default, IOCs are fanged.
Analyst Groups: If the Analyst Groups feature is enabled, select one or more analyst groups that will have access to this alert. The dropdown will only list the analyst groups you belong to. For more information, see Analyst Groups.
Category: Select a category for the alert. The category gives information about the type of alert, for example, Vulnerability Advisories, Educational, RSS Alerts, Malware Advisories, and other categories. Only admins and root admins can create or update categories. For more information, see Categories.
If the Analyst Groups feature is enabled, the available categories depend on the groups selected in the previous Analyst Groups field. You will see a combined list of all categories assigned to those groups.
Campaign (Optional): Select an associated campaign for the alert. This field shows only active campaigns. For more information, see Create Campaigns.
Traffic Light Protocol (TLP): Select a TLP for the alert. TLP ensures that the alert information is shared with the corresponding recipients. The default TLP value is based on what is configured in the settings. For more information, see Configure Alerts Settings.
Note
The selected TLP determines the visibility of the alert based on the TLP hierarchy of the recipient groups. Only recipients whose TLP permissions align with or exceed the selected TLP level will have access to the alert. For more information, see Configure Sharing Options.
Alert Image (Optional): Upload an image for the alert. You can upload an alert image with a maximum size of 1.5 MB. To use the default image, select Default Image. To create an alert without any image, select None. This field is displayed based on the configuration in settings. For more information, see Configure Alerts Settings.
Note
The recommended dimension for images is 750*250 px in a 3:1 aspect ratio. The accepted image size is greater than 3 KB and less than 2 MB.
Indicators (Optional): Add IOCs in the indicators field. Enter IP addresses, URLs, hashes, and other IOCs. Click Visible to Members to show indicators to members.
Click Defang to add text to an IOC so that it is not potentially malicious or harmful when members unintentionally click it in the shared alert. To ensure proper defanging, ensure that you clear formatting if you are pasting URLs. For example, IP address 192.158.1.38 becomes 192[.]158[.]1[.]38 after it is defanged. Similarly, https://example.com becomes hXXps[:]//example[.]com after it is defanged.
If you do not want to defang the IOC, click Fang. By default, IOCs are fanged.
To add email descriptions and email subjects as IOCs, click Add. From the dropdown, select your preference, enter the content, and click Add. By default, the email subjects and descriptions you add will be considered blocked indicators. You can enter up to 1000 characters for an email subject and up to 1500 characters for an email description.
Note
If you post the alert to , some indicator types such as SHA-224, SHA-384, ssdeep, file path, Windows registry key, autonomous system, directory, and MAC addresses may not ingest correctly. Upgrading to v3.6.2.1 will ensure the proper handling of these indicators.
Parse Indicators: Click Parse Indicators to parse the indicators and check if they are on the allowed or blocked list on the Analyst and Member Portal. By default, any indicator that is not added to the allowed list will be placed on the blocked list.
In , the indicators that are supported for parsing from the Indicators section are IPv6, IPv4, IPv4 CIDR, email ID, domain, URL, CVE, MD5, SHA1, SHA256, SHA224, SHA384, SHA512, ssdeep, file path, windows registry key, autonomous system, directory, and MAC address.
Note
While creating alerts from member intel submissions, you can parse IOCs extracted from attachments in the Indicators section. For more information, see Add Additional Information.
Attach Blocked IOCs: Attach blocked IOCs as CSV, XML, and JSON attachments to the alert. Members can download the blocked indicators as files to their computers from the alert.
Related Alerts for IOCs: View alerts related to the parsed IOCs. After parsing an IOC, click View Related Alerts to view all published alerts with the same parsed IOC.
Tags (Optional): Tags are text labels that you can assign to identify information in alerts. Analysts can use tag groups to quickly add a group of tags instead of applying multiple tags individually. To add tags, use the following information:
Tag Group: If you want to add tag groups to the alert, click Tag Group. Start typing the tag group name and select the required tag group to associate it with the alert. For more details, see Create a Tag Group.
Based on the tag groups selected, the Tags field is auto-populated.
Tags: If you want to add tags to the alert, start typing the tag name in Tags. You can create new tags or choose the required tags from the suggested tags. automatically suggests you create a new tag if it does not exist. To refine your search, you can use the following filter options:
Starts With: Shows tags that begin with your input.
Exact Match: Shows tags that exactly match your input.
Contains: Shows tags that contain your input anywhere within the tag name.
Note
After publishing the alert, you can modify (add or remove) tags directly from the alert details page.
Based on the selected category, additional fields may appear in the configured field order, ensuring all relevant details are captured. After entering the basic information, click Next to continue or Save as Draft to save your progress and complete the alert later. The next step is to add additional information to the alert. For more information, see Add Additional Information.
Add Additional Information
Add relevant details in the Additional Information section to provide context and supporting references for the alert. You can link past alerts, attach files, include intelligence requirements, and more to help recipients assess and respond effectively.
Analysts can add additional information, such as a description and references that add significance to the alert. Use the following information to add additional information:
Description: Enter additional information related to the alert. Since the alert summary has a character limit of 150 characters, use this field to add more information to the alert. To add a reference link directly to the Description field, place the cursor after the information, click the Reference icon, select New Reference, and enter the reference URL and name. The link is automatically parsed into the Reference fields.
If you add IOCs as additional information, click Defang to add text to the IOCs so that it is not potentially malicious or harmful when members unintentionally click them in the shared alert. For example, IP address 192.158.1.38 becomes 192[.]158[.]1[.]38 after it is defanged. If you do not want to defang the IOC, click Fang. By default, IOCs are fanged.
Reference URL: Enter any reference links that can provide more information about the alert. Additionally, any references added in text box fields across the form are automatically listed here. Use Visible to Members to show or hide references to alert recipients.
Reference Name: Provide a name for each reference link to make it easily identifiable.
Link past alerts to provide historical context or reference related incidents. To link past alerts, click Search Alerts, enter the keyword, select the relevant alerts, and click Attach.
Linked alerts appear as metadata, categorized by alert ID. Members can access these alerts directly from the alert content.
Add attachments to enhance alert information and add credibility to the alert. Analysts can add attachments from the Doc Library or upload files from their computer to the alert. You can attach up to 20 files to an alert.
To add attachments while creating alerts, use the following information:
Drag & drop files or Browse: Click Browse to upload files from your computer. You can attach up to 20 files simultaneously. The file name can only have alphanumeric characters and () { } [ ] - _ +. The maximum file size is 100 MB. Some of the supported formats are .pdf, .txt, .doc, and more. To learn more about all supported formats, hover over the information icon.
You can modify the file name, provide a description, and add tags to the file while adding it to the Doc Library. The uploaded file is added to the Doc Library. By default, the file is saved in the root directory of the Doc Library. You can change this path and save the file by clicking Change Path.
If the Analyst Group feature is enabled, the uploaded file is automatically shared with the analyst groups selected in the alert. For more information, see Analyst Groups.
Doc Library: Click Browse Doc Library to attach files directly from the Doc Library. You can sort the files in the Doc Library by their last updated date. To know more about this, see Upload Files to the Doc Library.
Note
If the Analyst Groups feature is enabled, when you attach a file from the Doc Library to an alert, the file’s access is updated to include all analyst groups added to the alert. For more information, see Analyst Groups.
Send as Email Attachment: Select this to share the attachments with recipients in the email alert.
Note
If member intel submissions contain attachments, analysts can automatically extract IOCs from the attachments using Extract Indicators. The extracted IOCs are added to the Indicators section, where analysts can verify and parse them as allowed and blocked indicators. The supported indicator types include SHA256, domain, SHA1, URL, IP address, email, MD5, IPv4, IPv6, and CIDR.
Intelligence Requirements (IRs) are information requests for a specified period that help you gain insight over a period of time. While creating the alert, you can attach relevant IRs to enrich the information in the alert. For more information, see Intelligence Requirements.
To attach IRs to the alert, click Attach IRs. You can browse all the published IRs and select the IRs you want to attach to the alert.
Note
After the alert is published, you can view all the matched IRs in the alert details. You can also modify (add or remove) IRs attached to an alert directly from the alert details page in Matched IRs.
Threat Defender Library (TDL) stores information and files utilized in threat detection, threat hunting, and threat defense. The unique content stored in TDL adds value to existing threat hunting and threat detection workflows, thereby helping members to proactively defend against organization-specific threats.
For example, if there is a ransomware threat that has an identified malicious code, you can attach a specific rule (YARA, SIEM, or other supported rules) that impacts that specific malicious code. This helps analysts detect or respond to the ransomware. In this case, members can use the attached content from TDL to defend against the ransomware threat. For more information about Threat Defender Library, see Threat Defender Library.
Before you Start
Add content to the Threat Defender Library so that it is available while creating alerts. For more information, see Create TDL Content.
Alternatively, you can attach already existing content from the Analyst or Member Repo of TDL.
Steps
To attach TDL content to alerts, follow these steps:
In the alert creation form, click Additional Information and go to the Threat Defender section.
Click Attach Threat Defender and select the required TDL content from the list. You can attach up to 20 TDL content to an alert.
Use threat assessments to get a pulse of how many members were impacted by a vulnerability, malware, or threat activity. Add threat assessment questions with response options along with an alert, and publish them to members. You can also use pre-configured templates for threat assessments to save time. Based on the response provided by alert recipients, analysts can extract a consolidated report to assess the sector-wide impact. Threat assessment questions appear on top of the alert content in the Member Portal. You can include service-level agreements (SLAs) for threat assessments to send automatic reminders to members at specified intervals to respond to the assessment.
Before you Start
Configure required threat assessment settings, such as templates and SLAs. For more information, see Threat Assessment.
Create a Threat Assessment
To create a threat assessment for the alert, follow these steps:
In the alert creation form, go to Additional Information and turn on the Threat Assessment toggle.
Select Create New and use the following information:
Question Type: Choose the type of assessment question. You can either have single-select or text questions for the assessment.
Title: Enter an appropriate title for the assessment.
Expiry: Choose a time of expiry for the threat assessment. Members cannot respond to an expired threat assessment.
SLA(Optional): Choose a preconfigured SLA using the drop-down list. SLAs allow you to send automatic reminders at specified time intervals to members for responding to threat assessments. For more information, see Threat Assessment SLA.
Add Threat Assessments from Templates
You can select threat assessments from pre-configured templates and attach them to your alert. This saves you time from entering repetitive data. To create pre-configured threat assessment templates, see Threat Assessment.
Steps
To add threat assessment from a template, follow these steps:
In the alert creation form, go to Additional Information and turn on the Threat Assessment toggle.
Select Choose from Templates and use the following information:
Template: Select the template for the threat assessment and edit it to your preference. You can either have single-select or text-based questions for the assessment.
Expiry: Choose a time of expiry for the threat assessment. Members cannot respond to an expired threat assessment.
SLA(Optional): Choose a preconfigured SLA using the drop-down list. SLAs allow you to send automatic reminders at specified time intervals to members for responding to threat assessments. For more information, see Threat Assessment SLA.
In an alert, actions are tasks assigned or recommended to members. This is based on the insights shared in the alert or as a course of normal security measures. As an analyst, you can recommend actions to members while creating alerts. For example, when there is a phishing threat, analysts can create an alert recommending actions to prevent the phishing attack, such as checking for suspicious links and other actions.
Steps
To create actions for the alert, follow these steps:
In the alert creation form, go to Additional Information and turn on the Recommended Actions toggle.
Enter a title and description for the action.
Click Add More to add more actions to the alert. You can add a maximum of five actions while creating an alert.
You can include conference call URLs in the alert. Connect using online conferencing applications such as Zoom, Google Meet, and Microsoft Teams. Members can view the conference call information in the alert. To configure numbers in the conference call directory, see Add Conference Call.
Steps
To add conference details to the alert, follow these steps:
In the alert creation form, go to Additional Information.
Turn on the Conference Details toggle and use the following information:
Create New: Select this to add new conference call details. Enter a new conference URL, number, and conference call time. The conference number must be in the format {Dial-in Number}, {PIN}#.
Existing in Directory: Select this to use pre-configured conference details. Select the conference directory from the dropdown. Add conference URL, number, and conference call date and time.
Next Steps
After entering the additional information, click Next to continue or Save as Draft to save your progress and complete the alert later. The next step is to configure sharing options. For more information, see Configure Sharing Options.
Configure Sharing Options
After adding alert details, configure the Sharing Options to define how the alert is shared, delivered, and handled by recipients. You can select recipients, enable push notifications, share the alert with integrated applications, add special handling instructions, and apply restrictions. These settings ensure the alert reaches the right audience through the appropriate channels.
Recipients are users who receive alerts created by analysts. Adding recipients is a mandatory step during alert creation. As an analyst, you can categorize members into different recipient groups for targeted sharing of alerts. For example, if there is a malware threat that is relevant to the finance team in your organization, you can configure the finance team as a recipient group and send an alert to them. A member can be associated with multiple recipient groups.
Before you Start
Ensure that you have configured recipient groups. For more information, see Recipient Group .
Steps
To add recipients to alerts, follow these steps:
In the alert creation form, click Sharing Options and go to the Recipients section.
Note
Send alerts to recipient groups, individual recipients, or both, based on your preference.
To add the alert recipients, use the following information:
Recipient Groups: Analysts can send an alert to multiple recipient groups at the same time. You can use the dropdown to add recipient groups or use one of the following methods:
By Groupset: Select a groupset to add the associated recipient groups. Groupsets allow the association of multiple recipient groups as a collection. To create a groupset, see Create Groupsets for Recipient Groups.
By Traffic Light Protocol (TLP): Select a TLP value to add the associated recipient groups. Recipient groups are associated with a TLP classification to ensure that the alert information is rightly shared with the intended recipients.
Note
Based on the TLP you select in the Basic Information section (Enter Basic Information), you can choose the corresponding TLP for the recipient groups. For example, if you choose TLP WHITE in the Basic Information section, you can share the alert with RED, AMBER, GREEN, and WHITE recipient groups. However, if you choose TLP RED in the Basic Information section, you can only share the alert with RED recipient groups.
By Group Type: Select a type to add the associated recipient groups. There are three types of recipient groups, namely Public Groups, Invite-only Groups, System Groups, and Org-based Groups. For more information, see Recipient Group .
Individual Users: Add individual users by their email addresses to send alerts to individual recipients.
Show Additional Settings: Filter recipients based on location and organization from the added recipient groups. You can filter recipients only if you choose a recipient group or individual recipients. Use the following information to filter recipients:
Locations: Select a country or region to send the alert to members operating from the specific geographic location. Configure member locations in Member Settings.
Organizations: Select an organization or organization type to send the alert to members operating from the specific organization or sector. Configure member organizations in Member Settings.
If you have added Threat Assessment or Recommended Actions in Additional Information, choose the recipients who should have access to them. The list is displayed based on your recipient selection.
Threat Assessment: Select recipients who will receive and assess the threat assessment for the alert.
Recommended Actions: Select recipients who need to take follow-up actions based on the alert details. If multiple recommended actions are added, each action appears with its title in parentheses. You can assign different recipients to each action.
Configure preferences to send push notifications for the alert and initiate notifications for mobile and email alerts. You can configure push notifications only if you choose a recipient group or individual recipients.
In the alert creation form, click Sharing Options, go to the Push Notifications section, and use the following information:
Turn on the Push Notifications toggle to send mobile and email notifications for the alert. You can also select the notification type (Email and Mobile) for specific recipient groups and individual recipients added to the alert.
If you do not enable push notifications, the alert will be published without notifying recipients. This disables all notifications for the alert, regardless of other notification configurations. For example, channel-specific push notifications enabled by members get disabled for the alert.
enables automated sharing of alerts between two different organizations that use , via secure API endpoints. Analysts can share alerts with communities of their choice. For example, when an alert is configured with RED TLP, the rule can automatically share the alert with an ISAC community.
Before you Start
Ensure that you add required information, like alert title, summary, category, and TLP.
Ensure that you add recipients to the alert.
Steps
To share the alert with communities, follow these steps:
In the alert creation form, click Sharing Options.
Go to Share Alert with Communities.
Select the communities you want to share the alert with. The list of communities displayed is based on the communities configured in Community Sharing > Credential Management.
Note
When you switch tabs, your selected communities may reset if active sharing rules apply. For more information, see Alerts.
You can post an alert you create in the Analyst Portal to , MISP, Flexera, and other supported applications.
Before you Start
Ensure that you have integrated the supported applications with . For more information, see Manage Integrations.
Steps
To post the alert to other applications, follow these steps:
In the alert creation form, click Sharing Options.
Go to Post to Other Apps and select the checkbox for the applications you want to post the alert to.
Analysts can attach special handling flags to alerts to share priority alerts with members, allowing them to stand out from regular alerts. For example, you can create a special handling flag named Top Secret to share alerts containing confidential information with the member. Recipients of the alert can view special handling instructions in the footer section of the email alert.
Before you Start
Ensure that you have configured special handling instructions. For more information, see Special Handlings.
Steps
To post the alert to other applications, follow these steps:
In the alert creation form, click Sharing Options.
Go to Special Handling Instructions and select the special handling instructions you want for the alert.
As an analyst, you can configure restrictions and options to manage how an alert is shared, scheduled, and handled. These settings help control access, distribution, and the alert's lifecycle based on your requirements.
Steps
To configure the restrictions and alert options, follow these steps:
In the alert creation form, click Sharing Options.
Go to Restrictions & Alert Options and use the following information:
Allow recipients to export this alert: Select the checkbox to allow members to export this alert for offline analysis.
Allow export as PDF: Select the checkbox to export the alert as a PDF for offline analysis.
Schedule this alert to be published on a specific date/time: Select the checkbox to set a date and time for publishing the alert.
Repeat this alert multiple times: Select the checkbox to repeat the alert between specified intervals. You cannot select this checkbox if you have previously selected the checkbox to self-destruct the alert.
Self-destruct this alert from the user's devices and from the server: Select the checkbox to self-destruct an alert after a specific time. You cannot select this checkbox if you have selected the checkbox to expire the alert. This will remove the alert from Member Portal and Cyware Enterprise mobile app. For example, if the alert information is going to be redundant after a time period, you can choose to self-destruct the alert.
In the Analyst Portal, the alerts display page shows the alert with the title Self Destructed. You can no longer view alert details such as summary, category, and other alert details. However, you can still view details like the date and time of self-destruction.
Schedule this alert to be expired on a specific date/time: Select the checkbox to expire the alert after a specific time. You cannot select this checkbox if you have previously selected the checkbox to self-destruct the alert. After an alert has expired, it cannot be edited or published. Analysts can view it as an expired alert, but the alert is deleted in the Member Portal. Unlike a self-destructed alert, you can still see all the details of an expired alert, such as summary, category, and other details in the Analyst Portal. For more information about expired alerts, see Expire Alerts.
Send Email to Publisher: Select the checkbox to send an email of the published alert to the publisher. By default, this option is mapped to TLP Controls > Send Email to Publisher in Alert Settings. To configure this setting in TLP Controls, see Alert Settings.
Note
In TLP Controls, for each TLP, the administrator can choose if an email notification is sent to publishers. Your selection in the Restrictions & Alert Options overrides the selection defined in TLP Controls
Publishers (optional): Select one or more publishers to review and publish the alert. Publishers are responsible for reviewing alerts and sharing them with the appropriate recipients.
If the Analyst Groups feature is enabled, the dropdown displays only those publishers who belong to at least one of the selected analyst groups and have publishing permissions.
If the feature is disabled, the list displays publishers based on the selected alert category.
After the alert is published, you can view the publisher names in the Alert Details section. If you have only Creator permissions, you must submit the alert to a publisher for review.
Next Steps
After configuring Sharing Options, click Preview to preview the alert and then click Publish to publish the alert and send it to the selected recipients. If you have creator permissions, submit the alert to a publisher for review by clicking Submit to Publisher. If you are a publisher, see Publish Alerts.
Create Alert From Template
Use pre-configured alert templates to quickly create alerts without having to enter repetitive data for similar alerts.
Before you Start
Ensure that you have the View and Create permissions in the Alerts module.
Ensure that you configure alert templates. For more information, see Create Alert Templates.
Ensure that you configure recipient groups. For more information, see Recipient Group .
Ensure that you configure categories. For more information, see Categories.
Steps
To create an alert from a pre-configured template, follow these steps:
Sign in to the Analyst Portal and click Home > Alerts.
From the Create Alert drop-down, select Choose from Templates.
Select a template from the list and add details to the alert. Use the information in Create New Alert to add details to the alert apart from the template.
Fill up the required alert details and publish the alert.
Create Crisis Alerts
helps analysts create crisis alerts when there is a critical security incident such as a data breach, malware infection, ransomware attack, or other incidents. Crisis alerts enable real-time communication with members and help you gauge the impact of the incident.
For example, if there is a data breach or ransomware attack in your organization, create a crisis alert to immediately mitigate the impact of the breach. Analysts can also track responses to the crisis communication sent to members.
Note
Crisis notification alerts are sent immediately and cannot be scheduled. The alert scheduling options are disabled for crisis alerts.
You can create crisis alerts in two ways:
From Alerts: You can create a crisis alert when you select Crisis Notification as the category in the alert creation form. Use the steps in the following section to know more about creating crisis alerts from Alerts.
From Crisis Management: You can also create a crisis alert from Crisis Management in the Analyst Portal. When you create an alert this way, the category is automatically set to Crisis Notification. For more information, see Create Crisis Alerts from Crisis Management.
Before you Start
You must have View and Create permissions in the Alerts.
Configure recipient groups. For more information, see Recipient Group .
Steps
To create a crisis alert from Alerts, follow these steps:
In the Analyst Portal, click Home > Alerts.
Click Create Alert.
In the Basic Information section, enter the mandatory details (title, summary, TLP, category). Ensure to select Crisis Notification as the category.
Note
Crisis Notification is available as a system category in the Analyst Portal. For information about system categories, see View System Alert Categories.
In the Recipients section of Sharing Options, select the recipients for the crisis alert. After selecting the recipients, you can configure preferences to send push notifications for the alert on mobile, email, SMS, and voice (phone) calls in the Push Notifications section.
If you select SMS Alert while configuring push notifications, you have the option to send an additional SMS alert, which is sent in addition to the default crisis SMS. In the default crisis SMS, the member receives the alert title and a link to confirm their acknowledgment of the crisis alert. In the additional SMS alert, you can enter a custom message, which helps you give more insight into the crisis.
Fill in the other required details for the crisis alert. For more information about adding details to alerts, see Create Alerts.
Click Preview to preview the alert and then click Publish to send crisis notifications to the recipients. Crisis notifications are sent in the form of email notifications, Member Portal notifications, voice calls, or SMS alerts. Analysts cannot disable these notifications for crisis alerts. Based on your configuration, a crisis alert is received as an email notification, Member Portal notification, voice call, or SMS alert.
Create Crisis Alerts from Crisis Management
You can also create a crisis alert from Crisis Management in the Analyst Portal. For more information about crisis management, see Crisis Management.
Before you Start
You must have the View, Create, and Update crisis management permissions in Crisis Management.
Configure recipient groups. For more information, see Recipient Group .
Steps
To create a crisis alert from Crisis Management, follow these steps:
Sign in to the Analyst Portal.
From the sidebar, click Crisis Management. You can create a crisis alert in one of the following ways:
Click Create From Templates to create an alert from an existing template. If you are creating a crisis alert from an existing template, then the title, description, category, and TLP are filled automatically. For more information, see Crisis Management Settings.
Click Create Alert to create a crisis alert. Verify that Crisis Notification is selected as the Category for this alert.
Fill in the other required details for the crisis alert. For more information about adding details to alerts, see Create Alerts.
In Sharing Options, click Preview to preview the alert and then click Publish to send crisis notifications to the recipients. Crisis notifications are sent in the form of email notifications, Member Portal notifications, voice calls, or SMS alerts. Analysts cannot disable these notifications for crisis alerts. Based on your configuration, a crisis alert is received as an email notification, Member Portal notification, voice call, or SMS alert.
View Crisis Alerts in the Analyst Portal
View the list of crisis alerts published from the Analyst Portal in Crisis Management.
Analysts can view details such as alert ID, title, alert creation information, and recipient response.
Click Not Responded for an alert to view users who have not responded to the crisis alert.
Click Responded for an alert to view users who have responded to the alerts. You can view the responders' email addresses and response method (web, mobile, email), along with the date and time of response.
Analysts can search for alerts or filter the search results by date range and location.
Create Alerts from Feeds
Note
This feature is available in v3.7.1.0 onwards.
Create alerts from the RSS Feeds in the Analyst Portal. This feature enables analysts to create alerts from the relevant information in the RSS Feeds and share it with members.
Before you Start
Ensure that you have the View and Create permissions in Alerts.
Steps
To create alerts from feeds, follow these steps:
Sign in to the Analyst Portal.
Go to Main Menu > RSS Feeds.
Select the article from which you want to create an alert and click Create Alert.
The alert title, summary, and references are pre-filled from the RSS Feeds article.
The category is set to RSS Alert, and TLP is set to TLP: CLEAR by default.
If the article has an image, it is automatically added to the alert. If there is no image in the article, the default alert image is assigned to the alert.
The recipient group, by default, is set to All Users.
You can make changes to all fields based on your preference. For more information about fields in the alert creation form, see Create Alerts.
To send the alert to the recipients, go to the Sharing Options section and click Preview to preview the changes and then click Publish. Based on your configuration in the alert, the alert is received as a mobile and email notification.
Schedule Events with Alerts
Schedule events through alerts and share invites directly with members. You can create alerts for events such as summits, expert webinar series, meetings, or other events. Members can choose their attendance responses (Attending, Maybe, Not Attending) to events in the Member Portal. You can view these responses in the alert details in the Analyst Portal.
Before you Start
Ensure that you have the View and Create permissions for Alerts.
Steps
To schedule event invites from alerts, follow these steps:
Sign in to the Analyst Portal and click Home > Alerts.
Click Create Alert.
In the Basic Information section, enter the mandatory details (title, summary, TLP, category). Make sure to select Event as the category. When you select Event, the Indicators field in Basic Information, as well as the Threat Assessment and Recommended Actions sections in Additional Information, become disabled since they do not apply to events.
Note
If you are unable to view the Event as a category, your role does not have access to the category. Contact your administrator to get access to an alert category.
When the category is Event, the Schedule Event form is enabled. You can create a single-day or multi-day event. Examples of single-day events are security conferences, single-day training events, panel discussions, and other events.
Multi-day events are ideal for recurring events or events that happen periodically. If you want to schedule a multi-day event, select the Multi Day Event checkbox. Use the following information while adding event details:
Timezone: Specify a timezone for the event and select one of the available options. For example, (GMT-05:00) Eastern Time (US and Canada).
Event Date: Select the date of the event. After selecting the date, you must select the event start and end times. For multi-day events, click Add More to add more event dates and times.
Place or Address: If it is an offline event, enter the address or place of the event.
Event URL: If it is an online event, enter the URL for the event. The format of the URL must be http://example.com.
Note
In the Preview and Publish section, you can view the event details. The event timing displayed here is based on the time zone you select while creating the event.
Add recipients and publish the alert. Participants receive an email reminder 10 minutes before a scheduled event.
View and Export Member Attendance Responses
After scheduling an event through alerts, you can view and export the member attendance responses. To view the attendance report for an event, follow these steps:
Sign in to the Analyst Portal and click Alerts.
Hover over the published event alert, click the vertical ellipsis, and click View.
Go to Responses > Event Attendance to view the attendance response for the event. You can view the attendance percentage for an event according to member responses.
Select the following filters to view information about single-day and multi-day event responses:
Entire Event: Select this filter to view a complete overview of responses for an event.
Custom Date/Time: Select a date and time to view responses specific to a particular date of a multi-day event.
Click Export to export a .csv file containing the attendance information.
Publish Alerts
After filling in all the required details for an alert in the alert creation form, only analysts with publisher permissions can preview and publish the alert. If you are not a publisher, you can submit the alert for review. For more information about user roles in the Analyst Portal, see Role-Based Access Control.
As a publisher, you can perform the following actions:
Create and publish alerts
Review and publish alerts submitted by creators
Before you Start
Ensure that you have permission to review and publish submitted alerts.
Steps
If you have publisher permissions, you can proceed to publish the alerts that you have created. To review and publish an alert submitted by creators, follow these steps:
Sign in to the Analyst Portal and click Alerts.
Click My Queue to view all the alerts submitted by creators for review and publishing. You can now view all alerts with SUBMITTED status.
Note
If the Analyst Groups feature is enabled, you can view and review submitted alerts only if you belong to at least one of the selected analyst groups and have publishing permissions. If the feature is disabled, your access depends on the categories assigned to your role.
In the Alert ID column, click the alert ID of the alert you want to review. Alternatively, you can also click the vertical ellipsis of the alert and click Edit to open the alert and review it.
After reviewing the alert, go to the Sharing Options section in the alert creation form.
Click Preview to preview the alert and then click Publish to publish it. The alert is published and sent to the recipients.
If the alert requires revisions, provide feedback by adding comments and clicking Revert. The status of the alert is modified to REVERTED. For more information about adding comments, see Add Comments to Alerts.
Add Comments to Alerts
You can add comments while reviewing or editing alerts to provide feedback, request revisions, or track changes. Comments persist across different alert statuses and are visible to users with access to the alert.
Who can add comments?
Publishers can add comments while reviewing alerts in the SUBMITTED or REVERTED status.
Creators can add comments while editing alerts in the DRAFT, SUBMITTED, or REVERTED status.
Analyst Portal users who have access to the alert can add comments in the DRAFT, SUBMITTED, or REVERTED status.
Steps
To add a comment, follow these steps:
From the alert listing page, click on the alert to which you want to add a comment.
In the alert form, navigate to the section where you want to add a comment.
Select the text you want to comment on, click the Comment icon, and enter your comment. You can click on highlighted text to view comments added by other users in the Comments section.
After adding the comment, go to the Sharing Options section in the alert creation form.
If you are a Publisher, you can revert the alert after providing feedback. If you are a Creator, you can submit the alert to a Publisher.
Manage Alerts
Use the following information to learn more about the supported options for an alert after it is published. Click the vertical ellipsis of an alert to see the following options:
View: View the details of a submitted, draft, or published alert. You can also click the unique alert ID to view the details of an alert.
Clone: Clone the details of the alert to a new alert. Use the information in Create Alerts to make the required changes and publish the alert. To know more about this, see Copy Alerts.
Update: Update alert details. When you update the alert and republish it, the old alert expires. To know more about this, see Update Alerts.
Edit: Edit a published alert. You can only edit a published alert within an hour of publishing. This feature allows analysts to make changes or corrections to the published alert.
Note
Both Edit and Update options let you make changes to a published alert, but the Edit option is unavailable one hour after publishing the alert.
Copy URL for Analysts: Copy the alert URL to share the alert link with other analysts. The receiver can directly locate alert details using the shared link.
Copy URL for Members: Copy the alert URL to share the alert link with members. The receiver can directly locate the alert details in the Member Portal using the shared link.
Expire: Expire an alert. After an alert is expired, it cannot be edited or published. Analysts can view it as an expired alert, but the alert is deleted in the Member Portal. To know more about this, see Expire Alerts.
Community Sharing: Select the communities to share alerts with. automatically selects communities for sharing alerts based on the conditions configured in the rules. For example, when an alert is configured with RED TLP, the rule can automatically share the alert with an ISAC community. You cannot view communities that do not allow sharing alerts. To manage and add sharing communities, see Manage Sharing Communities.
Send Mobile Notifications: Send mobile push notifications of the alert to the recipients. You can only view this option if you have not enabled mobile notifications during alert creation. To know more about this, see Send Notifications for a Published Alert.
Send Email Notifications: Send an email push notification of the alert to the recipients. You can view this option if you have not enabled email notifications during alert creation. To know more about this, see Send Notifications for a Published Alert.
Print and Export: Print or export the alert for offline analysis. To know more about this, see Print and Export Alerts.
Additionally, you can manage alerts in the following ways:
Click Open Filters to search and filter keywords for alert information. You can filter alerts based on title, category, TLP, status, recipient group, creator, publisher, and more. By default, the list shows alerts published in the last 7 days.
Click Export Alerts to export all alert details in the selected channel in .csv, .xml, and .json formats. You will receive the link to the exported file in your email, from which you can download it. The link can only be used once and expires in 72 hours from the time you receive it.
The background process may take a short while to compile the report based on data in the alerts.
Note
When you export the list of alerts in the .csv format, the alert IDs in the exported sheet are now in the format A-alert ID. For example, if the alert ID is 570e638b in , the alert ID in the exported CSV sheet is A-570e638b. This prevents the alert IDs from being converted to scientific notations after export.
Click My Queue to view all the alerts submitted by creators for review and publishing. To know more about reviewing alerts, see Publish Alerts.
Click Create Alert to create a new alert or an alert from a template. Only analysts with creator permissions can create an alert. To know more about creating alerts, see Create Alerts.
Select one or more alerts and click Expire to expire them. You can expire a maximum of 100 alerts simultaneously.
View Alerts
View the list of alerts in the Analyst Portal. If the Analyst Groups feature is enabled, you will only see alerts associated with the analyst groups you belong to.
View Alerts in Channels
Alerts are displayed and grouped according to the channels they belong to. Channels group alerts based on info sources, recipients, and tags. Click All to view all alerts created in the Analyst Portal. To know more about channels, see Create a Channel in the Analyst Portal.
View Alert List
The alert list displays the following information:
Alert ID: View the unique alert ID. Click to open the alert details page.
Title: View the alert title that is added during alert creation. Both analysts and members can use keywords in the alert title to search for the alert.
Category: View the categories that are assigned to alerts published from the Analyst Portal. Examples of categories are Cyber Incident, Malware Advisories, Informational, and other categories.
TLP: View the TLP associated with the alert. An alert can only be associated with one TLP.
Publisher: View the name of the alert publisher.
Modified Date: View the date and time the alert is published, edited, or updated.
Status: View the status of the alert. Alerts can have the following status:
PUBLISHED: Indicates published alerts. Alerts that are edited within an hour of publishing also have the status PUBLISHED.
DRAFTED: Indicates alerts saved as drafts. In the alert creation form, when you click Save as Draft, the alert is saved as a draft.
EXPIRED: Indicates alerts that are expired. The alert is deactivated and can no longer be edited or published.
SUBMITTED: Indicates alerts that are submitted by creators for review.
SCHEDULED: Indicates alerts that are scheduled to be published at a specified time.
REVERTED: Indicates alerts that are reverted to creators by publishers while reviewing.
Mobile: Displays if mobile notifications are enabled for the alert.
Email: Displays if email notifications are enabled for the alert.
View Alert Details
To view alert details, click the alert of your preference or hover over an alert, click the vertical ellipsis, and click View. Use the following information to view the details:
Alert Details
View the alert title, description, alert ID, associated Analyst Groups, and other key details in this section. You can also find a summary of references, linked alerts, threat defender content, and more based on the available alert data.
You can attach additional files to the published alert by clicking Add. If the alert already includes attachments, you can view them here.
You can match the alert with Intelligence Requirements (IRs) by clicking Edit. If any IRs are already matched, you can view them in this section.
Sharing Options
View the list of recipients of the alert and the associated publishing preferences. You can also find the total number of recipients when the alert was published and the current count of recipients in this section.
In the Other Information section, you can view additional sharing details, including communities the alert was shared with, external applications it was posted to, special handling tags, and more.
Responses
The Responses tab provides insights into recipient interactions with the alert, including threat assessments, event attendance, RFI responses, and alert feedback.
In the Threat Assessment section, you can view participation insights at both the member and organization levels, along with recipient responses. To send a follow-up notification to recipients who have not responded, click Trigger Reminder.
In the Event Attendance section, you can view the list of recipients and their response statuses for an event.
In the RFI Response section, you can view RFI responses and update the status of the RFI as required.
In the Alert Feedback section, you can view the engagement count, number of readers, content and relevancy rating, and feedback comments. Additionally, you can filter the results based on details such as content rating, engagement, organizations, and more.
To export the feedback details in .csv format, click Export. You will receive the link to the exported file in your email, from which you can download it. The link can only be used once and expires in 72 hours from the time you receive it.
Clone Alerts
Clone alert details of a published or expired alert to create a new alert.
Before you Start
You must have View and Create permissions in Alerts.
Steps
To clone an alert, follow these steps:
Sign in to the Analyst Portal and go to Home > Alerts. The alert list is displayed.
Click the vertical ellipsis of the alert you want to clone and click Clone. The alert details are cloned to a new alert.
Make the required changes and publish the alert. For more information about creating and publishing alerts, see Create Alerts.
Edit Alerts
After an alert is published, you can edit it for up to one hour after it is published. After one hour, you get the option to update the alert. For drafted alerts, you can edit the required alert details except for the Indicators, Threat Assessment, and Recommended Actions sections. While you are editing a drafted alert:
The alert creation form is locked for other analysts, which allows you to make changes to the alert for a specified time limit. This time limit is configured in Administration > Configuration. For more information, see Configure Alerts Settings.
Note
Save your changes before this time limit lapses to ensure your changes are not lost. You will receive a reminder to save your changes.
If another analyst is currently editing a draft alert, the alert is locked, and you will not be able to edit the alert. This lock indicates the remaining time for the other analyst to complete their edits. After the specified time has lapsed, the alert will be unlocked and ready for you to edit. Additionally, you can view the name of the analyst currently editing the alert, along with the remaining time.
Steps
To edit an alert, follow these steps:
Sign in to the Analyst Portal and click Alerts.
Click the vertical ellipsis of an alert you want to edit and click Edit.
Make the required changes to the alert in the available sections. Sections that are disabled are not available for you to make edits.
Note
If the Analyst Groups feature is enabled, you can edit the Analyst Groups and Category fields only if you belong to all the analyst groups that were previously selected for the alert. For more information, see Analyst Groups.
If you are prompted to save changes and continue as a reminder, click OK.
After updating the details, click Preview & Publish. You can also choose to save the alert as a draft or to expire the alert.
Update Alerts
You can update the details of an alert after it is published. When you update the alert and republish it, the original alert expires. If you do not want to expire the original alert after updating, it is recommended that you use the Copy option and reuse the alert details. The updated and published alert will have a unique alert ID.
Steps
To update alert details, follow these steps:
Sign in to the Analyst Portal, and click Home > Alerts. The alerts list is displayed.
Click the vertical ellipsis of the alert you want to update, and click Update.
Make the required changes to the alert. You can make changes to any field in the alert creation form.
After updating details, click Publish. The updated alert is published and sent to recipients while the original alert expires.
Expire Alerts
Expiring an alert means you are deactivating the alert. You can expire or deactivate both published and drafted alerts. After an alert has expired, it cannot be edited or published. You can still view details, copy details to create a new alert, and copy the URL of an expired alert. You can also schedule an alert expiry in the alert creation form. To know more about this, see Schedule Alerts and Configure Additional Options.
Steps
To expire an alert, follow these steps:
In the Analyst Portal, go to Home > Alerts. The alerts list is displayed.
Click the vertical ellipsis of the alert you want to expire, and click Expire. A confirmation pop-up is shown. You can expire the alert by clicking Yes.
Note
When you expire an alert on the Analyst Portal, the alert gets archived from the Member Portal for all recipients. Additionally, alert-based discussions on Messenger for this alert will no longer be available for members.
Send Notifications for a Published Alert
After publishing an alert, you can send mobile and email push notifications to the recipients. You cannot view the Send App Notification and Send Email Notification options if you have already sent push notifications for an alert while creating it.
Steps
To send push notifications for a published alert, follow these steps:
Sign in to the Analyst Portal, and click Home > Alerts. The alerts list is displayed.
Click the vertical ellipsis for an alert to view the following options:
Select Send Mobile Notification to send a mobile notification to the alert recipients.
Select Send Email Notification to send an email notification to the alert recipients.
Print and Export Alerts
After publishing an alert, you can print or export alert details. You can export the alert in JSON or XML formats.
Note
You can only export and print a published alert.
Steps
To print and export alert details, follow these steps:
Sign in to the Analyst Portal, and click Home > Alerts. The alerts list is displayed.
Click the vertical ellipsis for an alert to view the following options:
Click Print to print the alert.
Click Export as XML to export a published alert in XML format. In the exported XML file:
Field names that have special characters are displayed with an underscore. For example, if the field name is CVE-ID, in the XML file, it is displayed as cve_id.
Field names that begin with numbers or the word xml are displayed with an underscore in the beginning. For example, _123 and _xml.
Fields that are empty have the value None. For example, if you have not specified the severity field in the alert, the XML file displays <severity>None</severity>.
Click Export as JSON to export a published alert in JSON format.
Crisis Management
Crisis Management is a structured information dissemination format that allows analysts to send alerts to groups of specific individuals. Usually, it is initiated in case of an emergency wherein the organization needs to gauge the impact of an incident. Users who receive these alerts can respond to the alerts and report their current situation.
This feature may not be available if your organization has not subscribed to it.
Analysts can create crisis notifications using two techniques.
Create an alert from scratch. For more information, see Create Crisis Alerts.
Create and use a crisis management template. For more information, see Crisis Management Settings.
Digital Risk Protection
Notice
This feature is available in Collaborate v3.8.1 and only for Cyware cloud-based deployments.
Digital Risk Protection (DRP) is a proactive approach to cybersecurity that involves monitoring, threat identification, and threat mitigation of digital assets. In Collaborate, the DRP feature helps you comprehensively monitor the digital presence of organizations for whom DRP is enabled, which includes websites, domain registrations, and other online assets.
Note
To enable DRP for the Analyst Portal, contact your Collaborate administrator.
How does it work?
As an analyst, you must first configure and enable supported integrations for DRP in the Analyst Portal. For more information, see Manage Digital Risk Protection Integrations. After configuring these integrations, you must enable Digital Risk Protection as a feature for the organizations in the Member Portal. For more information, see Organization Details. This feature is subsequently available in both the Analyst and Member Portals.
To view Digital Risk Protection in the Analyst Portal, click the main menu and select Digital Risk Protection. By default, you can view incident reports, credential watchlists, domain watchlists, and dashboards for all organizations.
View Incident Reports
Incident reports give you detailed information about security incidents that have occurred in organizations for whom DRP is enabled.
From the Organization drop-down, select the specific organization for which you want to view incident reports.
You can view the description of the incidents in Analysis. This includes details such as when the incident occurred, and how it was discovered.
You can view all attachments associated with the incident in Attachments. You can choose to download them for your reference.
Use Search or click Filters to view reports based on category, incident type, report type, severity, and status.
View Credential Watchlists
Monitor and track compromised or potentially compromised user credentials, such as email addresses and passwords, from internet sources such as the dark web.
From the Organization drop-down, select the specific organization for which you want to view credential watchlists.
View all credential-related information such as the password, status, detection date, and more.
Switch between standard and JSON view based on your preference.
Use Search or click Filters to view credential details based on their status (addressed and compromised).
View Domain Watchlists
You can use Domain Watchlists to monitor specific domains of organizations for whom DRP is enabled. This helps you identify domains that may be involved in cyberattacks, such as phishing, malware distribution, or data breaches.
From the Organization drop-down, select the specific organization for which you want to view domain watchlists.
Switch between standard and JSON view based on your preference.
View all domain-related information such as the detection date, extraction date, and more.
Use Search or click Filters to view domain details based on their status (monitored and reported).
View Dashboards
Utilize visual representation of data received from supported integrations for organizations.
From the Organization drop-down, select the specific organization for which you want to view dashboards.
You can select the date range to view relevant data.
Click View All to view detailed information for each widget.
You can also choose to change the layout of each widget.
Intelligence Requirements
Notice
This feature is available in Collaborate (CSAP) v3.7.4 onwards and is only available for Cyware cloud-based deployments
Intelligence Requirements (IRs) are information requests that help you gain insights into a particular subject over a specified period. IRs guide the collection, analysis, and dissemination of intelligence to support decision-making and threat detection within your organization.
How does it work?
As an analyst, you can review and publish an IR submitted by members and as well as create IRs in the Analyst Portal. After an IR is published, it is available in the IR Repo. Members can choose to follow IRs for which they want to view relevant information through alerts.
Members can access and view alerts based on automatic tag matching between the IR tags and alert tags. During the active period of the IR, members continue to view matched alerts, resulting in the enrichment of their knowledge and awareness about the topic.
Additionally, while creating alerts, you can manually associate published IRs with them. For more information, see Attach Intelligence Requirements.
What are the use cases of Intelligence Requirements?
IRs help you stay updated on the latest cyber threats and trends. This approach allows you to adjust your security strategies to address new challenges.
Intelligence gathered through IRs helps you leverage threat intelligence to strengthen your cybersecurity defenses, respond effectively to threats, and make informed decisions.
This feature helps you manage all your information requirements in a single place, which helps you keep track of and prioritize crucial insights.
You can use IRs to gain insights into newly discovered vulnerabilities in software, hardware, or network infrastructure. This enables you to assess exposure and mitigate risk.
What are the types of Intelligence Requirements?
General Intelligence Requirement (GIR): General Intelligence Requirement (GIR) refers to the information needs which are usually long-term and strategic in nature. GIRs are not specific to any particular threat or incident but are designed to cover a wide range of topics related to cybersecurity.
For example, a GIR might include the need for information about emerging cyber threats, industry-specific attack trends, the capabilities and intentions of known threat actors, or vulnerabilities commonly exploited by attackers.
Priority Intelligence Requirement (PIR): Priority Intelligence Requirement (PIR) is a subset of GIR that i particularly critical or time-sensitive. The identification of PIRs is driven by the current threat landscape, recent security incidents, ongoing attacks, or your organization's specific vulnerabilities. PIRs may change frequently as the threat environment evolves.
For example, you can raise a PIR for emerging advanced persistent threat (APT) groups' targeted cyber espionage activities against financial institutions.
Specific Intelligence Requirement (SIR): Specific Intelligence Requirement (SIR) is a tactical information need that is focused on addressing a particular threat, incident, or vulnerability. SIRs are more detailed and operational compared to GIR and PIR.
For example, if your organization is experiencing a series of targeted phishing attacks, you can publish an SIR to gather intelligence on the sender's tactics, techniques, and procedures (TTPs) to strengthen email security measures.
Create an Intelligence Requirement
As an analyst, you can create an Intelligence Requirement (IR) to address specific cybersecurity challenges and potential threats.
Before you Start
Ensure you have View/Create permissions for Intelligence Requirements in Roles & Permissions.
Steps
To create an IR, follow these steps:
Sign in to the Analyst Portal.
Go to Intelligence Requirements, and click My IRs. You can view all the IRs that you have created here.
Click Create IR. Use the following information while creating an IR:
Title: Enter the IR title. For example, Phishing Campaign Targeting Employee Email Accounts.
Description: Enter a detailed description for the IR.
TLP: Select the TLP associated with the IR. The default TLP is AMBER. For more information about TLPs, see TLP Controls.
IR Type: Select the IR type to define the scope and focus of the IR. The types are GIR, PIR, and SIR. The default IR Type is General Intelligence Requirement (GIR).
Priority: Select the priority of the IR. Options are High, Medium, and Low. The default priority is Medium.
Category: Select the IR category. The category helps classify the intelligence requirements into relevant domains. To know more about configuring IR categories, see Add IR Categories.
Sub-category (optional): Select the sub-category associated with the previously selected IR category.
Tags: Enter the tags that are associated with the IR. Tags play an important role in IRs because members view alerts based on the tags that match the IR. You can attach up to 50 tags to an IR. Examples of tags are Phishing, Email Security, Social Engineering, and Data Breaches. To refine your search, you can use the following filter options:
Starts With: Shows tags that begin with your input.
Exact Match: Shows tags that exactly match your input.
Contains: Shows tags that contain your input anywhere within the tag name.
End Date: Enter the end date to close the IR. By default, the end date is set to three months from the day of publication. After the end date, members following the IR no longer view alerts corresponding to the IR. The minimum end date that you can set is 24 hours from the time of publishing.
Attachments (optional): Upload up to 10 files to give additional context to the IR. Each file can be of a maximum size of 10 MB.
Note
To save an IR as a draft, ensure you have entered the title because it is a mandatory field. You can find all your drafted IRs in My IRs.
Click Publish to create the IR. Published IRs appear in the IR Repo section and are available for members to follow. In the IR Repo, members can choose to follow the IR.
Best Practises while Creating IRs
Create and publish IRs with clear and descriptive titles and descriptions that accurately convey the objective and scope of the IR. Be specific about what intelligence you are seeking to gather or the security challenge you are addressing.
Use relevant tags that accurately reflect the key aspects of the IR.
Review and evaluate the effectiveness of ongoing IRs and the related alerts to improve the process of creating and publishing IRs.
Verify and validate the information in the IR because when you create or publish an IR, it is directly published to the IR Repo and you can no longer delete it.
Add IR Categories
Categories and sub-categories organize and classify Intelligence Requirements (IRs) based on their relevant domains and provide contextual information. You can manage these categories by navigating IR Settings in the upper-right corner.
By default, there are 10 IR categories such as Malware, Vulnerabilities, Data Breaches, Insider Threats, Mobile Security, and more. Additionally, each default category consists of 5 sub-categories. You can either use the default categories or add IR categories based on your preference. Use the following information while adding new categories and sub-categories:
Click Add Category to add a new IR category and corresponding sub-categories.
Note
You can add up to 20 active categories and sub-categories.
You cannot delete or inactivate a category or sub-categories if they are currently being used in ongoing IRs.
After adding categories, you can use them while creating IRs. Similarly, members can also use these categories while submitting IRs.
Review IR Requests
As an analyst, you can review the IRs submitted by members and publish them to the IR Repo. Members can choose to follow published IRs if it is relevant to them. Use the following information while reviewing IR requests:
To view the list of IRs that are submitted for review, navigate to Intelligence Requirements > IR Requests from the sidebar.
You can use the filters to view IRs based on categories, TLP, priority (high, medium, and low), and type (GIR, PIR, SIR). Additionally, you can choose to sort the list in ascending or descending order.
Click the IR to review the details. You can update or overwrite relevant fields and publish the IR. After you publish the IR, it is available in IR Repo and members can choose to follow the IR.
Note
Verify all IR details before publishing because you cannot edit or delete a published IR.
In case the submitted IR is not relevant or does not need to be published, you can reject the IR by clicking Reject in the IR form. You can enter the rejection comment which is visible to the member who submitted the IR.
View All Published IRs
The IR Repo consists of all the published IRs, either created by analysts or submitted by members and subsequently published by analysts. As an analyst, you can do the following in the IR Repo:
View the list of published IRs and all the information associated with them. On the landing page, you can view the total number of IRs published, as well as the number of IRs that are being reviewed by analysts. You can also view statistics in the form of widgets for the most-used IR categories as well as the most followed IRs by members. Click Hide Widgets to close the widgets.
Note
Click the details in the widgets to know all the associated IRs and categories.
Use the filters to view IRs based on categories, TLP, priority, and type. You can also view the list in ascending or descending order of category, type, TLP, and popularity.
Use the Status filter to view IRs that are published or closed.
To view the complete details of an IR, click the IR and use the following information:
To view the list of members who are following the IR, click View IR Followers. You can search for members or filter members by their organization.
To add followers to the IR, click Add Followers.
To add a recipient group as an IR follower, select your preference from the Recipient Groups dropdown.
To add an individual user as an IR follower, select the recipient from the Individual Recipients dropdown.
After making your selections, click Add. Members added as followers will receive an email notification.
You can also view the alerts that are matched with the IR based on the matching tags in Matched Alerts.
To close an IR before its end date, click the status dropdown and select Close. After an IR is closed, it is still available in the IR Repo but members no longer view alerts for it. You can only close published IRs.
Gather Opinions with Surveys
Use surveys to create, send, and collect responses from members about their opinions, behavior, or knowledge of threats and incidents.
For example, to improve security and safety for your people, property, and organizational data, you can conduct a survey that includes a thorough assessment of existing security policies and procedures. You can also survey analysts responsible for establishing and operating security and safety measures, such as access controls, pre-employment screening, interior security loss prevention, and more. With surveys, you can have your peers well-informed to mitigate the risks to your organization’s most critical and vulnerable operations.
You can use the following options to manage surveys:
Create survey information, add questions, and choose recipients, all in one interface.
Set a schedule to publish a survey to members automatically.
Analyze survey responses and visualize data in pie charts.
Expire a survey to maintain a repository without deleting it.
Note
Members can also request surveys. If the request is valid, the analyst publishes it.
Create a New Survey
Survey administrators can create customized surveys in to evaluate threats, vulnerabilities, malware, and more. They can include information in the surveys and publish them to members. supports 50 active surveys at a time.
Steps
To create a survey, follow these steps:
Go to the Main Menu and select Survey.
Click Create.
Enter a Survey Title.
Select a TLP to make sure that sensitive information is shared with the appropriate audience.
Select the Publisher(s) name.
Choose one or more Recipient Groups to send the survey to a selected group.
Filter Recipient Groupset by TLP or Group Type.
Choose the User Recipient Group(s) based on roles.
Select Individual User Email(s) to enter the individual email addresses for the survey.
You can also apply additional filters such as Location or Organization or Organization Type to narrow down the search results.
Enter Tag(s) to notify members about security breaches, vulnerabilities, security strategies, and more. To refine your search, you can use the following filter options:
Starts With: Shows tags that begin with your input.
Exact Match: Shows tags that exactly match your input.
Contains: Shows tags that contain your input anywhere within the tag name.
Choose a Survey Close time to schedule a due date for the survey.
Select the date and year.
Click select time and modify the hour and minute.
Click Now to close the survey after creating it, and click Ok.
Select Schedule this survey to be published on a specific date/time.
Select the date and year.
Click select time and modify the hour and minute.
Click Now to close the survey after creating it, and click Ok.
Select App Push Notification to receive email notifications about the survey.
Select Email Alert to send email notifications.
Click Next.
Select the question type: Single Select, Multi Select, or Text Box.
Enter the survey question.
For single-select or multi-select questions, you must include a minimum of 2 choices. You can have a maximum of 8 choices.
For Textbox, you can type your question, and the respondent can type their answer in 1000 characters.
Click Add Option to include choices and click Save.
Click Add Question to include a new question in the survey. You can add a maximum of 25 questions to a survey.
To make changes to the survey information, click Previous.
Click Save to save the changes.
Click Save to save the changes.
To submit the survey for review with the publisher, click Submit to Publisher.
To review and make changes to the survey, click Save as Draft.
To deactivate the survey draft, click Expire.
Publish a Requested Survey
You can review and publish submitted surveys. Surveys in the draft, submitted, or scheduled state can be published.
To review and publish a requested survey:
Navigate to the Main Menu and select Surveys.
Select a survey to publish.
Hover over the ellipsis and click Edit.
Check the Status of the survey and follow the steps mentioned below:
Draft:
Make changes to the Survey Information and Questions.
Click Save as Draft to retain the survey for further changes.
Click Submit to Publisher for the survey analyst to review the survey before sending it to the specified members or groups.
Click Publish to assign the survey to the specified members or groups.
Submitted:
Make changes to the Survey Information and Questions.
Click Submit to Publisher for the survey analyst to review the survey before sending it to the specified members or groups.
Click Publish to assign the survey to the specified members or groups.
Scheduled:
Make changes to the Survey Information and Questions.
Click Publish to assign the survey to the specified members or groups.
Note
You can use the  icon to view the details of the requested survey and Accept/Reject it upon review. You can add remarks in Comments when you reject a survey.
Access Survey Responses
You can view the various survey reports, such as Surveys by Metric Type and State from the listing page.
Before you start
You must have the View and Create/Update permissions to access the Surveys.
To view the survey responses:
Navigate to the Main Menu and select Surveys.
Hover over a survey and click Eye.
Click Export Response to save the survey recipient responses locally in .CSV format.
Note
Analysts who manage surveys that are published from CSAP can view the list of members who have responded or not responded to a survey from the right side panel of the survey details. Analysts can then follow up with respondents who have not responded to surveys by sending reminder emails and increasing the response rates for published surveys.
Reopen a Survey
You can reopen a survey to allow participants to modify the responses and resubmit a previously submitted response.
To reopen a survey:
Navigate to the Main Menu and select Surveys.
Select the closed survey.
Hover over the ellipsis and click Reopen.
Edit the Survey Close Time and click Publish.
Survey Email Notifications
You can assign a published survey and send a survey email notification to the respondents. The members can click the survey link in the email notification and take the survey.
To send email notification for a survey:
Navigate to the Main Menu and select Surveys.
Select a published survey to send email notifications.
Hover over the ellipsis and click Send Email Notification.
Modify Survey Close time
You can modify the survey close time after you have published a survey and started collecting results to adjust to the schedules and commitments of members. Extending the closing time allows the participants who are yet to take the survey to include their responses. The responses help survey managers to gather improved data for optimizing the security posture of the organization.
To modify a survey:
Navigate to the Main Menu and select Surveys.
To modify, select a published survey.
Click Edit.
Go to Survey Information to make changes to the Survey Close Time.
Click Next and Publish.
Expire a Survey
When the survey reaches its due date, the system automatically changes the status of the Survey End Time to Closed. You can choose to expire the survey after you collect the responses. You can then begin your analysis with the incident data received from the survey feedback. Analysts can view expired surveys.
To expire a survey:
Navigate to the Main Menu and select Surveys.
Select a survey to deactivate.
Click Expire.
A warning message is displayed about expiring the survey. Click Yes to continue.
Manage Surveys
A survey represents a questionnaire assigned to members. You can visualize the survey data to evaluate the responses and perform the following actions:
Go to Main Menu > Survey
Click Refresh to refresh the list for the latest Surveys.
Click Filter to show/hide the filter and search tool. Enter search keywords on the filter and search tool to perform filter, search and sort actions.
Click Export CSV to export survey details in .csv format. You will receive the link to the exported file in your email from where you can download it. The link can only be used once and expires in 72 hours from the time you receive it. The background process time depends on the volume of Survey details exported.
Click Create to create a survey. Analysts who are responsible for creating, reviewing, and publishing surveys to members can use this feature. For more information, see Create a New Survey
On the survey listing page you can do the following:
Edit: Modify the contents of the survey.
View: View the details of a survey.
Expire: Expire a survey.
Ellipsis: Select to send email notifications, reopen surveys, and export responses.
Threat Defender Library
Notice
This feature is only available for Cyware cloud-based deployments
Threat Defender Library (TDL) is a repository that allows security analysts to store and share content with analysts and members for threat detection, analysis, and response. In Collaborate, TDL serves as a repository for collecting and distributing this content, enabling security teams to respond to threats faster and with greater accuracy.
You can create, upload, manage, and share files such as:
SIEM rules files, for example, Splunk, Devo, and Sigma
Threat detection files, including YARA rules, log sources, Suricata, Snort rules, and more
Analytics files such as Cyber Analytics Repository (CAR) reports
playbooks
How does it work?
TDL simplifies the process of creating, sharing, and collaborating on threat detection rules and content.
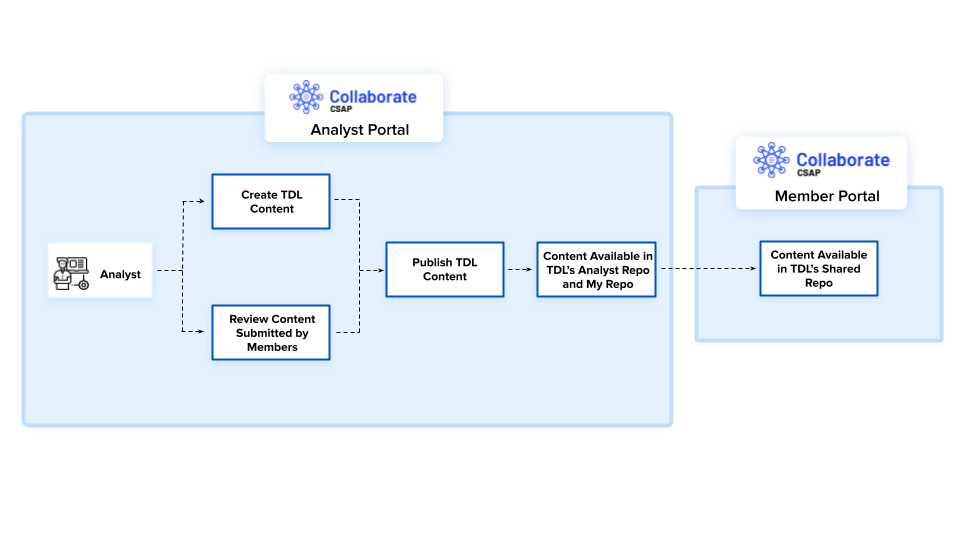
The following is an example of a Snort detection rule and how TDL helps you, as an analyst, respond to threats faster using this rule:
Create a Snort rule and share it with your team for feedback. The following Snort rule creates an alert in the intrusion prevention system (IPS) system when it identifies a transmission control protocol connection with a payload with a specific sequence of bytes (in this case, the string “ZOOM”).
alert tcp any any -> any any (msg:”Possible Zeus Botnet C&C Traffic”; flow:established,to_server; content:”|5a 4f 4f 4d 00 00|”; depth:6; sid:1000005; rev:1;)
To create TDL content, see Create TDL Content.
Publish the Snort rule to the TDL repository so that your team can use it.
You can share the TDL content with members to help them in the detection of the Zeus Botnet. To share TDL content, see Share TDL Content.
To notify your members about the Zeus botnet malware, you can attach the Snort rule to an alert and share it with the intended recipients.
What are the use cases of the Threat Defender Library?
Security teams often face challenges in establishing consistent detection and containment processes, resulting in slower incident response and reduced effectiveness. TDL simplifies this process by providing verified content and sharing important detection files like Yara, Snort, and Suricata, which enhances threat detection and overall incident handling efficiency.
Creating defender content often requires specialized knowledge and adherence to specific formats, which can hinder efficient content creation. TDL helps you easily create content without additional expertise. You can either upload supported files for validation or use the versatile code editor to streamline content creation.
Existing SIEM detection rules are confined within vendor or platform-specific silos, posing challenges when it comes to sharing them with the broader cybersecurity community. TDL enables you to create and distribute verified SIEM rules across the cybersecurity community, ensuring agility in responding to evolving threats. Additionally, you can use these rules to issue Collaborate alerts for quick action in SIEM or XDR tools.
Security teams require rapid threat detection and mitigation to prevent damage. They take actions like isolating systems, deactivating compromised accounts, blocking malicious network traffic, and more. Sharing TDL content or attaching it to alerts allows quick access to validated information from analysts, enabling swift responses to common and organization-specific threats.
Utilize the publicly available information from the open-source intelligence (OSINT) repository to create TDL content for known threats.
TDL Repositories
The content in the Threat Defender Library (TDL) is organized into the following repositories:
My Repo | Contains the content you have created. The content in this section has statuses such as Draft, Shared as Preview, Published and Expired. |
Analyst Repo | Contains the content created by other analysts in the Analyst Portal. The content in this section has statuses such as Shared as Preview, Expired and Published. |
Member Repo | Contains the content created by members in the Member Portal. The content in this section has statuses such as Under Analyst Review, Declined by Analyst, Expired, and Published. To know more about the member and analyst collaboration on TDL content, see Review TDL Content. |
OSINT Repo | Contains external content from open-source repositories. Open-source intelligence (OSINT) is the intel produced by collecting, evaluating, and analyzing publicly available information with the purpose of answering specific intel queries. You can configure the Analyst Portal to automatically publish threat defender content from OSINT Repo to required recipient groups. To know more about auto-publishing OSINT content, see Configure TDL. |
TDL Statuses
In the Analyst Portal, the TDL content can have the following statuses:
Draft | This status indicates content drafted by you in My Repo. |
Shared as Preview | This status indicates that the content is shared for preview with other analysts in the Analyst Repo. |
Under Analyst Review | This status indicates that the content is submitted to analysts for review by members. After you, as an analyst, approve the content, you can publish it to the intended recipients. Content associated with this status is available in Member Repo. |
Declined by Analyst | This status indicates content (submitted by members) that is declined by analysts. Content associated with this status is available in Member Repo. |
Published | This status indicates content published by analysts. Content associated with this status is available in My Repo, Analyst Repo, and Member Repo. |
Expired | This status indicates content expired by analysts. Content associated with this status is available in My Repo, Analyst Repo, and Member Repo. |
Configure TDL
As an analyst, you can configure the Threat Defender Library (TDL) settings for members.
Before you Start
Ensure that TDL is enabled for your tenant. For more information, contact Collaborate support.
Ensure you have View and Update permissions for Configurations in Roles and Permissions.
Steps
Sign in to the Analyst Portal.
Go to Administration > Configuration.
Click Edit for the required section.
To automatically publish open-source threat defender content in OSINT Repo, turn on the Auto Deliver Threat Defender OSINT Content toggle in Configurations > Analyst Dashboard. You can specify the recipient groups who will receive open-source content in the OSINT Repo. By default, no recipient groups are specified.
To add a peer review step that allows members to review the TDL content of their peers before it undergoes analyst review, turn on the Content Review by Peer Members in Threat Defender Library toggle in Member Submissions.
To ensure that TDL is linked to the ATT&CK Navigator, turn on the ATT&CK Navigator in Features. This enables TDL Heat Map in the ATT&CK Navigator for both Analyst and Member Portals. If TDL is enabled, the TDL Heat Map will continue to be available even if this configuration is switched off.
After configuring the settings, click Save. The changes will be available in the Member Portal.
Create TDL Content
You can create content in the Threat Defender Library (TDL) using different methods based on the type of content. You can use the following methods to create content in TDL:
Upload files: You can upload files to TDL in formats such as YML, YAML, YAR, YARA, and more. To view validated content examples for all the supported file formats, see TDL Content Examples.
Create content using code editor: You can create and validate content using the built-in code editor and file validator. You can create content in formats such as YML, YAML, YAR, YARA, SPL, RULES, JSON, and ZEEK. To view validated content examples for all the supported file formats, see TDL Content Examples.
Create content by selecting a category: You can create TDL content by selecting a content category. This makes TDL content creation easier without technical expertise and makes it more accessible to a wide range of users. The content creation form provides a list of categories widely used by security analysts for threat detection and response. You can select from the supported categories to create TDL content. For more information, see TDL Content Categories.
Before you Start
Ensure you have View and Create permissions for Threat Defender Library in Roles & Permissions.
Steps
To create TDL content, follow these steps:
In the Analyst Portal, click Threat Defender Library in the sidebar.
Click Create Content. Use one of the following methods to create TDL content:
Drag and drop the files or click Browse to upload the files. You can upload a maximum of 10 files, and the maximum size limit for each file is 2 MB. For content examples for the supported file formats, see TDL Content Examples.
After you upload files, you can view the file name, size, and title of uploaded files. The displayed title is based on the title key in file content. Click Edit to modify the details of the uploaded files. For more information about the file fields, see step 3.
Using Write Code, you can write custom threat defender codes.
Select a file category for the content you want to create. For example, Threat Detection (YARA Rules).
Select a file extension for the file category. For example, yara. You can select file extensions based on the file category you select.
Click Go to open the code editor. The following code is an example of a detection YARA rule:
rule blackhole2_jar : EK
{
meta:
   author = "John Doe"
   date = "2016-06-27"
   description = "BlackHole Exploit Kit Detection"
   hash0 = "sfhbdkblSKDJHBADKBAD"
   sample_filetype = "unknown"
   yaragenerator = "https://github.com/Xen0ph0n/YaraGenerator"
strings:
   $string0 = "k0/3;N"
}
Click Validate to verify the format of the content. Refer the validated content examples for all the supported file formats to create content in a valid format.
Click Save Changes, and enter a name for the file. For example, Blackhole Exploit Kit Detection.
Click Save.
The page displays the file name, size, and title of newly created content. The title is retrieved from the title key in file content. If there is no title key, then a temporary file name is provided. Click Edit to modify the details of the files. For more information about the fields, see step 3.
In the Select Content Category, select a category for the content you want to create and click Go. For example, Threat Detection (SNORT/Suricata).
The page populates the fields for the selected category. This includes basic details such as the title, description, and ATT&CK tactic-technique pairs. For more information about the fields, see step 3.
Use the following information to update the details of the files:
Title: The uploaded content in TDL automatically retrieves the title from the file contents. You can modify the title as required. For example, Detect Intrusion: Zeus Botnet C&C Traffic. The title is used to identify the uploaded file and its related details.
Description: The uploaded file automatically retrieves the description from the file contents. You can modify the description as required. For example, The following Snort rule creates an alert if it sees a TCP connection with a payload with a specific sequence of bytes (in this case, the string “ZOOM”).
Use the Matrix, Tactic, and Technique options to add the tactics, techniques, and sub-techniques used by the threat actors. This helps you map the threat to the ATT&CK Navigator dashboard and predict the attacker's behavior. You can map multiple tactic and technique pairs by clicking More.
Code Preview: The code editor shows the file contents in text view. Use the following information to modify the file contents.
Use Edit to modify the contents of the uploaded file.
Use Copy to copy the contents of the uploaded file to the clipboard.
Use Expand to switch focus to the code editor by expanding the code editor. The expand option is not available when modifying TDL content.
Use Download to download the file content to your computer.
Additional Information: Enter additional information to the content. The fields for additional information are automatically populated based on the uploaded file format or selected content category. For example, log sources can be additional information for SIEM-related files. The log sources have security-based logging information for detecting and investigating security threats.
Click Save as Draft to save the file as a draft in My Repo. You can make changes to the draft file before sharing it for preview or publishing.
Click Share as Preview to share your file as a preview with other analysts. The content shared for preview is available in the Analyst Repo for other analysts.
After entering the details, click Next to save the content of the uploaded files. Use the following information to add recipients for the content:
By Group Set: Select a group set to add the associated recipient groups. Group sets allow the association of multiple recipient groups as a collection. To create a group set, see Create Groupsets for Recipient Groups.
By Traffic Light Protocol (TLP): Select a TLP value to add the associated recipient groups. Recipient groups in Collaborate are associated with a TLP classification to ensure that the alert information is rightly shared with the intended recipients.
By Group Type: Select a type to add the associated recipient groups. There are three types of recipient groups namely Public Groups, Invite-only Groups, and System Groups. See Recipient Group .
You can select individual recipients to the content using Select Individual Recipients.
Click Publish to publish the content to the recipients.
As the creator, you can view the published content in My Repo. Other analysts can view the content in the Analyst Repo. Members can access the published content in the Shared Repo of the Member Portal.
Review TDL Content
The Threat Defender Library (TDL) supports a collaborative workflow for analysts and members to review and publish TDL content. Members can create TDL content and share it with analysts for review. As an analyst, you can review the content submitted by members in the Member Repo. The content submitted for analyst review has the status Under Analyst Review.
Additionally, you can add a peer review step, which allows members to review TDL content submitted by other members before it is submitted for analyst review. To enable peer review, you can enable Content Review by Peer Members in the Threat Defender Library in Configurations. For more information, see Configure Collaborate Preferences.
The following illustration shows the review workflow with and without member peer review:

You can view all content submitted by members for analyst review by going to Threat Defender Library > Member Repo.
Note
Ensure you have View permissions for Threat Defender Library in Roles & Permissions.
Use the following information while reviewing content submitted by members in TDL:
Select the content with Under Analyst Review status.
Review the content and click Publish, if you want to publish the content to intended recipients.
If the content is not relevant, click Decline and specify the reason for declining the content. When content is declined, the status of the content becomes Declined by Analyst. Members and other analysts can view this comment.
Manage TDL Content
Use the following information to know more about the supported options to manage TDL content. Hover over the content to view the following options:
View: View TDL content details by either clicking View or by directly clicking the content from the list.
Edit: Edit the TDL content you have created which has the Draft or Shared as Preview statuses.
Clone: Create an editable copy of already existing TDL content. This helps you create content based on existing information.
Share: Share TDL content with recipient groups and individual recipients.
Expire: Expire content to make the content outdated. Expiring content does not permanently remove the TDL content from the library, but the content status is marked as Expired. Other analysts and members can still view and clone expired content in the library.
Delete: Delete content from the library. Deleting content permanently removes the TDL content from the library and is no longer accessible to analysts and members. You can only delete expired content that you have created.
Comments: View the declined comment for content that has been declined by analysts. Hover over the icon to view the reason provided by analysts for declining TDL content submitted for analyst or peer review.
View TDL Content
In the Threat Defender Library (TDL), you can view content created by you, by other analysts, submitted by members, and OSINT repository content.
Use the following information while viewing TDL content:
To view the content in TDL you must have View permissions for Threat Defender Library in Roles and Permissions.
Click Threat Defender Library on the sidebar. Click the content from the list, or hover over the content, and click View.
After you click the content, you can view the details and code preview, if available. Use the following information to manage the code preview:
Click Download to download the code locally to your computer.
Click Copy to copy the code to your clipboard.
Click Expand to expand the code preview.
To view related TDL content based on the MITRE ATT&CK framework, click any tactic, technique, or sub-technique in the content details.
To access the TDL Heat Map in the ATT&CK Navigator, click Go to ATT&CK Navigator in the upper-right corner. The TDL Heat Map gives you a visual representation of the number of TDL content associated with tactics, techniques, and sub-techniques.
Edit TDL Content
You can update the Threat Defender Library content that you have created which are in the Draft and Shared as Preview statuses.
Before you Start
Ensure you have the Update permission for Threat Defender Library in Roles & Permissions.
Steps
To update TDL content, follow these steps:
Click Threat Defender Library on the sidebar.
Modify the content details based on your preference. For more information about fields while updating content, see Create TDL Content.
Clone TDL Content
You can clone Threat Defender Library content to create a copy of existing content and modify content based on your preference.
Before you Start
Ensure you have View and Create permissions for Threat Defender Library in Roles & Permissions.
Steps
To clone content in the TDL, follow these steps:
Click Threat Defender Library on the sidebar.
Hover over the TDL content from the list and click Clone.
Alternatively, you can click the content to view the content details. Click the vertical ellipses, and select Clone to clone the content.
The cloned content appears in the My Repo section. You can modify the content to either save it as a draft, share it as a preview, or publish it to the intended recipients. For more information, see Edit TDL Content.
Share TDL Content
You can share content from the TDL repository with members. This shared content is accessible to members in the Shared Repo section of the Member Portal. You can share content with Published and Shared as Preview statuses from My Repo, and Analyst Repo. You can also share published content from the Member Repo.
You can also share TDL content in bulk with members. For more information, see Bulk Share TDL Content.
Before you Start
Ensure you have View and Create permissions for Threat Defender Library in Roles & Permissions.
Steps
To share TDL content with members, follow these steps:
Click Threat Defender Library on the sidebar.
Select My Repo, Analyst Repo, or Member Repo, and click the content you want to share with members. You can share content that has the Shared as Preview, Under Analyst Review, and Published status with members.
Hover over the content from the list, and click Share.
Alternatively, you can click the content to view the content details. Click the vertical ellipses, and select Share to share the content with members. Use the following information to add recipients to the content:
By Group Set: Select a group set to add the associated recipient groups. Group sets allow the association of multiple recipient groups as a collection. To create a group set, see Create Groupsets for Recipient Groups.
By Traffic Light Protocol (TLP): Select a TLP value to add the associated recipient groups. Recipient groups in CSAP are associated with a TLP classification to ensure that the alert information is rightly shared with the intended recipients.
By Group Type: Select a type to add the associated recipient groups. There are three types of recipient groups namely Public Groups, Invite-only Groups, and System Groups. See Recipient Group .
You can select individual recipients to the content using Select Individual Recipients.
Click Publish.
Note
When sharing content that has been published previously, the original publication timestamp remains unchanged. This means that members will not view this shared content as latest in the Shared Repo.
Bulk Share TDL Content
As an analyst, you can simultaneously share multiple TDL content with members. Members can view this shared content in the Shared Repo section of the Member Portal.
Before you Start
Ensure you have View and Create permissions for Threat Defender Library in Roles & Permissions.
Steps
To bulk share TDL content with members, follow these steps:
Click Threat Defender Library on the sidebar.
Select My Repo, Analyst Repo, or Member Repo. You can bulk share content that has Shared as Preview and Published statuses.
Select the content using the checkbox. You can simultaneously select up to 20 items from the list.
After selecting content, scroll to the top of the list and click Share. Use the following information to add recipients to the content:
By Group Set: Select a group set to add the associated recipient groups. Group sets allow the association of multiple recipient groups as a collection. To create a group set, see Create Groupsets for Recipient Groups.
By Traffic Light Protocol (TLP): Select a TLP value to add the associated recipient groups. Recipient groups in CSAP are associated with a TLP classification to ensure that the alert information is rightly shared with the intended recipients.
By Group Type: Select a type to add the associated recipient groups. There are three types of recipient groups namely Public Groups, Invite-only Groups, and System Groups. See Recipient Group .
You can select individual recipients to the content using Select Individual Recipients.
Click Publish.
Note
When sharing content that has been published previously, the original publication timestamp remains unchanged. This means that members will not view this shared content as latest in the Shared Repo.
Share TDL Content as a Preview
You can allow other analysts from your team to preview TDL content before publishing it to the repository. This enables analysts to verify the correctness of the content before making it available for use in the Analyst Repo.
Analysts can preview content before publishing from My Repo and Analyst Repo.
Before you Start
Steps
To share content for preview before publishing, follow these steps:
Click Threat Defender Library on the sidebar.
Select My Repo and click the content you want to share as a preview. You can only share drafted content as a preview. After the status changes to Shared as Preview, you can no longer save it as a draft.
Click Share as Preview.
The content is shared with other analysts as a preview. When your content is ready for publishing, you can publish the content to the required recipients. To know more about publishing content, see Share TDL Content.
Expire TDL Content
You can expire TDL content that is no longer relevant. Expiring TDL content does not permanently remove the TDL content from the repository but the status of the content is marked as Expired. Analysts can view expired content in the TDL repository but cannot attach it to alerts. For more information about attaching TDL content to alerts, see Attach TDL Content.
Before you Start
Ensure you have View and Expire permissions for Threat Defender Library in Roles & Permissions.
Steps
To expire TDL content, follow these steps:
Click Threat Defender Library on the sidebar.
Hover over the content and click Expire. Alternatively, you can click the content to view the content details. Click the vertical ellipses in the upper-right corner, and select Expire.
Note
As an analyst, you can expire content from the Analyst Repo and Member Repo which have the Shared as Preview and Published statuses. You can also expire created by you. However, you cannot expire content in Declined by Analyst and Under Analyst Review statuses.
TDL Content Examples
The following sections contain validated examples of all the content types supported in the Threat Defender Library. You can use these examples to create valid TDL content in the supported file formats.
YARA rules are used to identify malware files and various indicators, including IP addresses, hashes, domains, and more by matching familiar patterns. YARA rules can identify distinctive traits like patterns and strings associated with malware or entire malware families. TDL allows analysts to create and validate personalized YARA rules that align with their organization's security needs. Additionally, TDL enables the swift duplication of pre-existing YARA rules for the detection of security threats and newly unearthed malware patterns. Users can also import YARA rules in .yara and .yar file formats. The following YARA rule is an example of successfully validated TDL content:
rule blackhole2_jar : EK
{
meta:
   author = "John Doe"
   date = "2016-06-27"
   description = "BlackHole Exploit Kit Detection"
   hash0 = "sjhbsvkiusbdosdbvskdvbsd"
   sample_filetype = "unknown"
   yaragenerator = "https://github.com/Xen0ph0n/YaraGenerator"
strings:
   $string0 = "k0/3;N"
   $string1 = "g:WlY0"
   $string2 = "(ww6Ou"
   $string3 = "SOUGX["
   $string4 = "7X2ANb"
   $string5 = "r8L<;zYH)"
   $string6 = "fbeatbea/fbeatbee.classPK"
   $string7 = "fbeatbea/fbeatbec.class"
   $string8 = "fbeatbea/fbeatbef.class"
   $string9 = "fbeatbea/fbeatbef.classPK"
   $string10 = "fbeatbea/fbeatbea.class"
   $string11 = "fbeatbea/fbeatbeb.classPK"
   $string12 = "nOJh-2"
   $string13 = "[af:Fr"
condition:
   13 of them
}
YAML is a human-readable data-serialization language and useful for managing data. It is often used as a format for configuration files, but its object serialization abilities make it a substitute for languages such as JSON. YAML is used as a format to create detection rules in the security community and one such example is Sigma rules created in YAML format. Sigma makes it easy to perform content matching based on collected logs to create threat alerts for analysts to investigate. Sigma rules and CAR Analytics support yaml and yml as well. Log files are usually collected and stored in a database or SIEM solution for further analysis. YAML files are also used to create MITRE Cyber Analytics Repository (CAR) files for detection. The following YAML rule is an example of successfully validated TDL content:
title: Antivirus Hacktool Detection
id: fa0c05b6-8ad3-468d-8231-c1cbccb64fba
description: Detects a highly relevant Antivirus alert that reports a hack tool or other attack tool
status: experimental
date: 2021/08/16
author: Florian Roth
references:
    - https://www.nextron-systems.com/2021/08/16/antivirus-event-analysis-cheat-sheet-v1-8-2/
logsource:
    product: antivirus
detection:
    selection:
        - Signature|startswith:
            - 'HTOOL'
            - 'HKTL'
            - 'SecurityTool'
            - 'ATK/'  # Sophos
        - Signature|contains:
            - 'Hacktool'
    condition: selection
fields:
    - FileName
    - User
falsepositives:
    - Unlikely
level: high
tags:
    - attack.execution
- attack.t1204A Splunk query is used to run a specific operation within the Splunk software. A Splunk query uses the software’s Search Processing Language to communicate with a database or source of data. This allows data users to perform analysis of their data by querying it. It can be compared to SQL in that it is used for updating, querying, and transforming the data in databases. Splunk’s query language is mainly used for parsing log files and extracting reference information from machine-produced data. Splunk query files are saved in .spl format. The following Splunk query is an example of successfully validated TDL content:
index=main earliest=-7d sourcetype="WinEventLog:Microsoft-Windows-Sysmon/Operational" LogName=System EventCode=7009 Message="A timeout was reached*" | table host _time Message
Snort is an open-source intrusion detection and intrusion prevention system (IDS/IPS) that monitors and analyzes network traffic in real-time to help identify and prevent potential security breaches. It analyzes network activity and compares it to predefined Snort rules to identify unusual patterns or behaviors that might indicate an intrusion or attack attempt. Besides, Snort rules can be configured to actively block or prevent malicious traffic from getting to its target, making it an effective tool for intrusion prevention. Snort rule files are saved in .rules format. The following Snort rule is an example of successfully validated TDL content:
# alert tcp $EXTERNAL_NET any -> $TELNET_SERVERS 23 (msg:"PROTOCOL-TELNET RuggedCom default backdoor login attempt"; flow:to_server,established; flowbits:isset,telnet.ruggedcom; content:"factory"; metadata:policy security-ips drop, service telnet; reference:cve,2012-1803; reference:url,www.securityfocus.com/archive/1/522467; classtype:attempted-admin; sid:21938; rev:4;)
# alert tcp $TELNET_SERVERS 23 -> $EXTERNAL_NET any (msg:"PROTOCOL-TELNET login failed"; flow:to_client,established; content:"Login failed"; nocase; metadata:ruleset community, service telnet; classtype:bad-unknown; sid:492; rev:15;)
# alert tcp $TELNET_SERVERS 23 -> $EXTERNAL_NET any (msg:"PROTOCOL-TELNET login incorrect"; flow:to_client,established; content:"Login incorrect"; metadata:ruleset community, service telnet; classtype:bad-unknown; sid:718; rev:16;)
Suricata is a Network Security Monitoring (NSM) tool that can detect and block attacks against your network. Suricata rules are pluggable intelligence components that are used to detect known threats in network traffic. Suricata rules are also used for sharing and matching threat intelligence against network traffic. Suricata rules are saved in .rules format. The following Suricata rule is an example of successfully validated TDL content:
alert ip any any -> any any (msg:"SURICATA Applayer Mismatch protocol both directions"; flow:established; app-layer-event:applayer_mismatch_protocol_both_directions; flowint:applayer.anomaly.count,+,1; classtype:protocol-command-decode; sid:2260000; rev:1;)
alert ip any any -> any any (msg:"SURICATA Applayer Wrong direction first Data"; flow:established; app-layer-event:applayer_wrong_direction_first_data; flowint:applayer.anomaly.count,+,1; classtype:protocol-command-decode; sid:2260001; rev:1;)
alert ip any any -> any any (msg:"SURICATA Applayer Detect protocol only one direction"; flow:established; app-layer-event:applayer_detect_protocol_only_one_direction; flowint:applayer.anomaly.count,+,1; classtype:protocol-command-decode; sid:2260002; rev:1;)
alert ip any any -> any any (msg:"SURICATA Applayer Protocol detection skipped"; flow:established; app-layer-event:applayer_proto_detection_skipped; flowint:applayer.anomaly.count,+,1; classtype:protocol-command-decode; sid:2260003; rev:1;)
# alert if STARTTLS was not followed by actual SSL/TLS
alert tcp any any -> any any (msg:"SURICATA Applayer No TLS after STARTTLS"; flow:established; app-layer-event:applayer_no_tls_after_starttls; flowint:applayer.anomaly.count,+,1; classtype:protocol-command-decode; sid:2260004; rev:2;)
# unexpected protocol in protocol upgrade
alert tcp any any -> any any (msg:"SURICATA Applayer Unexpected protocol"; flow:established; app-layer-event:applayer_unexpected_protocol; flowint:applayer.anomaly.count,+,1; classtype:protocol-command-decode; sid:2260005; rev:1;)

#next sid is 2260006
playbooks are a well-defined set of actions that are organized as a workflow to respond to an incident or a threat. They are designed to perform a multitude of security automation and orchestration tasks that are part of the incident response process. Security analysts can use playbooks to automate various manual and repetitive tasks, as well as to orchestrate common scenarios including but not restricted to analyzing vulnerabilities, IOCs (Indicators of Compromise), searching for suspicious logs, and more. Using playbooks, you can accelerate the entire incident response process by enabling security teams to quickly detect, and remove false positives, respond intelligently, and mitigate increasingly complex malicious attacks. The following JOSN is an example playbook exported from the application:
{
    "title": "Enrich IP Address",
    "start_node": "start",
    "nodes": {
        "1": {
            "type": "MEMORY",
            "internal_id": "1",
            "title": "Memory Node 1",
            "description": null,
            "actions": [],
            "conditions": [],
            "extra_params": {
                "position": {
                    "x": 280,
                    "y": 150
                },
                "validations": {
                    "is_not_valid": false
                }
            },
            "io_params_format": {},
            "stop_on_error": true,
            "memory_params": {
                "ip_address": "1.1.1.1"
            },
            "sub_type": "PREDEFINED",
            "condition_type": null,
            "io_params_email_details": null,
            "enable_io_param_email_details": false,
            "enable_app_notification": false,
            "data_storage_params": {},
            "storage_manager_reference": []
        },
        "start": {
            "type": "START",
            "internal_id": "start",
            "title": "Start",
            "description": null,
            "actions": [],
            "conditions": [],
            "extra_params": {
                "position": {
                    "x": 400,
                    "y": 50
                }
            },
            "io_params_format": {},
            "stop_on_error": true,
            "memory_params": {},
            "sub_type": "start",
            "condition_type": null,
            "io_params_email_details": null,
            "enable_io_param_email_details": false,
            "enable_app_notification": false,
            "data_storage_params": {},
            "storage_manager_reference": []
        },
        "2": {
            "type": "REGULAR",
            "internal_id": "2",
            "title": "AbuseIPDB - Get IP Address Reputation Details - Version 1.0.1",
            "description": null,
            "actions": [
                {
                    "action": "check_ip_address",
                    "parameter_data_source": {
                        "loop_keys": [],
                        "ip_address": "${const::ip_address}"
                    },
                    "action_type": "PREDEFINED",
                    "code": null,
                    "app_instances": [
                        "abuseipdb_ip_enrichment"
                    ],
                    "playbook": null,
                    "playbook_data": null,
                    "action_data": {
                        "action_identifier": "check_ip_address",
                        "app": "abuse_ipdb",
                        "app_slug": "abuse_ipdb_1_0_1",
                        "app_version": "1.0.1",
                        "app_title": "AbuseIPDB",
                        "action_title": "Get IP Address Reputation Details",
                        "is_system": true
                    },
                    "output_params": {},
                    "save_customized_result": false,
                    "run_async": false,
                    "action_run_attempt": 1,
                    "action_run_buffer_time": 1,
                    "save_result": true,
                    "save_input_keys": "ip_address,get_report_since,detailed_report",
                    "storage_manager_reference": []
                }
            ],
            "conditions": [],
            "extra_params": {
                "position": {
                    "x": 280,
                    "y": 290
                },
                "validations": {
                    "is_not_valid": false
                }
            },
            "io_params_format": {},
            "stop_on_error": true,
            "memory_params": {},
            "sub_type": "PREDEFINED",
            "condition_type": null,
            "io_params_email_details": null,
            "enable_io_param_email_details": false,
            "enable_app_notification": false,
            "data_storage_params": {},
            "storage_manager_reference": []
        },
        "3": {
            "type": "REGULAR",
            "internal_id": "3",
            "title": "Cyware Email Service - Send Email - Version 1.3.0",
            "description": null,
            "actions": [
                {
                    "action": "send_email",
                    "parameter_data_source": {
                        "loop_keys": [],
                        "sender_name": "John Doe",
                        "sender_email": "coqa@cyninjadev.com",
                        "email_message": "Attached IP Enrichment Results",
                        "email_subject": "IP Enrichment Results",
                        "recipient_list": "john.doe@example.com"
                    },
                    "action_type": "PREDEFINED",
                    "code": null,
                    "app_instances": [
                        "orchestrate_email_service"
                    ],
                    "playbook": null,
                    "playbook_data": null,
                    "action_data": {
                        "action_identifier": "send_email",
                        "app": "cyware_email",
                        "app_slug": "cyware_email_1_3_0",
                        "app_version": "1.3.0",
                        "app_title": "Cyware Email Service",
                        "action_title": "Send Email",
                        "is_system": true
                    },
                    "output_params": {},
                    "save_customized_result": false,
                    "run_async": false,
                    "action_run_attempt": 1,
                    "action_run_buffer_time": 1,
                    "save_result": true,
                    "save_input_keys": "sender_name,reply_to,sender_email,recipient_list,cc_list,bcc_list,email_message,file_attachment,email_subject",
                    "storage_manager_reference": []
                }
            ],
            "conditions": [],
            "extra_params": {
                "position": {
                    "x": 280,
                    "y": 430
                },
                "validations": {
                    "is_not_valid": false
                }
            },
            "io_params_format": {},
            "stop_on_error": true,
            "memory_params": {},
            "sub_type": "PREDEFINED",
            "condition_type": null,
            "io_params_email_details": null,
            "enable_io_param_email_details": false,
            "enable_app_notification": false,
            "data_storage_params": {},
            "storage_manager_reference": []
        }
    },
    "edges": [
        {
            "source_node": "1",
            "destination_node": "2",
            "label": "DEFAULT_LABEL",
            "extra_params": {
                "source_port": "bottom",
                "target_port": "top"
            }
        },
        {
            "source_node": "2",
            "destination_node": "3",
            "label": "DEFAULT_LABEL",
            "extra_params": {
                "source_port": "bottom",
                "target_port": "top"
            }
        },
        {
            "source_node": "start",
            "destination_node": "1",
            "label": "DEFAULT_LABEL",
            "extra_params": {
                "source_port": "bottom",
                "target_port": "top"
            }
        }
    ],
    "type": "UI",
    "labels": [],
    "tags": [],
    "extra_params": {
        "current_node": "start"
    },
    "status": "ACTIVE",
    "script_content": "",
    "cron_expression": null,
    "output_params": {
        "Result": "IP Enrichment Successful"
    },
    "is_runnable": true,
    "description": null,
    "auto_terminate": false,
    "auto_terminate_interval": null,
    "categories": [],
    "schedule_info": {
        "details": {
            "ends": "never",
            "mode": "once",
            "end_value": true,
            "repeat_on": [],
            "run_count": 0,
            "start_time": "2023-09-04T09:43:38.935Z"
        },
        "is_scheduled": false
    },
    "storage_manager_reference": [],
    "priority": "2"
}
Zeek is a network monitoring tool you can use to analyze network traffic in real time for threat detection. It captures detailed information about network sessions, protocols, and traffic flows, helping you identify potential threats. You can write custom detection logic using Zeek's scripting language to create your own rules.
The following Zeek rule is an example of detecting UDP packets with suspicious payloads and additional conditions:
signature mixed_conditions_actions {
    payload /suspicious-data/
    payload-size <= 1500
    ip-proto == udp
    event data_event "Suspicious UDP payload detected"
    enable "ftp"
}
The following Zeek rule is an example of detecting SSL traffic based on specific source, destination IP, and port conditions:
signature complex_header {
    src-ip == 192.168.1.1
    dst-ip != 10.0.0.1
    dst-port == 443
    event ssl_traffic_event "SSL traffic detected from a specific source"
}
The following Zeek rule is an example to monitor the states of UDP ports and trigger events for open ports:
signature udp_state_check {
    udp-state open
    event udp_open_event "UDP port open"
}This document shows the list of content categories supported by TDL. Analysts can use these categories to create TDL content.
It is a knowledge base developed by the MITRE corporation, initially known as MITRE Shield. It provides active defense information based on ten years of adversary engagement experience. Engage provides information for a range of levels, including practitioner-friendly discussions of defense tactics, techniques, and procedures (TTP) and CISO-ready considerations of objectives and opportunities.
CAR analytics is a repository of analytical tools created by MITRE, primarily based on the MITRE ATT&CK adversary model. These analytics are designed to analyze various data domains (such as host, network, process, and external data) and are aimed at providing effective and well-explained analytics.
CAR analytics category is not supported when you create content by selecting a category.
SIEM software collects log and event data generated by applications, devices, infrastructure, networks, and systems to analyze and provide complete visibility into view of an organization’s data. SIEMs also analyze data in real-time using SIEM rules and statistical correlations to give SOC analysts actionable insights they can use in investigations.
When you create TDL content by selecting a category, you can only create rules for Devo, General(Other) SIEM, and IBM Qradar SIEM.
Threat detection content identifies threats using data from various sources, such as log files, monitoring tools, error messages, intrusion detection systems, and firewalls. Analysts can perform analysis after detection to understand its exact nature and the scope of the threat.
Orchestration playbooks are a well-defined set of actions that are organized as a workflow to respond to an incident or a threat. They are designed to perform a multitude of security automation and orchestration tasks that are part of the incident response process. Security analysts can use playbooks to automate various manual and repetitive tasks, as well as to orchestrate common scenarios including but not restricted to analyzing vulnerabilities, IOCs (Indicators of Compromise), searching for suspicious logs, and more.
Response (Playbook) category is not supported when you create content by selecting a category.
Threat detection content identifies threats using data from various sources. Snort and Suracata are some of the detection methods used by security analysts. Snort is an open-source intrusion detection and intrusion prevention system (IDS/IPS) that monitors and analyzes network traffic in real-time to help identify and prevent potential security breaches. Suricata is a Network Security Monitoring (NSM) tool that can detect and block attacks against your network using rules.
Threat Detection (Snort/Suricata) category is not supported when you create content by selecting a category.
MITRE framework TTP analysis can help security teams detect and mitigate attacks by understanding the way threat actors operate. Tactics are types of activity that cyber criminals use to carry out an attack while techniques are general methods that attackers use to achieve their goals. A procedure is a specific series of steps that cybercriminals can use to carry out an attack.
Warning lists are lists of well-known indicators that can be associated with potential false positives, errors, or mistakes.
YARA rules are used to identify malware files and various indicators, including IP addresses, hashes, domains, and more by matching familiar patterns. YARA rules can identify distinctive traits like patterns and strings associated with malware or entire malware families.
Threat Detection (YARA Rules) category is not supported when you create content by selecting a category.
Important
This category is available in v3.8.5 onwards.
Zeek is an open-source network monitoring tool that detects threats through real-time network traffic analysis. It identifies suspicious activity and security breaches with deep protocol analysis and detailed session logs. Zeek’s customizable scripting language enables you to create specific rules for detecting network anomalies and potential threats.
Threat Detection (Zeek) category is not supported when you create content by selecting a category.
RSS Feeds
RSS Feeds provide a consolidated view of the information in the form of feeds, received from different RSS sources configured in the Analyst Portal. Analysts can leverage this information in the application and create alerts from it.
Feeds are classified into various categories based on the type of information they provide. Some of the system categories include Vulnerabilities, Security News, Threat Advisories, Security & Risk Management, and more. You can view different feeds based on these categories. Additionally, you can add custom categories in Settings > Advisory Settings > Advisory Category.
View RSS Feeds
Use the RSS Feeds section to browse intelligence from your configured sources. You can filter articles, preview their content, and create alerts. For more information on configuring sources, see Add Custom RSS Advisory Sources.
Note
Filters are available in v3.8.8.0 onwards.
To view RSS feeds, go to Main Menu > RSS Feeds. Ensure that you have the View RSS Feeds permission for the RSS Feeds feature and use the following information:
Enter keywords to find specific articles.
Use the filters below to narrow down the results:
Category: Select one or more categories to view relevant articles.
Source: Select specific RSS sources to filter the feed list.
Reported Date: Select a date range to view articles published within that time frame.
Click on a feed to preview the article content on the right.
To access the original article, click View Source.
Create Alert From Feeds
You can create alerts directly from RSS feed articles that are relevant to your organization. This helps you quickly convert external intelligence into actionable items in .
Note
The Merge as Alert is available in v3.8.8.0 onwards.
Before you Start
Ensure that you have the View and Create permissions to the Alerts module.
Steps
To create an alert from feeds, follow these steps:
Go to Main Menu > RSS Feeds.
To create an alert, use the following information:
To create an alert from a single article, select the article and click Create Alert.
To create a single alert from multiple articles, select their checkboxes and click Merge as Alert.
The alert creation form opens. If you are creating an alert from a single article, the Title field is prefilled with the article title. You can update the remaining fields based on your requirement. For more information, see Create Alerts from Feeds.
Intel Operations (Cyware Orchestrate)
Note
This feature is available in v3.8.8.1 onwards.
With Intel Operations (Cyware ), you can centralize threat intelligence from multiple sources and automate the response to security threats and vulnerabilities. helps operationalize threat intelligence by automating collection, enrichment, analysis, and response across your security operations. You can access Intel Operations from the Main Menu. You can enable Intel Operations from Configurations > Cyware Add-ons. For more information, see Configure Cyware Add-ons.
How does Cyware Orchestrate help you operationalize threat intelligence?
Cyware brings automation and orchestration capabilities to your threat intelligence operations, helping your team respond faster and more efficiently to security incidents. With , you can create actionable playbooks, streamlining your security processes.
supports the following key capabilities:
Playbooks: Automate and orchestrate security operation workflows with a manual or fully automated sequence of actions.
Labels: Add labels to events and playbooks to automatically trigger a playbook when the event occurs.
Run Logs: Review playbook execution details to analyze nodes and troubleshoot errors.
Apps: Connect with various security tools and data sources using prebuilt integrations to enrich your workflows.
Trigger Events: Create trigger events and run playbooks by assigning the same label to both the event and the playbook.
Configure Triggers: Configure triggers to automatically run a playbook when an event occurs in or on any external platform.
Webhooks: Use token-based URLs to securely send or receive data from external systems, enabling real-time event-driven automation.
Cyware Agent: Install Cyware Agent to enable organizations with on-premise applications to access features hosted on the cloud. For example, if is cloud-hosted and your SIEM application is on-premise, you can use Cyware Agent in a playbook to execute actions on the SIEM.
Note
Cyware Agent is available in v3.8.9.1 onwards.
Usage: Monitor your monthly action executions, view usage trends by playbooks or actions, and manage plan limits and tenant details.
Note
Usage is available in v3.8.9.1 onwards.
For more information, contact Cyware support.